
Owners Guide
Page 4
... monitor, firstly refer to the Troubleshooting guide at the mains sockets, pull out the plugs, and contact your plasma monitor. Never use remote control and on for further details. 1. Free from electromagnetic interferences from geomagnetic sources and ambient power lines, the panel produces high-quality ... screen is normal. Mis-use harsh or abrasive cleaners! Plasma monitor After the plasma monitor has been on screen display system The remote control included eases the work of setting display controls. Should you encounter any length of time, you will notice that this is ...
... monitor, firstly refer to the Troubleshooting guide at the mains sockets, pull out the plugs, and contact your plasma monitor. Never use remote control and on for further details. 1. Free from electromagnetic interferences from geomagnetic sources and ambient power lines, the panel produces high-quality ... screen is normal. Mis-use harsh or abrasive cleaners! Plasma monitor After the plasma monitor has been on screen display system The remote control included eases the work of setting display controls. Should you encounter any length of time, you will notice that this is ...
Owners Guide
Page 5
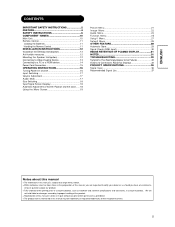
... understand the prerequisites to using the product. ENGLISH CONTENTS IMPORTANT SAFETY INSTRUCTIONS 2 FEATURE 4 SAFETY INSTRUCTIONS 6 COMPONENT NAMES 10 Main Unit 10 Remote Control 11 Loading the Batteries 11 Handing the Remote Control 11 INSTALLATION INSTRUCTIONS 12 Installation the Desktop stand(option 12 Anti-tumble measures 12 Mounting the Speaker Unit(option 12...
... understand the prerequisites to using the product. ENGLISH CONTENTS IMPORTANT SAFETY INSTRUCTIONS 2 FEATURE 4 SAFETY INSTRUCTIONS 6 COMPONENT NAMES 10 Main Unit 10 Remote Control 11 Loading the Batteries 11 Handing the Remote Control 11 INSTALLATION INSTRUCTIONS 12 Installation the Desktop stand(option 12 Anti-tumble measures 12 Mounting the Speaker Unit(option 12...
Owners Guide
Page 7
... in the molded plug with a new fuse, and then please replace with new one of the power cord connection. If you observe a leakage of the remote control. x Protect the power cord from the power outlet to the power cord and cables. x Do not hold the battery with no dust), before using...
... in the molded plug with a new fuse, and then please replace with new one of the power cord connection. If you observe a leakage of the remote control. x Protect the power cord from the power outlet to the power cord and cables. x Do not hold the battery with no dust), before using...
Owners Guide
Page 8
... dealer or service center. x Always display the image in a mode that the "Contrast" and "Brightness" level is widely changing. x Do not place the monitor, the remote control and other than that part of the sun. PRECAUTIONS Installation environment Do not obstruct a ventilation hole. x Do not display still images, such as near...
... dealer or service center. x Always display the image in a mode that the "Contrast" and "Brightness" level is widely changing. x Do not place the monitor, the remote control and other than that part of the sun. PRECAUTIONS Installation environment Do not obstruct a ventilation hole. x Do not display still images, such as near...
Owners Guide
Page 9
...transportation Please pay attention when you are properly made and in order for infirm or handicapped people. Any interfering radiation could invalidate the remote control. x Use only with the cart, stand, tripod, bracket, or table specified by the manufacturer. When a cart is better...NEVER fix legs with the apparatus. Precautions for wall, shelf or ceiling mounting as direct sun rays or room lighting) onto the remote control sensors could cause distorted images or noises. x Follow instructions for the installation x Do not use acid/alkaline detergent, alcoholic ...
...transportation Please pay attention when you are properly made and in order for infirm or handicapped people. Any interfering radiation could invalidate the remote control. x Use only with the cart, stand, tripod, bracket, or table specified by the manufacturer. When a cart is better...NEVER fix legs with the apparatus. Precautions for wall, shelf or ceiling mounting as direct sun rays or room lighting) onto the remote control sensors could cause distorted images or noises. x Follow instructions for the installation x Do not use acid/alkaline detergent, alcoholic ...
Owners Guide
Page 10
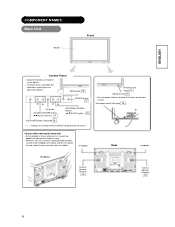
ENGLISH COMPONENT NAMES NOMS D ES COM POSANT S Main Unit Panel Front Control Panel x Adjustment buttons are required to distinguish the adjustment buttons. Handgrips Remote-control sensor 11 Indicating lamp 16 • The main power switch is heavy, whenever it should be lifted forwards using the two handgrips at the ...
ENGLISH COMPONENT NAMES NOMS D ES COM POSANT S Main Unit Panel Front Control Panel x Adjustment buttons are required to distinguish the adjustment buttons. Handgrips Remote-control sensor 11 Indicating lamp 16 • The main power switch is heavy, whenever it should be lifted forwards using the two handgrips at the ...
Owners Guide
Page 11
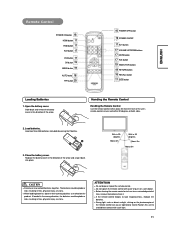
With in 30 degrees About 3m With in 30 degrees About 3m About 5m CAUTION z Do not use for an extended period of the remote control can cause operational failure.Position this unit to lack responsiveness, replace the batteries. If loaded in the wrong direction, the batteries could explode or ... put it on the photoreceptor of time, remove the batteries from the front of the arrow. z Strong light, such as marked on both sides. 2. ENGLISH Remote Control l POWER ON button 16 HDMI button 17 RGB button 17 AV2 button 17 AV3 button 17 OK button 19 MENU button 19 AUTO button...
With in 30 degrees About 3m With in 30 degrees About 3m About 5m CAUTION z Do not use for an extended period of the remote control can cause operational failure.Position this unit to lack responsiveness, replace the batteries. If loaded in the wrong direction, the batteries could explode or ... put it on the photoreceptor of time, remove the batteries from the front of the arrow. z Strong light, such as marked on both sides. 2. ENGLISH Remote Control l POWER ON button 16 HDMI button 17 RGB button 17 AV2 button 17 AV3 button 17 OK button 19 MENU button 19 AUTO button...

Owners Guide
Page 16
... When the main power switch is running, it would be turned ON/OFF using the SUB POWER button or the ON/OFF button on the remote control. x If a power failure occurs while the main unit is set to OFF. ENGLISH OPERATING INSTRUCTIONS Indicating lamp Main power switch Control Panel SUB-POWER... Turing Power On and Off To turn the monitor power OFF, press the SUB POWER button or the ON/OFF or OFF button on the remote control, and then press the main power switch on the monitor main unit to OFF. Indicating lamp Indicating lamp Power status Operating OFF OFF When...
... When the main power switch is running, it would be turned ON/OFF using the SUB POWER button or the ON/OFF button on the remote control. x If a power failure occurs while the main unit is set to OFF. ENGLISH OPERATING INSTRUCTIONS Indicating lamp Main power switch Control Panel SUB-POWER... Turing Power On and Off To turn the monitor power OFF, press the SUB POWER button or the ON/OFF or OFF button on the remote control, and then press the main power switch on the monitor main unit to OFF. Indicating lamp Indicating lamp Power status Operating OFF OFF When...

Owners Guide
Page 17
...following options. (1) 4:3 Input signal of AV1, AV2, AV3, AV4 Full Panoramic Normal Cinema (2) 16:9 Input signal 720p/60, 1080i/60 of the remote control. - x The volume setting can be lowered by pressing the VOLT button while the audio is muted. x Muting can be cancelled by pressing ...the audio is muted. x The volume will fix as Full mode and not change in the sequence by pressing the SOURCE button of the remote control. - x The volume will be displayed. OPERATING INSTRUCTIONS (continued) ENGLISH Volume Adjustment The volume can be adjusted by pressing the VOLSand VOLT...
...following options. (1) 4:3 Input signal of AV1, AV2, AV3, AV4 Full Panoramic Normal Cinema (2) 16:9 Input signal 720p/60, 1080i/60 of the remote control. - x The volume setting can be lowered by pressing the VOLT button while the audio is muted. x Muting can be cancelled by pressing ...the audio is muted. x The volume will fix as Full mode and not change in the sequence by pressing the SOURCE button of the remote control. - x The volume will be displayed. OPERATING INSTRUCTIONS (continued) ENGLISH Volume Adjustment The volume can be adjusted by pressing the VOLSand VOLT...

Owners Guide
Page 18
... were created in a 16:9 screen faithfully. In such case, adjust by pressing the RECALL button of the remote control. 埛 The display will go out in approximately 2 seconds. Play a 4:3 image in 4:3 mode. x Use of the remote control. ATTENTION Using a wide-screen monitor x This monitor has a screen mode selection feature. x This mode allows...
... were created in a 16:9 screen faithfully. In such case, adjust by pressing the RECALL button of the remote control. 埛 The display will go out in approximately 2 seconds. Play a 4:3 image in 4:3 mode. x Use of the remote control. ATTENTION Using a wide-screen monitor x This monitor has a screen mode selection feature. x This mode allows...

Owners Guide
Page 27
... around the screen in the Picture Menu. Min or 60 Min. (time limit operation) and press the OK button. Press the MENU button on the remote control to return to reduce the panel image retention. This function can be mitigated. When this control, power consumption can be reduced or degradation of...
... around the screen in the Picture Menu. Min or 60 Min. (time limit operation) and press the OK button. Press the MENU button on the remote control to return to reduce the panel image retention. This function can be mitigated. When this control, power consumption can be reduced or degradation of...
Owners Guide
Page 32
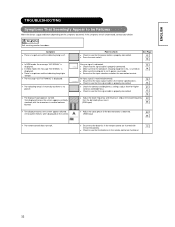
...404; Check the contrast and brightness settings (adjust them for higher 21 contrast and brightness). Ɣ Check to see that the batteries in the remote control are functional. 32 No sync signal is detected. 13 NO SIGNAL Ɣ Check that the signal cable is properly connected. Ɣ ...Make sure that the computer, imaging equipment, etc., is turned on the screen. (RGB input) 34 Ɣ The remote control does not work. ʳ Ɣ Ensure that the power cable is properly connected. Ɣ Press the main switch. If the symptoms remain uncorrected...
...404; Check the contrast and brightness settings (adjust them for higher 21 contrast and brightness). Ɣ Check to see that the batteries in the remote control are functional. 32 No sync signal is detected. 13 NO SIGNAL Ɣ Check that the signal cable is properly connected. Ɣ ...Make sure that the computer, imaging equipment, etc., is turned on the screen. (RGB input) 34 Ɣ The remote control does not work. ʳ Ɣ Ensure that the power cable is properly connected. Ɣ Press the main switch. If the symptoms remain uncorrected...


