Owners Guide
Page 7
...Mounting the Speaker Unit 15 Power Cord Connection 15 OPERATING INSTRUCTIONS 16 Turning Power On and Off 16 Input Switching 17 Volume Adjustment 17 Audio Mute 17 Size Switching 18 Input Signal Screen Display 18 Automatic Adjustment of Screen Position and the Clock ..19 Independent Operation of Multiple... Monitors 19 Using the Menu Screen 19 PICTURE MENU 20 AUDIO MENU 21 TIMER MENU 21 FUNCTION MENU 22 SETUP MENU 23 LANGUAGE MENU 24 OTHER FEATURES 24 Automatic Store 24 Signal Check 25 ...
...Mounting the Speaker Unit 15 Power Cord Connection 15 OPERATING INSTRUCTIONS 16 Turning Power On and Off 16 Input Switching 17 Volume Adjustment 17 Audio Mute 17 Size Switching 18 Input Signal Screen Display 18 Automatic Adjustment of Screen Position and the Clock ..19 Independent Operation of Multiple... Monitors 19 Using the Menu Screen 19 PICTURE MENU 20 AUDIO MENU 21 TIMER MENU 21 FUNCTION MENU 22 SETUP MENU 23 LANGUAGE MENU 24 OTHER FEATURES 24 Automatic Store 24 Signal Check 25 ...
Owners Guide
Page 16
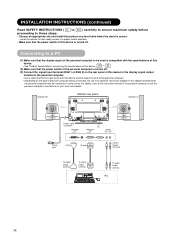
.... Speaker (R) Monitor rear panel Speaker (L) Power cable connector Power cord (DVI) (D-sub) To signal output terminal To signal output terminal 3.5mm Stereo mini jack To audio output terminal PC
.... Speaker (R) Monitor rear panel Speaker (L) Power cable connector Power cord (DVI) (D-sub) To signal output terminal To signal output terminal 3.5mm Stereo mini jack To audio output terminal PC

Owners Guide
Page 19
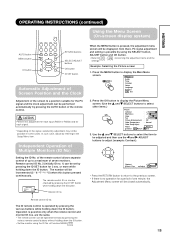
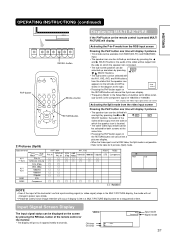
... Input Switching Input can be restored and the volume display (green) will appear. When the MUTE button of the remote control is pressed again, the audio will be temporarily mute by pressing the MUTE button of the remote control. buttons of the remote control (or the L and M volume buttons of ... VOL AV1 AV2 AV3 AV4 AUTO PinP SIZE RECALL MENU OK ID ID SET VOLUME UP/DOWN buttons • When a button is being displayed. Audio Mute The audio volume can be displayed. • The volume will increase when the VOL+ (or L) button is pressed while the guide is pressed, the volume ...
... Input Switching Input can be restored and the volume display (green) will appear. When the MUTE button of the remote control is pressed again, the audio will be temporarily mute by pressing the MUTE button of the remote control. buttons of the remote control (or the L and M volume buttons of ... VOL AV1 AV2 AV3 AV4 AUTO PinP SIZE RECALL MENU OK ID ID SET VOLUME UP/DOWN buttons • When a button is being displayed. Audio Mute The audio volume can be displayed. • The volume will increase when the VOL+ (or L) button is pressed while the guide is pressed, the volume ...
Owners Guide
Page 21
... (On-screen display system) When the MENU button is no operation for a period of Function MENU. concerning the adjustment items and the settings. Picture MENU Audio Timer Function Setup Language Select OK Set 2. CAUTION Perform this button pressed continuously. Remote control ID No. 2 (initially ID no . of one minute, the Adjustment...
... (On-screen display system) When the MENU button is no operation for a period of Function MENU. concerning the adjustment items and the settings. Picture MENU Audio Timer Function Setup Language Select OK Set 2. CAUTION Perform this button pressed continuously. Remote control ID No. 2 (initially ID no . of one minute, the Adjustment...
Owners Guide
Page 22
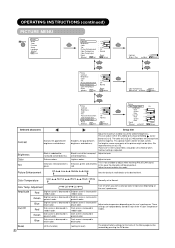
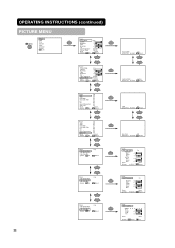
... brightness. This special mode is decreased in bluish color. "Panel Life" in the Function Menu should be clear. OPERATING INSTRUCTIONS (continued) PICTURE MENU MENU Picture Audio Timer Function Setup Language Select OK Set Picture Contrast : + 31 OK Brightness : - 31 OK Color : 0 Tint : + 31 Picture Enhancement : Off Color Temperature : Normal Color Temp...
... brightness. This special mode is decreased in bluish color. "Panel Life" in the Function Menu should be clear. OPERATING INSTRUCTIONS (continued) PICTURE MENU MENU Picture Audio Timer Function Setup Language Select OK Set Picture Contrast : + 31 OK Brightness : - 31 OK Color : 0 Tint : + 31 Picture Enhancement : Off Color Temperature : Normal Color Temp...

Owners Guide
Page 23
...side sound. Suppresses left-side sound. The original factory settings for Movie. hours (- - : )- Speech: This selects the audio suitable for Music. Adjust to taste. Input the required time by pressing the OK button. By using this Menu page can ... Adjust Return Selected characters Off Timer On Timer --Min. 30Min. 60Min. 120Min. 90Min. ENGLISH OPERATING INSTRUCTIONS (continued) AUDIO MENU MENU Picture Audio Timer Function Setup Language Select OK Set Audio Audio Mode : Movie OK Treble : + 10 Bass : - 10 Balance : 0L R SRS TruBass : Middle Matrix ...
...side sound. Suppresses left-side sound. The original factory settings for Movie. hours (- - : )- Speech: This selects the audio suitable for Music. Adjust to taste. Input the required time by pressing the OK button. By using this Menu page can ... Adjust Return Selected characters Off Timer On Timer --Min. 30Min. 60Min. 120Min. 90Min. ENGLISH OPERATING INSTRUCTIONS (continued) AUDIO MENU MENU Picture Audio Timer Function Setup Language Select OK Set Audio Audio Mode : Movie OK Treble : + 10 Bass : - 10 Balance : 0L R SRS TruBass : Middle Matrix ...
Owners Guide
Page 24
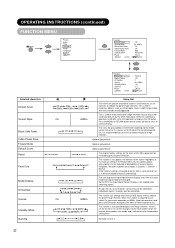
... be controlled individually (up to reduce the panel image retention that can be restored by the white field signal. OPERATING INSTRUCTIONS (continued) FUNCTION MENU Picture Audio Timer OK MENU Function Setup Language Select OK Set Function Screen Saver Screen Wipe Black Side Panel Video Power Save Freeze Mode Default Zoom Reset...
... be controlled individually (up to reduce the panel image retention that can be restored by the white field signal. OPERATING INSTRUCTIONS (continued) FUNCTION MENU Picture Audio Timer OK MENU Function Setup Language Select OK Set Function Screen Saver Screen Wipe Black Side Panel Video Power Save Freeze Mode Default Zoom Reset...
Owners Guide
Page 25
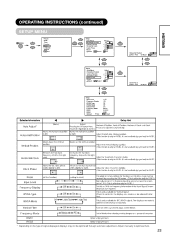
ENGLISH OPERATING INSTRUCTIONS (continued) SETUP MENU MENU Picture Audio Timer Function Setup Language Select OK Set Setup Auto Adjust Adjust OK Horizontal Position 0 Vertical Position + 31 Horizontal Clock - 20 Clock Phase 10 Reset Reset ...
ENGLISH OPERATING INSTRUCTIONS (continued) SETUP MENU MENU Picture Audio Timer Function Setup Language Select OK Set Setup Auto Adjust Adjust OK Horizontal Position 0 Vertical Position + 31 Horizontal Clock - 20 Clock Phase 10 Reset Reset ...

Owners Guide
Page 26
OTHER FEATURES Automatic Store Approximately 1 sec. OPERATING INSTRUCTIONS (continued) LANGUAGE MENU MENU Picture Audio Timer Function Setup Language Select OK Set Language English OK Français Español Select Return Exit Select a language by the horizontal/vertical ...
OTHER FEATURES Automatic Store Approximately 1 sec. OPERATING INSTRUCTIONS (continued) LANGUAGE MENU MENU Picture Audio Timer Function Setup Language Select OK Set Language English OK Français Español Select Return Exit Select a language by the horizontal/vertical ...

Owners Guide
Page 32
Panel Display dimensions Resolution Approx. 42 inches (920 (H) x 518 (V) mm, diagonal 1059mm) 852 (H) x 480 (V) pixels Net dimensions (excluding Speakers/Stand) 1030 (W) x 636 (H) x 91 (D) mm Net weight (excluding Speakers/Stand) 33.2kg Ambient conditions Temperature Operating : 5˚C to 35˚C, Storage : -15˚C to 60˚C Relative humidity Operating : 20% to 80%, Storage : 20% to change without notice. PRODUCT SPECIFICATIONS Product specifications and designs are subject to 90% (non-condensing) Power supply AC100 - 240V, 50/60Hz Power consumption/at standby 310W...
Panel Display dimensions Resolution Approx. 42 inches (920 (H) x 518 (V) mm, diagonal 1059mm) 852 (H) x 480 (V) pixels Net dimensions (excluding Speakers/Stand) 1030 (W) x 636 (H) x 91 (D) mm Net weight (excluding Speakers/Stand) 33.2kg Ambient conditions Temperature Operating : 5˚C to 35˚C, Storage : -15˚C to 60˚C Relative humidity Operating : 20% to 80%, Storage : 20% to change without notice. PRODUCT SPECIFICATIONS Product specifications and designs are subject to 90% (non-condensing) Power supply AC100 - 240V, 50/60Hz Power consumption/at standby 310W...
Owners Guide
Page 36
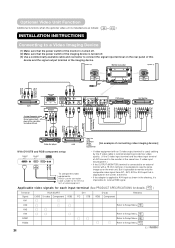
... terminals To component output terminals To component input terminals To component input terminals To S video output terminal To composite output terminal To audio output terminals To composite input terminal To audio input terminals VCR 20 18 16 14 12 10 8 6 4 2 21 19 17 15 13 11 9 7 5 3 1 Adaptor S-video/Composite video Do not...
... terminals To component output terminals To component input terminals To component input terminals To S video output terminal To composite output terminal To audio output terminals To composite input terminal To audio input terminals VCR 20 18 16 14 12 10 8 6 4 2 21 19 17 15 13 11 9 7 5 3 1 Adaptor S-video/Composite video Do not...
Owners Guide
Page 39
...The input signal status can be displayed on the screen by pressing the and AV1 AV2 SELECT buttons; VIDEO Off-timer On-timer OFF -- -- the audio of the video will cancel the 2 pictures display. • When the Video input is set to Movie when sub-screen is pressed MULTI PICTURE ...will cancel the 2 pictures display. • "Frequency Mode" in approximately 6 seconds. the audio of the video will be output from the side on which the speaker icon is located. • The sub-screen position can be careful since...
...The input signal status can be displayed on the screen by pressing the and AV1 AV2 SELECT buttons; VIDEO Off-timer On-timer OFF -- -- the audio of the video will cancel the 2 pictures display. • When the Video input is set to Movie when sub-screen is pressed MULTI PICTURE ...will cancel the 2 pictures display. • "Frequency Mode" in approximately 6 seconds. the audio of the video will be output from the side on which the speaker icon is located. • The sub-screen position can be careful since...
Owners Guide
Page 40
... Red Yellow Green Cyan Blue + 60 + 30 0 + 60 + 30 0 Reset Select On/Off Reset Return Picture Color Temp. OPERATING INSTRUCTIONS (continued) PICTURE MENU MENU Picture Audio Timer Function Setup Language Select OK Set Picture OK Picture Mode Day OK Contrast +31 Brightness -31 Color 0 Sharpness +15 Tint 0 Color Temperature Normal Contrast...
... Red Yellow Green Cyan Blue + 60 + 30 0 + 60 + 30 0 Reset Select On/Off Reset Return Picture Color Temp. OPERATING INSTRUCTIONS (continued) PICTURE MENU MENU Picture Audio Timer Function Setup Language Select OK Set Picture OK Picture Mode Day OK Contrast +31 Brightness -31 Color 0 Sharpness +15 Tint 0 Color Temperature Normal Contrast...

Owners Guide
Page 42
Magenta is strengthened. Yellow is strengthened. Blue is weakened. Color Decoding RGB R G B Red Darkens red only. Darkens colors. MENU Picture Audio Timer Function Setup Language Select OK Set Function Screen Saver Off OK Screen Wipe On 60Min. Red Red is strengthened. This adjusts listed colors individually ...
Magenta is strengthened. Yellow is strengthened. Blue is weakened. Color Decoding RGB R G B Red Darkens red only. Darkens colors. MENU Picture Audio Timer Function Setup Language Select OK Set Function Screen Saver Off OK Screen Wipe On 60Min. Red Red is strengthened. This adjusts listed colors individually ...

Owners Guide
Page 43
...that is selected on the 1st step. ENGLISH OPERATING INSTRUCTIONS (continued) SETUP MENU MENU Picture Audio Timer Function Setup Language Select OK Set Setup System System 2 OK Color System Video Input Audio Input Scart Output Monitor RGB1 DVI-STB RGB2 Component HDTV Select OK Set Return Setup Color... System OK AV1 Auto AV2 NTSC-M AV3 PAL-M AV4 PAL-N Select Return Exit Setup System Color System Video Input Audio Input Scart Output RGB1 RGB2 Select OK Set System 2 Monitor DVI-STB Component HDTV Return Setup Video Input OK AV1 Auto AV2 Composite...
...that is selected on the 1st step. ENGLISH OPERATING INSTRUCTIONS (continued) SETUP MENU MENU Picture Audio Timer Function Setup Language Select OK Set Setup System System 2 OK Color System Video Input Audio Input Scart Output Monitor RGB1 DVI-STB RGB2 Component HDTV Select OK Set Return Setup Color... System OK AV1 Auto AV2 NTSC-M AV3 PAL-M AV4 PAL-N Select Return Exit Setup System Color System Video Input Audio Input Scart Output RGB1 RGB2 Select OK Set System 2 Monitor DVI-STB Component HDTV Return Setup Video Input OK AV1 Auto AV2 Composite...
Owners Guide
Page 44
... automatically recognized. • If the input signal contains much noise or has a low level at Auto and the operation is connected to AV1 audio input terminal. Video Power Save 1 setting is selected on the 1st step. This step should be recorded as shown in the table below.... every input function and every Picture Mode, 1 setting is connected to RGB2 D-sub terminal. AV1 AV2 AV3 AV4 Video Input - AV2 AV4 Audio Input - This should correspond to the signal mode of the signal from the equipment that is completed, the adjustments will be lost. OTHER FEATURES...
... automatically recognized. • If the input signal contains much noise or has a low level at Auto and the operation is connected to AV1 audio input terminal. Video Power Save 1 setting is selected on the 1st step. This step should be recorded as shown in the table below.... every input function and every Picture Mode, 1 setting is connected to RGB2 D-sub terminal. AV1 AV2 AV3 AV4 Video Input - AV2 AV4 Audio Input - This should correspond to the signal mode of the signal from the equipment that is completed, the adjustments will be lost. OTHER FEATURES...

Owners Guide
Page 45
Point to composite output, or S.video output. Panel Display dimensions Resolution Approx. 42 inches (920 (H) x 518 (V) mm, diagonal 1059mm) 852 (H) x 480 (V) pixels Net dimensions (excluding Speakers/Stand) Net weight (excluding Speakers/Stand) 1030 (W) x 636 (H) x 91 (D) mm 33.2 kg Ambient conditions Temperature Operating : 5˚C to 35˚C, Storage : -15˚C to 60˚C Relative humidity Operating : 20% to 80%, Storage : 20% to be Failures Make the checks suggested below depending on the symptoms observed. Symptom • The screen becomes dark and the images ...
Point to composite output, or S.video output. Panel Display dimensions Resolution Approx. 42 inches (920 (H) x 518 (V) mm, diagonal 1059mm) 852 (H) x 480 (V) pixels Net dimensions (excluding Speakers/Stand) Net weight (excluding Speakers/Stand) 1030 (W) x 636 (H) x 91 (D) mm 33.2 kg Ambient conditions Temperature Operating : 5˚C to 35˚C, Storage : -15˚C to 60˚C Relative humidity Operating : 20% to 80%, Storage : 20% to be Failures Make the checks suggested below depending on the symptoms observed. Symptom • The screen becomes dark and the images ...
Owners Guide
Page 46
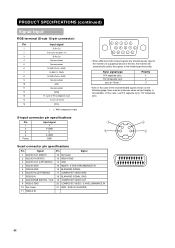
... Pin 1 2 3 4 Frame Input signal Y Y-GND C C-GND GND ᶅ ᶃ ᶆ ᶄ Scart connector pin specifications Pin Signal 1 AUDIO OUT (RIGHT) 2 AUDIO IN (RIGHT) 3 AUDIO OUT (LEFT/MONO) 4 AUDIO GND 5 RGB-B GND 6 AUDIO IN (LEFT/MONO) 7 RGB-B IN 8 AUDIO/RGB SWITCH / 16:9 9 RGB-G GND 10 Not Used 11 RGB-G IN Pin Signal 12 Not Used 13 RGB...
... Pin 1 2 3 4 Frame Input signal Y Y-GND C C-GND GND ᶅ ᶃ ᶆ ᶄ Scart connector pin specifications Pin Signal 1 AUDIO OUT (RIGHT) 2 AUDIO IN (RIGHT) 3 AUDIO OUT (LEFT/MONO) 4 AUDIO GND 5 RGB-B GND 6 AUDIO IN (LEFT/MONO) 7 RGB-B IN 8 AUDIO/RGB SWITCH / 16:9 9 RGB-G GND 10 Not Used 11 RGB-G IN Pin Signal 12 Not Used 13 RGB...


