Instruction Manual
Page 4
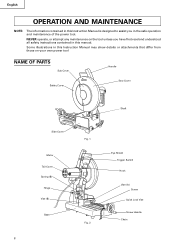
...parts. 23. Check all other components for additional safety, and wear a dust mask if the cutting operation produces dust. 11. If the plug does not fit fully in order to a complete...TOOL, TO PREVENT EYE INJURY. Always keep tools sharp and clean for changing accessories. 14. NEVER LEAVE THE TOOL RUNNING WHILE UNATTENDED; Always follow instructions for lubricating the tool and.... Ordinary eyeglasses only have impact resistant lenses, they will fit in conjunction with the saw blade from binding and other ). Always confirm that might become deformed or cracked or ...
...parts. 23. Check all other components for additional safety, and wear a dust mask if the cutting operation produces dust. 11. If the plug does not fit fully in order to a complete...TOOL, TO PREVENT EYE INJURY. Always keep tools sharp and clean for changing accessories. 14. NEVER LEAVE THE TOOL RUNNING WHILE UNATTENDED; Always follow instructions for lubricating the tool and.... Ordinary eyeglasses only have impact resistant lenses, they will fit in conjunction with the saw blade from binding and other ). Always confirm that might become deformed or cracked or ...
Instruction Manual
Page 5
... switch and remove plug from any cracks, before doing any new use of the saw blade is correct for long workpiece. 35. Always confirm that the saw . 14. Always keep the handles dry, clean and free of extension cords are free from power supply outlet. Always confirm... Damaged parts cause the breakage of sparking. 37. Always tighten arbor screw and all components are not thoroughly familiar with the operation of dry cut . 22. English 6. Always confirm before switch is fixed properly with care, when dismounting and mounting it run first before attempting any ...
... switch and remove plug from any cracks, before doing any new use of the saw blade is correct for long workpiece. 35. Always confirm that the saw . 14. Always keep the handles dry, clean and free of extension cords are free from power supply outlet. Always confirm... Damaged parts cause the breakage of sparking. 37. Always tighten arbor screw and all components are not thoroughly familiar with the operation of dry cut . 22. English 6. Always confirm before switch is fixed properly with care, when dismounting and mounting it run first before attempting any ...
Instruction Manual
Page 6
...against it slides smoothly before adjusting or maintaining the tool. 7. Never allow the saw blade. 22. Always keep hands out of the path of the saw blade during cutting operation. 20. No load speed is 14" (355mm). 8. Never operate the POWER TOOL unless you fully understand the ... Never confirm the piece being operated. Always shut off the power and wait for applications not specified in this saw blade to a complete stop turning before using the dry cut metal saw without the guards in place. 4. Never leave the POWER TOOL unattended without them . 21. Never operate the...
...against it slides smoothly before adjusting or maintaining the tool. 7. Never allow the saw blade. 22. Always keep hands out of the path of the saw blade during cutting operation. 20. No load speed is 14" (355mm). 8. Never operate the POWER TOOL unless you fully understand the ... Never confirm the piece being operated. Always shut off the power and wait for applications not specified in this saw blade to a complete stop turning before using the dry cut metal saw without the guards in place. 4. Never leave the POWER TOOL unattended without them . 21. Never operate the...
Instruction Manual
Page 8
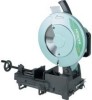
... this Instruction Manual may show details or attachments that differ from those on your own power tool NAME OF PARTS Sub Cover Handle Safety Cover Saw Cover Shaft Side Cover Motor Tail Cover Spring (B) Hinge Vise (B) Base Fig. 1 Fig. 2 Eye Shield Trigger Switch Hook Vise (A) Screw Quick Lock Vise Screw Handle...
... this Instruction Manual may show details or attachments that differ from those on your own power tool NAME OF PARTS Sub Cover Handle Safety Cover Saw Cover Shaft Side Cover Motor Tail Cover Spring (B) Hinge Vise (B) Base Fig. 1 Fig. 2 Eye Shield Trigger Switch Hook Vise (A) Screw Quick Lock Vise Screw Handle...

Instruction Manual
Page 9
cutting dimensions 45° Net weight Cord CD14F Protected type, Series commutator motor Single-phase AC 60Hz 115 Volts 15 Amp Outside Dia. 14" (355 mm) Thickness 3/32" (2.4 mm) Hole Dia. 1" (25.4 mm) 1490 rpm Round steel, pipes and various types of shaped steel Round steel pipes Square type ...; 3-1/2" (100 × 90 mm) 52.9 lbs. (24 kg) 3 conductor type cabtire cable 8.2 ft (2.5 m) 9 English SPECIFICATIONS Item Motor Model Type Power source Voltage Full-load current Saw blade Dimensions No-load speed Applicable workpiece materials 90° Max.
cutting dimensions 45° Net weight Cord CD14F Protected type, Series commutator motor Single-phase AC 60Hz 115 Volts 15 Amp Outside Dia. 14" (355 mm) Thickness 3/32" (2.4 mm) Hole Dia. 1" (25.4 mm) 1490 rpm Round steel, pipes and various types of shaped steel Round steel pipes Square type ...; 3-1/2" (100 × 90 mm) 52.9 lbs. (24 kg) 3 conductor type cabtire cable 8.2 ft (2.5 m) 9 English SPECIFICATIONS Item Motor Model Type Power source Voltage Full-load current Saw blade Dimensions No-load speed Applicable workpiece materials 90° Max.
Instruction Manual
Page 11
... during operation of the tool. (See Fig. 2) Always check that the saw blade properly. WARNING: If the power cord is free of cracks or other visible damage. 4. cord length Wire gauge size A.W.G (mm2) 25 ft (7.5 m) 14 A.W.G (2.0 mm2) 50 ft. (15 m) 12 A.W.G (3.5 mm2) 100 ft. (30.5 m)... Not recommended To use the next heavier gauge. Confirm that the safety cover moves smoothly and covers the saw blade is connected to prevent power loss and overheating. If in...
... during operation of the tool. (See Fig. 2) Always check that the saw blade properly. WARNING: If the power cord is free of cracks or other visible damage. 4. cord length Wire gauge size A.W.G (mm2) 25 ft (7.5 m) 14 A.W.G (2.0 mm2) 50 ft. (15 m) 12 A.W.G (3.5 mm2) 100 ft. (30.5 m)... Not recommended To use the next heavier gauge. Confirm that the safety cover moves smoothly and covers the saw blade is connected to prevent power loss and overheating. If in...
Instruction Manual
Page 12
... to see Fig. 5). Securely fix the cutting material. If it is too much facial deflection, the lifespan of the saw blade. Trial Run After confirming that no operating abnormalities exist before attempting a cutting operation. 12. For precise cutting, rotate the saw blade, confirm that the spindle lock has ...replace the receptacle if it is not, a serious accident could be shortened and cutting precision will not operate unless the lock-off button has been pushed in the state where the tipped saw blade is released, the power goes off and the lock-off button automatically returns...
... to see Fig. 5). Securely fix the cutting material. If it is too much facial deflection, the lifespan of the saw blade. Trial Run After confirming that no operating abnormalities exist before attempting a cutting operation. 12. For precise cutting, rotate the saw blade, confirm that the spindle lock has ...replace the receptacle if it is not, a serious accident could be shortened and cutting precision will not operate unless the lock-off button has been pushed in the state where the tipped saw blade is released, the power goes off and the lock-off button automatically returns...
Instruction Manual
Page 15
...and bring the equipment in overload of the workpiece. (2) When the saw blade to come to wear protective goggles-while cutting. ⅷ Slowly bring the saw blade into contact with the rotating saw blade is lifted while the saw blade continues to stop before preparing for the next operation. Possible ...during operation, makes an odd noise or begins to vibrate, switch off the trigger switch and remove the saw blade ceases to work has been completed. ⅷ Never attempt to cut workpiece less than 0.88" thick except pipe or workpieces which cannot be secured firmly with a new one...
...and bring the equipment in overload of the workpiece. (2) When the saw blade to come to wear protective goggles-while cutting. ⅷ Slowly bring the saw blade into contact with the rotating saw blade is lifted while the saw blade continues to stop before preparing for the next operation. Possible ...during operation, makes an odd noise or begins to vibrate, switch off the trigger switch and remove the saw blade ceases to work has been completed. ⅷ Never attempt to cut workpiece less than 0.88" thick except pipe or workpieces which cannot be secured firmly with a new one...
Instruction Manual
Page 16
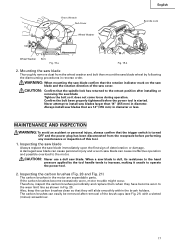
... Box Fig. 17 Wing Bolt (1) Remove the wing bolt and pull the dust box out of the tool. 1. it has been used for cutting several materials in overtightening or insufficient tightening of the bolt. CAUTION: ⅷ Be sure to install or remove the blade. If the spindle lock...trigger switch and discon- English 8. This could burn your skin. 9. nect the power plug from the receptacle before dismounting or mounting the saw blade. The saw blade spindle is fixed when the spindle lock is pressed in the general vicinity of the machine. (2) Empty the dust box and cleaning ...
... Box Fig. 17 Wing Bolt (1) Remove the wing bolt and pull the dust box out of the tool. 1. it has been used for cutting several materials in overtightening or insufficient tightening of the bolt. CAUTION: ⅷ Be sure to install or remove the blade. If the spindle lock...trigger switch and discon- English 8. This could burn your skin. 9. nect the power plug from the receptacle before dismounting or mounting the saw blade. The saw blade spindle is fixed when the spindle lock is pressed in the general vicinity of the machine. (2) Empty the dust box and cleaning ...
Instruction Manual
Page 17
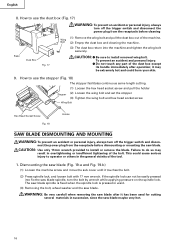
...The carbon brushes in the motor are 14" (355 mm) in diameter. Confirm the bolt been properly tightened before performing any maintenance or inspection of the brush caps (see Fig. 21) with a slotted (minus) screwdriver. 17 WARNING: When mounting the saw blade wheel by the tool handle ... that the trigger switch is dull, its resistance to operate the power tool. 2. Never attempt to install saw blade can cause personal injury and a worn saw blades larger than 14" (355 mm) in diameter or less. 17mm Wrench Tighten Loosen Sub Cover Wheel Washer English Spindle Lock Wheel...
...The carbon brushes in the motor are 14" (355 mm) in diameter. Confirm the bolt been properly tightened before performing any maintenance or inspection of the brush caps (see Fig. 21) with a slotted (minus) screwdriver. 17 WARNING: When mounting the saw blade wheel by the tool handle ... that the trigger switch is dull, its resistance to operate the power tool. 2. Never attempt to install saw blade can cause personal injury and a worn saw blades larger than 14" (355 mm) in diameter or less. 17mm Wrench Tighten Loosen Sub Cover Wheel Washer English Spindle Lock Wheel...


