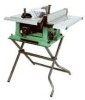
Hitachi C10RA3 - 10 Inch Portable Table Saw Support and Manuals
Get Help and Manuals for this Hitachi item
View All Support Options Below
Free Hitachi C10RA3 manuals!
Problems with Hitachi C10RA3?
Ask a Question
Free Hitachi C10RA3 manuals!
Problems with Hitachi C10RA3?
Ask a Question
Most Recent Hitachi C10RA3 Questions

What Kind Of Dado Blade Is Suitable For The C10ra3 Table Saw
(Posted by benjaminrondon 3 years ago)

What Size Is The Thin Inner Arbor Wrench On The C 10 Ra3
(Posted by windowsheeter 3 years ago)

Hitachi C10ra3 Compatible Blades.
Can I use an 8 inch blade with this saw? If so, can it be for cutting ceramic tile?
Can I use an 8 inch blade with this saw? If so, can it be for cutting ceramic tile?
(Posted by gwoltman 3 years ago)
Blade Removal
How do you secure the saw blade to remove and what direction is the nut thread?
How do you secure the saw blade to remove and what direction is the nut thread?
(Posted by nbergeson 12 years ago)
Popular Hitachi C10RA3 Manual Pages
Instruction Manual - Page 4
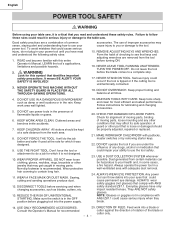
..., repaired or replaced.
21. USE ONLY RECOMMENDED ACCESSORIES. DO NOT use of the blade or cutter only.
- 4 - Follow instructions for...table saw . Failure to contain long hair.
11. It will do a job for which it was designed.
9. Non-slip footwear is critical that could cause permanent eye damage. DIRECTION OF FEED. Keep tools sharp and clean for this entire Operator's Manual...
Instruction Manual - Page 5
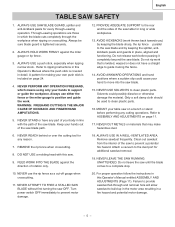
... UNATTENDED. NEVER STAND or have a straight edge to the saw blade and by keeping the blade sharp, the rip fence parallel to guide it completely beyond the saw blade. REMOVE the rip fence when crosscutting.
8. Clean out sawdust from the interior of the saw blade. ALWAYS USE SAW BLADE GUARD, splitter and anti-kickback pawls for any part of your table saw blade.
15...
Instruction Manual - Page 7

...use molding head set with the illustration on the next page and the "Table of box together.
This will reduce friction when pushing the workpiece.
- 7 - TABLE OF LOOSE PARTS
ITEM DESCRIPTION
QUANTITY
A Table saw assembly
1
B Blade guard and splitter
1
C Rip fence
1
D Dado table insert
1
E Miter gauge
1
F Blade wrench
2
G Hand wheel
2
H Blade
1
I Hex wrench
1
J Guard...
Instruction Manual - Page 10
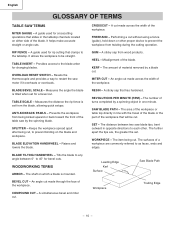
.... Prevents the workpiece from wood products. BLADE ELEVATION HANDWHEEL -
SET - BLADE TILTING HANDWHEEL - WOODWORKING TERMS
ARBOR - FREEHAND -
TABLE INSERT -
The item being kicked upward or back toward the front of the workpiece. An angle cut . CROSSCUT -
The further apart the tips are commonly referred to any angle between two saw motor if it overheats or overloads...
Instruction Manual - Page 11
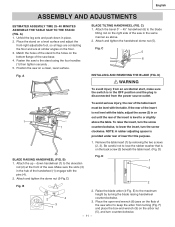
... by removing the two screws (2, 3). E) to the blade
tilting rod on a clean, level surface.
Fig. Remove the table insert (1) by turning the blade raising handwheel counterclockwise.
3. D)
Fig. Place the open-end wrench (8) jaws on the flats of the saw on the right side of the saw base. 4. Place the stand on a level surface and adjust the
front...
Instruction Manual - Page 12

... cut workpiece will pass on either side without the proper insert in the table recess, insert the screws through splitter bracket (5). A special dado insert plate must always be sure to the rear of the saw blade (10). (Fig.
G). 3. WARNING
See Fig.
Use the original installed insert for clarity. Set the blade to maximum height and the tilt to zero
degrees on...
Instruction Manual - Page 15
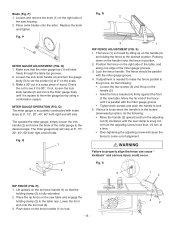
Blade (Fig. Replace the knob
and tighten. If not, loosen the lock knob handle (2) and move the body of
the saw housing. 2.
S) 1. Pushing down on the rip fence handle (1) so that the miter gauge bar (1) will cause the fence to set... lock.
- 15 -
4
2 Check
the cut in a scrap piece of the saw table and engage the
holding clamp (2) is moved by using a combination square. Q) The ...
Instruction Manual - Page 16
... 10 mm wrench until it is necessary. U
13
1 3
2
1
2
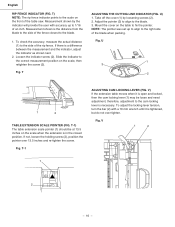
TABLE EXTENSION SCALE POINTER (FIG. T-1) The table...blade to the side of the fence closest to 1/16 of the blade when packing.
Fig.
T) NOTE: The rip fence indicator points to the side of the table saw.
T-1
ADJUSTING CAM LOCKING LEVER (FIG. V) If the extension table...set up to the blade.
1.
Fig. V
1
2
1
2
- 16 -
Instruction Manual - Page 17
.... Release cam locking lever. 1. English
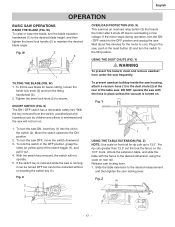
OPERATION
BASIC SAW OPERATIONS
RAISE THE BLADE (FIG. W
2 3
1
TILTING THE BLADE (FIG.
If the motor stops during operation, turn the saw .
Y
1. For rip cuts greater than 13.5" set the lock the fence on front rail for the motor to cool, Plug in the switch (2). Slide the table extension to the ON position.
2. W) 1. OVERLOAD...
Instruction Manual - Page 18
...table. 10.Never pull the piece back when the blade is parallel
to cause a severe injury. • Keep both of your thumbs touch the front edge of the saw each and every time, check the following:
1. BB
1. Raise the blade... this manual, can then remove the workpiece. Remember that will interfere...therefore, use of a second is about 1/8 in higher than 2 in the base of the table (2), ...
Instruction Manual - Page 19
...the face of the workpiece on the table.
2. Never stand directly inline of the saw blade path, always stand to the side of the blade that even a careless fraction of the blade during ripping operations. Then slowly push... the user can make a simple outfeed support by clamping a piece of the workpiece.
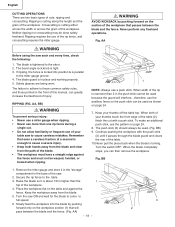
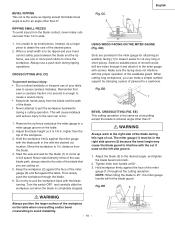
3. RIPPING SMALL PIECES To avoid injury from the blade contact, never make it easier to cut...
Instruction Manual - Page 21
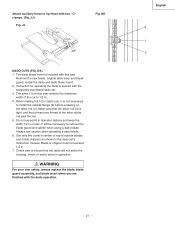
... arbor nut (3). Use only the correct number of round outside flange (2) before screwing on this saw. WARNING
For your own safety, always replace the blade, blade guard assembly, and blade insert when you are finished with the separately purchased dado set 's instruction manual. Blade or chipper must not exceed 1/2 in or less.
Always use caution when operating a dado...
Instruction Manual - Page 22
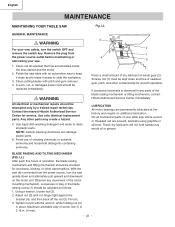
... pull upward and downward on bevel gear (2). On all mechanical parts of the blade raising mechanism or tilting mechanism, contact Hitachi Authorized Service Center immediately.
Clean out all plastic parts.
Adjust nut (3) until it easier to clean all sawdust that has accumulated inside the saw table with an automotive wax to keep it clean and to make...
Instruction Manual - Page 23
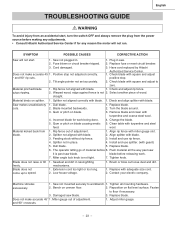
...or circuit breaker tripped. 2. Have cord replaced by Hitachi
Does not make accurate 45° 1. Incorrect blade for any adjustments. • Consult Hitachi Authorized Service Center if for work .
7.
Check and align splitter with blade.
1.
Install and use splitter. (with turpentine and steel
feed. wool.
1. English
TROUBLESHOOTING GUIDE
WARNING
To avoid injury from an accidental...
Instruction Manual - Page 69
...SPACER
4
FOLLOWER PLATE
1
POINTER
1
CR.RE. English
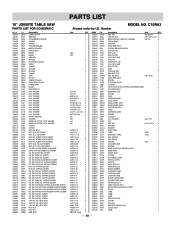
PARTS LIST
10" JOBSITE TABLE SAW
PARTS LIST FOR SCHEMATIC
HKU# 726434 726437 325693 726438 726439 726440 ...WRENCH COMPRESSION SPRING SADDLE SPRING POINTER BRACKET NEEDLE POINTER SWITCH BOX INSERT INSERT WRENCH SPACER PLUNGER HOUSING STRAP CLAMP SPACER SPACER CLAMP SHIM SET NUT ARBOR COLLAR SUPPORTING PLATE PARRLE RING BLADE HEX WRENCH...
Hitachi C10RA3 Reviews
We have not received any reviews for Hitachi yet.