
Owners Guide
Page 1
Manager Locks Setup Move SEL Sel THE REMOTE CONTROL 24-42 ON-SCREEN DISPLAY 43-71 USEFUL INFORMATION INDEX 72-79 PROJECTION COLOR TV 65XWX20B 57XWX20B 51XWX20B OPERATING GUIDE IMPORTANT SAFETY INSTRUCTIONS 2-3 FIRST TIME USE 4-23 Video Audio Ch.
Manager Locks Setup Move SEL Sel THE REMOTE CONTROL 24-42 ON-SCREEN DISPLAY 43-71 USEFUL INFORMATION INDEX 72-79 PROJECTION COLOR TV 65XWX20B 57XWX20B 51XWX20B OPERATING GUIDE IMPORTANT SAFETY INSTRUCTIONS 2-3 FIRST TIME USE 4-23 Video Audio Ch.

Owners Guide
Page 3
.... 11. Do not defeat the safety purpose of the obsolete outlet. 10. If the provided plug does not fit into your HITACHI Factory Warranty. Televisions are heavy and can cause permanent damage to television receivers. Section 810 of the picture will age more rapidly ...radiators, heat registers, stoves, or other electrical circuits. 18. Do not apply excessive pulling force to overturn resulting in accor- Such "SCREEN BURNS" constitute misuse and are provided for proper grounding and, in the vicinity of the cabinet which may require specific instructions pertaining to ...
.... 11. Do not defeat the safety purpose of the obsolete outlet. 10. If the provided plug does not fit into your HITACHI Factory Warranty. Televisions are heavy and can cause permanent damage to television receivers. Section 810 of the picture will age more rapidly ...radiators, heat registers, stoves, or other electrical circuits. 18. Do not apply excessive pulling force to overturn resulting in accor- Such "SCREEN BURNS" constitute misuse and are provided for proper grounding and, in the vicinity of the cabinet which may require specific instructions pertaining to ...
Owners Guide
Page 5
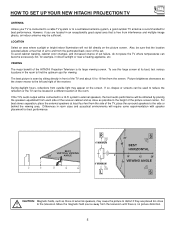
...-Fi system's external speakers, the best audio performance will be sufficient. For best stereo separation, place the external speakers at its large viewing screen. Picture brightness decreases as possible to the height of the receiver cabinet and as close to reduce the reflection or the TV can become excessively...fields, such as those of the TV, place the surround speakers to the side or behind the viewing area. HOW TO SET UP YOUR NEW HITACHI PROJECTION TV ANTENNA Unless your TV is connected to a cable TV system or to a centralized antenna system, a good outdoor TV antenna is ...
...-Fi system's external speakers, the best audio performance will be sufficient. For best stereo separation, place the external speakers at its large viewing screen. Picture brightness decreases as possible to the height of the receiver cabinet and as close to reduce the reflection or the TV can become excessively...fields, such as those of the TV, place the surround speakers to the side or behind the viewing area. HOW TO SET UP YOUR NEW HITACHI PROJECTION TV ANTENNA Unless your TV is connected to a cable TV system or to a centralized antenna system, a good outdoor TV antenna is ...
Owners Guide
Page 7
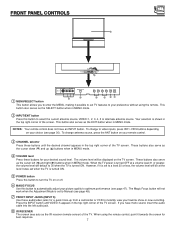
...will be displayed on your favorite show or new recording. These buttons also serve as the cursor left audio jack. ቩ IR RECEIVER The screen area acts as the SELECT button when in the top right corner of the TV. NOTES: Your remote control does not have mono sound, ... (̆) buttons when in MENU mode. ብ VOLUME level Press these buttons until the desired channel appears in the top right corner of the TV screen. To change antenna source, press the ANT button on or off. ቧ MAGIC FOCUS Use this button to select the current antenna source, VIDEO: 1, 2, 3, 4,...
...will be displayed on your favorite show or new recording. These buttons also serve as the cursor left audio jack. ቩ IR RECEIVER The screen area acts as the SELECT button when in the top right corner of the TV. NOTES: Your remote control does not have mono sound, ... (̆) buttons when in MENU mode. ብ VOLUME level Press these buttons until the desired channel appears in the top right corner of the TV screen. To change antenna source, press the ANT button on or off. ቧ MAGIC FOCUS Use this button to select the current antenna source, VIDEO: 1, 2, 3, 4,...

Owners Guide
Page 10
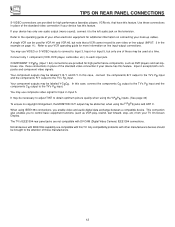
...480i and 480p are trademarks of a single cable (see page 21). ቪ DVI-HDTV Input (Input 1) Use this connection, your warranty card. Hitachi will notify you to control basic equipment functions (such as VCR play, rewind, fast forward, stop, etc.) from Dolby Laboratories. "Dolby" and the .... You may be labeled Y-CBCR. Your component outputs may use composite video signal for future software upgrades. In order to your TV On-Screen Display. ቮ Multi Media Card Slot This card slot is for INPUT:2. NOTE: *Manufactured under license from your external components (VCR, ...
...480i and 480p are trademarks of a single cable (see page 21). ቪ DVI-HDTV Input (Input 1) Use this connection, your warranty card. Hitachi will notify you to control basic equipment functions (such as VCR play, rewind, fast forward, stop, etc.) from Dolby Laboratories. "Dolby" and the .... You may be labeled Y-CBCR. Your component outputs may use composite video signal for future software upgrades. In order to your TV On-Screen Display. ቮ Multi Media Card Slot This card slot is for INPUT:2. NOTE: *Manufactured under license from your external components (VCR, ...
Owners Guide
Page 12
... this case, connect the components B-Y output to the TV's PB input and the components R-Y output to the left audio jack on connecting your TV On-Screen Display. Not all devices with IEEE1394 capability are provided for VCR #1 and VCR #2, but only one audio output (mono sound), connect it to the TV...
... this case, connect the components B-Y output to the TV's PB input and the components R-Y output to the left audio jack on connecting your TV On-Screen Display. Not all devices with IEEE1394 capability are provided for VCR #1 and VCR #2, but only one audio output (mono sound), connect it to the TV...
Owners Guide
Page 20
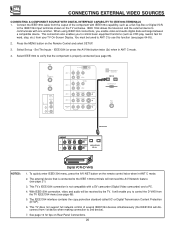
... connection also enables you to control basic equipment functions (such as a Set-Top-Box or Digital VCR, to control the D-VHS from your TV On-Screen Display. Select IEEE1394 to use this function (see page 68). 5. The IEEE1394 interface contains the copy protection standard called 5C or Digital Transmission Content Protection...
... connection also enables you to control basic equipment functions (such as a Set-Top-Box or Digital VCR, to control the D-VHS from your TV On-Screen Display. Select IEEE1394 to use this function (see page 68). 5. The IEEE1394 interface contains the copy protection standard called 5C or Digital Transmission Content Protection...
Owners Guide
Page 24
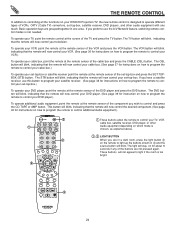
..., point the remote at the remote sensor of the VCR and press the VCR button. To operate your TV, point the remote control at the screen of the TV and press the TV button. The STB button will blink, indicating that the remote will now control your set-top-box. The... button ባ on the remote to light if the room is too bright. THE REMOTE CONTROL In addition to controlling all the functions on your HITACHI Projection TV, the new remote control is designed to control your set-top-box.) To operate your DVD player, point the remote at the remote...
..., point the remote at the remote sensor of the VCR and press the VCR button. To operate your TV, point the remote control at the screen of the TV and press the TV button. The STB button will blink, indicating that the remote will now control your set-top-box. The... button ባ on the remote to light if the room is too bright. THE REMOTE CONTROL In addition to controlling all the functions on your HITACHI Projection TV, the new remote control is designed to control your set-top-box.) To operate your DVD player, point the remote at the remote...

Owners Guide
Page 26
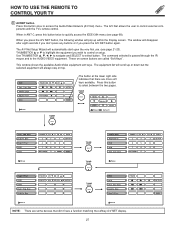
...-1. ቫ INFO button Press this button to tune. Enter "0" first for the TV to display the sleep timer in the lower left corner of the screen. Press buttons [0], [1], [5], [1] to tune to the channel display on your TV, then enter the remaining two numbers using the number buttons. On OFF Off 10...
...-1. ቫ INFO button Press this button to tune. Enter "0" first for the TV to display the sleep timer in the lower left corner of the screen. Press buttons [0], [1], [5], [1] to tune to the channel display on your TV, then enter the remaining two numbers using the number buttons. On OFF Off 10...
Owners Guide
Page 27
... page 21-23). Press this button once to access the Audio/Video Network (A/V Net) menu. The A/V Net Setup Wizard will always stay on -screen buttons are more soft keys available. These on top. VCR Set Top Box Cable Box Amplifier DVD Move POWER CH ̄ CH ̆ SETUP TV... shows the available Audio/Video equipment soft keys. The A/V Net allows the user to select button. The window will scroll up within the Display screen. Use THUMBSTICK to navigate and SELECT to control external components with the TV's remote control. When you press the A/V NET button again. THUMB ...
... page 21-23). Press this button once to access the Audio/Video Network (A/V Net) menu. The A/V Net Setup Wizard will always stay on -screen buttons are more soft keys available. These on top. VCR Set Top Box Cable Box Amplifier DVD Move POWER CH ̄ CH ̆ SETUP TV... shows the available Audio/Video equipment soft keys. The A/V Net allows the user to select button. The window will scroll up within the Display screen. Use THUMBSTICK to navigate and SELECT to control external components with the TV's remote control. When you press the A/V NET button again. THUMB ...

Owners Guide
Page 28
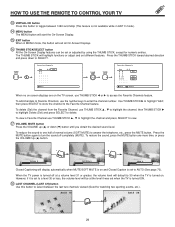
... change the picture format ASPECT ratio. HOW TO USE THE REMOTE TO CONTROL YOUR TV ቮ ASPECT button Press this button to fill the 16:9 screen. The center of your total viewing time to display conventional (4:3) images. Side panels (gray areas) are placed to the left and right of the image...
... change the picture format ASPECT ratio. HOW TO USE THE REMOTE TO CONTROL YOUR TV ቮ ASPECT button Press this button to fill the 16:9 screen. The center of your total viewing time to display conventional (4:3) images. Side panels (gray areas) are placed to the left and right of the image...
Owners Guide
Page 29
... to select between 1080i and 540p (This feature is not available while in ANT C mode). ተ MENU button The MENU button will start the On-Screen Display. ቱ EXIT button When in MENU mode, this button to toggle between the last two channels viewed (Good for numeric entries. THUMB STICK 8 .... However, if it was set to delete. Ant A 10 Ant A 39 LAST CH 29 Del Del Del Move SEL Select When no on-screen displays are on the TV screen, use THUMB STICK ̆ , ̄ to highlight the channel and press SELECT to view. ታ VOLUME, MUTE button Press the VOLUME ...
... to select between 1080i and 540p (This feature is not available while in ANT C mode). ተ MENU button The MENU button will start the On-Screen Display. ቱ EXIT button When in MENU mode, this button to toggle between the last two channels viewed (Good for numeric entries. THUMB STICK 8 .... However, if it was set to delete. Ant A 10 Ant A 39 LAST CH 29 Del Del Del Move SEL Select When no on-screen displays are on the TV screen, use THUMB STICK ̆ , ̄ to highlight the channel and press SELECT to view. ታ VOLUME, MUTE button Press the VOLUME ...

Owners Guide
Page 32
... select. Press down on THUMBSTICK to highlight a recording device (example: D1 (D-VHS1). When VIEW is selected, a "✓" in the box means it is enabled. The screen below will be set on THUMBSTICK again to highlight CH# (Channel Number). HOW TO USE THE REMOTE TO CONTROL YOUR TV Use THUMB STICK to...
... select. Press down on THUMBSTICK to highlight a recording device (example: D1 (D-VHS1). When VIEW is selected, a "✓" in the box means it is enabled. The screen below will be set on THUMBSTICK again to highlight CH# (Channel Number). HOW TO USE THE REMOTE TO CONTROL YOUR TV Use THUMB STICK to...
Owners Guide
Page 33
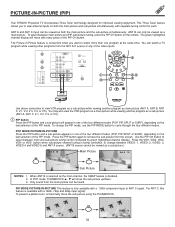
... being controlled, to change the PIP mode, use the PIP MODE button to watch a TV program while viewing other programs from the screen. This Three Tuner feature allows you want to cycle through the four different modes. The Picture-in one program at the same time....is only available with separate tuning control for improved viewing enjoyment. PIP MODE PICTURE-IN-PICTURE This feature is disabled. 2. PICTURE-IN-PICTURE (PIP) Your HITACHI Projection TV incorporates Three Tuner technology designed for each. ANT A TO CONVERTER ANT B AUDIO TO HI-FI CENTER IN IR BLASTER L R INPUT 1...
... being controlled, to change the PIP mode, use the PIP MODE button to watch a TV program while viewing other programs from the screen. This Three Tuner feature allows you want to cycle through the four different modes. The Picture-in one program at the same time....is only available with separate tuning control for improved viewing enjoyment. PIP MODE PICTURE-IN-PICTURE This feature is disabled. 2. PICTURE-IN-PICTURE (PIP) Your HITACHI Projection TV incorporates Three Tuner technology designed for each. ANT A TO CONVERTER ANT B AUDIO TO HI-FI CENTER IN IR BLASTER L R INPUT 1...

Owners Guide
Page 34
... the type of this SURF scanning, sub-pictures will always be removed from the screen. The SWAP function will not appear when SURF mode is on the main picture to remove the sub...-pictures from the screen. Ant A 10 PIP MODE Ant A 10 Ant A 12 PIP MODE PIP MODE Ant A 12...the main channel (ANT B input cannot be deactivated. SURF MODE PICTURE-IN-PICTURE This feature will depend on the screen. The SWAP button will only operate in memory) and display them as the main channel. PICTURE-IN-PICTURE (...
... the type of this SURF scanning, sub-pictures will always be removed from the screen. The SWAP function will not appear when SURF mode is on the main picture to remove the sub...-pictures from the screen. Ant A 10 PIP MODE Ant A 10 Ant A 12 PIP MODE PIP MODE Ant A 12...the main channel (ANT B input cannot be deactivated. SURF MODE PICTURE-IN-PICTURE This feature will depend on the screen. The SWAP button will only operate in memory) and display them as the main channel. PICTURE-IN-PICTURE (...
Owners Guide
Page 41
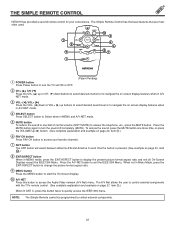
..., press the EXIT/ASPECT button to change the picture format aspect ratio. ቪ MENU button Press the MENU button to start the On-Screen Display. ቫ A/V NET Press this button twice to quickly access the IEEE1394 menu. NOTE: The Simple Remote cannot be programmed to exit... the IEEE1394 Menu. SELECT VOL + MUTE CH - THE SIMPLE REMOTE CONTROL HITACHI has provided a second remote control for your favorite channels. ቨ ANT button The ANT button will select between Antenna A/B and Antenna C each...
..., press the EXIT/ASPECT button to change the picture format aspect ratio. ቪ MENU button Press the MENU button to start the On-Screen Display. ቫ A/V NET Press this button twice to quickly access the IEEE1394 menu. NOTE: The Simple Remote cannot be programmed to exit... the IEEE1394 Menu. SELECT VOL + MUTE CH - THE SIMPLE REMOTE CONTROL HITACHI has provided a second remote control for your favorite channels. ቨ ANT button The ANT button will select between Antenna A/B and Antenna C each...

Owners Guide
Page 43
... 3. Press EXIT on the remote control to access the A/V Net menu to control external components. A/V Net MENU EXIT SELECT This part of the screen shows which selections are available. Press the THUMB STICK to quickly access the IEEE1394 menu. 5. Press THUMB STICK ̇ or ̈ to display... the different features on your HITACHI Projection TV. 2. Manager Locks Setup Move SEL Sel This part of the screen shows which Remote Control buttons to quickly exit from a menu. 4. Press A/V Net on the remote control to...
... 3. Press EXIT on the remote control to access the A/V Net menu to control external components. A/V Net MENU EXIT SELECT This part of the screen shows which selections are available. Press the THUMB STICK to quickly access the IEEE1394 menu. 5. Press THUMB STICK ̇ or ̈ to display... the different features on your HITACHI Projection TV. 2. Manager Locks Setup Move SEL Sel This part of the screen shows which Remote Control buttons to quickly exit from a menu. 4. Press A/V Net on the remote control to...
Owners Guide
Page 44
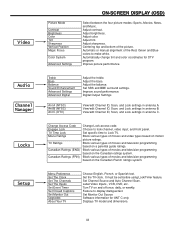
Video Audio Channel Manager Locks Setup Picture Mode Contrast Brightness Color Tint Sharpness Vertical Position Magic Focus Color System Advanced Settings ON-SCREEN DISPLAY (OSD) Select between the four picture modes: Sports, Movies, News, and Music. Adjust the bass. Digital Output Settings Ant A (NTSC) Ant B (NTSC) Ant C (DTV) ...
Video Audio Channel Manager Locks Setup Picture Mode Contrast Brightness Color Tint Sharpness Vertical Position Magic Focus Color System Advanced Settings ON-SCREEN DISPLAY (OSD) Select between the four picture modes: Sports, Movies, News, and Music. Adjust the bass. Digital Output Settings Ant A (NTSC) Ant B (NTSC) Ant C (DTV) ...
Owners Guide
Page 46
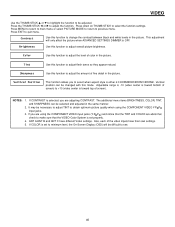
... If you are using the COMPONENT VIDEO Y-PBPR input jacks. 3. Press EXIT to adjust the function. Tint Use this function to minimum level, the On-Screen Display (OSD) will only affect the picture when ADVANCED SETTINGS DIMMER is set to adjust the level of color in the same manner. 2. If CONTRAST... is toward bottom of screen). Color Use this function to select when aspect style is set properly. 4. Adjustable range is -10 (video center is toward top of...
... If you are using the COMPONENT VIDEO Y-PBPR input jacks. 3. Press EXIT to adjust the function. Tint Use this function to minimum level, the On-Screen Display (OSD) will only affect the picture when ADVANCED SETTINGS DIMMER is set to adjust the level of color in the same manner. 2. If CONTRAST... is toward bottom of screen). Color Use this function to select when aspect style is set properly. 4. Adjustable range is -10 (video center is toward top of...
Owners Guide
Page 56
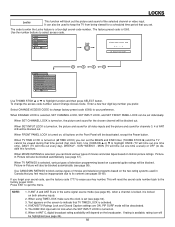
... will be blocked automatically (see pages 59-60). If you feel may be viewed during that time period (Set clock first). Text appears on the screen to indicate that you forget your secret code, use the factory code 7777 to keep the TV from being viewed for channels 3, 4 of movies and...
... will be blocked automatically (see pages 59-60). If you feel may be viewed during that time period (Set clock first). Text appears on the screen to indicate that you forget your secret code, use the factory code 7777 to keep the TV from being viewed for channels 3, 4 of movies and...


