Owners Guide
Page 1
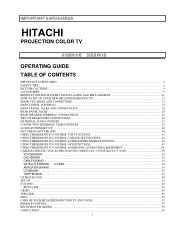
IMPORTANT SAFEGUARDS PROJECTION COLOR TV 61SBX01B 53SBX01B OPERATING GUIDE TABLE OF CONTENTS IMPORTANT SAFEGUARDS ...2 SAFETY TIPS ...4 PICTURE CAUTIONS...9 ACCESSORIES ...9 REMOTE CONTROL BATTERY INSTALLATION AND REPLACEMENT 11 HOW TO SET UP YOUR NEW HITACHI PROJECTION TV 11 HOOK-UP CABLES AND CONNECTORS ...13 FRONT PANEL CONTROLS...15 FRONT PANEL JACKS AND CONNECTIONS...... BRAND ...55 ULTRATEC OSD...56 SET UP ...59 CUSTOM ...67 AUTO LINK ...76 VIDEO ...80 THEATER ...85 INFO ...94 CARE OF YOUR HITACHI PROJECTION TV AND YOUR 97 REMOTE CONTROL ...97 RECEPTION PROBLEMS...98 USEFUL INFO ...99 1
IMPORTANT SAFEGUARDS PROJECTION COLOR TV 61SBX01B 53SBX01B OPERATING GUIDE TABLE OF CONTENTS IMPORTANT SAFEGUARDS ...2 SAFETY TIPS ...4 PICTURE CAUTIONS...9 ACCESSORIES ...9 REMOTE CONTROL BATTERY INSTALLATION AND REPLACEMENT 11 HOW TO SET UP YOUR NEW HITACHI PROJECTION TV 11 HOOK-UP CABLES AND CONNECTORS ...13 FRONT PANEL CONTROLS...15 FRONT PANEL JACKS AND CONNECTIONS...... BRAND ...55 ULTRATEC OSD...56 SET UP ...59 CUSTOM ...67 AUTO LINK ...76 VIDEO ...80 THEATER ...85 INFO ...94 CARE OF YOUR HITACHI PROJECTION TV AND YOUR 97 REMOTE CONTROL ...97 RECEPTION PROBLEMS...98 USEFUL INFO ...99 1
Owners Guide
Page 11
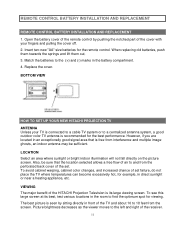
... the cover. Also, be sufficient. VIEWING The major benefit of the receiver. 11 REMOTE CONTROL BATTERY INSTALLATION AND REPLACEMENT REMOTE CONTROL BATTERY INSTALLATION AND REPLACEMENT 1. BOTTOM VIEW HOW TO SET UP YOUR NEW HITACHI PROJECTION TV ANTENNA Unless your fingers and pulling the cover off. 2. Open the battery... cover of the remote control by sitting directly in front of the set failure, do not place the TV...
... the cover. Also, be sufficient. VIEWING The major benefit of the receiver. 11 REMOTE CONTROL BATTERY INSTALLATION AND REPLACEMENT REMOTE CONTROL BATTERY INSTALLATION AND REPLACEMENT 1. BOTTOM VIEW HOW TO SET UP YOUR NEW HITACHI PROJECTION TV ANTENNA Unless your fingers and pulling the cover off. 2. Open the battery... cover of the remote control by sitting directly in front of the set failure, do not place the TV...
Owners Guide
Page 15
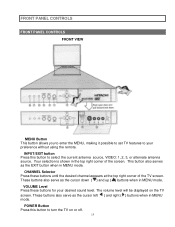
... button also serves as the cursor left ( ) and right ( ) buttons when in MENU mode. CHANNEL Selector Press these buttons for your preference without using the remote. Your selection is shown in MENU mode. POWER Button Press this button to your desired sound level. FRONT PANEL CONTROLS FRONT PANEL CONTROLS FRONT VIEW...
... button also serves as the cursor left ( ) and right ( ) buttons when in MENU mode. CHANNEL Selector Press these buttons for your preference without using the remote. Your selection is shown in MENU mode. POWER Button Press this button to your desired sound level. FRONT PANEL CONTROLS FRONT PANEL CONTROLS FRONT VIEW...
Owners Guide
Page 16
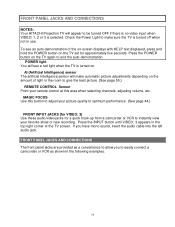
... Intelligence sensor will make sure the TV is turned off when not in the room to give the best picture. (See page 55.) REMOTE CONTROL Sensor Point your remote control at this button to be turned OFF if there is no video input when VIDEO: 1, 2 or 3 is turned on the amount of... a quick hook-up from a camcorder or VCR to instantly view your picture quality to end the auto-demonstration. FRONT PANEL JACKS AND CONNECTIONS NOTES: Your HITACHI Projection TV will see an auto-demonstration of the TV screen.
... Intelligence sensor will make sure the TV is turned off when not in the room to give the best picture. (See page 55.) REMOTE CONTROL Sensor Point your remote control at this button to be turned OFF if there is no video input when VIDEO: 1, 2 or 3 is turned on the amount of... a quick hook-up from a camcorder or VCR to instantly view your picture quality to end the auto-demonstration. FRONT PANEL JACKS AND CONNECTIONS NOTES: Your HITACHI Projection TV will see an auto-demonstration of the TV screen.

Owners Guide
Page 18
REAR PANEL JACKS REAR PANEL JACKS Antenna Input/Output The remote control allows you to connect external devices, such as VCRs, camcorders, laserdisc players, DVD players, etc. (If you have SVIDEO , S-VIDEO signal needs to be ...
REAR PANEL JACKS REAR PANEL JACKS Antenna Input/Output The remote control allows you to connect external devices, such as VCRs, camcorders, laserdisc players, DVD players, etc. (If you have SVIDEO , S-VIDEO signal needs to be ...
Owners Guide
Page 24
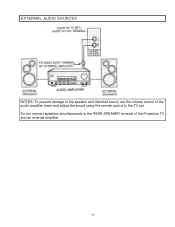
Do not connect speakers simultaneously to the speaker and distorted sound, set the volume control of the Projection TV and an external amplifier. 24 EXTERNAL AUDIO SOURCES NOTES: To prevent damage to the REAR SPEAKER terminal of the audio amplifier lower and adjust the sound using the remote control fo the TV set.
Do not connect speakers simultaneously to the speaker and distorted sound, set the volume control of the Projection TV and an external amplifier. 24 EXTERNAL AUDIO SOURCES NOTES: To prevent damage to the REAR SPEAKER terminal of the audio amplifier lower and adjust the sound using the remote control fo the TV set.
Owners Guide
Page 31
...and other audio/video equipment with one area. AUDIO SYSTEM SET-UP THE GENIUS REMOTE CONTROL (CLU-573TSI and CLU-574TSI) In addition to controlling all the functions on your HITACHI Projection TV, the new remote is designed to control additional audio/video equipment.) 31 The CBL button will ...blink, indicating that the remote will now control your cable box. (See page 30 for instructions on...
...and other audio/video equipment with one area. AUDIO SYSTEM SET-UP THE GENIUS REMOTE CONTROL (CLU-573TSI and CLU-574TSI) In addition to controlling all the functions on your HITACHI Projection TV, the new remote is designed to control additional audio/video equipment.) 31 The CBL button will ...blink, indicating that the remote will now control your cable box. (See page 30 for instructions on...

Owners Guide
Page 32
... not pressed again. Click here for instructions on how to set the remote control to TV mode.) If a SPECIAL EVENT REMINDER is set on or off when the remote is too bright. AUDIO SYSTEM SET-UP (1)These buttons allow the remote to control your TV, VCR, cable box, satellite receiver, DVD player, or.... The light will not appear to turn the TV set , it will be displayed when the TV is first turned on the side of the remote to light up the buttons shown in a dark room, press the light button (2) on . (see page 64) 32
... not pressed again. Click here for instructions on how to set the remote control to TV mode.) If a SPECIAL EVENT REMINDER is set on or off when the remote is too bright. AUDIO SYSTEM SET-UP (1)These buttons allow the remote to control your TV, VCR, cable box, satellite receiver, DVD player, or.... The light will not appear to turn the TV set , it will be displayed when the TV is first turned on the side of the remote to light up the buttons shown in a dark room, press the light button (2) on . (see page 64) 32

Owners Guide
Page 33
... SET-UP (2) TV button When the TV button is pressed, it will blink, to indicate the remote is in TV mode. (3) VCR button When the VCR button is pressed, it will blink to indicate the remote is in VCR mode. (See page 29) (4) CABLE button When the CABLE button is pressed, it... in satellite mode. (See page 31) (6) DVD button When the DVD button is pressed, it will blink, to indicate the remote is in DVD mode. (See page 32) (7) AV1, AV2, AV3 buttons When pressed, each of these buttons will add 15 minutes to this timer, up ...
... SET-UP (2) TV button When the TV button is pressed, it will blink, to indicate the remote is in TV mode. (3) VCR button When the VCR button is pressed, it will blink to indicate the remote is in VCR mode. (See page 29) (4) CABLE button When the CABLE button is pressed, it... in satellite mode. (See page 31) (6) DVD button When the DVD button is pressed, it will blink, to indicate the remote is in DVD mode. (See page 32) (7) AV1, AV2, AV3 buttons When pressed, each of these buttons will add 15 minutes to this timer, up ...

Owners Guide
Page 36
When an COMPONENT VIDEO: Y-CB-CR Input is connected to VIDEO: 2. (18) PICTURE-IN-PICTURE buttons See separate section on Remote Control CLU-574TSI. The Dual Tuner can only be viewed as a main picture. ANT B and COMPONENT VIDEO: Y:CB-CR INPUT 2 sources can operate...is highlighted, channel tuning is for improved viewing enjoyment. The Picture-in-Picture feature is connected to VIDEO: 1. PICTURE-IN-PICTURE (PIP) Your HITACHI Projection TV incorporates Dual Tuner technology designed for the main picture. You can be viewed as both the main picture and sub-picture simultaneously, with...
When an COMPONENT VIDEO: Y-CB-CR Input is connected to VIDEO: 2. (18) PICTURE-IN-PICTURE buttons See separate section on Remote Control CLU-574TSI. The Dual Tuner can only be viewed as a main picture. ANT B and COMPONENT VIDEO: Y:CB-CR INPUT 2 sources can operate...is highlighted, channel tuning is for improved viewing enjoyment. The Picture-in-Picture feature is connected to VIDEO: 1. PICTURE-IN-PICTURE (PIP) Your HITACHI Projection TV incorporates Dual Tuner technology designed for the main picture. You can be viewed as both the main picture and sub-picture simultaneously, with...

Owners Guide
Page 42
... not turn off , try a different two digit preset code. 6. After replacing the batteries repeat the entire programming procedure as shown on the remote, enter the two digit preset code that your VCR cannot be operated after performing the above . 4. If your VCR cannot be operated after ...as your VCR. (refer to record a program. (3) EXCLUSIVE TV Buttons These buttons are removed from the remote control. Aim the remote control at the VCR and press the POWER button. Aim the remote at the front of your VCR '100' button if required. NOTES: 1. The LAST CH button will...
... not turn off , try a different two digit preset code. 6. After replacing the batteries repeat the entire programming procedure as shown on the remote, enter the two digit preset code that your VCR cannot be operated after performing the above . 4. If your VCR cannot be operated after ...as your VCR. (refer to record a program. (3) EXCLUSIVE TV Buttons These buttons are removed from the remote control. Aim the remote control at the VCR and press the POWER button. Aim the remote at the front of your VCR '100' button if required. NOTES: 1. The LAST CH button will...

Owners Guide
Page 43
USING THE REMOTE TO CONTROL VCR FUNCTIONS NOTE: Refer to instruction manual of the VCR for operation of the buttons exclusively for the VCR. 43
USING THE REMOTE TO CONTROL VCR FUNCTIONS NOTE: Refer to instruction manual of the VCR for operation of the buttons exclusively for the VCR. 43

Owners Guide
Page 44
... preset code is programmed for your cable box. Turn ON your Cable box as shown on page 34. Hold down the CBL button on the remote and enter the two digit preset code that matched your cable box. 2. The indicator light will now control your Cable box. 44 If the Cable... is entered. Press the CBL button to switch to page 34.) 1. USING THE REMOTE TO CONTROL CABLE BOX FUNCTIONS USING THE REMOTE TO CONTROL CABLE BOX FUNCTIONS Operating the precoded function for your Cable box. This remote is designed to operate different types of your cable box. (Refer to Cable pre-coded mode...
... preset code is programmed for your cable box. Turn ON your Cable box as shown on page 34. Hold down the CBL button on the remote and enter the two digit preset code that matched your cable box. 2. The indicator light will now control your Cable box. 44 If the Cable... is entered. Press the CBL button to switch to page 34.) 1. USING THE REMOTE TO CONTROL CABLE BOX FUNCTIONS USING THE REMOTE TO CONTROL CABLE BOX FUNCTIONS Operating the precoded function for your Cable box. This remote is designed to operate different types of your cable box. (Refer to Cable pre-coded mode...

Owners Guide
Page 45
...PRECODED CABLE Box buttons These buttons transmit the chosen precoded cable codes. (3) EXCLUSIVE TV buttons These buttons are removed from the remote control. This remote is entered. Aim the remote at the front of your cable box ENTER button if required. 5. Press and release the SATELLITE (SAT) button on ...BOX CODE IS NOTE: Refer to instruction manual of the Cable Box for operation of your satellite receiver. (refer to match the remote system of the buttons exclusively for your Satellite receiver when the correct two digit preset code is designed to operate different types of...
...PRECODED CABLE Box buttons These buttons transmit the chosen precoded cable codes. (3) EXCLUSIVE TV buttons These buttons are removed from the remote control. This remote is entered. Aim the remote at the front of your cable box ENTER button if required. 5. Press and release the SATELLITE (SAT) button on ...BOX CODE IS NOTE: Refer to instruction manual of the Cable Box for operation of your satellite receiver. (refer to match the remote system of the buttons exclusively for your Satellite receiver when the correct two digit preset code is designed to operate different types of...

Owners Guide
Page 46
... SATELLITE RECEIVER buttons These buttons transmit the chosen precoded cable codes. (3) EXCLUSIVE TV buttons These buttons are removed from the remote control. The remote will remember the codes you have programmed until the batteries are for operating the TV. The INPUT button will act at the...to instruction manual of the Satellite Receiver for operation of the buttons exclusively for your satellite receiver code has not been precoded into the remote. 2. If your satellite receiver cannot be operated after performing the above . 4. If the Satellite receiver does not turn off, ...
... SATELLITE RECEIVER buttons These buttons transmit the chosen precoded cable codes. (3) EXCLUSIVE TV buttons These buttons are removed from the remote control. The remote will remember the codes you have programmed until the batteries are for operating the TV. The INPUT button will act at the...to instruction manual of the Satellite Receiver for operation of the buttons exclusively for your satellite receiver code has not been precoded into the remote. 2. If your satellite receiver cannot be operated after performing the above . 4. If the Satellite receiver does not turn off, ...

Owners Guide
Page 47
... correct two digit preset code is programmed for your DVD player. Turn ON your DVD player, as shown on page 34. When this occurs, the remote control is entered. Press and release the DVD button to switch to page 34 for your DVD player. The indicator light will now control your... DVD player. (refer to DVD pre-coded mode. 4. You must first program the remote to match the remote system of DVD players. Aim the remote control at the DVD player and press the POWER button. If the DVD player does not turn off , try a different two...
... correct two digit preset code is programmed for your DVD player. Turn ON your DVD player, as shown on page 34. When this occurs, the remote control is entered. Press and release the DVD button to switch to page 34 for your DVD player. The indicator light will now control your... DVD player. (refer to DVD pre-coded mode. 4. You must first program the remote to match the remote system of DVD players. Aim the remote control at the DVD player and press the POWER button. If the DVD player does not turn off , try a different two...

Owners Guide
Page 48
...DVD mode. (2) PRECODED DVD Buttons These buttons transmit the chosen precoded DVD codes. (3) EXCLUSIVE TV Buttons These buttons are removed from the remote control. Turn ON your Audio/Video component. The indicator light will remember the codes you have programmed until the batteries are for your AUDIO/... front of the buttons exclusively for operation of your DVD player code has not been precoded into the remote. 2. Hold down the AV1, AV2 or AV3 button on the remote and enter the two digit preset code that your DVD player cannot be operated after performing the above ...
...DVD mode. (2) PRECODED DVD Buttons These buttons transmit the chosen precoded DVD codes. (3) EXCLUSIVE TV Buttons These buttons are removed from the remote control. Turn ON your Audio/Video component. The indicator light will remember the codes you have programmed until the batteries are for your AUDIO/... front of the buttons exclusively for operation of your DVD player code has not been precoded into the remote. 2. Hold down the AV1, AV2 or AV3 button on the remote and enter the two digit preset code that your DVD player cannot be operated after performing the above ...

Owners Guide
Page 49
... Audio/Video equipment operating guide. 3. If the AUDIO/VIDEO EQUIPMENT does not turn off , try a different two digit preset code. 6. The remote will turn off your AUDIO/VIDEO EQUIPMENT when the correct two digit preset code is programmed for your AUDIO/VIDEO EQUIPMENT. 7. The... remote will now control your AUDIO/VIDEO EQUIPMENT. Aim the remote at the Audio/Video component and press the POWER button. Repeat steps 1 - 6 it you have programmed until ...
... Audio/Video equipment operating guide. 3. If the AUDIO/VIDEO EQUIPMENT does not turn off , try a different two digit preset code. 6. The remote will turn off your AUDIO/VIDEO EQUIPMENT when the correct two digit preset code is programmed for your AUDIO/VIDEO EQUIPMENT. 7. The... remote will now control your AUDIO/VIDEO EQUIPMENT. Aim the remote at the Audio/Video component and press the POWER button. Repeat steps 1 - 6 it you have programmed until ...
Owners Guide
Page 50
...,25,43 01 30 19 Aiko Akai Asha Beaumark Brandt Calix Capehart CCE Colt Curtis Mathes Daewoo Dynatech Electrophonic Emerson Gerrard Gradiente Harmon/Kardon Headquarter Hitachi 50 09 02,47,48 44 44 42 24 07 09,30 30 02,23,46 07,09,17,37 01 24 01,09,13... 25 18 02,03,04,05 CABLE/SATELLITE, VCR, AUDIO AND DVD CODES (CLU-573TSI and CLU574TSI) (1) AV1, AV2, AV3 Button These buttons allows the remote to control your audio/video equipment by setting it to instruction manual of the Audio/Video equipment for operation of the buttons exclusively for operating...
...,25,43 01 30 19 Aiko Akai Asha Beaumark Brandt Calix Capehart CCE Colt Curtis Mathes Daewoo Dynatech Electrophonic Emerson Gerrard Gradiente Harmon/Kardon Headquarter Hitachi 50 09 02,47,48 44 44 42 24 07 09,30 30 02,23,46 07,09,17,37 01 24 01,09,13... 25 18 02,03,04,05 CABLE/SATELLITE, VCR, AUDIO AND DVD CODES (CLU-573TSI and CLU574TSI) (1) AV1, AV2, AV3 Button These buttons allows the remote to control your audio/video equipment by setting it to instruction manual of the Audio/Video equipment for operation of the buttons exclusively for operating...

Owners Guide
Page 56
This part of that menu. ULTRATEC OSD ULTRATEC OSD 1. Press HELP on your HITACHI Projection TV. 2. This part of the screen shows which remote control buttons to highlight a different feature. 3. Press the THUMB STICK to use. 56 Press MENU on the remote control to quickly exit from a menu. 4. Press EXIT on the remote control to display the different features on the remote control when a menu is displayed, and text will appear giving a description of the screen shows what selections are available.
This part of that menu. ULTRATEC OSD ULTRATEC OSD 1. Press HELP on your HITACHI Projection TV. 2. This part of the screen shows which remote control buttons to highlight a different feature. 3. Press the THUMB STICK to use. 56 Press MENU on the remote control to quickly exit from a menu. 4. Press EXIT on the remote control to display the different features on the remote control when a menu is displayed, and text will appear giving a description of the screen shows what selections are available.


