Owners Guide
Page 3
... force to the point of time. 14. ed to qualified service personnel. Read these instructions. 3. et, or table specified by TV stations and cable companies, as well as programs from other . Do not use the attachments/accessories specified by the manufacturer. 17. ticularly...practical. Follow instructions for replacement of the NEC that produce heat. 9. Keep these instructions. 2. Follow all servicing to call "1-800-HITACHI". Do not block any way, such as to comply with respect to proper grounding for the mast and supporting structure, grounding of...
... force to the point of time. 14. ed to qualified service personnel. Read these instructions. 3. et, or table specified by TV stations and cable companies, as well as programs from other . Do not use the attachments/accessories specified by the manufacturer. 17. ticularly...practical. Follow instructions for replacement of the NEC that produce heat. 9. Keep these instructions. 2. Follow all servicing to call "1-800-HITACHI". Do not block any way, such as to comply with respect to proper grounding for the mast and supporting structure, grounding of...
Owners Guide
Page 4
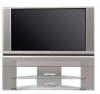
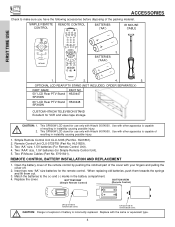
...("AA") IR MOUSE CABLE 3. This SPX50W LCD stand for use only with Hitachi 60VX500. Use with other apparatus is capable of resulting in instability causing possible injury.... (Part No. SELECT VOL + MUTE CH - MENU EXIT FAV CH ANT POWER REMOTE CONTROL POWER TV DVD VCR CBL SOURCE WIZARD CD PVR STB AMP 1 2 3 4 5 6 7 8 9 ...Hitachi 50VX500. Match the batteries to remove back cover. CAUTION: 1. OPTIONAL LCD REAR PTV STAND (NOT INCLUDED, ORDER SEPARATELY) PART NAME PART NO. 50" LCD Rear PTV Stand H520447 SPX50W 60" LCD Rear PTV Stand H520448 SPX60W CUSTOM HITACHI...
...("AA") IR MOUSE CABLE 3. This SPX50W LCD stand for use only with Hitachi 60VX500. Use with other apparatus is capable of resulting in instability causing possible injury.... (Part No. SELECT VOL + MUTE CH - MENU EXIT FAV CH ANT POWER REMOTE CONTROL POWER TV DVD VCR CBL SOURCE WIZARD CD PVR STB AMP 1 2 3 4 5 6 7 8 9 ...Hitachi 50VX500. Match the batteries to remove back cover. CAUTION: 1. OPTIONAL LCD REAR PTV STAND (NOT INCLUDED, ORDER SEPARATELY) PART NAME PART NO. 50" LCD Rear PTV Stand H520447 SPX50W 60" LCD Rear PTV Stand H520448 SPX60W CUSTOM HITACHI...
Owners Guide
Page 5
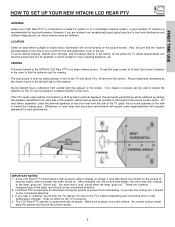
... speaker placement for best performance. FIRST TIME USE HOW TO SET UP YOUR NEW HITACHI LCD REAR PTV ANTENNA Unless your LCD Rear PTV is connected to a cable TV system or to a centralized antenna system, a good outdoor TV antenna is recommended for best performance. Also, be considered defective. 3. VIEWING The ... image, it on . These are located in a different section of the HITACHI LCD Rear PTV is free from the screen. However, if you hear a "cracking" sound from the TV cabinet, it is due to the TV's cabinet expanding and contracting due to place it may take about 10 to ...
... speaker placement for best performance. FIRST TIME USE HOW TO SET UP YOUR NEW HITACHI LCD REAR PTV ANTENNA Unless your LCD Rear PTV is connected to a cable TV system or to a centralized antenna system, a good outdoor TV antenna is recommended for best performance. Also, be considered defective. 3. VIEWING The ... image, it on . These are located in a different section of the HITACHI LCD Rear PTV is free from the screen. However, if you hear a "cracking" sound from the TV cabinet, it is due to the TV's cabinet expanding and contracting due to place it may take about 10 to ...
Owners Guide
Page 6
...connected Attach an optional antenna cable mixer to the TV antenna terminal, and connect the cables to the ANT A (75-Ohm) terminal. disc players with an S-Video feature in front of the IR sensor of the VHF or UHF adapter. ANTENNA CONNECTIONS TO REAR JACK PANEL VHF (75-Ohm) antenna/CATV ...(Cable TV) When using the A/V Network feature. When both VHF and UHF antennas are illustrations and names of your...
...connected Attach an optional antenna cable mixer to the TV antenna terminal, and connect the cables to the ANT A (75-Ohm) terminal. disc players with an S-Video feature in front of the IR sensor of the VHF or UHF adapter. ANTENNA CONNECTIONS TO REAR JACK PANEL VHF (75-Ohm) antenna/CATV ...(Cable TV) When using the A/V Network feature. When both VHF and UHF antennas are illustrations and names of your...

Owners Guide
Page 7
...antenna source, press the ANT button on your remote control. ቤ CHANNEL selector Press these buttons until VIDEO: 5 appears in MENU mode. When the TV power is turned OFF at the level it from a camcorder or VCR to instantly view your Photo memory card to select the current antenna source... recording. These buttons also serve as the cursor down (̄) and up from your preference without using the remote. Below are trademarks of the TV screen. The volume level will be at a volume level 31 or greater, the volume level will be displayed on the front control panel until...
...antenna source, press the ANT button on your remote control. ቤ CHANNEL selector Press these buttons until VIDEO: 5 appears in MENU mode. When the TV power is turned OFF at the level it from a camcorder or VCR to instantly view your Photo memory card to select the current antenna source... recording. These buttons also serve as the cursor down (̄) and up from your preference without using the remote. Below are trademarks of the TV screen. The volume level will be at a volume level 31 or greater, the volume level will be displayed on the front control panel until...

Owners Guide
Page 8
...This light is not lit (OFF) when you hear the cooling fan, it should not be considered defective. 3. NOTES: 1. Your Hitachi LCD Rear Projection Television has an internal lamp that lights up . See page 69-72 for proper part. If light is blinking, lamp cover is... to input 1 ~ input 5 and the video signal is not received from the TV cabinet, it may appear to be considered defective. 4. Consult your Hitachi dealer for lamp replacement procedure. Your Hitachi LCD Rear Projection Television may take about 2 minutes to prevent from overheating. POWER TEMP LAMP 3. It...
...This light is not lit (OFF) when you hear the cooling fan, it should not be considered defective. 3. NOTES: 1. Your Hitachi LCD Rear Projection Television has an internal lamp that lights up . See page 69-72 for proper part. If light is blinking, lamp cover is... to input 1 ~ input 5 and the video signal is not received from the TV cabinet, it may appear to be considered defective. 4. Consult your Hitachi dealer for lamp replacement procedure. Your Hitachi LCD Rear Projection Television may take about 2 minutes to prevent from overheating. POWER TEMP LAMP 3. It...

Owners Guide
Page 9
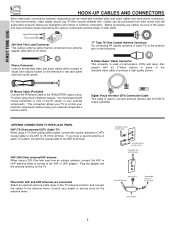
If you to easily connect a camcorder or VCR as shown in place of your TV. 9 If you have a mono VCR, insert the audio cable into the left audio jack of the standard video cable. 3. FIRST TIME USE FRONT PANEL JACKS ...
If you to easily connect a camcorder or VCR as shown in place of your TV. 9 If you have a mono VCR, insert the audio cable into the left audio jack of the standard video cable. 3. FIRST TIME USE FRONT PANEL JACKS ...
Owners Guide
Page 10
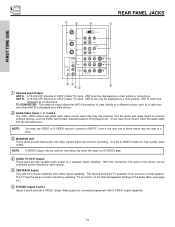
...one of the Audio Menu (see page 51). ቧ S-VIDEO Inputs 3 and 4 Inputs 3 and 4 provide S-VIDEO (Super Video) jacks for recording. FIRST TIME USE REAR PANEL JACKS ቢ ባ ቪ ቨ ANT A TO CONVERTER ANT B INPUT 1 INPUT 2 DVI-HDTV PR PB Y R (MONO)/L AUDIO PR PB Y/... video output. ANT B- Use the S-VIDEO Output for stereo amplifiers with S-VIDEO output capability. 10 NOTE: S-VIDEO output may be controlled by selecting "TV as a main picture. ባ Audio/Video Inputs 1, 2, 3 and 4 The VID1~VID4 buttons will select each video source each time they are...
...one of the Audio Menu (see page 51). ቧ S-VIDEO Inputs 3 and 4 Inputs 3 and 4 provide S-VIDEO (Super Video) jacks for recording. FIRST TIME USE REAR PANEL JACKS ቢ ባ ቪ ቨ ANT A TO CONVERTER ANT B INPUT 1 INPUT 2 DVI-HDTV PR PB Y R (MONO)/L AUDIO PR PB Y/... video output. ANT B- Use the S-VIDEO Output for stereo amplifiers with S-VIDEO output capability. 10 NOTE: S-VIDEO output may be controlled by selecting "TV as a main picture. ባ Audio/Video Inputs 1, 2, 3 and 4 The VID1~VID4 buttons will select each video source each time they are...
Owners Guide
Page 11
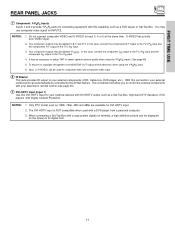
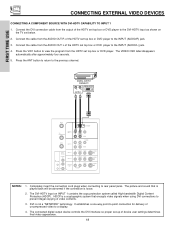
... as a DVD player or Set Top Box. It may be used with this case, connect the component CB output to the TV's PB input and the component CR output to the TV's PR input. 3. This connection will be labeled Y, B-Y, and R-Y. You may be abnormal, when using the Y-PBPR inputs. (See...composite video and component video input. ቩ IR Blaster This jack provides IR output to Input 3, 4 or 5 at the same time. FIRST TIME USE REAR PANEL JACKS ቨ Component: Y-PBPR Inputs Inputs 1 and 2 provide Y-PBPR jacks for connecting equipment with a DVD player from a personal computer. 3.
... as a DVD player or Set Top Box. It may be used with this case, connect the component CB output to the TV's PB input and the component CR output to the TV's PR input. 3. This connection will be labeled Y, B-Y, and R-Y. You may be abnormal, when using the Y-PBPR inputs. (See...composite video and component video input. ቩ IR Blaster This jack provides IR output to Input 3, 4 or 5 at the same time. FIRST TIME USE REAR PANEL JACKS ቨ Component: Y-PBPR Inputs Inputs 1 and 2 provide Y-PBPR jacks for connecting equipment with a DVD player from a personal computer. 3.
Owners Guide
Page 12
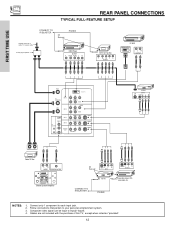
... to Input2~Input5. 4. Connect only 1 component to each input jack. 2. FIRST TIME USE REAR PANEL CONNECTIONS TYPICAL FULL-FEATURE SETUP Outside antenna or cable TV coaxial cable 2-Way signal splitter CONNECT TO IR BLASTER IR Sensor (Provided) DVD Player OUTPUT Y... MONITOR OUT R (MONO)/L VIDEO R (MONO)/L VIDEO R L VIDEO AUDIO S-VIDEO S-VIDEO S-VIDEO VCR #1 ANT OUTPUT IN S-VIDEO V L R OUTPUT INPUT Cable TV Box LR INPUT CENTER OUTPUT Stereo System Amplifier IR Sensor S-VIDEO V L R INPUT S-VIDEO V L R OUTPUT CONNECT TO IR BLASTER VCR #2 (Provided) Laserdisc player,...
... to Input2~Input5. 4. Connect only 1 component to each input jack. 2. FIRST TIME USE REAR PANEL CONNECTIONS TYPICAL FULL-FEATURE SETUP Outside antenna or cable TV coaxial cable 2-Way signal splitter CONNECT TO IR BLASTER IR Sensor (Provided) DVD Player OUTPUT Y... MONITOR OUT R (MONO)/L VIDEO R (MONO)/L VIDEO R L VIDEO AUDIO S-VIDEO S-VIDEO S-VIDEO VCR #1 ANT OUTPUT IN S-VIDEO V L R OUTPUT INPUT Cable TV Box LR INPUT CENTER OUTPUT Stereo System Amplifier IR Sensor S-VIDEO V L R INPUT S-VIDEO V L R OUTPUT CONNECT TO IR BLASTER VCR #2 (Provided) Laserdisc player,...
Owners Guide
Page 13
...inputs to connect to Input 3, Input 4 or Input 5, but note that have this case, connect the components B-Y output to the TV's PB input and the components R-Y output to the TV's PR input. • Your component outputs may use a 1080i or 720p input signal. 13 Use these may be used for VCR... 2 accepts both composite and component video signals. • Your component outputs may be labeled Y, B-Y, and R-Y. In this feature. FIRST TIME USE TIPS ON REAR PANEL CONNECTIONS • S-VIDEO connections are provided for high performance laserdisc players, VCRs etc. top-boxes.
...inputs to connect to Input 3, Input 4 or Input 5, but note that have this case, connect the components B-Y output to the TV's PB input and the components R-Y output to the TV's PR input. • Your component outputs may use a 1080i or 720p input signal. 13 Use these may be used for VCR... 2 accepts both composite and component video signals. • Your component outputs may be labeled Y, B-Y, and R-Y. In this feature. FIRST TIME USE TIPS ON REAR PANEL CONNECTIONS • S-VIDEO connections are provided for high performance laserdisc players, VCRs etc. top-boxes.
Owners Guide
Page 14
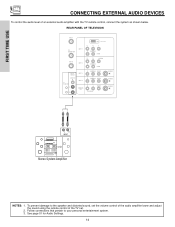
REAR PANEL OF TELEVISION ANT A TO CONVERTER ANT B INPUT 1 INPUT 2 DVI-HDTV PR PB Y R (MONO)/L AUDIO PR PB Y/VIDEO R (MONO)/L AUDIO AUDIO TO HI-FI CENTER ... sound, set the volume control of the audio amplifier lower and adjust the sound using the remote control of an external audio amplifier with the TV remote control, connect the system as shown below. FIRST TIME USE CONNECTING EXTERNAL AUDIO DEVICES To control the audio level of the...
REAR PANEL OF TELEVISION ANT A TO CONVERTER ANT B INPUT 1 INPUT 2 DVI-HDTV PR PB Y R (MONO)/L AUDIO PR PB Y/VIDEO R (MONO)/L AUDIO AUDIO TO HI-FI CENTER ... sound, set the volume control of the audio amplifier lower and adjust the sound using the remote control of an external audio amplifier with the TV remote control, connect the system as shown below. FIRST TIME USE CONNECTING EXTERNAL AUDIO DEVICES To control the audio level of the...

Owners Guide
Page 15
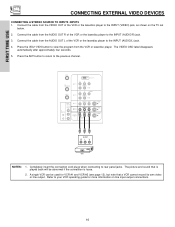
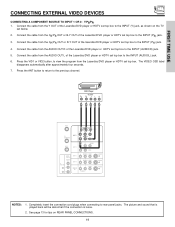
... audio cables should be OFF. 2. Connect an external source to the INPUT terminal, then press the VID1~VID5 button as shown below . 2. When the TV is set to VIDEO and a video signal is pressed as necessary to the INPUT (VIDEO) jack, as suggestions. Before Operating External Video Source The input... of the VCR or the laserdisc player to be made from coaxial shielded wire. is not connected or the video device is dependent on the TV set will appear to the INPUT (MONO)/L(AUDIO) jack. 3. Press the VID2~VID5 button to the previous channel. FIRST TIME USE CONNECTING EXTERNAL ...
... audio cables should be OFF. 2. Connect an external source to the INPUT terminal, then press the VID1~VID5 button as shown below . 2. When the TV is set to VIDEO and a video signal is pressed as necessary to the INPUT (VIDEO) jack, as suggestions. Before Operating External Video Source The input... of the VCR or the laserdisc player to be made from coaxial shielded wire. is not connected or the video device is dependent on the TV set will appear to the INPUT (MONO)/L(AUDIO) jack. 3. Press the VID2~VID5 button to the previous channel. FIRST TIME USE CONNECTING EXTERNAL ...
Owners Guide
Page 16
...OUTPUT RL V VCR NOTES: 1. A single VCR can be abnormal if the connection is played back will be used for more information on the TV set below. 2. Press the VID2~VID5 button to the INPUT (AUDIO/L) jack. 4. The VIDEO OSD label disappears automatically after approximately four seconds.... 5. Connect the cable from the AUDIO OUT R of the VCR or the laserdisc player to rear panel jacks. Completely insert the connection cord plugs when connecting to the INPUT (VIDEO) jack, as shown on line input-output connections. ...
...OUTPUT RL V VCR NOTES: 1. A single VCR can be abnormal if the connection is played back will be used for more information on the TV set below. 2. Press the VID2~VID5 button to the INPUT (AUDIO/L) jack. 4. The VIDEO OSD label disappears automatically after approximately four seconds.... 5. Connect the cable from the AUDIO OUT R of the VCR or the laserdisc player to rear panel jacks. Completely insert the connection cord plugs when connecting to the INPUT (VIDEO) jack, as shown on line input-output connections. ...

Owners Guide
Page 17
... for VCR #1 and VCR #2 (see page 12), but note that is played back will be used for more information on the TV set below. 2. Press the ANT button to return to rear panel jacks. Refer to the INPUT (AUDIO/L) jack. 4. The picture and sound that a VCR cannot record its own video or...
... for VCR #1 and VCR #2 (see page 12), but note that is played back will be used for more information on the TV set below. 2. Press the ANT button to return to rear panel jacks. Refer to the INPUT (AUDIO/L) jack. 4. The picture and sound that a VCR cannot record its own video or...
Owners Guide
Page 18
...channel. It establishes a one-way point-to-point connection for delivery of the HDTV set top box or DVD player. Press the VID1 button to rear panel jacks. Completely insert the connection cord plugs when connecting to view the program from the AUDIO OUT L of uncompressed video to the INPUT (...AUDIO/L) jack. 4. DVI is loose. 2. Connect the DVI connection cable from the AUDIO OUT R of the HDTV set below. 2. The DVI-HDTV input on the TV set top box or DVD player to the INPUT (AUDIO/R) jack. 3. Connect the cable from the output of the HDTV set -up of video contents...
...channel. It establishes a one-way point-to-point connection for delivery of the HDTV set top box or DVD player. Press the VID1 button to rear panel jacks. Completely insert the connection cord plugs when connecting to view the program from the AUDIO OUT L of uncompressed video to the INPUT (...AUDIO/L) jack. 4. DVI is loose. 2. Connect the DVI connection cable from the AUDIO OUT R of the HDTV set below. 2. The DVI-HDTV input on the TV set top box or DVD player to the INPUT (AUDIO/R) jack. 3. Connect the cable from the output of the HDTV set -up of video contents...
Owners Guide
Page 19
... loose. 2. Connect the cable from the Laserdisc/DVD player or HDTV set top box to the previous channel. See page 13 for tips on the TV set top box to the INPUT (AUDIO/L) jack. 6. Press the ANT button to return to the INPUT (Y) jack, as shown on... REAR PANEL CONNECTIONS. 19 Press the VID1 or VID2 button, to rear panel jacks. Completely insert the connection cord plugs when connecting to view the program from the Y OUT of the Laserdisc...
... loose. 2. Connect the cable from the Laserdisc/DVD player or HDTV set top box to the previous channel. See page 13 for tips on the TV set top box to the INPUT (AUDIO/L) jack. 6. Press the ANT button to return to the INPUT (Y) jack, as shown on... REAR PANEL CONNECTIONS. 19 Press the VID1 or VID2 button, to rear panel jacks. Completely insert the connection cord plugs when connecting to view the program from the Y OUT of the Laserdisc...
Owners Guide
Page 20
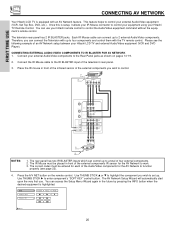
FIRST TIME USE CONNECTING AV NETWORK Your Hitachi LCD TV is equipped with up to function properly (see the following example of the external components you wish to enter component's "SOFT KEY" control button. The television rear panel has 2 IR BLASTER jacks. Each IR Mouse cable can connect up to .... Therefore, you wish to set up to a total of the external components IR sensor for the AV Network to the Rear Panel jacks as shown on the remote control. Connect your Hitachi TV Remote Control. IR Sensor IR Mouse DVD Player OUTPUT PR/CR PB/CB Y L R ANT A TO CONVERTER INPUT 1...
FIRST TIME USE CONNECTING AV NETWORK Your Hitachi LCD TV is equipped with up to function properly (see the following example of the external components you wish to enter component's "SOFT KEY" control button. The television rear panel has 2 IR BLASTER jacks. Each IR Mouse cable can connect up to .... Therefore, you wish to set up to a total of the external components IR sensor for the AV Network to the Rear Panel jacks as shown on the remote control. Connect your Hitachi TV Remote Control. IR Sensor IR Mouse DVD Player OUTPUT PR/CR PB/CB Y L R ANT A TO CONVERTER INPUT 1...
Owners Guide
Page 21
...your equipment receiver cannot be operated after performing the above procedures, your AV Network. 7. HITACHI AV NET SET UP DVD Device Code Video Input Audio Input 0 6 7 2 (Enter code "9999" to uninstall) Input 1 Using TV Transmission Test BACK POWER OK PLAY EXIT Move Set Input SEL Select CH UP THUMB ... Code 0672 Video INPUT 1 Not Setup Not Setup Not Setup Not Setup Not Setup Not Setup Audio Using TV Not Setup Not Setup Not Setup Not Setup Not Setup Not Setup EXIT SEL Select 6. HITACHI AV NET SET UP DVD Device Code Video Input Audio Input 0 6 7 2 (Enter code "9999" to...
...your equipment receiver cannot be operated after performing the above procedures, your AV Network. 7. HITACHI AV NET SET UP DVD Device Code Video Input Audio Input 0 6 7 2 (Enter code "9999" to uninstall) Input 1 Using TV Transmission Test BACK POWER OK PLAY EXIT Move Set Input SEL Select CH UP THUMB ... Code 0672 Video INPUT 1 Not Setup Not Setup Not Setup Not Setup Not Setup Not Setup Audio Using TV Not Setup Not Setup Not Setup Not Setup Not Setup Not Setup EXIT SEL Select 6. HITACHI AV NET SET UP DVD Device Code Video Input Audio Input 0 6 7 2 (Enter code "9999" to...
Owners Guide
Page 23
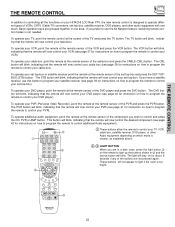
... remote will now control your VCR (see page 40 for instructions on how to program the remote to control additional Audio equipment). ቢ POWER ባ TV DVD VCR CBL SOURCE WIZARD CD PVR STB AMP 1 2 3 4 5 6 ቤ 7 8 9 SLEEP C.C. The CBL button will blink, indicating that ... THE REMOTE CONTROL THE REMOTE CONTROL In addition to controlling all the functions on your HITACHI LCD Rear PTV, the new remote control is designed to operate different types of VCRs, CATV (Cable TV) converters, set-top-box, satellite receiver, DVD players, and other Audio equipment depending...
... remote will now control your VCR (see page 40 for instructions on how to program the remote to control additional Audio equipment). ቢ POWER ባ TV DVD VCR CBL SOURCE WIZARD CD PVR STB AMP 1 2 3 4 5 6 ቤ 7 8 9 SLEEP C.C. The CBL button will blink, indicating that ... THE REMOTE CONTROL THE REMOTE CONTROL In addition to controlling all the functions on your HITACHI LCD Rear PTV, the new remote control is designed to operate different types of VCRs, CATV (Cable TV) converters, set-top-box, satellite receiver, DVD players, and other Audio equipment depending...


