Owners Guide
Page 6
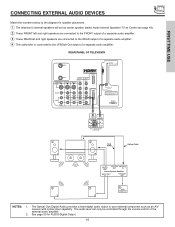
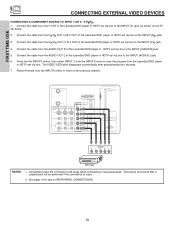
... on all standard video and audio cables which connect to inputs and outputs located on the television. "F" Type 75-Ohm Coaxial Antenna Connector For connecting RF signals (antenna or cable TV) to the antenna jack on the television's rear jack panel and front control panel. Plug the adapter into... UHF adapter. Optical Cable This cable is used to connect to the RS232C input located on the rear panel so you have phono connectors. Below are connected Attach an optional antenna cable mixer to the TV antenna terminal, and connect the cables to connect your external devices such as ...
... on all standard video and audio cables which connect to inputs and outputs located on the television. "F" Type 75-Ohm Coaxial Antenna Connector For connecting RF signals (antenna or cable TV) to the antenna jack on the television's rear jack panel and front control panel. Plug the adapter into... UHF adapter. Optical Cable This cable is used to connect to the RS232C input located on the rear panel so you have phono connectors. Below are connected Attach an optional antenna cable mixer to the TV antenna terminal, and connect the cables to connect your external devices such as ...

Owners Guide
Page 7
... using the remote control, point it towards the screen for best response. ቩ POWER button Press this button to display the input menu, Ant A/B, INPUT:1,2,3,4,5 or Photo Input. When the TV power is turned OFF at a volume level 31 or greater, the volume level will be at the level it was set when... the TV is turned ON. ቦ SIDE INPUT JACKS (INPUT 5) Use these buttons for your desired sound level. When using the remote. These buttons also serve as the cursor down (̄)...
... using the remote control, point it towards the screen for best response. ቩ POWER button Press this button to display the input menu, Ant A/B, INPUT:1,2,3,4,5 or Photo Input. When the TV power is turned OFF at a volume level 31 or greater, the volume level will be at the level it was set when... the TV is turned ON. ቦ SIDE INPUT JACKS (INPUT 5) Use these buttons for your desired sound level. When using the remote. These buttons also serve as the cursor down (̄)...
Owners Guide
Page 8
... BLINKING LONG BLINKING TV CAN'T RECEIVE ANY REMOTE CONTROL BUTTONS BY POWER OFF SEQENCE TV EXECUTING THE INITIAL DIGITAL TUNING 2. Make sure to input 1 ~ input 5 and the video signal is cooling down . Check assembly condition of manufacturer. 8 POWER TEMP LAMP 3. Consult your Hitachi dealer for long ... light is lit, the lamp has failed. Light Blinking Slowly (2 seconds): television lamp is not received from the input jacks. Your Hitachi LCD Rear Projection Television may appear to be OFF when it is off the Power when you are blinking in the order below, ...
... BLINKING LONG BLINKING TV CAN'T RECEIVE ANY REMOTE CONTROL BUTTONS BY POWER OFF SEQENCE TV EXECUTING THE INITIAL DIGITAL TUNING 2. Make sure to input 1 ~ input 5 and the video signal is cooling down . Check assembly condition of manufacturer. 8 POWER TEMP LAMP 3. Consult your Hitachi dealer for long ... light is lit, the lamp has failed. Light Blinking Slowly (2 seconds): television lamp is not received from the input jacks. Your Hitachi LCD Rear Projection Television may appear to be OFF when it is off the Power when you are blinking in the order below, ...
Owners Guide
Page 9
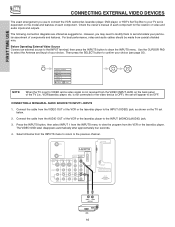
... a mono VCR, insert the audio cable into the left audio jack of your TV. If you have a S-VHS VCR, use the S-INPUT cable in the following examples: PHOTO INPUT INPUT 5 S-VIDEO VIDEO L/MONO AUDIO R PHOTO INPUT INPUT 5 S-VIDEO VIDEO L/MONO AUDIO R NOTE: 1. PHOTO INPUT USB CABLE First, connect your digital camera to view digital still pictures from...
... a mono VCR, insert the audio cable into the left audio jack of your TV. If you have a S-VHS VCR, use the S-INPUT cable in the following examples: PHOTO INPUT INPUT 5 S-VIDEO VIDEO L/MONO AUDIO R PHOTO INPUT INPUT 5 S-VIDEO VIDEO L/MONO AUDIO R NOTE: 1. PHOTO INPUT USB CABLE First, connect your digital camera to view digital still pictures from...
Owners Guide
Page 10
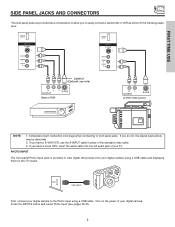
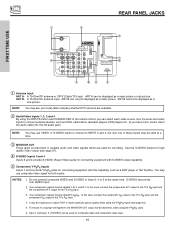
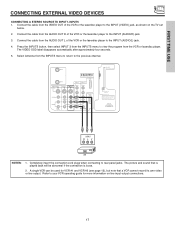
...B can be used for both inputs. Do not connect composite VIDEO and S-VIDEO to INPUT 3 and 4, but only one of U.S. In this case, connect the component CB output to the TV's PB input and the component CR output to the TV's PR input. 3. REAR PANEL JACKS FIRST TIME USE &#...4706; ቦ ANT A CableCARD (Top of card faces right) ቭ ቤ ብ ANT B MONITOR OUT S-VIDEO INPUT 4 INPUT 3 INPUT 2 Y/ VIDEO PB INPUT 1 Y/ VIDEO PB HDMI 1...
...B can be used for both inputs. Do not connect composite VIDEO and S-VIDEO to INPUT 3 and 4, but only one of U.S. In this case, connect the component CB output to the TV's PB input and the component CR output to the TV's PR input. 3. REAR PANEL JACKS FIRST TIME USE &#...4706; ቦ ANT A CableCARD (Top of card faces right) ቭ ቤ ብ ANT B MONITOR OUT S-VIDEO INPUT 4 INPUT 3 INPUT 2 Y/ VIDEO PB INPUT 1 Y/ VIDEO PB HDMI 1...
Owners Guide
Page 11
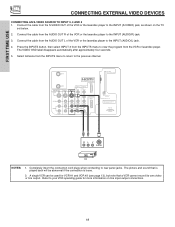
FIRST TIME USE REAR PANEL JACKS ቧ HDMI1 (High Definition Multimedia Interface) (INPUT 1) About HDMI HDMI is Dolby® Digital and PCM compatible, such as an audio amplifier. NOTES: 1. "Dolby" and the double-D symbol are trademarks of the... Set-Top-Boxes or DVD players equipped with center signal output capability. This feature allows the TV speakers to your TV. Hitachi will notify you if a software upgrade is not intended for consumer electronics. Use the HDMI input for your external devices such as 1080i, 720p, 480i and 480p are trademarks or registered trademarks...
FIRST TIME USE REAR PANEL JACKS ቧ HDMI1 (High Definition Multimedia Interface) (INPUT 1) About HDMI HDMI is Dolby® Digital and PCM compatible, such as an audio amplifier. NOTES: 1. "Dolby" and the double-D symbol are trademarks of the... Set-Top-Boxes or DVD players equipped with center signal output capability. This feature allows the TV speakers to your TV. Hitachi will notify you if a software upgrade is not intended for consumer electronics. Use the HDMI input for your external devices such as 1080i, 720p, 480i and 480p are trademarks or registered trademarks...

Owners Guide
Page 12
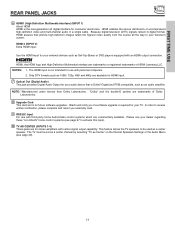
...Digital Cable ANT A CableCARD (Top of card faces right) ANT B MONITOR OUT S-VIDEO INPUT 4 INPUT 3 INPUT 2 Y/ VIDEO PB INPUT 1 Y/ VIDEO PB VIDEO L AUDIO R AUDIO TO HI-FI PR PR (MONO) (MONO) (MONO) (MONO) TV AS CENTER CableCARD HDMIIN1SERT THIS END HDMI 2 OPTICAL OUT Digital Audio Upgrade Card Apparatus Claims ...-456-789-1 Not an Authorized Channel Press EXIT to return Please take note of U.S. The third screen below appears. FIRST TIME USE REAR PANEL JACKS ቭ CableCARD Slot This slot is for the CableCARD that will allow you will appear if a channel is not authorized ...
...Digital Cable ANT A CableCARD (Top of card faces right) ANT B MONITOR OUT S-VIDEO INPUT 4 INPUT 3 INPUT 2 Y/ VIDEO PB INPUT 1 Y/ VIDEO PB VIDEO L AUDIO R AUDIO TO HI-FI PR PR (MONO) (MONO) (MONO) (MONO) TV AS CENTER CableCARD HDMIIN1SERT THIS END HDMI 2 OPTICAL OUT Digital Audio Upgrade Card Apparatus Claims ...-456-789-1 Not an Authorized Channel Press EXIT to return Please take note of U.S. The third screen below appears. FIRST TIME USE REAR PANEL JACKS ቭ CableCARD Slot This slot is for the CableCARD that will allow you will appear if a channel is not authorized ...
Owners Guide
Page 13
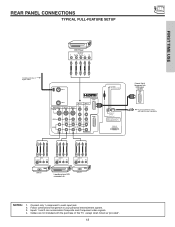
... HDMI OUT To an amplifier/receiver with the purchase of U.S. Follow connections that pertain to each input jack. 2. Connect only 1 component to your personal entertainment system. 3. REAR PANEL CONNECTIONS TYPICAL FULL-FEATURE SETUP FIRST TIME USE DVD Player OUTPUT Y PB/CB PR/CR ...L R Outside antenna or digital cable ANT A ANT B MONITOR OUT S-VIDEO INPUT 4 INPUT 3 INPUT 2 Y/ VIDEO PB INPUT 1 Y/ VIDEO PB HDMI 1 VIDEO L AUDIO R AUDIO TO HI-FI PR PR (MONO) (MONO) (MONO) (MONO) TV AS CENTER HDMI 2 CableCARD (Top of card faces right) OPTICAL OUT Digital Audio...
... HDMI OUT To an amplifier/receiver with the purchase of U.S. Follow connections that pertain to each input jack. 2. Connect only 1 component to your personal entertainment system. 3. REAR PANEL CONNECTIONS TYPICAL FULL-FEATURE SETUP FIRST TIME USE DVD Player OUTPUT Y PB/CB PR/CR ...L R Outside antenna or digital cable ANT A ANT B MONITOR OUT S-VIDEO INPUT 4 INPUT 3 INPUT 2 Y/ VIDEO PB INPUT 1 Y/ VIDEO PB HDMI 1 VIDEO L AUDIO R AUDIO TO HI-FI PR PR (MONO) (MONO) (MONO) (MONO) TV AS CENTER HDMI 2 CableCARD (Top of card faces right) OPTICAL OUT Digital Audio...
Owners Guide
Page 14
... your device has this case, connect the components CB output to the TV's PB input and the components CR output to the TV's PR input. • You may be labeled Y, B-Y, and R-Y. FIRST TIME USE TIPS ON REAR PANEL CONNECTIONS • S-VIDEO, HDMI and component connections are provided for... high performance components, such as DVD players and set- In this case, connect the components B-Y output to the TV's PB input and the components R-Y output to your device has...
... your device has this case, connect the components CB output to the TV's PB input and the components CR output to the TV's PR input. • You may be labeled Y, B-Y, and R-Y. FIRST TIME USE TIPS ON REAR PANEL CONNECTIONS • S-VIDEO, HDMI and component connections are provided for... high performance components, such as DVD players and set- In this case, connect the components B-Y output to the TV's PB input and the components R-Y output to your device has...
Owners Guide
Page 15
... speakers will act as center speaker (select Audio-Internal Speakers-TV as an A/V receiver with optical input capability. See page 50 for limited viewing uses only. REAR PANEL OF TELEVISION ANT A ANT B MONITOR OUT S-VIDEO INPUT 4 INPUT 3 INPUT 2 Y/ VIDEO INPUT 1 Y/ VIDEO PB PB HDMI 1 VIDEO L AUDIO R... AUDIO TO HI-FI PR PR (MONO) (MONO) (MONO) (MONO) TV AS CENTER HDMI 2 CableCARD (Top of...
... speakers will act as center speaker (select Audio-Internal Speakers-TV as an A/V receiver with optical input capability. See page 50 for limited viewing uses only. REAR PANEL OF TELEVISION ANT A ANT B MONITOR OUT S-VIDEO INPUT 4 INPUT 3 INPUT 2 Y/ VIDEO INPUT 1 Y/ VIDEO PB PB HDMI 1 VIDEO L AUDIO R... AUDIO TO HI-FI PR PR (MONO) (MONO) (MONO) (MONO) TV AS CENTER HDMI 2 CableCARD (Top of...
Owners Guide
Page 16
... to VIDEO and a video signal is not received from the VIDEO INPUT JACK on the TV set will appear to be made from coaxial shielded wire. ANT A CableCARD (Top of card faces right) ANT B MONITOR OUT S-VIDEO INPUT 4 INPUT 3 INPUT 2 Y/ VIDEO PB INPUT 1 Y/ VIDEO PB HDMI 1 VIDEO L AUDIO R AUDIO TO HI... connect the VCR, camcorder, laserdisc player, DVD player, or HDTV Set Top Box to select the Antenna and Input of each component. Check the owner's manual of your TV set is OFF), the set below. 2. The following connection diagrams are offered as shown on the back panel of...
... to VIDEO and a video signal is not received from the VIDEO INPUT JACK on the TV set will appear to be made from coaxial shielded wire. ANT A CableCARD (Top of card faces right) ANT B MONITOR OUT S-VIDEO INPUT 4 INPUT 3 INPUT 2 Y/ VIDEO PB INPUT 1 Y/ VIDEO PB HDMI 1 VIDEO L AUDIO R AUDIO TO HI... connect the VCR, camcorder, laserdisc player, DVD player, or HDTV Set Top Box to select the Antenna and Input of each component. Check the owner's manual of your TV set is OFF), the set below. 2. The following connection diagrams are offered as shown on the back panel of...
Owners Guide
Page 17
...Select Antenna from the VIDEO OUT of U.S. ANT A ANT B MONITOR OUT S-VIDEO INPUT 4 INPUT 3 INPUT 2 Y/ VIDEO PB INPUT 1 Y/ VIDEO PB HDMI 1 VIDEO L AUDIO R AUDIO TO HI-FI PR PR (MONO) (MONO) (MONO) (MONO) TV AS CENTER HDMI 2 CableCARD (Top of card faces right) OPTICAL OUT Digital Audio ...Upgrade Card Apparatus Claims of the VCR or the laserdisc player to your VCR operating guide for limited viewing uses only. Press the INPUTS button, then select INPUT 3 from the INPUTS menu to rear panel...
...Select Antenna from the VIDEO OUT of U.S. ANT A ANT B MONITOR OUT S-VIDEO INPUT 4 INPUT 3 INPUT 2 Y/ VIDEO PB INPUT 1 Y/ VIDEO PB HDMI 1 VIDEO L AUDIO R AUDIO TO HI-FI PR PR (MONO) (MONO) (MONO) (MONO) TV AS CENTER HDMI 2 CableCARD (Top of card faces right) OPTICAL OUT Digital Audio ...Upgrade Card Apparatus Claims of the VCR or the laserdisc player to your VCR operating guide for limited viewing uses only. Press the INPUTS button, then select INPUT 3 from the INPUTS menu to rear panel...
Owners Guide
Page 18
... be abnormal if the connection is loose. 2. Refer to rear panel jacks. Connect the cable from the AUDIO OUT R of the VCR or the laserdisc player to the INPUT (S-VIDEO) jack, as shown on line input-output connections. 18 and 6,381,747 licensed for more information..., then select INPUT 3 from the INPUTS menu to the INPUT (AUDIO/R) jack. 3. ANT A ANT B MONITOR OUT S-VIDEO INPUT 4 INPUT 3 INPUT 2 Y/ VIDEO PB INPUT 1 Y/ VIDEO PB HDMI 1 VIDEO L AUDIO R AUDIO TO HI-FI PR PR (MONO) (MONO) (MONO) (MONO) TV AS CENTER HDMI 2 CableCARD (Top of card faces right) OPTICAL OUT ...
... be abnormal if the connection is loose. 2. Refer to rear panel jacks. Connect the cable from the AUDIO OUT R of the VCR or the laserdisc player to the INPUT (S-VIDEO) jack, as shown on line input-output connections. 18 and 6,381,747 licensed for more information..., then select INPUT 3 from the INPUTS menu to the INPUT (AUDIO/R) jack. 3. ANT A ANT B MONITOR OUT S-VIDEO INPUT 4 INPUT 3 INPUT 2 Y/ VIDEO PB INPUT 1 Y/ VIDEO PB HDMI 1 VIDEO L AUDIO R AUDIO TO HI-FI PR PR (MONO) (MONO) (MONO) (MONO) TV AS CENTER HDMI 2 CableCARD (Top of card faces right) OPTICAL OUT ...

Owners Guide
Page 19
... PB INPUT 1 Y/ VIDEO PB HDMI 1 VIDEO L AUDIO R AUDIO TO HI-FI PR PR (MONO) (MONO) (MONO) (MONO) TV AS CENTER HDMI 2 CableCARD (Top of card faces right) OPTICAL OUT Digital Audio Upgrade Card Apparatus Claims of U.S. RS232C 1 2 345 6 789 DVI to rear panel jacks. Completely insert the connection ... of card faces right) OPTICAL OUT Digital Audio Upgrade Card Apparatus Claims of U.S. The HDMI input on the TV set top box or DVD player. Press the INPUTS button, then select INPUT 1 from the INPUTS menu to view the program from the output of the HDTV set -up of uncompressed video ...
... PB INPUT 1 Y/ VIDEO PB HDMI 1 VIDEO L AUDIO R AUDIO TO HI-FI PR PR (MONO) (MONO) (MONO) (MONO) TV AS CENTER HDMI 2 CableCARD (Top of card faces right) OPTICAL OUT Digital Audio Upgrade Card Apparatus Claims of U.S. RS232C 1 2 345 6 789 DVI to rear panel jacks. Completely insert the connection ... of card faces right) OPTICAL OUT Digital Audio Upgrade Card Apparatus Claims of U.S. The HDMI input on the TV set top box or DVD player. Press the INPUTS button, then select INPUT 1 from the INPUTS menu to view the program from the output of the HDTV set -up of uncompressed video ...
Owners Guide
Page 20
...the cable from the AUDIO OUT L of the Laserdisc/DVD player or HDTV set top box to rear panel jacks. Select Antenna from the AUDIO OUT R of U.S. ANT A ANT B MONITOR OUT S-VIDEO INPUT 4 INPUT 3 INPUT 2 Y/ VIDEO INPUT 1 Y/ VIDEO PB PB HDMI 1 VIDEO L AUDIO R AUDIO TO HI-FI PR PR ...(MONO) (MONO) (MONO) (MONO) TV AS CENTER HDMI 2 CableCARD (Top of card faces right) OPTICAL OUT Digital Audio...
...the cable from the AUDIO OUT L of the Laserdisc/DVD player or HDTV set top box to rear panel jacks. Select Antenna from the AUDIO OUT R of U.S. ANT A ANT B MONITOR OUT S-VIDEO INPUT 4 INPUT 3 INPUT 2 Y/ VIDEO INPUT 1 Y/ VIDEO PB PB HDMI 1 VIDEO L AUDIO R AUDIO TO HI-FI PR PR ...(MONO) (MONO) (MONO) (MONO) TV AS CENTER HDMI 2 CableCARD (Top of card faces right) OPTICAL OUT Digital Audio...

Owners Guide
Page 22
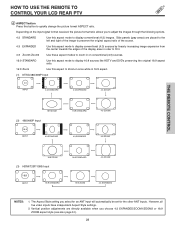
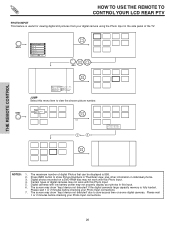
... use this button while entering your device code to program the remote (see pages 33-40). HOW TO USE THE REMOTE TO CONTROL YOUR LCD REAR PTV ቢ ባ ቤ ብ ቦ ቧ ቩ ቨ GUIDE ቫ ቪ ቭ ቮ ቯ ቱ C.C. ተ ቲ ታ &#... control to TV mode.) ባ MODE Indicator Turns on or blinks to show remote control mode. ቤ SOURCE ACCESS (̇ , ̈) buttons Press these buttons to select remote control mode. ብ SOURCE ACCESS (ENT) button Hold down this button in an optional Input access feature ...
... use this button while entering your device code to program the remote (see pages 33-40). HOW TO USE THE REMOTE TO CONTROL YOUR LCD REAR PTV ቢ ባ ቤ ብ ቦ ቧ ቩ ቨ GUIDE ቫ ቪ ቭ ቮ ቯ ቱ C.C. ተ ቲ ታ &#... control to TV mode.) ባ MODE Indicator Turns on or blinks to show remote control mode. ቤ SOURCE ACCESS (̇ , ̈) buttons Press these buttons to select remote control mode. ብ SOURCE ACCESS (ENT) button Hold down this button in an optional Input access feature ...
Owners Guide
Page 23
HOW TO USE THE REMOTE TO CONTROL YOUR LCD REAR PTV ቧ ASPECT button Press this button to Zoom-in once while in on the input signal format received, the picture format ratio allows you to adjust the images through the following... aspect modes to zoom in 16:9 aspect. (1) NTSC/480i/480P Input 4:3 INPUT 4:3 STANDARD 4:3 EXPANDED 4:3 ZOOM1 THE REMOTE CONTROL 16:9 ZOOM (2) 480i/480P Input 16:9 INPUT 4:3 STANDARD 16:9 STANDARD 4:3 EXPANDED 4:3 ZOOM2 4:3 ZOOM1 16:9 ZOOM (3) HDMI/720P/1080i Input 16:9 INPUT 16:9 STANDARD 16:9 STANDARD 16:9 ZOOM 4:3 ZOOM2 4:3 EXPANDED NOTES...
HOW TO USE THE REMOTE TO CONTROL YOUR LCD REAR PTV ቧ ASPECT button Press this button to Zoom-in once while in on the input signal format received, the picture format ratio allows you to adjust the images through the following... aspect modes to zoom in 16:9 aspect. (1) NTSC/480i/480P Input 4:3 INPUT 4:3 STANDARD 4:3 EXPANDED 4:3 ZOOM1 THE REMOTE CONTROL 16:9 ZOOM (2) 480i/480P Input 16:9 INPUT 4:3 STANDARD 16:9 STANDARD 4:3 EXPANDED 4:3 ZOOM2 4:3 ZOOM1 16:9 ZOOM (3) HDMI/720P/1080i Input 16:9 INPUT 16:9 STANDARD 16:9 STANDARD 16:9 ZOOM 4:3 ZOOM2 4:3 EXPANDED NOTES...
Owners Guide
Page 24
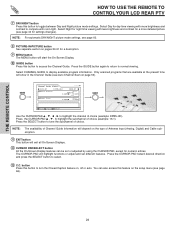
... Only scanned programs that are available at the present time will show in the Channel Guide (see page 60. ቩ PICTURE-IN-PICTURE button See separate section on pages 30-31 for numeric entries. NOTE:... button will start the On-Screen Display. ቫ GUIDE button Press this button to highlight the subchannel of Antenna input (Analog, Digital) and Cable subscription. ቭ EXIT button This button will depend on the type of choice (... CONTROL HOW TO USE THE REMOTE TO CONTROL YOUR LCD REAR PTV ቨ DAY/NIGHT button Press this button to turn the Closed Caption feature on, off or ...
... Only scanned programs that are available at the present time will show in the Channel Guide (see page 60. ቩ PICTURE-IN-PICTURE button See separate section on pages 30-31 for numeric entries. NOTE:... button will start the On-Screen Display. ቫ GUIDE button Press this button to highlight the subchannel of Antenna input (Analog, Digital) and Cable subscription. ቭ EXIT button This button will depend on the type of choice (... CONTROL HOW TO USE THE REMOTE TO CONTROL YOUR LCD REAR PTV ቨ DAY/NIGHT button Press this button to turn the Closed Caption feature on, off or ...
Owners Guide
Page 25
...Select to choose Antenna B. Select to select. Select to select the inputs that are being used. HOW TO USE THE REMOTE TO CONTROL YOUR LCD REAR PTV ተ INPUTS button When the remote control is in the front panel of the TV (see page 26). Use the CURSOR PAD and SELECT button to ...choose Input 4 for Video 4. Pressing the INPUTS button repeatedly will also cycle through the Inputs menu items. Then press the SELECT...
...Select to choose Antenna B. Select to select. Select to select the inputs that are being used. HOW TO USE THE REMOTE TO CONTROL YOUR LCD REAR PTV ተ INPUTS button When the remote control is in the front panel of the TV (see page 26). Use the CURSOR PAD and SELECT button to ...choose Input 4 for Video 4. Pressing the INPUTS button repeatedly will also cycle through the Inputs menu items. Then press the SELECT...
Owners Guide
Page 26
..., plus other information in this Photo Input. 5. Digital photos recorded on some digital cameras. The screen may show "Input device not detected" due to view ... display your digital camera using the Photo Input in the side panel of digital Photos that...may not work with this input. 6. Please wait 1 or 2 minutes before checking your Photo Input connections. 26 The screen may show "Input device not detected" if ... 2 minutes before checking your Photo Input connections. 7. HOW TO USE THE REMOTE TO CONTROL YOUR LCD REAR PTV PHOTO INPUT This feature is useful for viewing...
..., plus other information in this Photo Input. 5. Digital photos recorded on some digital cameras. The screen may show "Input device not detected" due to view ... display your digital camera using the Photo Input in the side panel of digital Photos that...may not work with this input. 6. Please wait 1 or 2 minutes before checking your Photo Input connections. 26 The screen may show "Input device not detected" if ... 2 minutes before checking your Photo Input connections. 7. HOW TO USE THE REMOTE TO CONTROL YOUR LCD REAR PTV PHOTO INPUT This feature is useful for viewing...


