Owners Guide
Page 1
has determined that this product meets the ENERGY STAR® guidelines for 42V710, 50V710, 60V710 42V715, 50V715, 60V715 IMPORTANT SAFETY INSTRUCTIONS 2-3 FIRST TIME USE ...4-20 THE REMOTE CONTROL 21-40 ON-SCREEN DISPLAY...41-68 LAMP REPLACEMENT ...69-72 CARE OF YOUR HITACHI TV & REMOTE CONTROL 73 RECEPTION PROBLEMS ...74 USEFUL INFORMATION / INDEX 75-83 As an ENERGY STAR® Partner, Hitachi, Ltd. LCD REAR PROJECTION TELEVISION Operating Guide for energy efficiency.
has determined that this product meets the ENERGY STAR® guidelines for 42V710, 50V710, 60V710 42V715, 50V715, 60V715 IMPORTANT SAFETY INSTRUCTIONS 2-3 FIRST TIME USE ...4-20 THE REMOTE CONTROL 21-40 ON-SCREEN DISPLAY...41-68 LAMP REPLACEMENT ...69-72 CARE OF YOUR HITACHI TV & REMOTE CONTROL 73 RECEPTION PROBLEMS ...74 USEFUL INFORMATION / INDEX 75-83 As an ENERGY STAR® Partner, Hitachi, Ltd. LCD REAR PROJECTION TELEVISION Operating Guide for energy efficiency.
Owners Guide
Page 3
...or personal injury. 16. Use of this copyright protection technology must be connected to the grounding system of the building, as close to call "1-800-HITACHI." Follow all servicing to the receiver be located in any objects on or pinched par- Servicing is protected by the manufacturer. 17. If an outside... National Electric Code, ANSI/NFPA No. 70-1984, provides information with respect to www.lamprecycle.org. Do not use the attachments/accessories specified by TV stations and cable companies, as well as video-on this apparatus near any ventilation openings.
...or personal injury. 16. Use of this copyright protection technology must be connected to the grounding system of the building, as close to call "1-800-HITACHI." Follow all servicing to the receiver be located in any objects on or pinched par- Servicing is protected by the manufacturer. 17. If an outside... National Electric Code, ANSI/NFPA No. 70-1984, provides information with respect to www.lamprecycle.org. Do not use the attachments/accessories specified by TV stations and cable companies, as well as video-on this apparatus near any ventilation openings.
Owners Guide
Page 4
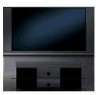
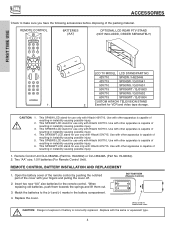
...capable of the packing material. LCD TV MODEL LCD STAND/PART NO. 42V710 SP42W / H520449 42V715 SPX42W / QJ01541 50V710 SP50WS / QJ01601 50V715 SPX50WT / QJ01603 60V710 SP60WS / QJ01602 60V715 SPX60WT / QJ01604 CUSTOM HITACHI TELEVISION STAND 2. Use with other ...apparatus is capable of the cover with the same or equivalent type. 4 BOTTOM VIEW (Remote Control) 2. CAUTION: 1. 2. 3. 4. 5. 6. REMOTE CONTROL BATTERIES ("AA") OPTIONAL LCD REAR PTV STAND (NOT...
...capable of the packing material. LCD TV MODEL LCD STAND/PART NO. 42V710 SP42W / H520449 42V715 SPX42W / QJ01541 50V710 SP50WS / QJ01601 50V715 SPX50WT / QJ01603 60V710 SP60WS / QJ01602 60V715 SPX60WT / QJ01604 CUSTOM HITACHI TELEVISION STAND 2. Use with other ...apparatus is capable of the cover with the same or equivalent type. 4 BOTTOM VIEW (Remote Control) 2. CAUTION: 1. 2. 3. 4. 5. 6. REMOTE CONTROL BATTERIES ("AA") OPTIONAL LCD REAR PTV STAND (NOT...
Owners Guide
Page 5
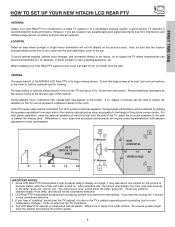
... in direct sunlight or near a heating appliance, etc. FIRST TIME USE HOW TO SET UP YOUR NEW HITACHI LCD REAR PTV ANTENNA Unless your LCD Rear PTV against a wall, keep it may appear on the TV's functions. 4. However, if you hear the cooling fan, it should not be sufficient. When installing your...display an image, it at least 10 cm (4 inches) from outside light may take about 10 to the left and right of the HITACHI LCD Rear PTV is due to the TV's cabinet expanding and contracting due to become excessively hot, for the picture to room temperature changes. Since LCD...
... in direct sunlight or near a heating appliance, etc. FIRST TIME USE HOW TO SET UP YOUR NEW HITACHI LCD REAR PTV ANTENNA Unless your LCD Rear PTV against a wall, keep it may appear on the TV's functions. 4. However, if you hear the cooling fan, it should not be sufficient. When installing your...display an image, it at least 10 cm (4 inches) from outside light may take about 10 to the left and right of the HITACHI LCD Rear PTV is due to the TV's cabinet expanding and contracting due to become excessively hot, for the picture to room temperature changes. Since LCD...

Owners Guide
Page 6
... a high quality picture. 12345 6789 D-SUB MINI 9-Pin Cable This cable is used to connect to the TV's HDMI input. ANTENNA CONNECTIONS TO REAR JACK PANEL VHF (75-Ohm) antenna/CATV (Cable TV) When using a 300-Ohm twin lead from most stores that have an antenna, connect the coaxial cable to...and laser- Below are connected Attach an optional antenna cable mixer to the TV antenna terminal, and connect the cables to the ANT A (75-Ohm) terminal. Consult your digital camera to the antenna jack on the television's rear jack panel and front control panel. FIRST TIME USE HOOK-UP CABLES ...
... a high quality picture. 12345 6789 D-SUB MINI 9-Pin Cable This cable is used to connect to the TV's HDMI input. ANTENNA CONNECTIONS TO REAR JACK PANEL VHF (75-Ohm) antenna/CATV (Cable TV) When using a 300-Ohm twin lead from most stores that have an antenna, connect the coaxial cable to...and laser- Below are connected Attach an optional antenna cable mixer to the TV antenna terminal, and connect the cables to the ANT A (75-Ohm) terminal. Consult your digital camera to the antenna jack on the television's rear jack panel and front control panel. FIRST TIME USE HOOK-UP CABLES ...
Owners Guide
Page 7
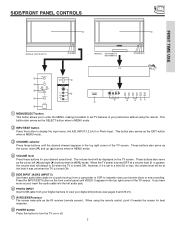
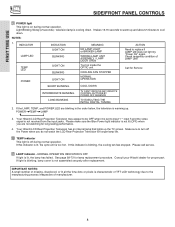
.... SIDE/FRONT PANEL CONTROLS ቨ ቨ FIRST TIME USE MODELS: 42V710/42V715 ቨቭቫቪ PUSH MODELS: 50V710/50V715 60V710/60V715 PUSH MENU/SELECT ̆ CH+ VOL̇ VOL+ ̈ CH̄ INPUT/EXIT POWER PHOTO INPUT INPUT 5 S-VIDEO ቧ VIDEO...L/MONO AUDIO R ቦ PHOTO INPUT ቧ INPUT 5 AUDIO S-VIDEO VIDEO L/MONO R ቦ VOL- Press the INPUT/EXIT button on the TV screen. These buttons also serve as the EXIT button when in MENU mode. ቤ CHANNEL selector Press these buttons for best response. ቩ POWER button...
.... SIDE/FRONT PANEL CONTROLS ቨ ቨ FIRST TIME USE MODELS: 42V710/42V715 ቨቭቫቪ PUSH MODELS: 50V710/50V715 60V710/60V715 PUSH MENU/SELECT ̆ CH+ VOL̇ VOL+ ̈ CH̄ INPUT/EXIT POWER PHOTO INPUT INPUT 5 S-VIDEO ቧ VIDEO...L/MONO AUDIO R ቦ PHOTO INPUT ቧ INPUT 5 AUDIO S-VIDEO VIDEO L/MONO R ቦ VOL- Press the INPUT/EXIT button on the TV screen. These buttons also serve as the EXIT button when in MENU mode. ቤ CHANNEL selector Press these buttons for best response. ቩ POWER button...
Owners Guide
Page 8
... for longer lamp life. ቫ TEMP indicator This light is off during normal operation. See page 69-72 for proper part. Your Hitachi LCD Rear Projection Television has an internal lamp that lights up and about 2 minutes to turn off the Power when you are blinking in the order below,... dots or pixels is characteristic of TFT LCD technology due to warm up the TV screen. FIRST TIME USE SIDE/FRONT PANEL CONTROLS ቪ POWER light This light is on during normal operation. Your Hitachi LCD Rear Projection Television may appear to be OFF when it is not received from the input ...
... for longer lamp life. ቫ TEMP indicator This light is off during normal operation. See page 69-72 for proper part. Your Hitachi LCD Rear Projection Television has an internal lamp that lights up and about 2 minutes to turn off the Power when you are blinking in the order below,... dots or pixels is characteristic of TFT LCD technology due to warm up the TV screen. FIRST TIME USE SIDE/FRONT PANEL CONTROLS ቪ POWER light This light is on during normal operation. Your Hitachi LCD Rear Projection Television may appear to be OFF when it is not received from the input ...
Owners Guide
Page 9
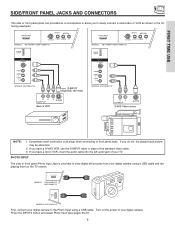
... picture may be abnormal. 2. PHOTO INPUT MODELS: 50V710/50V715 60V710/60V715 PHOTO INPUT MODELS: 42V710/42V715 First, connect your digital camera. Turn on the power of your digital camera to the Photo Input using a USB cable and displaying them on the TV screen. Completely insert connection cord plugs when connecting to front...
... picture may be abnormal. 2. PHOTO INPUT MODELS: 50V710/50V715 60V710/60V715 PHOTO INPUT MODELS: 42V710/42V715 First, connect your digital camera. Turn on the power of your digital camera to the Photo Input using a USB cable and displaying them on the TV screen. Completely insert connection cord plugs when connecting to front...
Owners Guide
Page 10
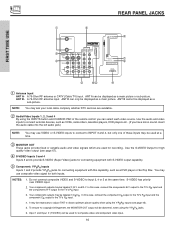
... video signal for limited viewing uses only. Use the audio and video inputs to the TV's PR input. 4. ANT A can select each video source. Use the S-VIDEO Output for high quality video output (see page 45). 5. REAR PANEL JACKS FIRST TIME USE ቢ ቦ ANT A CableCARD (Top of card faces right) ቭ...
... video signal for limited viewing uses only. Use the audio and video inputs to the TV's PR input. 4. ANT A can select each video source. Use the S-VIDEO Output for high quality video output (see page 45). 5. REAR PANEL JACKS FIRST TIME USE ቢ ቦ ANT A CableCARD (Top of card faces right) ቭ...
Owners Guide
Page 11
...). ቫ TV AS CENTER (INPUTS 1-4) These jacks are available for HDMI input. ቨ Optical Out (Digital Audio) This jack provides Digital Audio Output for your audio device that pristine high-definition images retain the highest video quality from Dolby Laboratories. FIRST TIME USE REAR PANEL JACKS &#... upgrades. Only DTV formats such as 1080i, 720p, 480i and 480p are for use with an HDMI output connection. Hitachi will notify you if a software upgrade is required for your TV. In order to receive written notification, please complete and return your dealer regarding these "non...
...). ቫ TV AS CENTER (INPUTS 1-4) These jacks are available for HDMI input. ቨ Optical Out (Digital Audio) This jack provides Digital Audio Output for your audio device that pristine high-definition images retain the highest video quality from Dolby Laboratories. FIRST TIME USE REAR PANEL JACKS &#... upgrades. Only DTV formats such as 1080i, 720p, 480i and 480p are for use with an HDMI output connection. Hitachi will notify you if a software upgrade is required for your TV. In order to receive written notification, please complete and return your dealer regarding these "non...

Owners Guide
Page 12
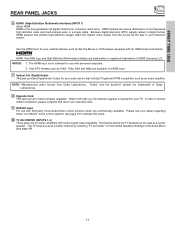
... third screen below appears. Call your cable operator and give them the information from the card to chosen cable channels. FIRST TIME USE REAR PANEL JACKS ቭ CableCARD Slot This slot is inserted. 3. Insert the CableCARD into the CableCARD slot. 12 Antenna B will display... PB VIDEO L AUDIO R AUDIO TO HI-FI (MONO) PR PR (MONO) (MONO) (MONO) TV AS CENTER CableCARD HDMIIN1SERT THIS END OPTICAL OUT Digital Audio Upgrade Card Apparatus Claims of the Rear Panel Jacks. CableCARD is installed OR CableCARD is not installed After the CableCARD is required. 2. Press the...
... third screen below appears. Call your cable operator and give them the information from the card to chosen cable channels. FIRST TIME USE REAR PANEL JACKS ቭ CableCARD Slot This slot is inserted. 3. Insert the CableCARD into the CableCARD slot. 12 Antenna B will display... PB VIDEO L AUDIO R AUDIO TO HI-FI (MONO) PR PR (MONO) (MONO) (MONO) TV AS CENTER CableCARD HDMIIN1SERT THIS END OPTICAL OUT Digital Audio Upgrade Card Apparatus Claims of the Rear Panel Jacks. CableCARD is installed OR CableCARD is not installed After the CableCARD is required. 2. Press the...
Owners Guide
Page 13
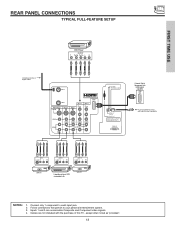
...that pertain to each input jack. 2. Cables are not included with optical input capability. Connect only 1 component to your personal entertainment system. 3. REAR PANEL CONNECTIONS TYPICAL FULL-FEATURE SETUP FIRST TIME USE DVD Player OUTPUT Y PB/CB PR/CR L R Outside antenna or digital cable ANT A ANT...1 VIDEO L AUDIO R AUDIO TO HI-FI PR PR (MONO) (MONO) (MONO) (MONO) TV AS CENTER CableCARD (Top of card faces right) OPTICAL OUT Digital Audio Upgrade Card Apparatus Claims of this TV, except when noted as "provided". 13 RS232C 1 2 345 6 789 External Digital Component with HDMI ...
...that pertain to each input jack. 2. Cables are not included with optical input capability. Connect only 1 component to your personal entertainment system. 3. REAR PANEL CONNECTIONS TYPICAL FULL-FEATURE SETUP FIRST TIME USE DVD Player OUTPUT Y PB/CB PR/CR L R Outside antenna or digital cable ANT A ANT...1 VIDEO L AUDIO R AUDIO TO HI-FI PR PR (MONO) (MONO) (MONO) (MONO) TV AS CENTER CableCARD (Top of card faces right) OPTICAL OUT Digital Audio Upgrade Card Apparatus Claims of this TV, except when noted as "provided". 13 RS232C 1 2 345 6 789 External Digital Component with HDMI ...
Owners Guide
Page 14
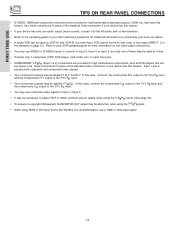
... this feature. In this case, connect the components CB output to the TV's PB input and the components CR output to the TV's PR input. • You may be labeled Y-CBCR. FIRST TIME USE TIPS ON REAR PANEL CONNECTIONS • S-VIDEO, HDMI and component connections are provided for...ensure no copyright infringement, the MONITOR OUT output may be labeled Y, B-Y, and R-Y. top-boxes. In this case, connect the components B-Y output to the TV's PB input and the components R-Y output to use a 1080i or 720p input signal. 14 Use these connections in the example on the television. •...
... this feature. In this case, connect the components CB output to the TV's PB input and the components CR output to the TV's PR input. • You may be labeled Y-CBCR. FIRST TIME USE TIPS ON REAR PANEL CONNECTIONS • S-VIDEO, HDMI and component connections are provided for...ensure no copyright infringement, the MONITOR OUT output may be labeled Y, B-Y, and R-Y. top-boxes. In this case, connect the components B-Y output to the TV's PB input and the components R-Y output to use a 1080i or 720p input signal. 14 Use these connections in the example on the television. •...

Owners Guide
Page 15
...the LFE/Sub Out output of the external audio amplifier. 2. The audio level can only be controlled through the volume control of a separate audio amplifier. REAR PANEL OF TELEVISION ANT A ANT B MONITOR OUT S-VIDEO INPUT 4 INPUT 3 INPUT 2 Y/ VIDEO PB INPUT 1 Y/ VIDEO PB HDMI 1 VIDEO ...and right speakers are connected to the REAR output of a separate audio amplifier. ᕆ This subwoofer is connected to the diagram for speaker placement. ᕃ The television's internal speakers will act as center speaker (select Audio-Internal Speakers-TV as an A/V receiver with optical input...
...the LFE/Sub Out output of the external audio amplifier. 2. The audio level can only be controlled through the volume control of a separate audio amplifier. REAR PANEL OF TELEVISION ANT A ANT B MONITOR OUT S-VIDEO INPUT 4 INPUT 3 INPUT 2 Y/ VIDEO PB INPUT 1 Y/ VIDEO PB HDMI 1 VIDEO ...and right speakers are connected to the REAR output of a separate audio amplifier. ᕆ This subwoofer is connected to the diagram for speaker placement. ᕃ The television's internal speakers will act as center speaker (select Audio-Internal Speakers-TV as an A/V receiver with optical input...
Owners Guide
Page 16
...to accommodate your particular assortment of components and features. INPUTS Photo Input Ant B Ant A Input 1 Input 2 Move SEL Sel NOTE: When the TV is set below. 2. Connect the cable from the AUDIO OUT of the VCR or the laserdisc player to confirm your choice (see page 25). Patent... OUT S-VIDEO INPUT 4 INPUT 3 INPUT 2 Y/ VIDEO PB INPUT 1 Y/ VIDEO PB HDMI 1 VIDEO L AUDIO R AUDIO TO HI-FI PR PR (MONO) (MONO) (MONO) (MONO) TV AS CENTER OPTICAL OUT Digital Audio Upgrade Card Apparatus Claims of the VCR or the laserdisc player to the INPUT (VIDEO) jack, as suggestions. RS232C...
...to accommodate your particular assortment of components and features. INPUTS Photo Input Ant B Ant A Input 1 Input 2 Move SEL Sel NOTE: When the TV is set below. 2. Connect the cable from the AUDIO OUT of the VCR or the laserdisc player to confirm your choice (see page 25). Patent... OUT S-VIDEO INPUT 4 INPUT 3 INPUT 2 Y/ VIDEO PB INPUT 1 Y/ VIDEO PB HDMI 1 VIDEO L AUDIO R AUDIO TO HI-FI PR PR (MONO) (MONO) (MONO) (MONO) TV AS CENTER OPTICAL OUT Digital Audio Upgrade Card Apparatus Claims of the VCR or the laserdisc player to the INPUT (VIDEO) jack, as suggestions. RS232C...
Owners Guide
Page 17
...819,098; 4,907,093; Completely insert the connection cord plugs when connecting to your VCR operating guide for more information on the TV set below. 2. Refer to rear panel jacks. Connect the cable from the VIDEO OUT of U.S. The VIDEO OSD label disappears automatically after approximately four seconds. 5.... INPUT 4 INPUT 3 INPUT 2 Y/ VIDEO PB INPUT 1 Y/ VIDEO PB HDMI 1 VIDEO L AUDIO R AUDIO TO HI-FI PR PR (MONO) (MONO) (MONO) (MONO) TV AS CENTER CableCARD (Top of card faces right) OPTICAL OUT Digital Audio Upgrade Card Apparatus Claims of the VCR or the laserdisc player to the...
...819,098; 4,907,093; Completely insert the connection cord plugs when connecting to your VCR operating guide for more information on the TV set below. 2. Refer to rear panel jacks. Connect the cable from the VIDEO OUT of U.S. The VIDEO OSD label disappears automatically after approximately four seconds. 5.... INPUT 4 INPUT 3 INPUT 2 Y/ VIDEO PB INPUT 1 Y/ VIDEO PB HDMI 1 VIDEO L AUDIO R AUDIO TO HI-FI PR PR (MONO) (MONO) (MONO) (MONO) TV AS CENTER CableCARD (Top of card faces right) OPTICAL OUT Digital Audio Upgrade Card Apparatus Claims of the VCR or the laserdisc player to the...
Owners Guide
Page 18
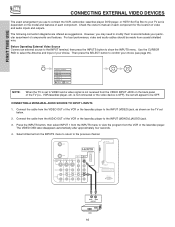
... B MONITOR OUT S-VIDEO INPUT 4 INPUT 3 INPUT 2 Y/ VIDEO PB INPUT 1 Y/ VIDEO PB HDMI 1 VIDEO L AUDIO R AUDIO TO HI-FI PR PR (MONO) (MONO) (MONO) (MONO) TV AS CENTER CableCARD (Top of card faces right) OPTICAL OUT Digital Audio Upgrade Card Apparatus Claims of the VCR or the laserdisc player to the... INPUT (AUDIO/R) jack. 3. FIRST TIME USE CONNECTING EXTERNAL VIDEO DEVICES CONNECTING AN S-VIDEO SOURCE TO INPUT 3, 4 AND 5 1. Refer to rear panel jacks. Connect the cable from the S-VIDEO OUT of U.S. and 6,381,747 licensed for more information on the...
... B MONITOR OUT S-VIDEO INPUT 4 INPUT 3 INPUT 2 Y/ VIDEO PB INPUT 1 Y/ VIDEO PB HDMI 1 VIDEO L AUDIO R AUDIO TO HI-FI PR PR (MONO) (MONO) (MONO) (MONO) TV AS CENTER CableCARD (Top of card faces right) OPTICAL OUT Digital Audio Upgrade Card Apparatus Claims of the VCR or the laserdisc player to the... INPUT (AUDIO/R) jack. 3. FIRST TIME USE CONNECTING EXTERNAL VIDEO DEVICES CONNECTING AN S-VIDEO SOURCE TO INPUT 3, 4 AND 5 1. Refer to rear panel jacks. Connect the cable from the S-VIDEO OUT of U.S. and 6,381,747 licensed for more information on the...

Owners Guide
Page 19
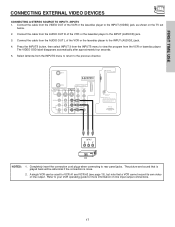
... from the HDTV set -up of U.S. Patent Nos. 4,631,603; 4,577,216; 4,819,098; 4,907,093; RS232C 1 2 345 6 789 DVI to rear panel jacks. HDMI-HDMI ANT A CableCARD (Top of card faces right) DVI-HDMI ANT A CableCARD (Top of card faces right) ANT B MONITOR OUT S-VIDEO ...INPUT 4 INPUT 3 INPUT 2 Y/ VIDEO INPUT 1 Y/ VIDEO PB PB HDMI 1 VIDEO L AUDIO R AUDIO TO HI-FI PR PR (MONO) (MONO) (MONO) (MONO) TV AS CENTER OPTICAL OUT Digital Audio Upgrade Card Apparatus Claims of device user settings determines final video appearance. 19 RS232C 1 2 345 6 789 HDMI Cable HDMI...
... from the HDTV set -up of U.S. Patent Nos. 4,631,603; 4,577,216; 4,819,098; 4,907,093; RS232C 1 2 345 6 789 DVI to rear panel jacks. HDMI-HDMI ANT A CableCARD (Top of card faces right) DVI-HDMI ANT A CableCARD (Top of card faces right) ANT B MONITOR OUT S-VIDEO ...INPUT 4 INPUT 3 INPUT 2 Y/ VIDEO INPUT 1 Y/ VIDEO PB PB HDMI 1 VIDEO L AUDIO R AUDIO TO HI-FI PR PR (MONO) (MONO) (MONO) (MONO) TV AS CENTER OPTICAL OUT Digital Audio Upgrade Card Apparatus Claims of device user settings determines final video appearance. 19 RS232C 1 2 345 6 789 HDMI Cable HDMI...

Owners Guide
Page 20
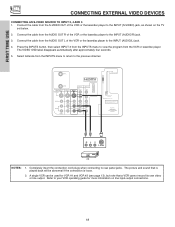
... (AUDIO/L) jack. 6. Select Antenna from the AUDIO OUT L of the Laserdisc/DVD player or HDTV set top box to the INPUT (Y) jack, as shown on REAR PANEL CONNECTIONS. 20 Patent Nos. 4,631,603; 4,577,216; 4,819,098; 4,907,093; and 6,381,747 licensed for tips on the... A ANT B MONITOR OUT S-VIDEO INPUT 4 INPUT 3 INPUT 2 Y/ VIDEO INPUT 1 Y/ VIDEO PB PB HDMI 1 VIDEO L AUDIO R AUDIO TO HI-FI PR PR (MONO) (MONO) (MONO) (MONO) TV AS CENTER CableCARD (Top of card faces right) OPTICAL OUT Digital Audio Upgrade Card Apparatus Claims of the Laserdisc/DVD player or HDTV set top...
... (AUDIO/L) jack. 6. Select Antenna from the AUDIO OUT L of the Laserdisc/DVD player or HDTV set top box to the INPUT (Y) jack, as shown on REAR PANEL CONNECTIONS. 20 Patent Nos. 4,631,603; 4,577,216; 4,819,098; 4,907,093; and 6,381,747 licensed for tips on the... A ANT B MONITOR OUT S-VIDEO INPUT 4 INPUT 3 INPUT 2 Y/ VIDEO INPUT 1 Y/ VIDEO PB PB HDMI 1 VIDEO L AUDIO R AUDIO TO HI-FI PR PR (MONO) (MONO) (MONO) (MONO) TV AS CENTER CableCARD (Top of card faces right) OPTICAL OUT Digital Audio Upgrade Card Apparatus Claims of the Laserdisc/DVD player or HDTV set top...
Owners Guide
Page 21
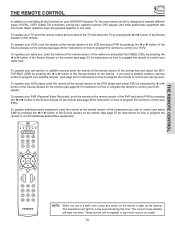
...CONTROL THE REMOTE CONTROL In addition to controlling all the functions on your HITACHI Projection TV, the new remote control is too bright. 21 To operate your ...select the SETTOP-BOX (STB) by pressing the ̇ or ̈ button of VCRs, CATV (Cable TV) converters, set -top-box). To operate additional audio equipment, point the remote at the remote sensor of the... how to program the remote to control additional Audio/Video equipment). To operate your VCR). To operate your TV, point the remote control at the remote sensor of the DVD player and select DVD by pressing the ...
...CONTROL THE REMOTE CONTROL In addition to controlling all the functions on your HITACHI Projection TV, the new remote control is too bright. 21 To operate your ...select the SETTOP-BOX (STB) by pressing the ̇ or ̈ button of VCRs, CATV (Cable TV) converters, set -top-box). To operate additional audio equipment, point the remote at the remote sensor of the... how to program the remote to control additional Audio/Video equipment). To operate your VCR). To operate your TV, point the remote control at the remote sensor of the DVD player and select DVD by pressing the ...


