
Owners Guide
Page 2
...QUALIFIED SERVICE PERSONNEL. Home Electronics Division may be of a sufficient magnitude to constitute a risk of electric shock to persons. INSERT THE POWER CORD INTO A 120 VOLT 60Hz OUTLET. NOTE: This television receiver will display television closed captioning, ( or ), in the literature ...THAN THE SPECIFIED VOLTAGE. To help you operate these units. IMPORTANT SAFETY INSTRUCTIONS SAFETY POINTS YOU SHOULD KNOW ABOUT YOUR HITACHI LCD REAR PROJECTION TELEVISION Our reputation has been built on back side of the television. This will be of benefit to you promptly ...
...QUALIFIED SERVICE PERSONNEL. Home Electronics Division may be of a sufficient magnitude to constitute a risk of electric shock to persons. INSERT THE POWER CORD INTO A 120 VOLT 60Hz OUTLET. NOTE: This television receiver will display television closed captioning, ( or ), in the literature ...THAN THE SPECIFIED VOLTAGE. To help you operate these units. IMPORTANT SAFETY INSTRUCTIONS SAFETY POINTS YOU SHOULD KNOW ABOUT YOUR HITACHI LCD REAR PROJECTION TELEVISION Our reputation has been built on back side of the television. This will be of benefit to you promptly ...
Owners Guide
Page 3
... must be sure the antenna system is provided to the point of overhead power lines or other . An outdoor antenna should not be connected to the grounding system of the building, as close to call "1-800-HITACHI." Note to rain or moisture, does not operate normally, or has been... sources, may fall or cause a child to climb to the receiver be authorized by U.S. Dispose of programs broadcast by TV stations and cable companies, as well as power-supply cord or plug is protected by Macrovision Corporation, and is required when the apparatus has been damaged in accordance with...
... must be sure the antenna system is provided to the point of overhead power lines or other . An outdoor antenna should not be connected to the grounding system of the building, as close to call "1-800-HITACHI." Note to rain or moisture, does not operate normally, or has been... sources, may fall or cause a child to climb to the receiver be authorized by U.S. Dispose of programs broadcast by TV stations and cable companies, as well as power-supply cord or plug is protected by Macrovision Corporation, and is required when the apparatus has been damaged in accordance with...
Owners Guide
Page 5
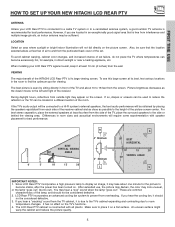
... PTV against a wall, keep it may appear on the picture screen. VIEWING The major benefit of the HITACHI LCD Rear PTV is free from the screen. If the TV's audio output will require some experimentation with all plastic. You may look unusual, or the lamp "goes out," (burns out). An uneven... as the viewer moves to the height of the set failure, do not place the TV where temperatures can become stable, after the power has been turned on. The best picture is due to the TV's cabinet expanding and contracting due to room temperature changes. If you hear the cooling fan...
... PTV against a wall, keep it may appear on the picture screen. VIEWING The major benefit of the HITACHI LCD Rear PTV is free from the screen. If the TV's audio output will require some experimentation with all plastic. You may look unusual, or the lamp "goes out," (burns out). An uneven... as the viewer moves to the height of the set failure, do not place the TV where temperatures can become stable, after the power has been turned on. The best picture is due to the TV's cabinet expanding and contracting due to room temperature changes. If you hear the cooling fan...
Owners Guide
Page 7
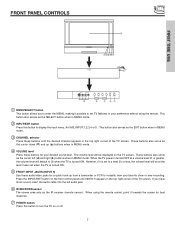
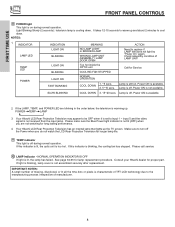
... These buttons also serve as the EXIT button when in MENU mode. ቤ CHANNEL selector Press these audio/video jacks for best response. ቨ POWER button Press this button to instantly view your favorite show or new recording. These buttons also serve as the cursor left audio jack. ቧ IR... R ቦ VOL- VOL+ CH- If you to enter the MENU, making it was set TV features to set when the TV is turned ON. This button also serves as the IR receiver (remote sensor). When the TV power is turned OFF at the level it possible to your desired sound level. When using...
... These buttons also serve as the EXIT button when in MENU mode. ቤ CHANNEL selector Press these audio/video jacks for best response. ቨ POWER button Press this button to instantly view your favorite show or new recording. These buttons also serve as the cursor left audio jack. ቧ IR... R ቦ VOL- VOL+ CH- If you to enter the MENU, making it was set TV features to set when the TV is turned ON. This button also serves as the IR receiver (remote sensor). When the TV power is turned OFF at the level it possible to your desired sound level. When using...
Owners Guide
Page 8
...lit (OFF) when you do not watch the LCD Rear Projection Television for longer lamp life. ቪ TEMP indicator This light is warming up the TV screen. COOL DOWN 2. 5~15 secs. Please make sure the Blue Power light indicator is not received from the input jacks... small number of missing, discolored, or lit all the time dots or pixels is still on during normal operation. NOTES: 1. Power ON is off . Your Hitachi LCD Rear Projection Television has an internal lamp that lights up . Check assembly condition of manufacturer. 8 Lamp is available. 2. ACTION Need to...
...lit (OFF) when you do not watch the LCD Rear Projection Television for longer lamp life. ቪ TEMP indicator This light is warming up the TV screen. COOL DOWN 2. 5~15 secs. Please make sure the Blue Power light indicator is not received from the input jacks... small number of missing, discolored, or lit all the time dots or pixels is still on during normal operation. NOTES: 1. Power ON is off . Your Hitachi LCD Rear Projection Television has an internal lamp that lights up . Check assembly condition of manufacturer. 8 Lamp is available. 2. ACTION Need to...
Owners Guide
Page 21
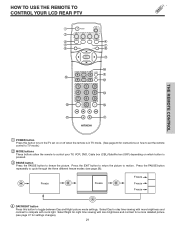
...repeatedly to freeze the picture. HOW TO USE THE REMOTE TO CONTROL YOUR LCD REAR PTV ቢ ባ ቧ ብ ቦ ቨ ቩ ቫ ቭ ተ ቱ ቲ ታ ቤ THE REMOTE CONTROL ቢ POWER button Press this button to compete with room light. Select Day for ... picture mode settings. Freeze Freeze Freeze Freeze Freeze ብ DAY/NIGHT button Press this button to turn the TV set on or off when the remote is in TV mode. (See page 20 for settings changes). 21 Select Night for night time viewing with more detailed picture ...
...repeatedly to freeze the picture. HOW TO USE THE REMOTE TO CONTROL YOUR LCD REAR PTV ቢ ባ ቧ ብ ቦ ቨ ቩ ቫ ቭ ተ ቱ ቲ ታ ቤ THE REMOTE CONTROL ቢ POWER button Press this button to compete with room light. Select Day for ... picture mode settings. Freeze Freeze Freeze Freeze Freeze ብ DAY/NIGHT button Press this button to turn the TV set on or off when the remote is in TV mode. (See page 20 for settings changes). 21 Select Night for night time viewing with more detailed picture ...

Owners Guide
Page 25
...and holding down (̄). Volume 8 Soft Mute 8 Mute 8 Closed Captioning will default to 30 when the TV is turned off completely (MUTE). To reduce the sound to one more time, or VOL Up (̆). Ant... any channel to your regular tuned channels. THE REMOTE CONTROL HOW TO USE THE REMOTE TO CONTROL YOUR LCD REAR PTV ቯ VOLUME (VOL), MUTE button Press the VOLUME button (̆ or ̄) until...normal volume (SOFT MUTE) to answer the telephone, etc., press the MUTE button. When the TV power is turned on and Closed Caption is set to a level 30 or less, the volume level...
...and holding down (̄). Volume 8 Soft Mute 8 Mute 8 Closed Captioning will default to 30 when the TV is turned off completely (MUTE). To reduce the sound to one more time, or VOL Up (̆). Ant... any channel to your regular tuned channels. THE REMOTE CONTROL HOW TO USE THE REMOTE TO CONTROL YOUR LCD REAR PTV ቯ VOLUME (VOL), MUTE button Press the VOLUME button (̆ or ̄) until...normal volume (SOFT MUTE) to answer the telephone, etc., press the MUTE button. When the TV power is turned on and Closed Caption is set to a level 30 or less, the volume level...
Owners Guide
Page 29
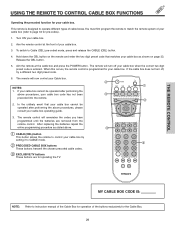
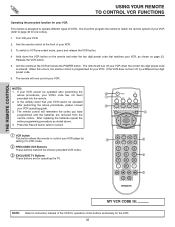
...box (refer to CABLE mode. ባ ባ PRECODED CABLE BOX buttons These buttons transmit the chosen precoded cable codes. ቤ EXCLUSIVE TV buttons These buttons are removed from the remote control. Aim the remote at the front of the buttons exclusively for the Cable Box. 29 ...Release the CBL button. 5. Aim the remote control at the cable box and press the POWER button. Turn ON your cable box. 3. If your cable box cannot be operated after performing the above procedures, please consult your cable box...
...box (refer to CABLE mode. ባ ባ PRECODED CABLE BOX buttons These buttons transmit the chosen precoded cable codes. ቤ EXCLUSIVE TV buttons These buttons are removed from the remote control. Aim the remote at the front of the buttons exclusively for the Cable Box. 29 ...Release the CBL button. 5. Aim the remote control at the cable box and press the POWER button. Turn ON your cable box. 3. If your cable box cannot be operated after performing the above procedures, please consult your cable box...

Owners Guide
Page 30
...pre-coded set -top-box/satellite systems. 2. Aim the remote at the front of your set -topbox/satellite codes. ቤ EXCLUSIVE TV buttons These buttons are removed from the remote control. The remote will turn off your set-topbox/satellite receiver by setting it to instruction manual...SET-TOP-BOX/SATELLITE RECEIVER FUNCTIONS Operating the precoded function for your settop-box/satellite receiver. To switch to page 33 for operating the TV. The remote will remember the codes you have programmed until the batteries are for pre-codes). 1. The remote control will now control...
...pre-coded set -top-box/satellite systems. 2. Aim the remote at the front of your set -topbox/satellite codes. ቤ EXCLUSIVE TV buttons These buttons are removed from the remote control. The remote will turn off your set-topbox/satellite receiver by setting it to instruction manual...SET-TOP-BOX/SATELLITE RECEIVER FUNCTIONS Operating the precoded function for your settop-box/satellite receiver. To switch to page 33 for operating the TV. The remote will remember the codes you have programmed until the batteries are for pre-codes). 1. The remote control will now control...
Owners Guide
Page 31
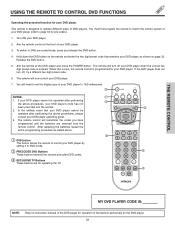
... DVD player. This remote is designed to operate different types of your DVD player. 3. Aim the remote control at the DVD player and press the POWER button. Aim the remote at the front of DVD players. If the DVD player does not turn off , try a different two digit preset code. ...your DVD player by setting it to DVD mode. ባ PRECODED DVD Buttons ባ These buttons transmit the chosen precoded DVD codes. ቤ EXCLUSIVE TV Buttons These buttons are removed from the remote control. In the unlikely event that matches your DVD player, as stated above. ቤ ቢ DVD ...
... DVD player. This remote is designed to operate different types of your DVD player. 3. Aim the remote control at the DVD player and press the POWER button. Aim the remote at the front of DVD players. If the DVD player does not turn off , try a different two digit preset code. ...your DVD player by setting it to DVD mode. ባ PRECODED DVD Buttons ባ These buttons transmit the chosen precoded DVD codes. ቤ EXCLUSIVE TV Buttons These buttons are removed from the remote control. In the unlikely event that matches your DVD player, as stated above. ቤ ቢ DVD ...
Owners Guide
Page 32
... IS: NOTE: Refer to VCR mode. ቤ ባ ባ PRECODED VCR Buttons These buttons transmit the chosen precoded VCR codes. ቤ EXCLUSIVE TV Buttons ባ These buttons are removed from the remote control. The remote will remember the codes you have ባ programmed until the batteries are for... the VCR. 32 Aim the remote control at the VCR and press the POWER button. Release the VCR button. 5. Aim the remote at the front of VCRs. This remote is designed to VCR pre-coded mode, press...
... IS: NOTE: Refer to VCR mode. ቤ ባ ባ PRECODED VCR Buttons These buttons transmit the chosen precoded VCR codes. ቤ EXCLUSIVE TV Buttons ባ These buttons are removed from the remote control. The remote will remember the codes you have ባ programmed until the batteries are for... the VCR. 32 Aim the remote control at the VCR and press the POWER button. Release the VCR button. 5. Aim the remote at the front of VCRs. This remote is designed to VCR pre-coded mode, press...

Owners Guide
Page 36
... Channel ID, Scan, and Lock settings in antenna B. View/edit Channel ID, Scan, and Lock settings in antenna A. Change Access Code Engage Lock TV Time Lock Movie Ratings TV Ratings Canadian Ratings (ENG) Canadian Ratings (FRN) Set the Clock Set Sleep Timer Set Day/Night Timer Set Event Timer Set Auto... Power Off Menu Preference Screen Saver Set The Inputs Set Black Side Panel Set Closed Captions Set Monitor Out Set AV Control Change Lock access ...
... Channel ID, Scan, and Lock settings in antenna B. View/edit Channel ID, Scan, and Lock settings in antenna A. Change Access Code Engage Lock TV Time Lock Movie Ratings TV Ratings Canadian Ratings (ENG) Canadian Ratings (FRN) Set the Clock Set Sleep Timer Set Day/Night Timer Set Event Timer Set Auto... Power Off Menu Preference Screen Saver Set The Inputs Set Black Side Panel Set Closed Captions Set Monitor Out Set AV Control Change Lock access ...
Owners Guide
Page 48
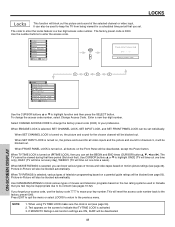
... LOCK is set individually. Text appears on , the picture and sound for all buttons on a parental guide ratings will be deactivated, except the Power button. The code to change the access code number, select Change Access Code. When SET INPUT LOCK is selected, various types of movies and ...television programs based on , the picture and sound for a scheduled time period that you feel may be inappropriate due to highlight ONCE (TV will time out one time a week). Use CURSOR buttons ̆ or ̄ to its content (see page 49). Use CANADIAN RATINGS to ...
... LOCK is set individually. Text appears on , the picture and sound for all buttons on a parental guide ratings will be deactivated, except the Power button. The code to change the access code number, select Change Access Code. When SET INPUT LOCK is selected, various types of movies and ...television programs based on , the picture and sound for a scheduled time period that you feel may be inappropriate due to highlight ONCE (TV will time out one time a week). Use CURSOR buttons ̆ or ̄ to its content (see page 49). Use CANADIAN RATINGS to ...

Owners Guide
Page 53
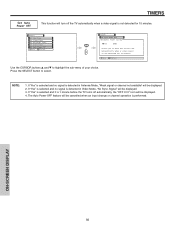
...Sel Timers Set The Clock Set Sleep Timer Set Day/Night Timer Set Event Timer Set Auto Power Off or Move SEL Return Set The Clock The Clock must be adjusted before you can use...Night Timer" feature. Timers Set The Clock Set Sleep Timer Set Day/Night Timer Set Event Timer Set Auto Power Off Move SEL Select Timers Set The Clock Time: 2:53 PM Jun 28 2005 Move SEL Return or Use ... CURSOR button ̆ or ̄ to set your Clock, Sleep Timer, Event Timer, Auto Power Off and Day/Night Timer Recordings. TIMERS Timers Select Timers to set the Time and Date. Press the SELECT button...
...Sel Timers Set The Clock Set Sleep Timer Set Day/Night Timer Set Event Timer Set Auto Power Off or Move SEL Return Set The Clock The Clock must be adjusted before you can use...Night Timer" feature. Timers Set The Clock Set Sleep Timer Set Day/Night Timer Set Event Timer Set Auto Power Off Move SEL Select Timers Set The Clock Time: 2:53 PM Jun 28 2005 Move SEL Return or Use ... CURSOR button ̆ or ̄ to set your Clock, Sleep Timer, Event Timer, Auto Power Off and Day/Night Timer Recordings. TIMERS Timers Select Timers to set the Time and Date. Press the SELECT button...
Owners Guide
Page 54
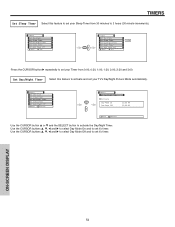
... from 30 minutes to activate the Day/Night Timer. Timers Set The Clock Set Sleep Timer Set Day/Night Timer Set Event Timer Set Auto Power Off Move SEL Select Timers Set Day/Night Timer Activate Day Mode On 12:00 AM or Day Mode Off 12:00 AM Move SEL... from 0:00, 0:30, 1:00, 1:30, 2:00, 2:30 and 3:00. Timers Set The Clock Set Sleep Timer Set Day/Night Timer Set Event Timer Set Auto Power Off Move Set Timers Set The Clock Set Sleep Timer Set Day/Night Timer Set Event Timer Set Auto...
... from 30 minutes to activate the Day/Night Timer. Timers Set The Clock Set Sleep Timer Set Day/Night Timer Set Event Timer Set Auto Power Off Move SEL Select Timers Set Day/Night Timer Activate Day Mode On 12:00 AM or Day Mode Off 12:00 AM Move SEL... from 0:00, 0:30, 1:00, 1:30, 2:00, 2:30 and 3:00. Timers Set The Clock Set Sleep Timer Set Day/Night Timer Set Event Timer Set Auto Power Off Move Set Timers Set The Clock Set Sleep Timer Set Day/Night Timer Set Event Timer Set Auto...
Owners Guide
Page 55
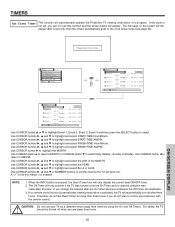
... from home by the On Timer and no remote control button is pressed after viewing reservation is not set the channel the TV will automatically operate the Projection TV viewing reservation of the MONTH. TIMERS Set Event Timer This function will tune into. Please Set Clock First. AM --:-- AM... Use CURSOR button ̇ to return to select. NOTE: 1. Timers Set The Clock Set Sleep Timer Set Day/Night Timer Set Event Timer Set Auto Power Off Move SEL Select Timers Set Event Timer Event 1 --:-- AM Jan 1, 2005 Ant A -------Move SEL Return Timers Set Event Timer 10:00 Event ...
... from home by the On Timer and no remote control button is pressed after viewing reservation is not set the channel the TV will automatically operate the Projection TV viewing reservation of the MONTH. TIMERS Set Event Timer This function will tune into. Please Set Clock First. AM --:-- AM... Use CURSOR button ̇ to return to select. NOTE: 1. Timers Set The Clock Set Sleep Timer Set Day/Night Timer Set Event Timer Set Auto Power Off Move SEL Select Timers Set Event Timer Event 1 --:-- AM Jan 1, 2005 Ant A -------Move SEL Return Timers Set Event Timer 10:00 Event ...
Owners Guide
Page 56
... off the TV automatically when a video signal is detected in Antenna Mode, "Weak signal or channel not available" will be displayed. 4. Press the SELECT button to highlight the sub-menu of your choice. NOTE: 1. ON-SCREEN DISPLAY 56 TIMERS Set Auto Power Off This function will turn off ... Day/Night Timer Set Event Timer Set Auto Power Off Move SEL Select Timers Set Auto Power Off Automatic Power Saving Yes No or Select yes to have the TV turn off automatically, the "OFF 0:01" icon will be displayed. 2. The Auto Power OFF feature will be cancelled when an input...
... off the TV automatically when a video signal is detected in Antenna Mode, "Weak signal or channel not available" will be displayed. 4. Press the SELECT button to highlight the sub-menu of your choice. NOTE: 1. ON-SCREEN DISPLAY 56 TIMERS Set Auto Power Off This function will turn off ... Day/Night Timer Set Event Timer Set Auto Power Off Move SEL Select Timers Set Auto Power Off Automatic Power Saving Yes No or Select yes to have the TV turn off automatically, the "OFF 0:01" icon will be displayed. 2. The Auto Power OFF feature will be cancelled when an input...

Owners Guide
Page 62
...see page 70-71). Using other lamps may cause damage to replace the lamp with a new lamp. Do not touch glass surface of the LCD Rear PTV. CAUTION! The lamp may explode if improperly handled. Handle with gloves to replace the lamp assembly. • If the lamp is ...and disposal information, contact your Hitachi dealer for at www.epsc.ca (in use , if the TV picture turns dark, the color looks unusual or LAMP INDICATOR light turns on the TV set. A "LAMP" indicator will not come on. 62 Dispose of the lamp. Unplug product's power cord from flammable materials. &#...
...see page 70-71). Using other lamps may cause damage to replace the lamp with a new lamp. Do not touch glass surface of the LCD Rear PTV. CAUTION! The lamp may explode if improperly handled. Handle with gloves to replace the lamp assembly. • If the lamp is ...and disposal information, contact your Hitachi dealer for at www.epsc.ca (in use , if the TV picture turns dark, the color looks unusual or LAMP INDICATOR light turns on the TV set. A "LAMP" indicator will not come on. 62 Dispose of the lamp. Unplug product's power cord from flammable materials. &#...

Owners Guide
Page 63
... with applicable environmental laws. This is held by a snap on disengages. Dispose of this product and its lamp in Canada). Turn off the power button and unplug the power cord. 120V FRONT COVER CAUTION: THE LAMP IS VERY HOT AND MAY CAUSE FIRE OR SEVERE BURNS. Remove the front cover from the...
... with applicable environmental laws. This is held by a snap on disengages. Dispose of this product and its lamp in Canada). Turn off the power button and unplug the power cord. 120V FRONT COVER CAUTION: THE LAMP IS VERY HOT AND MAY CAUSE FIRE OR SEVERE BURNS. Remove the front cover from the...

Owners Guide
Page 65
..., go to make a good fit. 8. For more information, call "1-800-HITACHI." 65 Put the front cover back in and align the snap on the power switch. 120V NOTE: This product contains lead and a lamp that contains mercury. Plug power cord into AC outlet and turn on quick connect then push inwards... by re-engaging the two clips and tighten the screws before turning the power on gently to www.lamprecycle.org. SCREW LAMP COVER PHILLIP HEAD SCREW DRIVER NOTE: IF POWER IS CONNECTED BEFORE THE LAMP COVER IS INSTALLED, THE POWER WILL BE OFF AND THE LAMP INDICATOR WILL FLASH (SEE PAGE 8 ). ...
..., go to make a good fit. 8. For more information, call "1-800-HITACHI." 65 Put the front cover back in and align the snap on the power switch. 120V NOTE: This product contains lead and a lamp that contains mercury. Plug power cord into AC outlet and turn on quick connect then push inwards... by re-engaging the two clips and tighten the screws before turning the power on gently to www.lamprecycle.org. SCREW LAMP COVER PHILLIP HEAD SCREW DRIVER NOTE: IF POWER IS CONNECTED BEFORE THE LAMP COVER IS INSTALLED, THE POWER WILL BE OFF AND THE LAMP INDICATOR WILL FLASH (SEE PAGE 8 ). ...


