
Owners Guide
Page 1
... REMOTE CONTROL BATTERY INSTALLATION AND REPLACEMENT ....... 10 HOW TO SET UP YOUR NEW HITACHI PROJECTION TV 11 HOOK-UP CABLES AND CONNECTORS 13 ANTENNA CONNECTIONS TO REAR JACK PANEL 14 FRONT PANEL CONTROLS 15 AVX (Audio/Video) selector 15 VOLUME level ...15 CHANNEL selector 15 POWER button ...15 POWER light ...15 AI (Artificial Intelligence) sensor 15 REMOTE CONTROL sensor 15 V-SYNC (Vertical Hold) knob 15 FRONT INPUT JACKS (for VIDEO :3 15 FRONT PANEL JACKS AND CONNECTIONS 16 REAR PANEL JACKS ...17 Antenna Input / Output 17 Audio/Video Inputs 1, 2 17 Output...
... REMOTE CONTROL BATTERY INSTALLATION AND REPLACEMENT ....... 10 HOW TO SET UP YOUR NEW HITACHI PROJECTION TV 11 HOOK-UP CABLES AND CONNECTORS 13 ANTENNA CONNECTIONS TO REAR JACK PANEL 14 FRONT PANEL CONTROLS 15 AVX (Audio/Video) selector 15 VOLUME level ...15 CHANNEL selector 15 POWER button ...15 POWER light ...15 AI (Artificial Intelligence) sensor 15 REMOTE CONTROL sensor 15 V-SYNC (Vertical Hold) knob 15 FRONT INPUT JACKS (for VIDEO :3 15 FRONT PANEL JACKS AND CONNECTIONS 16 REAR PANEL JACKS ...17 Antenna Input / Output 17 Audio/Video Inputs 1, 2 17 Output...
Owners Guide
Page 2
... TV BUTTONS 30 VCR AND CABLE BOX CODES 31 TABLE 1. Cable Box Precoded remote controls 32 USING THE GENIUS REMOTE TO LEARN ADDITIONAL FUNCTIONS 33 LEARNABLE BUTTONS 33 EXCLUSIVE BUTTONS 33 EASY GRAPHIC GUIDE 36 SET UP...38 FAVORITE CHANNELS 41 RESET...42 PROGRAM ...43 CLOCK ...45 VIDEO ...47 AUDIO ...50 CARE OF YOUR HITACHI PROJECTION TV AND YOUR REMOTE CONTROL.. 54 RECEPTION PROBLEMS 55 CHECK HERE BEFORE CALLING FOR SERVICE 56 SPECIFICATIONS ...57 NOTES ...59 WARRANTY CARD, front 61 HITACHI PROJECTION TV...
... TV BUTTONS 30 VCR AND CABLE BOX CODES 31 TABLE 1. Cable Box Precoded remote controls 32 USING THE GENIUS REMOTE TO LEARN ADDITIONAL FUNCTIONS 33 LEARNABLE BUTTONS 33 EXCLUSIVE BUTTONS 33 EASY GRAPHIC GUIDE 36 SET UP...38 FAVORITE CHANNELS 41 RESET...42 PROGRAM ...43 CLOCK ...45 VIDEO ...47 AUDIO ...50 CARE OF YOUR HITACHI PROJECTION TV AND YOUR REMOTE CONTROL.. 54 RECEPTION PROBLEMS 55 CHECK HERE BEFORE CALLING FOR SERVICE 56 SPECIFICATIONS ...57 NOTES ...59 WARRANTY CARD, front 61 HITACHI PROJECTION TV...
Owners Guide
Page 3
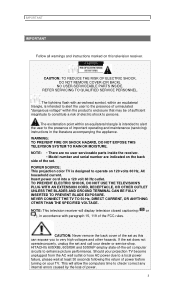
... shock to enhance picture performance. NOTE: This television receiver will allow the computers time to operate on 120 volts 60 Hz, AC household current. Should your projection TV become unplugged from the AC wall outlet or lose AC power due to very high voltages and other hazards. CAUTION: Never remove the back cover of the set as this television receiver. This will display television closed captioning ( or ), in...
... shock to enhance picture performance. NOTE: This television receiver will allow the computers time to operate on 120 volts 60 Hz, AC household current. Should your projection TV become unplugged from the AC wall outlet or lose AC power due to very high voltages and other hazards. CAUTION: Never remove the back cover of the set as this television receiver. This will display television closed captioning ( or ), in...
Owners Guide
Page 4
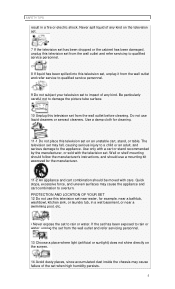
... you to service this television set is equipped with a polarized alternating-current line plug (a plug having one way. Please fill out your model of HITACHI television receivers. Do not defeat the safety purpose of the polarized plug. 2 When the power cord or plug is damaged or frayed, unplug this television set from it to HITACHI. Refer all warnings and instructions marked on the television receiver. This...
... you to service this television set is equipped with a polarized alternating-current line plug (a plug having one way. Please fill out your model of HITACHI television receivers. Do not defeat the safety purpose of the polarized plug. 2 When the power cord or plug is damaged or frayed, unplug this television set from it to HITACHI. Refer all warnings and instructions marked on the television receiver. This...
Owners Guide
Page 5
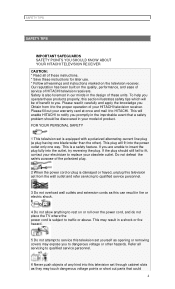
... damage the picture tube surface. 10 Unplug this television set . If the set has been exposed to rain or water, unplug the set from the wall outlet and refer service to qualified service personnel. 8 If liquid has been spilled into this television set from the wall outlet and refer servicing to qualified service personnel. 9 Do not subject your television set on the screen. 14 Avoid...
... damage the picture tube surface. 10 Unplug this television set . If the set has been exposed to rain or water, unplug the set from the wall outlet and refer service to qualified service personnel. 8 If liquid has been spilled into this television set from the wall outlet and refer servicing to qualified service personnel. 9 Do not subject your television set on the screen. 14 Avoid...
Owners Guide
Page 7
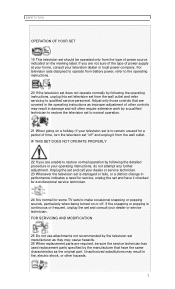
... service technician has used replacement parts specified by the manufacturer that are covered in damage and will often require extensive work by the television set manufacturer as they may result in the operating instructions as the original part. Unauthorized substitutions may result in fire, electric shock, or other controls may cause hazards. 26 When replacement parts are required, be operated only from the type of time, turn...
... service technician has used replacement parts specified by the manufacturer that are covered in damage and will often require extensive work by the television set manufacturer as they may result in the operating instructions as the original part. Unauthorized substitutions may result in fire, electric shock, or other controls may cause hazards. 26 When replacement parts are required, be operated only from the type of time, turn...
Owners Guide
Page 11
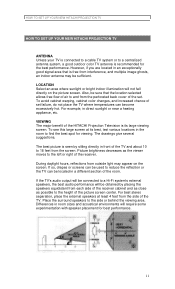
... best picture is its best, test various locations in front of the picture screen center. If the TV's audio output will be connected to a Hi-Fi system's external speakers, the best audio performance will be obtained by sitting directly in the room to the left or right of the HITACHI Projection Television is seen by placing the speakers equidistant from each side of the receiver cabinet and as close as...
... best picture is its best, test various locations in front of the picture screen center. If the TV's audio output will be connected to a Hi-Fi system's external speakers, the best audio performance will be obtained by sitting directly in the room to the left or right of the HITACHI Projection Television is seen by placing the speakers equidistant from each side of the receiver cabinet and as close as...

Owners Guide
Page 15
... TV screen. Check the POWER On indicator to make automatic picture adjustments depending on . FRONT INPUT JACKS (for VIDEO :3) Use these audio/video jacks for your Remote at this knob until the desired channel appears in use. VOLUME level Press these buttons until you get a good picture. CHANNEL selector Press these buttons for a "quick" hook-up or down, adjust this area when selecting channels, adjusting volume, etc. This control seldom needs adjustment. NOTE: Your HITACHI TV will see front panel diagram...
... TV screen. Check the POWER On indicator to make automatic picture adjustments depending on . FRONT INPUT JACKS (for VIDEO :3) Use these audio/video jacks for your Remote at this knob until the desired channel appears in use. VOLUME level Press these buttons until you get a good picture. CHANNEL selector Press these buttons for a "quick" hook-up or down, adjust this area when selecting channels, adjusting volume, etc. This control seldom needs adjustment. NOTE: Your HITACHI TV will see front panel diagram...

Owners Guide
Page 17
... to connect external devices, such as a pay-TV cable decoder. The antenna output labeled "To converter" allows the Main (VHF/UHF) antenna connection to pass directly to a separate stereo system amplifier. Audio/Video Inputs 1, 2 The "AVX" (Auxiliary Video) button will step through each video source and the current antenna input each time it is controlled by the remote control main volume buttons and also by the television's remote control. Output These jacks provide fixed audio and video signals which are used for connecting...
... to connect external devices, such as a pay-TV cable decoder. The antenna output labeled "To converter" allows the Main (VHF/UHF) antenna connection to pass directly to a separate stereo system amplifier. Audio/Video Inputs 1, 2 The "AVX" (Auxiliary Video) button will step through each video source and the current antenna input each time it is controlled by the remote control main volume buttons and also by the television's remote control. Output These jacks provide fixed audio and video signals which are used for connecting...

Owners Guide
Page 20
REAR SPEAKER TERMINAL CONNECTIONS TIPS ON REAR PANEL CONNECTIONS The S-Video connection is provided for more information on the "line" input-output connections. 20 Refer to your VCR operating guide for high performance laser discs, VCRs, etc., that a VCR cannot record its own video or line output (INPUT: 1 in place of your device has only one audio output (mono sound), connect it to the operating guide of the standard video connection if your hook-up cables. Refer to the left...
REAR SPEAKER TERMINAL CONNECTIONS TIPS ON REAR PANEL CONNECTIONS The S-Video connection is provided for more information on the "line" input-output connections. 20 Refer to your VCR operating guide for high performance laser discs, VCRs, etc., that a VCR cannot record its own video or line output (INPUT: 1 in place of your device has only one audio output (mono sound), connect it to the operating guide of the standard video connection if your hook-up cables. Refer to the left...

Owners Guide
Page 22
... REMOTE CONTROL (CLU-850GR) In addition to controlling all the functions on your HITACHI Color TV, the new Genius Remote is designed to light if the room is pressed. LEARN/USE select switch (Located on for normal use. The buttons will stay on rear side of remote control) LEARN......Enters the Learning mode. (Refer to be switched to Page 26. SEND/LEARN indicator light Refer to cover any of CATV (Cable TV) converters with a display...
... REMOTE CONTROL (CLU-850GR) In addition to controlling all the functions on your HITACHI Color TV, the new Genius Remote is designed to light if the room is pressed. LEARN/USE select switch (Located on for normal use. The buttons will stay on rear side of remote control) LEARN......Enters the Learning mode. (Refer to be switched to Page 26. SEND/LEARN indicator light Refer to cover any of CATV (Cable TV) converters with a display...

Owners Guide
Page 24
... audio program (SAP), press the RECALL button. Click to select between the VHF/UHF and AUX (Auxiliary) antenna inputs. When the AUX input is selected, the channel number is in the upper right corner of the other on -screen display. HOW TO USE THE REMOTE TO CONTROL YOUR TV HOW TO USE THE REMOTE TO CONTROL YOUR TV POWER button Press this button to turn the TV set . (See page 40.) You can also use the RECALL button...
... audio program (SAP), press the RECALL button. Click to select between the VHF/UHF and AUX (Auxiliary) antenna inputs. When the AUX input is selected, the channel number is in the upper right corner of the other on -screen display. HOW TO USE THE REMOTE TO CONTROL YOUR TV HOW TO USE THE REMOTE TO CONTROL YOUR TV POWER button Press this button to turn the TV set . (See page 40.) You can also use the RECALL button...

Owners Guide
Page 25
... TV These buttons are also used to set features to your preference. If the Picture-in the correct AIR/CABLE mode. (See page 32) AVX button The AVX (Auxiliary Video) button will remain displayed if the CLOSED CAPTION feature is on , the AVX will select between the antenna signal and the three sets of video input jacks. (See page 21) VOLUME, MUTE buttons Press the "VOLUME" up ( ) or down ( ). To turn the sound...
... TV These buttons are also used to set features to your preference. If the Picture-in the correct AIR/CABLE mode. (See page 32) AVX button The AVX (Auxiliary Video) button will remain displayed if the CLOSED CAPTION feature is on , the AVX will select between the antenna signal and the three sets of video input jacks. (See page 21) VOLUME, MUTE buttons Press the "VOLUME" up ( ) or down ( ). To turn the sound...
Owners Guide
Page 36
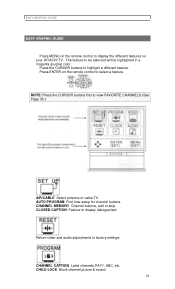
... buttons first to factory settings. AUTO PROGRAM First time setup for channel buttons. Return video and audio adjustments to view FAVORITE CHANNELS (See Page 35.) AIR/CABLE Select antenna or cable TV. CHANNEL CAPTION Label channels PAY1, ABC, etc. CHANNEL MEMORY Channel buttons, add or skip. The feature to display dialogue/text. EASY GRAPHIC GUIDE EASY GRAPHIC GUIDE Press MENU on the remote control to display the different features on the remote control to select a feature. Press ENTER on your HITACHI TV. CHILD LOCK Block channel picture & sound. 36 CLOSED CAPTION...
... buttons first to factory settings. AUTO PROGRAM First time setup for channel buttons. Return video and audio adjustments to view FAVORITE CHANNELS (See Page 35.) AIR/CABLE Select antenna or cable TV. CHANNEL CAPTION Label channels PAY1, ABC, etc. CHANNEL MEMORY Channel buttons, add or skip. The feature to display dialogue/text. EASY GRAPHIC GUIDE EASY GRAPHIC GUIDE Press MENU on the remote control to display the different features on the remote control to select a feature. Press ENTER on your HITACHI TV. CHILD LOCK Block channel picture & sound. 36 CLOSED CAPTION...

Owners Guide
Page 37
... ADJUST Adjust color, brightness, etc.. CONVERGENCE ADJUST Match red, green, and blue colors to make white. VOLUME CORRECTION Lower volume on or off one time or daily. SURROUND Special sound effects. 37 ON/OFF TIMER Turn TV on selected channels. PREFERENCE SETTING Improve picture performance. CLOCK SET Set before using timer features. PREFERENCE ADJUST Adjust balance, bass, and treble. PREFERENCE SETTING Improve sound performance. AUTOMATIC MESSAGE 1 Set for one time or daily. EASY GRAPHIC GUIDE PROGRAM LIST Check channel name, scan, child-lock. AUTOMATIC MESSAGE 2 Set...
... ADJUST Adjust color, brightness, etc.. CONVERGENCE ADJUST Match red, green, and blue colors to make white. VOLUME CORRECTION Lower volume on or off one time or daily. SURROUND Special sound effects. 37 ON/OFF TIMER Turn TV on selected channels. PREFERENCE SETTING Improve picture performance. CLOCK SET Set before using timer features. PREFERENCE ADJUST Adjust balance, bass, and treble. PREFERENCE SETTING Improve sound performance. AUTOMATIC MESSAGE 1 Set for one time or daily. EASY GRAPHIC GUIDE PROGRAM LIST Check channel name, scan, child-lock. AUTOMATIC MESSAGE 2 Set...

Owners Guide
Page 39
See CHANNEL MEMORY to the remote control CHANNEL ( ), ( ) buttons. Your choice will be highlighted magenta. CLOSED CAPTION Closed captions are the dialogue, narration, and/or sound effects of a television program or home video which are displayed on or off. MODE: TEXT is not possible. This information covers the entire screen and viewing the TV program is for additional information such as or . CHANNEL MEMORY Use this function after AUTOPROGRAM to add or erase...
See CHANNEL MEMORY to the remote control CHANNEL ( ), ( ) buttons. Your choice will be highlighted magenta. CLOSED CAPTION Closed captions are the dialogue, narration, and/or sound effects of a television program or home video which are displayed on or off. MODE: TEXT is not possible. This information covers the entire screen and viewing the TV program is for additional information such as or . CHANNEL MEMORY Use this function after AUTOPROGRAM to add or erase...

Owners Guide
Page 47
...- Use this function to change the contrast between black and white level in magenta. RESET- PREFERENCE ADJUST Use this function to adjust contrast, color, etc. CONTRAST- This adjustment will only affect the picture when the PICTURE SETTING AI is selected, press ENTER to return video adjustments to adjust the level of fine detail in the picture. Use this feature to adjust overall picture brightness. Press the CURSOR buttons to adjust convergence. VIDEO VIDEO Select VIDEO to adjust picture settings, improve picture...
...- Use this function to change the contrast between black and white level in magenta. RESET- PREFERENCE ADJUST Use this function to adjust contrast, color, etc. CONTRAST- This adjustment will only affect the picture when the PICTURE SETTING AI is selected, press ENTER to return video adjustments to adjust the level of fine detail in the picture. Use this feature to adjust overall picture brightness. Press the CURSOR buttons to adjust convergence. VIDEO VIDEO Select VIDEO to adjust picture settings, improve picture...

Owners Guide
Page 48
... SETTINGS. Over a period of time, the picture tubes can drift out of high brightness. If you move your TV, or if, after a program or channel changes. Automatically monitor and adjust contrast depending on SUPER CONTR to improve picture detail in the front panel), to turn function on . Properly converged, the lines appear white, which is located in areas of alignment due to normal bumps and vibrations or moving the TV. Use...
... SETTINGS. Over a period of time, the picture tubes can drift out of high brightness. If you move your TV, or if, after a program or channel changes. Automatically monitor and adjust contrast depending on SUPER CONTR to improve picture detail in the front panel), to turn function on . Properly converged, the lines appear white, which is located in areas of alignment due to normal bumps and vibrations or moving the TV. Use...

Owners Guide
Page 51
... is always received). when you set . Adjust front volume first. See example below the channel number. AUDIO MTS MODE (Multi-Channel Television Sound) will allow you to select STEREO (a stereo broadcast), SAP (second audio program) which may be displayed to the left of the channel number. The sources received will be heard only with movie and other stereo material that would hear in the section on rear panel connections on...
... is always received). when you set . Adjust front volume first. See example below the channel number. AUDIO MTS MODE (Multi-Channel Television Sound) will allow you to select STEREO (a stereo broadcast), SAP (second audio program) which may be displayed to the left of the channel number. The sources received will be heard only with movie and other stereo material that would hear in the section on rear panel connections on...

Owners Guide
Page 54
... precision parts may cause the screen to cease operation. Replace the old batteries with a soft cloth moistened in a high humidity place or getting it on or near a heater. DO NOT Do not clean your TV and remote control away from the wall outlet if your television set . Don't leave it on the floor, etc. Exposure of time, for a long period of the viewing screen...
... precision parts may cause the screen to cease operation. Replace the old batteries with a soft cloth moistened in a high humidity place or getting it on or near a heater. DO NOT Do not clean your TV and remote control away from the wall outlet if your television set . Don't leave it on the floor, etc. Exposure of time, for a long period of the viewing screen...


