
Owners Guide
Page 2
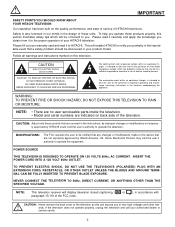
... your HITACHI television. To help you promptly in the instructions, as this device that any changes or modifications made to operate the television. Please fill out your warranty card and mail it carefully and apply the knowledge you to the presence of these products properly, this television. INSERT THE POWER CORD INTO A 120 VOLT 60Hz OUTLET. NO USER SERVICEABLE PARTS INSIDE. This will display television closed captioning, ( or...
... your HITACHI television. To help you promptly in the instructions, as this device that any changes or modifications made to operate the television. Please fill out your warranty card and mail it carefully and apply the knowledge you to the presence of these products properly, this television. INSERT THE POWER CORD INTO A 120 VOLT 60Hz OUTLET. NO USER SERVICEABLE PARTS INSIDE. This will display television closed captioning, ( or...
Owners Guide
Page 3
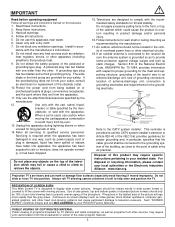
... cable ground shall be located in the vicinity of overhead power lines or other sources, may require specific instructions pertaining to your safety. Such "SCREEN BURNS" constitute misuse and are heavy and can cause permanent damage to television receivers. PUBLIC VIEWING OF COPYRIGHTED MATERIAL Public viewing of programs broadcast by your outlet, consult an electrician for your resident state. Projection TV's are NOT COVERED by TV...
... cable ground shall be located in the vicinity of overhead power lines or other sources, may require specific instructions pertaining to your safety. Such "SCREEN BURNS" constitute misuse and are heavy and can cause permanent damage to television receivers. PUBLIC VIEWING OF COPYRIGHTED MATERIAL Public viewing of programs broadcast by your outlet, consult an electrician for your resident state. Projection TV's are NOT COVERED by TV...
Owners Guide
Page 5
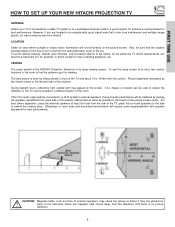
... from the screen. FIRST TIME USE HOW TO SET UP YOUR NEW HITACHI PROJECTION TV ANTENNA Unless your TV is connected to a cable TV system or to and from the perforated back cover of the HITACHI Projection Television is its best, test various locations in a different section of the room. To see this large screen at least four feet from the side of the picture screen center. Picture brightness decreases as close to find...
... from the screen. FIRST TIME USE HOW TO SET UP YOUR NEW HITACHI PROJECTION TV ANTENNA Unless your TV is connected to a cable TV system or to and from the perforated back cover of the HITACHI Projection Television is its best, test various locations in a different section of the room. To see this large screen at least four feet from the side of the picture screen center. Picture brightness decreases as close to find...
Owners Guide
Page 7
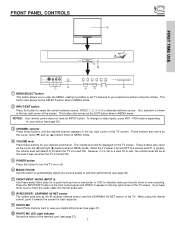
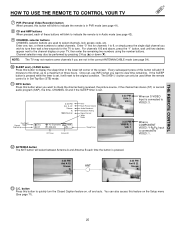
... FOCUS Use this button to turn the TV on the TV screen. These buttons also serve as the cursor left audio jack. ቩ IR RECEIVER / LEARNING AV NET sensor The screen area acts as the EXIT button when in MENU mode. ብ VOLUME level Press these buttons for best response. ቪ PHOTO MC Insert Photo memory card to instantly view your desired sound level. FRONT PANEL CONTROLS ቩ POWER FIRST TIME USE POWER ቦ ቫ PULL INPUT 5 S-VIDEO AUDIO VIDEO...
... FOCUS Use this button to turn the TV on the TV screen. These buttons also serve as the cursor left audio jack. ቩ IR RECEIVER / LEARNING AV NET sensor The screen area acts as the EXIT button when in MENU mode. ብ VOLUME level Press these buttons for best response. ቪ PHOTO MC Insert Photo memory card to instantly view your desired sound level. FRONT PANEL CONTROLS ቩ POWER FIRST TIME USE POWER ቦ ቫ PULL INPUT 5 S-VIDEO AUDIO VIDEO...
Owners Guide
Page 9
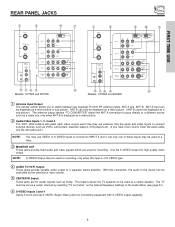
... variable audio output to a separate stereo amplifier. NOTE: S-VIDEO Output may be set as a center channel by the television's main volume. ቦ CENTER IN (Input) These jacks are pressed. The TV must be used at a time. ቤ MONITOR OUT These jacks provide fixed audio and video signals which are used as VCRs, camcorders, laserdisc players, DVD players etc. (if you to the stereo can be controlled by selecting "TV as a main picture. ባ Audio/Video Inputs 1, 2, 3 and...
... variable audio output to a separate stereo amplifier. NOTE: S-VIDEO Output may be set as a center channel by the television's main volume. ቦ CENTER IN (Input) These jacks are pressed. The TV must be used at a time. ቤ MONITOR OUT These jacks provide fixed audio and video signals which are used as VCRs, camcorders, laserdisc players, DVD players etc. (if you to the stereo can be controlled by selecting "TV as a main picture. ባ Audio/Video Inputs 1, 2, 3 and...
Owners Guide
Page 10
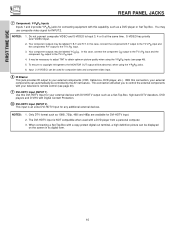
..., a high definition picture can be displayed on the screen in its digital form. 10 The DVI-HDTV input is an extra DVI-HDTV Input for any additional external devices. When connecting a Set-Top-Box with a DVD player from a personal computer. 3. You may be necessary to adjust TINT to Input 3, 4 or 5 at the same time. FIRST TIME USE REAR PANEL JACKS ቨ Component: Y-PBPR Inputs Inputs 1 and 2 provide Y-PBPR jacks for connecting equipment with Digital Content Protection. ቫ DVI-HDTV Input (INPUT 2) This input...
..., a high definition picture can be displayed on the screen in its digital form. 10 The DVI-HDTV input is an extra DVI-HDTV Input for any additional external devices. When connecting a Set-Top-Box with a DVD player from a personal computer. 3. You may be necessary to adjust TINT to Input 3, 4 or 5 at the same time. FIRST TIME USE REAR PANEL JACKS ቨ Component: Y-PBPR Inputs Inputs 1 and 2 provide Y-PBPR jacks for connecting equipment with Digital Content Protection. ቫ DVI-HDTV Input (INPUT 2) This input...

Owners Guide
Page 13
... using a DVI input from a Set-Top-Box, it to the left audio jack on the television. • Refer to the TV's PR input. • You may use composite video signal for Input 2~Input 5. • It may be labeled Y-CBCR. FIRST TIME USE TIPS ON REAR PANEL CONNECTIONS • S-VIDEO connections are provided for high performance components, such as DVD players and set- In this case, connect the components CB output to the TV's PB input and the components CR output...
... using a DVI input from a Set-Top-Box, it to the left audio jack on the television. • Refer to the TV's PR input. • You may use composite video signal for Input 2~Input 5. • It may be labeled Y-CBCR. FIRST TIME USE TIPS ON REAR PANEL CONNECTIONS • S-VIDEO connections are provided for high performance components, such as DVD players and set- In this case, connect the components CB output to the TV's PB input and the components CR output...
Owners Guide
Page 14
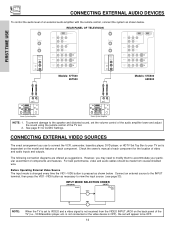
... volume control of the audio amplifier lower and adjust the sound using the remote control of the TV set will appear to be made from the VIDEO INPUT JACK on the model and features of each component for AUDIO Settings. For best performance, video and audio cables should be OFF. 14 INPUT MODE SELECTION ORDER (ANTENNA) (INPUT) Ant A VID1 YPBPR:1 VID1 ANT NOTE: When the TV is set is not received from coaxial shielded wire. FIRST TIME USE CONNECTING EXTERNAL AUDIO...
... volume control of the audio amplifier lower and adjust the sound using the remote control of the TV set will appear to be made from the VIDEO INPUT JACK on the model and features of each component for AUDIO Settings. For best performance, video and audio cables should be OFF. 14 INPUT MODE SELECTION ORDER (ANTENNA) (INPUT) Ant A VID1 YPBPR:1 VID1 ANT NOTE: When the TV is set is not received from coaxial shielded wire. FIRST TIME USE CONNECTING EXTERNAL AUDIO...
Owners Guide
Page 18
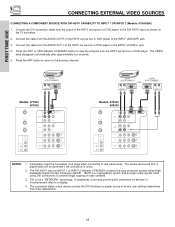
... rear panel jacks. Connect the DVI connection cable from the AUDIO OUT R of video contents. 3. The VIDEO label disappears automatically after approximately four seconds. 5. FIRST TIME USE CONNECTING EXTERNAL VIDEO SOURCES CONNECTING A COMPONENT SOURCE WITH DVI-HDTV CAPABILITY TO INPUT 1 OR INPUT 2 (Models: 57/65X500) 1. Connect the cable from the output of the HDTV set top box or DVD player. The picture and sound that is played back will be abnormal if the connection is a cryptographic system that encrypts video signals when using DVI connections to a display...
... rear panel jacks. Connect the DVI connection cable from the AUDIO OUT R of video contents. 3. The VIDEO label disappears automatically after approximately four seconds. 5. FIRST TIME USE CONNECTING EXTERNAL VIDEO SOURCES CONNECTING A COMPONENT SOURCE WITH DVI-HDTV CAPABILITY TO INPUT 1 OR INPUT 2 (Models: 57/65X500) 1. Connect the cable from the output of the HDTV set top box or DVD player. The picture and sound that is played back will be abnormal if the connection is a cryptographic system that encrypts video signals when using DVI connections to a display...
Owners Guide
Page 19
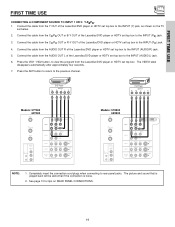
... DVI-HDTV R (MONO)/L AUDIO PR PB Y/VIDEO R (MONO)/L AUDIO DVI-HDTV INPUT 3 R (MONO)/L VIDEO S-VIDEO INPUT 4 R (MONO)/L VIDEO S-VIDEO MONITOR OUT R L VIDEO AUDIO S-VIDEO NOTE: 1. FIRST TIME USE FIRST TIME USE CONNECTING A COMPONENT SOURCE TO INPUT 1 OR 2: Y-PBPR. 1. Connect the cable from the Y OUT of the Laserdisc/DVD player or HDTV set top box to the INPUT (AUDIO/R) jack. 5. The VIDEO label disappears automatically after approximately four seconds. 7. Completely insert the connection cord plugs when connecting to the previous channel. The picture and sound...
... DVI-HDTV R (MONO)/L AUDIO PR PB Y/VIDEO R (MONO)/L AUDIO DVI-HDTV INPUT 3 R (MONO)/L VIDEO S-VIDEO INPUT 4 R (MONO)/L VIDEO S-VIDEO MONITOR OUT R L VIDEO AUDIO S-VIDEO NOTE: 1. FIRST TIME USE FIRST TIME USE CONNECTING A COMPONENT SOURCE TO INPUT 1 OR 2: Y-PBPR. 1. Connect the cable from the Y OUT of the Laserdisc/DVD player or HDTV set top box to the INPUT (AUDIO/R) jack. 5. The VIDEO label disappears automatically after approximately four seconds. 7. Completely insert the connection cord plugs when connecting to the previous channel. The picture and sound...
Owners Guide
Page 23
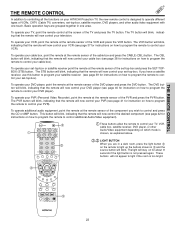
... DVD button will blink, indicating that the remote will now control your DVD player (see page 38 for instruction on how to program the remote to control your VCR). These buttons will now control the desired component (see page 39 for instructions on for instructions on how to program the remote to program your cable box). To operate your cable box, point the remote at the screen of the component you have a satellite receiver, use this button to control...
... DVD button will blink, indicating that the remote will now control your DVD player (see page 38 for instruction on how to program the remote to control your VCR). These buttons will now control the desired component (see page 39 for instructions on for instructions on how to program the remote to program your cable box). To operate your cable box, point the remote at the screen of the component you have a satellite receiver, use this button to control...
Owners Guide
Page 25
... turn the Closed Caption feature on the Setup menu (See page 71). 25 Every subsequent press of this button will add 15 minutes to this timer, up (̆) or down (̄). Once set, use INFO when you want to view time remaining. Off Timer Virtual HD Time Main Picture Source Audio Broadcast Broadcast Rating Signal Format Wide Mode Sleep Timer 3:32 PM S-IN: 3 VID 3 When an S-VIDEO Input is connected to VIDEO...
... turn the Closed Caption feature on the Setup menu (See page 71). 25 Every subsequent press of this button will add 15 minutes to this timer, up (̆) or down (̄). Once set, use INFO when you want to view time remaining. Off Timer Virtual HD Time Main Picture Source Audio Broadcast Broadcast Rating Signal Format Wide Mode Sleep Timer 3:32 PM S-IN: 3 VID 3 When an S-VIDEO Input is connected to VIDEO...
Owners Guide
Page 34
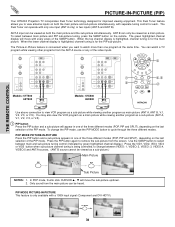
... Audio Video OUTPUT ANT A TO CONVERTER ANT B AUDIO TO HI-FI CENTER IN IR BLASTER L R INPUT 1 INPUT 2 PR PB Y DVI-HDTV R (MONO)/L AUDIO PR PB Y/VIDEO R (MONO)/L AUDIO DVI-HDTV INPUT 3 R (MONO)/L VIDEO S-VIDEO INPUT 4 R (MONO)/L VIDEO S-VIDEO MONITOR OUT R L VIDEO AUDIO S-VIDEO Models: 57X500 65X500 Audio Video OUTPUT MENU EXIT VOL SELECT CH ቤ ቢ ቤ MUTE LAST CH VID 1 VID 2 PIP VID 3 SURF VID 5 VID 4 FREEZE PIP MODE PIP ACCESS SWAP DAY/NIGHT ብ,ቦ ባ REC VCR VCR Use above connection to remove the sub-picture...
... Audio Video OUTPUT ANT A TO CONVERTER ANT B AUDIO TO HI-FI CENTER IN IR BLASTER L R INPUT 1 INPUT 2 PR PB Y DVI-HDTV R (MONO)/L AUDIO PR PB Y/VIDEO R (MONO)/L AUDIO DVI-HDTV INPUT 3 R (MONO)/L VIDEO S-VIDEO INPUT 4 R (MONO)/L VIDEO S-VIDEO MONITOR OUT R L VIDEO AUDIO S-VIDEO Models: 57X500 65X500 Audio Video OUTPUT MENU EXIT VOL SELECT CH ቤ ቢ ቤ MUTE LAST CH VID 1 VID 2 PIP VID 3 SURF VID 5 VID 4 FREEZE PIP MODE PIP ACCESS SWAP DAY/NIGHT ብ,ቦ ባ REC VCR VCR Use above connection to remove the sub-picture...

Owners Guide
Page 39
... to instruction manual of the set-top-box/satellite receiver for operation of the buttons exclusively for your satellite receiver by setting it to set-top-box/satellite pre-coded mode. 4. The remote will act as the TV/STB button when in STB mode. ቢ SET-TOP-BOX (STB) button This button allows the remote to control your set-top-box/satellite receiver. The remote will flash 3 times if the code was accepted. 5. THE REMOTE CONTROL USING THE REMOTE TO CONTROL SET-TOP-BOX/SATELLITE RECEIVER FUNCTIONS Operating the...
... to instruction manual of the set-top-box/satellite receiver for operation of the buttons exclusively for your satellite receiver by setting it to set-top-box/satellite pre-coded mode. 4. The remote will act as the TV/STB button when in STB mode. ቢ SET-TOP-BOX (STB) button This button allows the remote to control your set-top-box/satellite receiver. The remote will flash 3 times if the code was accepted. 5. THE REMOTE CONTROL USING THE REMOTE TO CONTROL SET-TOP-BOX/SATELLITE RECEIVER FUNCTIONS Operating the...
Owners Guide
Page 46
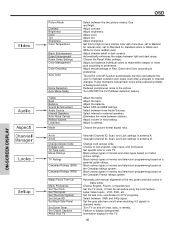
... programming based on motion picture ratings. Select internal or external speakers. Ant A Ant B Change Access Code Engage Lock TV Time Lock Movie Ratings TV Ratings Canadian Ratings (ENG) Canadian Ratings (FRN) Magic Focus Tune Up Menu Preference Set The Clock Set The Inputs Set The Color System Set Virtual HD Set Black Side Panel Set Event Timer Set Closed Captions About Your TV View/edit Channel ID, Scan, and Lock settings in the picture. Choose to preference. Adjust tint. Change Lock access code. Automatic and manual alignment of movies and television programming...
... programming based on motion picture ratings. Select internal or external speakers. Ant A Ant B Change Access Code Engage Lock TV Time Lock Movie Ratings TV Ratings Canadian Ratings (ENG) Canadian Ratings (FRN) Magic Focus Tune Up Menu Preference Set The Clock Set The Inputs Set The Color System Set Virtual HD Set Black Side Panel Set Event Timer Set Closed Captions About Your TV View/edit Channel ID, Scan, and Lock settings in the picture. Choose to preference. Adjust tint. Change Lock access code. Automatic and manual alignment of movies and television programming...
Owners Guide
Page 49
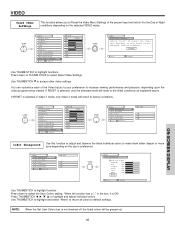
... SELECT Video Picture Mode Contrast Brightness Color Tint Sharpness Color Temperature Black Enhancement Edge Enhancement Reset Video Settings Move SEL Select ANT A/B Day 100% 50% 50% Night 50% High High High THUMB STICK Video Color Management Color Decoding Auto Color Noise Reduction Auto Movie Mode Move SEL Select ANT A/B Off Off Off ON-SCREEN DISPLAY Color Management Use this input to the original factory settings. VIDEO Reset Video Settings This function allows you to Reset the Video Menu Settings of the Video Inputs to your preference to increase viewing...
... SELECT Video Picture Mode Contrast Brightness Color Tint Sharpness Color Temperature Black Enhancement Edge Enhancement Reset Video Settings Move SEL Select ANT A/B Day 100% 50% 50% Night 50% High High High THUMB STICK Video Color Management Color Decoding Auto Color Noise Reduction Auto Movie Mode Move SEL Select ANT A/B Off Off Off ON-SCREEN DISPLAY Color Management Use this input to the original factory settings. VIDEO Reset Video Settings This function allows you to Reset the Video Menu Settings of the Video Inputs to your preference to increase viewing...

Owners Guide
Page 58
... Lock function settings are in the same signal source mode (see page 54), when a channel is locked, it is selected, various types of movies and video tapes based on , the picture and sound for all buttons on (❒✔ TIME LOCK) you set individually. It can be set . When SET INPUT LOCK is activated. 4. Manager Locks Setup Move SEL Sel THUMB STICK SELECT Please Enter Access Code [ - - - - ] [# Keys] Enter Code ON-SCREEN DISPLAY Locks Change Access Code Engage Lock TV Time Lock...
... Lock function settings are in the same signal source mode (see page 54), when a channel is locked, it is selected, various types of movies and video tapes based on , the picture and sound for all buttons on (❒✔ TIME LOCK) you set individually. It can be set . When SET INPUT LOCK is activated. 4. Manager Locks Setup Move SEL Sel THUMB STICK SELECT Please Enter Access Code [ - - - - ] [# Keys] Enter Code ON-SCREEN DISPLAY Locks Change Access Code Engage Lock TV Time Lock...
Owners Guide
Page 64
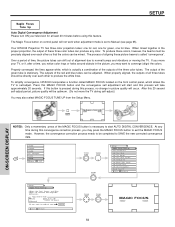
... SELECT Setup Magic Focus Tune Up Menu Preference Set The Clock Set The Inputs Set The Color System Set Virtual HD Set Black Side Panel Set Event Timer Set Closed Caption About Your TV Move SEL Select THUMB STICK THUMB STICK SELECT MAGIC FOCUS 64 Properly converged, the lines appear white, which allows the TV to self-adjust. When properly aligned, the outputs of all three tubes should be mixed. Video Aspect Audio Ch. The process of time, the picture tubes can...
... SELECT Setup Magic Focus Tune Up Menu Preference Set The Clock Set The Inputs Set The Color System Set Virtual HD Set Black Side Panel Set Event Timer Set Closed Caption About Your TV Move SEL Select THUMB STICK THUMB STICK SELECT MAGIC FOCUS 64 Properly converged, the lines appear white, which allows the TV to self-adjust. When properly aligned, the outputs of all three tubes should be mixed. Video Aspect Audio Ch. The process of time, the picture tubes can...

Owners Guide
Page 65
... remote control to SAVE adjusted data and return to the manual convergence adjustment mode (crosshatch pattern). ON-SCREEN DISPLAY 65 Using the Remote Control, select SETUP-MAGIC FOCUS TUNE UP-MANUAL ADJUSTMENT MODE-START to main picture. SETUP Manual Convergence Adjustment Mode NOTES: 1. Please turn ON your television for Magnetic Influences. To Move Adjustment Point To move the Adjustment Point Cursor is indicated by the Adjustment Point Cursor. Manager Locks MENU Setup Move SEL Sel Setup Magic Focus Tune Up Aligns the Red, Green, and Blue colors...
... remote control to SAVE adjusted data and return to the manual convergence adjustment mode (crosshatch pattern). ON-SCREEN DISPLAY 65 Using the Remote Control, select SETUP-MAGIC FOCUS TUNE UP-MANUAL ADJUSTMENT MODE-START to main picture. SETUP Manual Convergence Adjustment Mode NOTES: 1. Please turn ON your television for Magnetic Influences. To Move Adjustment Point To move the Adjustment Point Cursor is indicated by the Adjustment Point Cursor. Manager Locks MENU Setup Move SEL Sel Setup Magic Focus Tune Up Aligns the Red, Green, and Blue colors...

Owners Guide
Page 75
... improvements, specifications in Picture • Magic Focus (Auto Digital Convergence and Manual Adjustment) • Dual Antenna Inputs • Video Input Sensor • 3 Dimensional Y/C Comb Filter • Full 1080i HDTV capable when used with a Set-Top Box. • High bandwidth Digital Content Protection V1.0 compatible. • Photo MC(View digital still pictures from BBE Sound, Inc. W+28 Ultra Band W+29 - BBE and BBE symbol are subject to change without notice. 75 W+84 • Video 1.0Vp...
... improvements, specifications in Picture • Magic Focus (Auto Digital Convergence and Manual Adjustment) • Dual Antenna Inputs • Video Input Sensor • 3 Dimensional Y/C Comb Filter • Full 1080i HDTV capable when used with a Set-Top Box. • High bandwidth Digital Content Protection V1.0 compatible. • Photo MC(View digital still pictures from BBE Sound, Inc. W+28 Ultra Band W+29 - BBE and BBE symbol are subject to change without notice. 75 W+84 • Video 1.0Vp...


