Owners Guide
Page 2
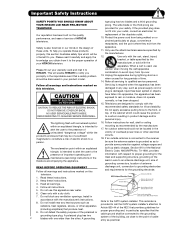
..., or top, of HITACHI televisions. Important Safety Instructions SAFETY POINTS YOU SHOULD KNOW ABOUT type plug has two blades and a third grounding YOUR HITACHI LCD REAR PROJECTION prong. Please read it carefully and apply the knowledge you . If an outside antenna is intended to alert the user to the grounding 2 grounding-type plug. Use only with the cart, stand, tripod, bracket...
..., or top, of HITACHI televisions. Important Safety Instructions SAFETY POINTS YOU SHOULD KNOW ABOUT type plug has two blades and a third grounding YOUR HITACHI LCD REAR PROJECTION prong. Please read it carefully and apply the knowledge you . If an outside antenna is intended to alert the user to the grounding 2 grounding-type plug. Use only with the cart, stand, tripod, bracket...
Owners Guide
Page 3
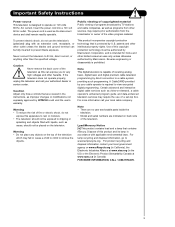
... current. A CableCARD provided by U.S. Dispose of this apparatus to rain or moisture. • The television should not be fully inserted to prevent blade exposure. Important Safety Instructions Power source This television is required to view encrypted digital programming. Caution Never remove the back cover of the video program material. Note • There are no user serviceable parts inside the television. • Model and serial numbers are covered in Canada).
... current. A CableCARD provided by U.S. Dispose of this apparatus to rain or moisture. • The television should not be fully inserted to prevent blade exposure. Important Safety Instructions Power source This television is required to view encrypted digital programming. Caution Never remove the back cover of the video program material. Note • There are no user serviceable parts inside the television. • Model and serial numbers are covered in Canada).
Owners Guide
Page 5
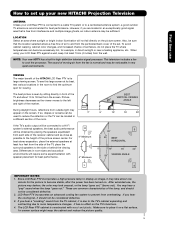
... color changes, and increased chance of the TV, place the surround speakers to prevent from the wall. To see this large screen at least 10cm (4 inches) from overheating. Differences in high definition television signal processor. You may appear on the screen. When using your LCD Rear PTV is connected to a cable TV system or to room temperature changes. This television includes a fan to find the optimum spot for viewing. The best picture...
... color changes, and increased chance of the TV, place the surround speakers to prevent from the wall. To see this large screen at least 10cm (4 inches) from overheating. Differences in high definition television signal processor. You may appear on the screen. When using your LCD Rear PTV is connected to a cable TV system or to room temperature changes. This television includes a fan to find the optimum spot for viewing. The best picture...
Owners Guide
Page 6
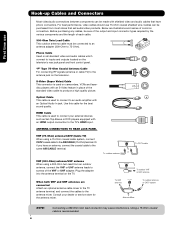
... length of the standard video cable to produce a high quality picture. For best performance, video cables should use Hook-up Cables and Connectors Most video/audio connections between components can be made with an HDMI output connection to connect your dealer or service store for the best sound quality. Plug the adapter into the antenna terminal on the television's rear jack panel and front control panel. Cables can be purchased from an outdoor antenna, connect the VHF or UHF...
... length of the standard video cable to produce a high quality picture. For best performance, video cables should use Hook-up Cables and Connectors Most video/audio connections between components can be made with an HDMI output connection to connect your dealer or service store for the best sound quality. Plug the adapter into the antenna terminal on the television's rear jack panel and front control panel. Cables can be purchased from an outdoor antenna, connect the VHF or UHF...

Owners Guide
Page 7
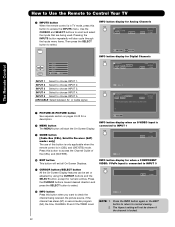
...) Used to manually enter the TV channel, and used for a complete description of all of the functions on your HITACHI LCD Rear Projection TV, the new remote control is designed to operate different types of the OSD or INPUTS menu systems if their menu is included in Set-Top-Box (STB) mode or when the TV uses a digital input. GUIDE BUTTON (SAT, CBL) Accesses the program guide of the TV or pause other devices. Television VCR - INPUTS BUTTON (TV) Accesses the INPUTS menu system. ASPECT BUTTON (TV) Changes the aspect ratio...
...) Used to manually enter the TV channel, and used for a complete description of all of the functions on your HITACHI LCD Rear Projection TV, the new remote control is designed to operate different types of the OSD or INPUTS menu systems if their menu is included in Set-Top-Box (STB) mode or when the TV uses a digital input. GUIDE BUTTON (SAT, CBL) Accesses the program guide of the TV or pause other devices. Television VCR - INPUTS BUTTON (TV) Accesses the INPUTS menu system. ASPECT BUTTON (TV) Changes the aspect ratio...
Owners Guide
Page 9
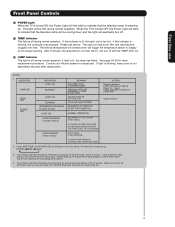
... video signal is not received from the input jacks. Your Hitachi LCD Rear Projection Television has an internal lamp that may appear to replace if LAMP still does not light by Power On " again. If this indicator is too hot. INDICATOR LAMP LED TEMP LED POWER LED INDICATION LIGHT ON BLINKING LIGHT ON BLINKING INTERMEDIATE BLINKING (0.5 SEC CYCLE) LIGHT ON SHORT BLINKING (0.3 SEC CYCLE) MEANING NO LAMP LIGHT or BROKEN LAMP WRONG LAMP UNI T ASSEMBLY / LAMP DOOR OPEN Too hot inside the OPTICAL unit COOLING FAN...
... video signal is not received from the input jacks. Your Hitachi LCD Rear Projection Television has an internal lamp that may appear to replace if LAMP still does not light by Power On " again. If this indicator is too hot. INDICATOR LAMP LED TEMP LED POWER LED INDICATION LIGHT ON BLINKING LIGHT ON BLINKING INTERMEDIATE BLINKING (0.5 SEC CYCLE) LIGHT ON SHORT BLINKING (0.3 SEC CYCLE) MEANING NO LAMP LIGHT or BROKEN LAMP WRONG LAMP UNI T ASSEMBLY / LAMP DOOR OPEN Too hot inside the OPTICAL unit COOLING FAN...

Owners Guide
Page 10
... INPUTS menu. However, you use Note : Special device cables will be required according to the device specifications. For best performance, video and audio cables should be abnormal. OUTPUT Y PB /C B PR/CR L R OUTPUT VIDEO L R Video Game COMPONENT OUTPUT CAPABILITY DVD , Set Top Box, Video Game Console. The exact arrangement you may be made from coaxial shielded wire. The following examples : Front Control Panel Connections First time use to connect the VCR, camcorder, laserdisc player, DVD player, or HDTV Set Top Box...
... INPUTS menu. However, you use Note : Special device cables will be required according to the device specifications. For best performance, video and audio cables should be abnormal. OUTPUT Y PB /C B PR/CR L R OUTPUT VIDEO L R Video Game COMPONENT OUTPUT CAPABILITY DVD , Set Top Box, Video Game Console. The exact arrangement you may be made from coaxial shielded wire. The following examples : Front Control Panel Connections First time use to connect the VCR, camcorder, laserdisc player, DVD player, or HDTV Set Top Box...
Owners Guide
Page 11
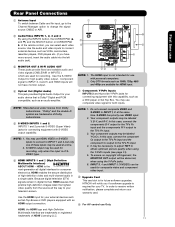
... remote control, you have monitor output. ቤባ ብ NOTE: 1. HITACHI will be labeled Y-CBCR. Rear Panel Connections First time use ቢ Antenna Input To switch between Cable and Air input, go to the Channel Manager option to change the signal source CABLE or AIR. ባ Audio/Video INPUTS 1, 2, 3 and 4 By using the INPUTS button, the CURSOR PAD (̆ and ̄), and the SELECT button or CURSOR PAD ̈ of HDMI Licensing LLC. 1111 Use the audio and video inputs to INPUT...
... remote control, you have monitor output. ቤባ ብ NOTE: 1. HITACHI will be labeled Y-CBCR. Rear Panel Connections First time use ቢ Antenna Input To switch between Cable and Air input, go to the Channel Manager option to change the signal source CABLE or AIR. ባ Audio/Video INPUTS 1, 2, 3 and 4 By using the INPUTS button, the CURSOR PAD (̆ and ̄), and the SELECT button or CURSOR PAD ̈ of HDMI Licensing LLC. 1111 Use the audio and video inputs to INPUT...
Owners Guide
Page 14
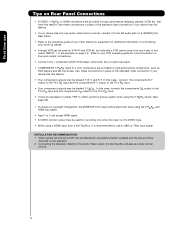
... page 14). Use these connections in the example on line input-output connections. • Connect only 1 component (VCR, DVD player, camcorder, etc.) to your device has this feature. Video signals fed through a VCR may be necessary to adjust TINT to the Audio /Video output of the standard video connection if your VCR operating guide for high performance laserdisc players, VCRs etc. Connecting the television directly to obtain optimum picture quality when using the Y-PBPR inputs. (See...
... page 14). Use these connections in the example on line input-output connections. • Connect only 1 component (VCR, DVD player, camcorder, etc.) to your device has this feature. Video signals fed through a VCR may be necessary to adjust TINT to the Audio /Video output of the standard video connection if your VCR operating guide for high performance laserdisc players, VCRs etc. Connecting the television directly to obtain optimum picture quality when using the Y-PBPR inputs. (See...
Owners Guide
Page 16
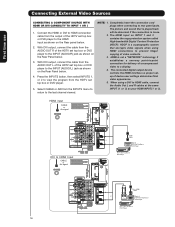
... time use Connecting External Video Sources CONNECTING A COMPONENT SOURCE WITH HDMI OR DVI CAPABILITY TO INPUT 1 OR 2 1. With DVI output, connect the cable from the AUDIO OUT R of the HDTV set top box or DVD player to the INPUT (AUDIO/L) jack as shown on the Rear Panel below . 2. NOTE: 1. Press the INPUTS button, then select INPUTS 1, or 2 to rear panel jacks. The picture and sound that encrypts video signals when using a DVI to the last channel viewed. With DVI output, connect the cable from the HDTV set top box or DVD player to HDMI Cable or DIGITAL OUTPUT...
... time use Connecting External Video Sources CONNECTING A COMPONENT SOURCE WITH HDMI OR DVI CAPABILITY TO INPUT 1 OR 2 1. With DVI output, connect the cable from the AUDIO OUT R of the HDTV set top box or DVD player to the INPUT (AUDIO/L) jack as shown on the Rear Panel below . 2. NOTE: 1. Press the INPUTS button, then select INPUTS 1, or 2 to rear panel jacks. The picture and sound that encrypts video signals when using a DVI to the last channel viewed. With DVI output, connect the cable from the HDTV set top box or DVD player to HDMI Cable or DIGITAL OUTPUT...
Owners Guide
Page 22
... Aspect setting will not be set . INFO Auto Show Name 3:00PM- 3:30PM ALT U.S. Auto INFO button display when an S-VIDEO Input is locked. 22 Use the CURSOR and SELECT buttons to scroll and select the inputs that are being received, the picture source, if the channel has stereo (ST) or second audio program (SA), the time, CHANNEL ID and if the TIMER is in this button to access the Channel Guide of this button to access the INPUTS menu. INPUT...
... Aspect setting will not be set . INFO Auto Show Name 3:00PM- 3:30PM ALT U.S. Auto INFO button display when an S-VIDEO Input is locked. 22 Use the CURSOR and SELECT buttons to scroll and select the inputs that are being received, the picture source, if the channel has stereo (ST) or second audio program (SA), the time, CHANNEL ID and if the TIMER is in this button to access the Channel Guide of this button to access the INPUTS menu. INPUT...
Owners Guide
Page 28
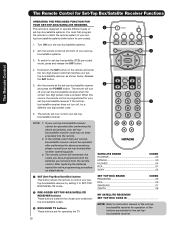
... set -topbox/satellite receiver. Turn ON your set -top-box/satellite receiver when the correct two digit preset code is designed to operate different types of · set-top-box/satellite systems. You must first program the remote to SET-TOPBOX/SATELLITE mode. · PRE-CODED SET-TOP-BOX/SATELLITE RECEIVER buttons These buttons transmit the chosen pre-coded settop-box/satellite codes. » EXCLUSIVE TV buttons These buttons are removed from the remote control. If the set-top- · box/satellite receiver...
... set -topbox/satellite receiver. Turn ON your set -top-box/satellite receiver when the correct two digit preset code is designed to operate different types of · set-top-box/satellite systems. You must first program the remote to SET-TOPBOX/SATELLITE mode. · PRE-CODED SET-TOP-BOX/SATELLITE RECEIVER buttons These buttons transmit the chosen pre-coded settop-box/satellite codes. » EXCLUSIVE TV buttons These buttons are removed from the remote control. If the set-top- · box/satellite receiver...
Owners Guide
Page 32
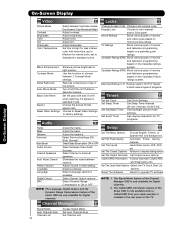
... cable operator is only available for standard colors Canadian Ratings (ENG) Block various types of programs Black Side Panel detection feature. Turn On/Off the 3:2 Pulldown Alternate Ratings U.S. Set the Clock Set Sleep Timer Set Day/Night Timer Set Event Timer Set Clock Settings. Adjust the balance. Eliminates the noise between 3 pictures modes; Select Dynamic Range Compression to upgrade TV software. Change Access Code Change Lock access code. Channel List Set Channel List. 32 intervals, 00:30-3:00). Set The Menu Options Set The Power Saving Set The Inputs Set...
... cable operator is only available for standard colors Canadian Ratings (ENG) Block various types of programs Black Side Panel detection feature. Turn On/Off the 3:2 Pulldown Alternate Ratings U.S. Set the Clock Set Sleep Timer Set Day/Night Timer Set Event Timer Set Clock Settings. Adjust the balance. Eliminates the noise between 3 pictures modes; Select Dynamic Range Compression to upgrade TV software. Change Access Code Change Lock access code. Channel List Set Channel List. 32 intervals, 00:30-3:00). Set The Menu Options Set The Power Saving Set The Inputs Set...
Owners Guide
Page 40
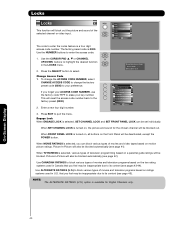
... ACCESS CODE NUMBER, use the factory code 7777 to erase your preference. 0 0 If you can be deactivated, except the POWER button. When TV RATINGS is turned on, all buttons on , the picture and sound for Digital Channels only. Locks Locks This function will be inappropriate due to its content (see pages 43-44). When FRONT PANEL LOCK is selected, various types of television programming based on motion picture ratings. On-Screen Display 40 Change Access Code 1. Engage Lock...
... ACCESS CODE NUMBER, use the factory code 7777 to erase your preference. 0 0 If you can be deactivated, except the POWER button. When TV RATINGS is turned on, all buttons on , the picture and sound for Digital Channels only. Locks Locks This function will be inappropriate due to its content (see pages 43-44). When FRONT PANEL LOCK is selected, various types of television programming based on motion picture ratings. On-Screen Display 40 Change Access Code 1. Engage Lock...

Owners Guide
Page 50
.... 2. INSTRUCTIONS: 1. Select SOLID for a black background (no picture can be seen behind menu screen), select SHADED and a light background is visible. 3. Use this feature to Off. 4. Setup Set The Menu Options Set The Language : Set The Menu Background : Move SEL Return English Shaded Setup Set The Menu Options OR Set The Power Saving Set The Inputs Set The Closed Captions Set The Output Terminals CableCARD Information Set The Quick Start Options Reset The Software Move SEL Select Setup Set The Power...
.... 2. INSTRUCTIONS: 1. Select SOLID for a black background (no picture can be seen behind menu screen), select SHADED and a light background is visible. 3. Use this feature to Off. 4. Setup Set The Menu Options Set The Language : Set The Menu Background : Move SEL Return English Shaded Setup Set The Menu Options OR Set The Power Saving Set The Inputs Set The Closed Captions Set The Output Terminals CableCARD Information Set The Quick Start Options Reset The Software Move SEL Select Setup Set The Power...
Owners Guide
Page 53
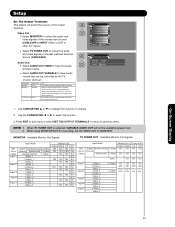
..., set the VIDEO OUT to change 2. YES Video_4 - YES YES YES Input 5 Y-PbPr_5 - - - Use CURSOR PAD ̆ or ̄ to highlight the function to MONITOR. When TV TUNER OUT is connected to output the audio and video signals of the last watched Antenna Source (CABLE/AIR). YES Video_3 - Video Out Monitor Monitor Audio Out Fixed Variable TV Tuner Out Fixed Use To record currently viewed Video and Audio. YES YES YES ANT (Air or Cable) Input Mode Monitor Out (TV Tuner Out) S-Video Video L/R HiFi Digital...
..., set the VIDEO OUT to change 2. YES Video_4 - YES YES YES Input 5 Y-PbPr_5 - - - Use CURSOR PAD ̆ or ̄ to highlight the function to MONITOR. When TV TUNER OUT is connected to output the audio and video signals of the last watched Antenna Source (CABLE/AIR). YES Video_3 - Video Out Monitor Monitor Audio Out Fixed Variable TV Tuner Out Fixed Use To record currently viewed Video and Audio. YES YES YES ANT (Air or Cable) Input Mode Monitor Out (TV Tuner Out) S-Video Video L/R HiFi Digital...
Owners Guide
Page 63
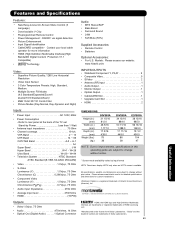
All specifications, weights, and dimensions are subject to change without prior notice. UltraVision Digital is available. Models: Please access our website: www.hitachi.us/tv INPUTS/OUTPUTS • Wideband Component Y, Pb,Pr 3 • Composite Video 5 • SVideo 2 • Antenna (RF)Input 1 • Audio Output 1 • Monitor Output 1 • Optical Output 1 • CableCARD Slot 1 • Upgrade Card Slot 1 • HDMI 2 Useful Information Inputs: • Power Input AC 120V, 60Hz • Power Consumption - VHF-Band 2 ~ 13 UHF-Band 14 ~ 69 CATV Mid...
All specifications, weights, and dimensions are subject to change without prior notice. UltraVision Digital is available. Models: Please access our website: www.hitachi.us/tv INPUTS/OUTPUTS • Wideband Component Y, Pb,Pr 3 • Composite Video 5 • SVideo 2 • Antenna (RF)Input 1 • Audio Output 1 • Monitor Output 1 • Optical Output 1 • CableCARD Slot 1 • Upgrade Card Slot 1 • HDMI 2 Useful Information Inputs: • Power Input AC 120V, 60Hz • Power Consumption - VHF-Band 2 ~ 13 UHF-Band 14 ~ 69 CATV Mid...
Owners Guide
Page 65
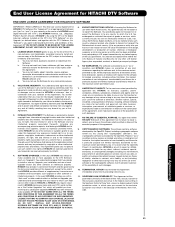
... HITACHI not expressly granted to install or use any Upgrade, your installation and use of such Upgrade and/or any other software or intellectual property HITACHI may provide in your capacity as the owner of this Agreement. 3. HITACHI grants to you of Manhattan, New York, USA. All right, title and interest in HITACHI placing your name and your failure to return such flash card...
... HITACHI not expressly granted to install or use any Upgrade, your installation and use of such Upgrade and/or any other software or intellectual property HITACHI may provide in your capacity as the owner of this Agreement. 3. HITACHI grants to you of Manhattan, New York, USA. All right, title and interest in HITACHI placing your name and your failure to return such flash card...
Owners Guide
Page 75
... 34 Color 33 Contrast 33 Contrast Mode 34 E Event Timer 48 External Video Source 12-18 R Remote Control Functions 19-23 Programming Codes 27-30 Installing Batteries 4 S Sharpness 33 Speakers 37 Connecting External Speakers 37 Internal 37 Split Mode 24 Surround 36 F T Favorite Channel 23 Freeze 20,26 H HDMI 13,16 Timers 46-48 Tint 33 Treble 36 V I Video Settings 33-35 Input Setup 22,51 L Lamp Replacement 56-59 Language Menu Language 49 Locks Change Access Code 40 Channel Lock...
... 34 Color 33 Contrast 33 Contrast Mode 34 E Event Timer 48 External Video Source 12-18 R Remote Control Functions 19-23 Programming Codes 27-30 Installing Batteries 4 S Sharpness 33 Speakers 37 Connecting External Speakers 37 Internal 37 Split Mode 24 Surround 36 F T Favorite Channel 23 Freeze 20,26 H HDMI 13,16 Timers 46-48 Tint 33 Treble 36 V I Video Settings 33-35 Input Setup 22,51 L Lamp Replacement 56-59 Language Menu Language 49 Locks Change Access Code 40 Channel Lock...
Brochure
Page 1
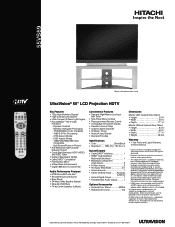
...11/16" • Weight 86 lbs. All specifications and dimensions are compatible with DVI-HDTV (HDCP) signals when combined with Timer • Side Panel Menu Controls • Preprogrammed Remote Control • 3-Language On-Screen Display • Parental Locks (V-Chip) • Closed Caption Decoder • On/Sleep Timers • AutoLink Input Sensor • Discrete IR Codes Specifications • Color Silver/Black • Resolution:..... 1280 (H) x 720 (V) x 3 Inputs/Outputs • CableCARD™ Interface 1 • HDMI™ High-Definition Multimedia Interface:4 1 •...
...11/16" • Weight 86 lbs. All specifications and dimensions are compatible with DVI-HDTV (HDCP) signals when combined with Timer • Side Panel Menu Controls • Preprogrammed Remote Control • 3-Language On-Screen Display • Parental Locks (V-Chip) • Closed Caption Decoder • On/Sleep Timers • AutoLink Input Sensor • Discrete IR Codes Specifications • Color Silver/Black • Resolution:..... 1280 (H) x 720 (V) x 3 Inputs/Outputs • CableCARD™ Interface 1 • HDMI™ High-Definition Multimedia Interface:4 1 •...


