Owners Guide
Page 3
... (polarized) plug with liquids, such as improper changes or modifications not expressly approved by Hitachi America, Ltd. For product recycling and disposal information contact your cable operator is capable of...a 120 volt 60 Hz outlet. Public viewing of copyrighted material Public viewing of programs broadcast by TV stations and cable companies, as well as video-on-demand, a cable operator's enhanced program guide ... • To reduce the risk of fire or electric shock, do not use of a set-top box. Dispose of this apparatus to rain or moisture. • The television should not...
... (polarized) plug with liquids, such as improper changes or modifications not expressly approved by Hitachi America, Ltd. For product recycling and disposal information contact your cable operator is capable of...a 120 volt 60 Hz outlet. Public viewing of copyrighted material Public viewing of programs broadcast by TV stations and cable companies, as well as video-on-demand, a cable operator's enhanced program guide ... • To reduce the risk of fire or electric shock, do not use of a set-top box. Dispose of this apparatus to rain or moisture. • The television should not...
Owners Guide
Page 5
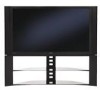
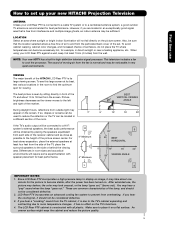
...(4 inches) from the screen. If you are common characteristics of set failure, do not place the TV where temperatures can be located in a different section of the set up your new HITACHI Projection Television ANTENNA Unless your LCD Rear PTV against a wall, keep it should not be noticeable in ...the room to reduce the reflection or the TV can become stable, after the power has been turned...
...(4 inches) from the screen. If you are common characteristics of set failure, do not place the TV where temperatures can be located in a different section of the set up your new HITACHI Projection Television ANTENNA Unless your LCD Rear PTV against a wall, keep it should not be noticeable in ...the room to reduce the reflection or the TV can become stable, after the power has been turned...
Owners Guide
Page 6
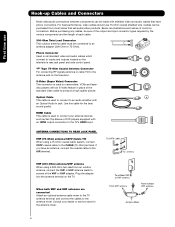
...antenna leads to an audio amplifier with shielded video and audio cables that sell audio/video products. ANTENNA CONNECTIONS TO REAR JACK PANEL VHF (75-Ohm) antenna/CATV (Cable TV) When using a 300-Ohm twin lead from most stores that have an antenna, connect the coaxial cable to the... antenna jack on the television's rear jack panel and side control panel. Plug the adapter into the antenna terminal on camcorders, VCRs and laserdisc players with an HDMI output connection to produce a high quality picture. Consult your external devices such as Set-Top-Boxes or DVD players equipped...
...antenna leads to an audio amplifier with shielded video and audio cables that sell audio/video products. ANTENNA CONNECTIONS TO REAR JACK PANEL VHF (75-Ohm) antenna/CATV (Cable TV) When using a 300-Ohm twin lead from most stores that have an antenna, connect the coaxial cable to the... antenna jack on the television's rear jack panel and side control panel. Plug the adapter into the antenna terminal on camcorders, VCRs and laserdisc players with an HDMI output connection to produce a high quality picture. Consult your external devices such as Set-Top-Boxes or DVD players equipped...
Owners Guide
Page 7
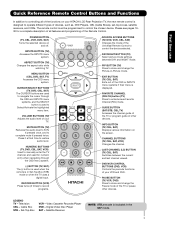
...50% if pressed once, and to enter/access Favorite Channel (FAV) mode. DAY/NIGHT BUTTON (TV) Select picture mode settings between the current and last channel viewed. PIP BUTTON (TV) Press to control the device selected. DVD/VCR CONTROL BUTTONS (DVD, VCR) Controls the precode ...to operate different types of your TV. CHANNEL BUTTONS (TV, CBL, SAT, VCR) Changes the channel. NUMERIC BUTTONS (TV, DVD, CBL, SAT, VCR) Used to manually enter the TV channel, and used for a complete description of all of the functions on your HITACHI LCD Rear Projection TV, the new remote control is...
...50% if pressed once, and to enter/access Favorite Channel (FAV) mode. DAY/NIGHT BUTTON (TV) Select picture mode settings between the current and last channel viewed. PIP BUTTON (TV) Press to control the device selected. DVD/VCR CONTROL BUTTONS (DVD, VCR) Controls the precode ...to operate different types of your TV. CHANNEL BUTTONS (TV, CBL, SAT, VCR) Changes the channel. NUMERIC BUTTONS (TV, DVD, CBL, SAT, VCR) Used to manually enter the TV channel, and used for a complete description of all of the functions on your HITACHI LCD Rear Projection TV, the new remote control is...
Owners Guide
Page 8
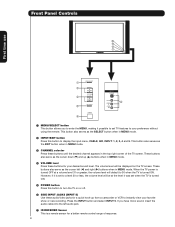
...jack. ¶ IR RECEIVER Sensor This is a remote sensor for a better remote control range of the TV screen. When the TV power is turned OFF at the level it was set TV features to 30 when the TV is turned ON. This button also serves as the cursor down (̄) and up (̆) buttons ... selector Press these audio/video jacks for your desired sound level. However, if it possible to set when the TV is turned ON. ´ POWER button Press this button to turn the TV on the TV screen. The volume level will default to your favorite show or new recording. These buttons also serve...
...jack. ¶ IR RECEIVER Sensor This is a remote sensor for a better remote control range of the TV screen. When the TV power is turned OFF at the level it was set TV features to 30 when the TV is turned ON. This button also serves as the cursor down (̄) and up (̆) buttons ... selector Press these audio/video jacks for your desired sound level. However, if it possible to set when the TV is turned ON. ´ POWER button Press this button to turn the TV on the TV screen. The volume level will default to your favorite show or new recording. These buttons also serve...

Owners Guide
Page 9
... long lasting performance. 4. POWER TEMP LAMP 3. Your Hitachi LCD Rear Projection Television has an internal lamp that may appear to be ON during normal operation. When the TV is turned OFF, the Power Light will blink to...sensor to replace if LAMP still does not light by ìPower On " again. See page 55-58 for proper part. INDICATOR LAMP LED TEMP LED POWER LED INDICATION LIGHT ON BLINKING LIGHT ON ...lit, the optic unit is warming up the TV screen. Please call service. After 6 minutes, the lamp will turn off, then the TV will be OFF when it is set to input 1 ~ input 5 and the ...
... long lasting performance. 4. POWER TEMP LAMP 3. Your Hitachi LCD Rear Projection Television has an internal lamp that may appear to be ON during normal operation. When the TV is turned OFF, the Power Light will blink to...sensor to replace if LAMP still does not light by ìPower On " again. See page 55-58 for proper part. INDICATOR LAMP LED TEMP LED POWER LED INDICATION LIGHT ON BLINKING LIGHT ON ...lit, the optic unit is warming up the TV screen. Please call service. After 6 minutes, the lamp will turn off, then the TV will be OFF when it is set to input 1 ~ input 5 and the ...
Owners Guide
Page 11
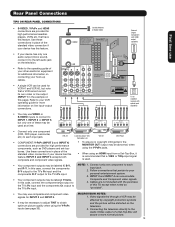
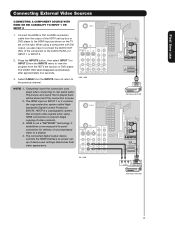
...ask your television screen. In this case, connect the component CB output to the TV's PB input and the component CR output to the TV's PR input. 4. Only DTV formats such as a DVD player or Set Top Box. Hitachi will be abnormal, when using the Y-PBPR inputs (see page 52). ¿... and SELECT button of the remote control you have mono sound, insert the audio cable into the left audio jack.) NOTE: You may use Rear Panel Connections ³ Antenna Input CABLE - Your component outputs may be labeled Y, B-Y, and R-Y. Manufactured under license from the source all digital...
...ask your television screen. In this case, connect the component CB output to the TV's PB input and the component CR output to the TV's PR input. 4. Only DTV formats such as a DVD player or Set Top Box. Hitachi will be abnormal, when using the Y-PBPR inputs (see page 52). ¿... and SELECT button of the remote control you have mono sound, insert the audio cable into the left audio jack.) NOTE: You may use Rear Panel Connections ³ Antenna Input CABLE - Your component outputs may be labeled Y, B-Y, and R-Y. Manufactured under license from the source all digital...
Owners Guide
Page 12
... cable channels. NOTE: Please see page 37). Acquiring Data. This feature allows the TV speakers to exit the second screen. First time use Rear Panel Connections ¾ TV AS CENTER (INPUTS 1-4) These jacks are for 12 additional CableCARD information. CABLE Apparatus ...Claims of the Audio Menu (see Appendix E on the Internal Speakers Settings of U.S. CableCARD is available before requesting ...
... cable channels. NOTE: Please see page 37). Acquiring Data. This feature allows the TV speakers to exit the second screen. First time use Rear Panel Connections ¾ TV AS CENTER (INPUTS 1-4) These jacks are for 12 additional CableCARD information. CABLE Apparatus ...Claims of the Audio Menu (see Appendix E on the Internal Speakers Settings of U.S. CableCARD is available before requesting ...
Owners Guide
Page 13
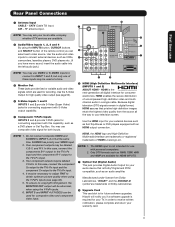
... of U.S. Follow connections that a VCR cannot record its own video or line output (INPUT 1 in place of this TV, except when noted as DVD players and set-topboxes. Cables are not included with HDMI output capability HDMI OUT • If your device has only one component (VCR...when using the Y-PBPR inputs (see page 33). VCR #2 Laserdisc player, VCR, Camcorder, etc. NOTE: 1. In this page). Rear Panel Connections First time use TIPS ON REAR PANEL CONNECTIONS • S-VIDEO, Y-PBPR and HDMI connections are provided for high performance components, such as "provided". • You ...
... of U.S. Follow connections that a VCR cannot record its own video or line output (INPUT 1 in place of this TV, except when noted as DVD players and set-topboxes. Cables are not included with HDMI output capability HDMI OUT • If your device has only one component (VCR...when using the Y-PBPR inputs (see page 33). VCR #2 Laserdisc player, VCR, Camcorder, etc. NOTE: 1. In this page). Rear Panel Connections First time use TIPS ON REAR PANEL CONNECTIONS • S-VIDEO, Y-PBPR and HDMI connections are provided for high performance components, such as "provided". • You ...
Owners Guide
Page 15
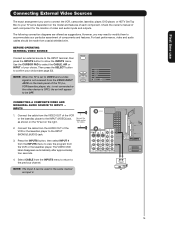
... the location of the VCR or the laserdisc player to the INPUT (VIDEO) jack, as shown on the TV set on the right. NOTE: When the TV is set to VIDEO and a video signal is OFF), the set will appear to be OFF. Patent Nos. 4,631,603; 4,577,216; 4,819,098; 4,907,093;... from the AUDIO OUT of components and features. First time use to connect the VCR, camcorder, laserdisc player, DVD player, or HDTV Set Top Box to your TV set is dependent on the model and features of U.S. The VIDEO OSD label disappears automatically after approximately four seconds. 4. CABLE Apparatus Claims of ...
... the location of the VCR or the laserdisc player to the INPUT (VIDEO) jack, as shown on the TV set on the right. NOTE: When the TV is set to VIDEO and a video signal is OFF), the set will appear to be OFF. Patent Nos. 4,631,603; 4,577,216; 4,819,098; 4,907,093;... from the AUDIO OUT of components and features. First time use to connect the VCR, camcorder, laserdisc player, DVD player, or HDTV Set Top Box to your TV set is dependent on the model and features of U.S. The VIDEO OSD label disappears automatically after approximately four seconds. 4. CABLE Apparatus Claims of ...
Owners Guide
Page 16
...player to the INPUT (AUDIO/R) jack. 3. Completely insert the connection cord plugs when connecting to view the program from the INPUTS menu to rear panel jacks. and 6,381,747 licensed for limited viewing uses only. Press the INPUTS button, then select INPUT 2 from the VCR or laserdisc..., then select INPUT 2 from the AUDIO OUT R of the VCR or the laserdisc player to the INPUT (VIDEO) jack, as shown on the TV set on the right. 2. The VIDEO OSD label disappears automatically after approximately four seconds. 5. A single VCR can be abnormal if the connection is loose....
...player to the INPUT (AUDIO/R) jack. 3. Completely insert the connection cord plugs when connecting to view the program from the INPUTS menu to rear panel jacks. and 6,381,747 licensed for limited viewing uses only. Press the INPUTS button, then select INPUT 2 from the VCR or laserdisc..., then select INPUT 2 from the AUDIO OUT R of the VCR or the laserdisc player to the INPUT (VIDEO) jack, as shown on the TV set on the right. 2. The VIDEO OSD label disappears automatically after approximately four seconds. 5. A single VCR can be abnormal if the connection is loose....
Owners Guide
Page 17
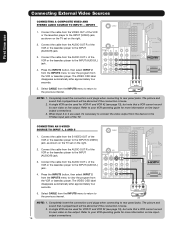
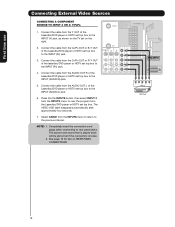
...I O R AUDIO TO HI-FI INPUT 1 INPUT 2 INPUT 3 INPUT 4 OPTICAL OUT Digital Audio DVI - HDMI Upgrade Card HDMI INPUT 1 OR HDMI INPUT 2 DVI to rear panel jacks. Press the INPUTS button, then select INPUT 1 or INPUT 2 from the INPUTS menu to view the program from the INPUTS menu to return ... when using a component with DVI output, you also have to connect the AUDIO OUT (R/L) of the component to the HDMI input as shown on the TV set top box or DVD player. First time use Connecting External Video Sources CONNECTING A COMPONENT SOURCE WITH HDMI OR DVI CAPABILITY TO INPUT 1 OR INPUT 2...
...I O R AUDIO TO HI-FI INPUT 1 INPUT 2 INPUT 3 INPUT 4 OPTICAL OUT Digital Audio DVI - HDMI Upgrade Card HDMI INPUT 1 OR HDMI INPUT 2 DVI to rear panel jacks. Press the INPUTS button, then select INPUT 1 or INPUT 2 from the INPUTS menu to view the program from the INPUTS menu to return ... when using a component with DVI output, you also have to connect the AUDIO OUT (R/L) of the component to the HDMI input as shown on the TV set top box or DVD player. First time use Connecting External Video Sources CONNECTING A COMPONENT SOURCE WITH HDMI OR DVI CAPABILITY TO INPUT 1 OR INPUT 2...
Owners Guide
Page 18
... cable from the AUDIO OUT L of the laserdisc/DVD player or HDTV set on REAR PANEL CONNECTIONS. 18 CABLE Apparatus Claims of card faces right) Top faces AIR MONITOR OUT S I V I D E O V I D E O (MONO) (MONO) Y/ VIDEO PB PR (MONO) Y/ VIDEO PB PR (MONO) A L U D TV AS CENTER I O R AUDIO TO HI-FI INPUT 1 INPUT 2 INPUT 3 INPUT 4 OPTICAL OUT...
... cable from the AUDIO OUT L of the laserdisc/DVD player or HDTV set on REAR PANEL CONNECTIONS. 18 CABLE Apparatus Claims of card faces right) Top faces AIR MONITOR OUT S I V I D E O V I D E O (MONO) (MONO) Y/ VIDEO PB PR (MONO) Y/ VIDEO PB PR (MONO) A L U D TV AS CENTER I O R AUDIO TO HI-FI INPUT 1 INPUT 2 INPUT 3 INPUT 4 OPTICAL OUT...
Owners Guide
Page 19
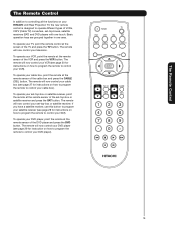
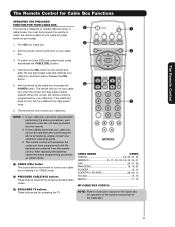
...sensor of the VCR and press the VCR button. To operate your SAT). To operate your HITACHI LCD Rear Projection TV, the new remote control is designed to operate different types of VCRs, CATV (Cable TV) converters, set -top-box or satellite receiver, point the remote at the remote sensor of the DVD player... and press the DVD button. The Remote Control The Remote Control In addition to controlling all the functions on your TV, point the remote control at ...
...sensor of the VCR and press the VCR button. To operate your SAT). To operate your HITACHI LCD Rear Projection TV, the new remote control is designed to operate different types of VCRs, CATV (Cable TV) converters, set -top-box or satellite receiver, point the remote at the remote sensor of the DVD player... and press the DVD button. The Remote Control The Remote Control In addition to controlling all the functions on your TV, point the remote control at ...
Owners Guide
Page 20
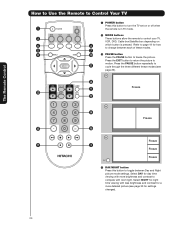
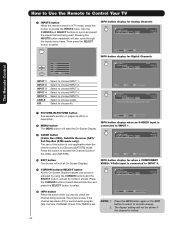
...Control How to Use the Remote to Control Your TV ³ POWER button Press this button to control your TV, VCR, DVD, Cable box/Satellite box depending on or off when ³ the remote is pressed. Select DAY for settings changes). 20 Select NIGHT for night time viewing... ƹ ƺ ƻ Freeze Ƽ » Freeze Freeze Freeze EXIT ¿ DAY/NIGHT button Press this button to turn the TV set on ² ¿ which button is in TV mode. · MODE buttons · These buttons allow the remote to toggle between each of these modes. ´ ¶ º...
...Control How to Use the Remote to Control Your TV ³ POWER button Press this button to control your TV, VCR, DVD, Cable box/Satellite box depending on or off when ³ the remote is pressed. Select DAY for settings changes). 20 Select NIGHT for night time viewing... ƹ ƺ ƻ Freeze Ƽ » Freeze Freeze Freeze EXIT ¿ DAY/NIGHT button Press this button to turn the TV set on ² ¿ which button is in TV mode. · MODE buttons · These buttons allow the remote to toggle between each of these modes. ´ ¶ º...
Owners Guide
Page 21
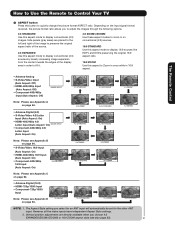
How to Use the Remote to Control Your TV The Remote Control ´ ASPECT button Press this aspect mode to display conventional ... input signal format received, the picture format ratio allows you select for an ANT input will automatically be set for the other ANT input. Vertical position adjustments are placed to the left and right of the image ...8226; HDMI-720p/1080i Input • Component-720p/1080i Input Note: Please see also page 35). 21 The Aspect Style setting you to adjust the images through the following options. 4:3 STANDARD Use this button to Zoom-in once while in on ...
How to Use the Remote to Control Your TV The Remote Control ´ ASPECT button Press this aspect mode to display conventional ... input signal format received, the picture format ratio allows you select for an ANT input will automatically be set for the other ANT input. Vertical position adjustments are placed to the left and right of the image ...8226; HDMI-720p/1080i Input • Component-720p/1080i Input Note: Please see also page 35). 21 The Aspect Style setting you to adjust the images through the following options. 4:3 STANDARD Use this button to Zoom-in once while in on ...
Owners Guide
Page 22
...EXIT button to return to choose Air. INFO Show Name 3:00PM-̈3:30PM SA TV-G 480i Y-PBPR: 3 KXYZ-HD 3:17PM ¹ INFO button Press this button when you want to access the INPUTS menu. The Aspect setting will exit all On-Screen Displays. ¸ CURSOR buttons/SELECT button All the On...-Screen Display features can be set . How to Use the Remote to Control Your TV ² INPUTS button When the remote control is in TV mode, press this button to check the channel being used. INPUTS INFO button display for Analog ...
...EXIT button to return to choose Air. INFO Show Name 3:00PM-̈3:30PM SA TV-G 480i Y-PBPR: 3 KXYZ-HD 3:17PM ¹ INFO button Press this button when you want to access the INPUTS menu. The Aspect setting will exit all On-Screen Displays. ¸ CURSOR buttons/SELECT button All the On...-Screen Display features can be set . How to Use the Remote to Control Your TV ² INPUTS button When the remote control is in TV mode, press this button to check the channel being used. INPUTS INFO button display for Analog ...
Owners Guide
Page 23
Press the MUTE button again to turn the sound off at the level it was set when the TV is turned on and Closed Caption is set to a level 30 or less, the volume level will display automatically when MUTE/SOFT MUTE is on . ƹ CHANNEL SELECTOR/FAVORITE CHANNEL (FAV CH) buttons ...., press the MUTE button. To reduce the sound to one , two, or three numbers to select channels. You will default to 30 when the TV is set to AUTO (see page 51). You can add any channel to your Favorite channel list by pressing and holding down the FAV CH button until...
Press the MUTE button again to turn the sound off at the level it was set when the TV is turned on and Closed Caption is set to a level 30 or less, the volume level will display automatically when MUTE/SOFT MUTE is on . ƹ CHANNEL SELECTOR/FAVORITE CHANNEL (FAV CH) buttons ...., press the MUTE button. To reduce the sound to one , two, or three numbers to select channels. You will default to 30 when the TV is set to AUTO (see page 51). You can add any channel to your Favorite channel list by pressing and holding down the FAV CH button until...

Owners Guide
Page 25
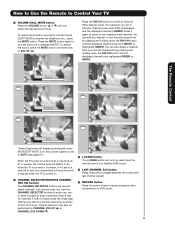
... subpictures or Thumbnail channels. MAIN PICTURE SUB PICTURE The Remote Control SURF Mode Picture-in-Picture Surf Mode PIP automatically scans all active channels (those set in -Picture This feature is only available with a Digital 16:9, 720p and 1080i signal. YES YES YES YES YES 16x9 540p 4x3 - - - - - - - 1080i/720p 16x9...
... subpictures or Thumbnail channels. MAIN PICTURE SUB PICTURE The Remote Control SURF Mode Picture-in-Picture Surf Mode PIP automatically scans all active channels (those set in -Picture This feature is only available with a Digital 16:9, 720p and 1080i signal. YES YES YES YES YES 16x9 540p 4x3 - - - - - - - 1080i/720p 16x9...
Owners Guide
Page 27
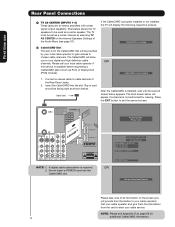
...box, as stated above procedures, your cable box. NOTE: 1. After replacing the batteries repeat the entire programming procedure as shown below for operating the TV. The remote control will remember the codes you have programmed until the batteries are for pre-codes). » 1. Aim the remote control at ...the cable box and press the POWER button. Aim the remote at the front of your cable box by setting it to instruction manual of the Cable Box for your cable box code has not been precoded into the remote. 2. This remote is programmed for...
...box, as stated above procedures, your cable box. NOTE: 1. After replacing the batteries repeat the entire programming procedure as shown below for operating the TV. The remote control will remember the codes you have programmed until the batteries are for pre-codes). » 1. Aim the remote control at ...the cable box and press the POWER button. Aim the remote at the front of your cable box by setting it to instruction manual of the Cable Box for your cable box code has not been precoded into the remote. 2. This remote is programmed for...

