Owners Guide
Page 3
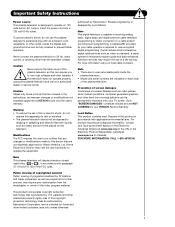
... fire or electric shock, do not use of a set-top box. A CableCARD provided by your HITACHI Factory Warranty. Note • There are no user serviceable parts inside the plasma television. • Model and serial numbers are covered in Canada). Prevention of screen damages Continuous on ...requires the user to be authorized by TV stations and cable companies, as well as video-on -screen displays such as improper changes or modifications not expressly approved by your cable operator is protected by U.S. authorized by Hitachi America, Ltd. This product incorporates copyright ...
... fire or electric shock, do not use of a set-top box. A CableCARD provided by your HITACHI Factory Warranty. Note • There are no user serviceable parts inside the plasma television. • Model and serial numbers are covered in Canada). Prevention of screen damages Continuous on ...requires the user to be authorized by TV stations and cable companies, as well as video-on -screen displays such as improper changes or modifications not expressly approved by your cable operator is protected by U.S. authorized by Hitachi America, Ltd. This product incorporates copyright ...
Owners Guide
Page 4
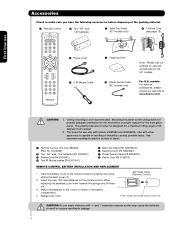
...visit our website for optional accessories for the front glass panel. Replace the cover. This plasma television product is designed for a maximum tilting angle of resulting in instability causing possible injury... to swell or rupture resulting in the battery compartment. 4. CAUTION: Do not insert batteries with Hitachi 42HDS52 and 42HDS52A. When replacing old batteries, push them towards the springs and lift them out...For optional accessories, please access our web site at: www.hitachi.us/tv CAUTION: 1. See important marking located on the ceiling does not provide adequate ventilation...
...visit our website for optional accessories for the front glass panel. Replace the cover. This plasma television product is designed for a maximum tilting angle of resulting in instability causing possible injury... to swell or rupture resulting in the battery compartment. 4. CAUTION: Do not insert batteries with Hitachi 42HDS52 and 42HDS52A. When replacing old batteries, push them towards the springs and lift them out...For optional accessories, please access our web site at: www.hitachi.us/tv CAUTION: 1. See important marking located on the ceiling does not provide adequate ventilation...
Owners Guide
Page 5
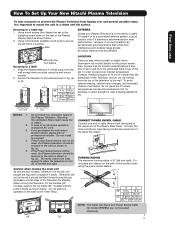
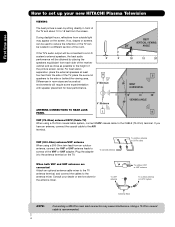
...right. First time use How To Set Up Your New Hitachi Plasma Television To take measures to prevent the Plasma Television from tipping over and prevent possible injury it is ... ) to the swivel slot of the Plasma Rear Panel. TURNING RADIUS The maximum turning radius is moved, two people are not included (Optional). 42" 55" 5 Whenever the unit is recommended for...Plasma Television is connected to a cable TV system or to the clamping screw holes on the rear of set firmly in position. Keep the Plasma television 4 inches away from the top of the Television for model 55HDS52...
...right. First time use How To Set Up Your New Hitachi Plasma Television To take measures to prevent the Plasma Television from tipping over and prevent possible injury it is ... ) to the swivel slot of the Plasma Rear Panel. TURNING RADIUS The maximum turning radius is moved, two people are not included (Optional). 42" 55" 5 Whenever the unit is recommended for...Plasma Television is connected to a cable TV system or to the clamping screw holes on the rear of set firmly in position. Keep the Plasma television 4 inches away from the top of the Television for model 55HDS52...
Owners Guide
Page 6
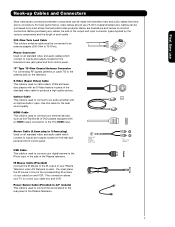
... If so, drapes or screens can be used to reduce the reflection or the TV can be located in front of the TV and about 10 to 18 feet from the screen. Consult your new HITACHI Plasma Television VIEWING The best picture is recommended. Differences in room sizes and acoustical environments ... in a different section of the room. For best stereo separation, place the external speakers at least four feet from the side of the TV, place the surround speakers to the AIR terminal. During daylight hours, reflections from outside light may cause interference. First time use How to ...
... If so, drapes or screens can be used to reduce the reflection or the TV can be located in front of the TV and about 10 to 18 feet from the screen. Consult your new HITACHI Plasma Television VIEWING The best picture is recommended. Differences in room sizes and acoustical environments ... in a different section of the room. For best stereo separation, place the external speakers at least four feet from the side of the TV, place the surround speakers to the AIR terminal. During daylight hours, reflections from outside light may cause interference. First time use How to ...
Owners Guide
Page 7
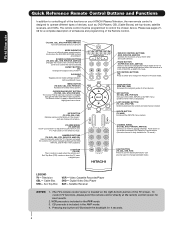
... VCR. Use this cable for the best sound quality. Below are illustrations and names of the Plasma Television. S-Video (Super Video) Cable This cable is used to connect your TV to the antenna jack on camcorders, VCRs and laserdisc players with shielded video and audio cables that... sell audio/video products. Power Swivel Cable (Provided in place of the Plasma television. AUDIO OUT 3.8mm STEREO MINI-PLUG 2 RCA...
... VCR. Use this cable for the best sound quality. Below are illustrations and names of the Plasma Television. S-Video (Super Video) Cable This cable is used to connect your TV to the antenna jack on camcorders, VCRs and laserdisc players with shielded video and audio cables that... sell audio/video products. Power Swivel Cable (Provided in place of the Plasma television. AUDIO OUT 3.8mm STEREO MINI-PLUG 2 RCA...
Owners Guide
Page 8
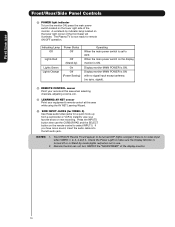
... control sensor for 4 seconds. 8 Also used as , DVD Players, CBL (Cable Boxes), set-top-boxes, satellite receivers, and VCRs. EXIT BUTTON (TV, CBL, STB, PVR/VCR) Exits out of your HITACHI Plasma Television, the new remote control is designed to adjust the audio level of the OSD, INPUTS or AV NET menu systems...
... control sensor for 4 seconds. 8 Also used as , DVD Players, CBL (Cable Boxes), set-top-boxes, satellite receivers, and VCRs. EXIT BUTTON (TV, CBL, STB, PVR/VCR) Exits out of your HITACHI Plasma Television, the new remote control is designed to adjust the audio level of the OSD, INPUTS or AV NET menu systems...
Owners Guide
Page 10
... using the AV NET Learning Wizard. ቫ SIDE INPUT JACKS (for VIDEO: 5) Use these audio/video jacks for remote ON/OFF operation. Your HITACHI Plasma TV will illuminate. The Plasma TV is ON. Display monitor MAIN POWER is now ready for a quick hook-up from a camcorder or VCR to OFF. Press the INPUTS button then...
... using the AV NET Learning Wizard. ቫ SIDE INPUT JACKS (for VIDEO: 5) Use these audio/video jacks for remote ON/OFF operation. Your HITACHI Plasma TV will illuminate. The Plasma TV is ON. Display monitor MAIN POWER is now ready for a quick hook-up from a camcorder or VCR to OFF. Press the INPUTS button then...
Owners Guide
Page 13
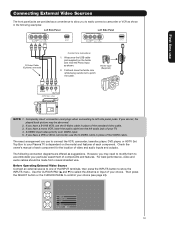
...particular assortment of video and audio inputs and outputs. If you do not, the played back picture may need to modify them to accommodate your TV. 4. If you have a mono VCR, insert the audio cable into the left side panel jacks. The exact arrangement you use to connect the... and audio cables should be abnormal. 2. Ferrite Core (Supplied) NOTE: 1. Then press the SELECT button or the CURSOR PAD ̈ to confirm your Plasma TV is dependent on the ferrite core near the Photo Input as suggestions. Wrap once the USB cable (not supplied) on the model and features of...
...particular assortment of video and audio inputs and outputs. If you do not, the played back picture may need to modify them to accommodate your TV. 4. If you have a mono VCR, insert the audio cable into the left side panel jacks. The exact arrangement you use to connect the... and audio cables should be abnormal. 2. Ferrite Core (Supplied) NOTE: 1. Then press the SELECT button or the CURSOR PAD ̈ to confirm your Plasma TV is dependent on the ferrite core near the Photo Input as suggestions. Wrap once the USB cable (not supplied) on the model and features of...

Owners Guide
Page 19
Connect the cable from the AUDIO IN R of the Plasma TV to the INPUT (VIDEO) jack, as shown on the Rear Panel on the TV Rear Panel. AUDIO OUT VIDEO OUT Back of VCR VCR Stereo System Amplifier OPTICAL INPUT CONNECTING MONITOR OUT The MONITOR OUT terminal outputs video and... AUDIO IN L of the VCR or Laserdisk player. Connecting Video: Connect the cable from the Rear Panel is controlled by the amplifier, not by the Plasma Television. The OPTICAL OUT terminal outputs all audio sources with Optical IN capability. 1. NOTE: When making video connections, connect S-Video only or Video only....
Connect the cable from the AUDIO IN R of the Plasma TV to the INPUT (VIDEO) jack, as shown on the Rear Panel on the TV Rear Panel. AUDIO OUT VIDEO OUT Back of VCR VCR Stereo System Amplifier OPTICAL INPUT CONNECTING MONITOR OUT The MONITOR OUT terminal outputs video and... AUDIO IN L of the VCR or Laserdisk player. Connecting Video: Connect the cable from the Rear Panel is controlled by the amplifier, not by the Plasma Television. The OPTICAL OUT terminal outputs all audio sources with Optical IN capability. 1. NOTE: When making video connections, connect S-Video only or Video only....
Owners Guide
Page 20
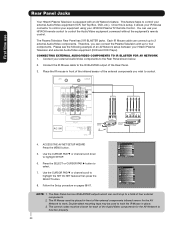
... Audio/Video components to the Rear Panel shown below. 2. Connect your Hitachi Plasma Television and external Audio/Video equipment (VCR and DVD Player). Once this is equipped with up to four components. The Plasma Television Rear Panel has 2 IR BLASTER jacks. Place the IR mouse ...the equipment's remote control. Each IR Mouse cable can use Rear Panel Jacks Your Hitachi Plasma Television is setup, it allows your IR Mouse connector to control your equipment using your HITACHI Plasma TV Remote Control. CONNECTING EXTERNAL AUDIO/VIDEO COMPONENTS TO IR BLASTER FOR AV NETWORK 1....
... Audio/Video components to the Rear Panel shown below. 2. Connect your Hitachi Plasma Television and external Audio/Video equipment (VCR and DVD Player). Once this is equipped with up to four components. The Plasma Television Rear Panel has 2 IR BLASTER jacks. Place the IR mouse ...the equipment's remote control. Each IR Mouse cable can use Rear Panel Jacks Your Hitachi Plasma Television is setup, it allows your IR Mouse connector to control your equipment using your HITACHI Plasma TV Remote Control. CONNECTING EXTERNAL AUDIO/VIDEO COMPONENTS TO IR BLASTER FOR AV NETWORK 1....
Owners Guide
Page 21
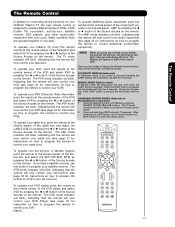
...and Manual modes. They are two modes of the Source Access on the remote. To operate your Plasma TV, point the remote control at the remote sensor of the Television and select the TV by pressing the ̇ or ̈ button of lighting the Remote Control buttons. The DVD ...Control In addition to controlling all the functions on the remote. The AMP mode indicator will blink, indicating that the remote will now control your HITACHI Plasma TV, the new remote control is pressed, the illumination will light up. top-box and select the SET-TOP-BOX (STB) by pressing the...
...and Manual modes. They are two modes of the Source Access on the remote. To operate your Plasma TV, point the remote control at the remote sensor of the Television and select the TV by pressing the ̇ or ̈ button of lighting the Remote Control buttons. The DVD ...Control In addition to controlling all the functions on the remote. The AMP mode indicator will blink, indicating that the remote will now control your HITACHI Plasma TV, the new remote control is pressed, the illumination will light up. top-box and select the SET-TOP-BOX (STB) by pressing the...
Owners Guide
Page 24
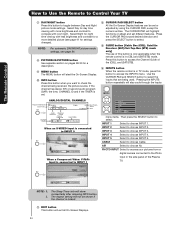
... choose INPUT 3. NOTE: For automatic DAY/NIGHT picture mode settings, see page 41 for day time viewing with room light. PM ST TV-14 V Audio Broadcast Broadcast Rating Closed Captioning Day CC Off Cable 6 11:00PM Aspect Mode 16:9 Standard Main Picture Source Time When an...changes). INPUT 3 Select to choose Air. The Remote Control How to Use the Remote to Control Your TV ቨ DAY/NIGHT button Press this button to access the Channel Guide of the Plasma TV. Press this button to toggle between Day and Night picture mode settings. Day CC Off 4:3 Expanded ...
... choose INPUT 3. NOTE: For automatic DAY/NIGHT picture mode settings, see page 41 for day time viewing with room light. PM ST TV-14 V Audio Broadcast Broadcast Rating Closed Captioning Day CC Off Cable 6 11:00PM Aspect Mode 16:9 Standard Main Picture Source Time When an...changes). INPUT 3 Select to choose Air. The Remote Control How to Use the Remote to Control Your TV ቨ DAY/NIGHT button Press this button to access the Channel Guide of the Plasma TV. Press this button to toggle between Day and Night picture mode settings. Day CC Off 4:3 Expanded ...
Owners Guide
Page 28
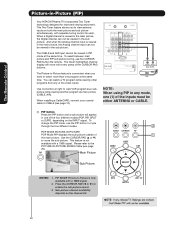
...-in-Picture (PIP) Your HITACHI Plasma TV incorporates Two Tuner technology designed for each. When a Digital channel is not available with every press of the video inputs. The Green highlighted channel display will appear in one (1) of the inputs must be viewed in PIP mode at right to watch a TV program while viewing other...
...-in-Picture (PIP) Your HITACHI Plasma TV incorporates Two Tuner technology designed for each. When a Digital channel is not available with every press of the video inputs. The Green highlighted channel display will appear in one (1) of the inputs must be viewed in PIP mode at right to watch a TV program while viewing other...
Owners Guide
Page 39
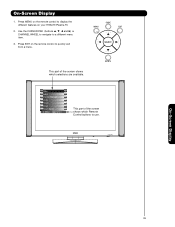
On-Screen Display 39 On-Screen Display 1. Use the CURSOR PAD (buttons ̆, ̄, ̇ and ̈) or CHANNEL WHEEL to navigate to quickly exit from a menu. This part of the screen shows which selections are available. Press EXIT on the remote control to use. Video Audio Channel Manager Locks Timers Setup Power Swivel Move SEL Select This part of the screen shows which Remote Control buttons to display the different features on your HITACHI Plasma TV. 2. Press MENU on the remote control to a different menu item. 3.
On-Screen Display 39 On-Screen Display 1. Use the CURSOR PAD (buttons ̆, ̄, ̇ and ̈) or CHANNEL WHEEL to navigate to quickly exit from a menu. This part of the screen shows which selections are available. Press EXIT on the remote control to use. Video Audio Channel Manager Locks Timers Setup Power Swivel Move SEL Select This part of the screen shows which Remote Control buttons to display the different features on your HITACHI Plasma TV. 2. Press MENU on the remote control to a different menu item. 3.
Owners Guide
Page 44
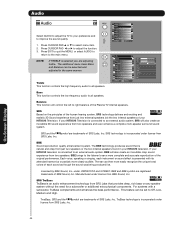
... system, SRS technology delivers and exciting and realistic 3D Sound experience from just two external speakers (or) the two internal speakers of your HITACHI Television is connected to an external audio system, BBE will control the left to Off, Low, Medium and High. If your...incredible 3D sound experience from two speakers and even enhance a complete multi-speaker surround sound system. SRS and the symbol are trademarks of the Plasma TV internal speakers. SRS TruBass TruBass is an audio enhancement technology from SRS Labs that is natural and crisp from just two speakers or the two...
... system, SRS technology delivers and exciting and realistic 3D Sound experience from just two external speakers (or) the two internal speakers of your HITACHI Television is connected to an external audio system, BBE will control the left to Off, Low, Medium and High. If your...incredible 3D sound experience from two speakers and even enhance a complete multi-speaker surround sound system. SRS and the symbol are trademarks of the Plasma TV internal speakers. SRS TruBass TruBass is an audio enhancement technology from SRS Labs that is natural and crisp from just two speakers or the two...

Owners Guide
Page 55
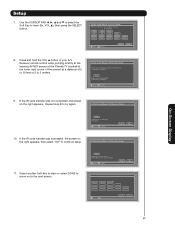
If the clock is pressed, the Event Timer Icon will automatically operate the Plasma TV viewing reservation of the MONTH. 9. Timers Set The Clock Set Sleep Timer Set Day/Night Timer Set Event Timer Move SEL Set -- : -- Use the CURSOR .... AM AM Cable AM AM Cable AM AM Cable AM AM Cable ------- 4:11 PM Jan. 1 2005 Jan. 1 2005 Jan. 1 2005 Jan. 1 2005 7. On-Screen Display 55 Use the CURSOR PAD ̆, ̄ or ̄ to highlight and select START TIME HOUR/MINUTE. 3. PST 0:00 Not Set Not Set 4. Use the CURSOR...
If the clock is pressed, the Event Timer Icon will automatically operate the Plasma TV viewing reservation of the MONTH. 9. Timers Set The Clock Set Sleep Timer Set Day/Night Timer Set Event Timer Move SEL Set -- : -- Use the CURSOR .... AM AM Cable AM AM Cable AM AM Cable AM AM Cable ------- 4:11 PM Jan. 1 2005 Jan. 1 2005 Jan. 1 2005 Jan. 1 2005 7. On-Screen Display 55 Use the CURSOR PAD ̆, ̄ or ̄ to highlight and select START TIME HOUR/MINUTE. 3. PST 0:00 Not Set Not Set 4. Use the CURSOR...
Owners Guide
Page 58
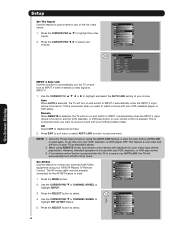
...**** Input2 : **** Input3 : **** Input4 : **** Auto Link : Off Input5 : **** Move SEL Return On-Screen Display INPUT 4 Auto Link Use this function to automatically turn the TV on using your VCR, laserdisc, or DVD player OFF. This is convenient when you want to record a movie with your VCR and watch a movie with...been turned on and tune to INPUT 4 when it must be reset before AUTO LINK is used again. To do this, turn your HITACHI Plasma TV Remote Control. Set AV Net Use this feature to control your external Audio/Video equipment using the AUTO LINK feature, it detects a video...
...**** Input2 : **** Input3 : **** Input4 : **** Auto Link : Off Input5 : **** Move SEL Return On-Screen Display INPUT 4 Auto Link Use this function to automatically turn the TV on using your VCR, laserdisc, or DVD player OFF. This is convenient when you want to record a movie with your VCR and watch a movie with...been turned on and tune to INPUT 4 when it must be reset before AUTO LINK is used again. To do this, turn your HITACHI Plasma TV Remote Control. Set AV Net Use this feature to control your external Audio/Video equipment using the AUTO LINK feature, it detects a video...
Owners Guide
Page 63
...Receiver Setup Press and hold the VOL ̆ button of your A/V Receiver remote control while pointing directly at the learning AV NET sensor of the Plasma TV (located at the lower right corner of the screen) at a distance of 5 to 10 feet or 2 to learn ? If the IR code... transfer was successful. AV Net Setup Wizard : Custom Settings Select the A/V Receiver softkey to try again. Try again? TV Softkeys POWER CH̆ VOL̆ MUTE CH̄ VOL̄ AUDIO SOURCE 1 SOURCE 2 SOURCE 3 SOURCE 4 SOURCE 5 SOURCE 6 SOURCE 7 SOURCE 8 SOURCE...
...Receiver Setup Press and hold the VOL ̆ button of your A/V Receiver remote control while pointing directly at the learning AV NET sensor of the Plasma TV (located at the lower right corner of the screen) at a distance of 5 to 10 feet or 2 to learn ? If the IR code... transfer was successful. AV Net Setup Wizard : Custom Settings Select the A/V Receiver softkey to try again. Try again? TV Softkeys POWER CH̆ VOL̆ MUTE CH̄ VOL̄ AUDIO SOURCE 1 SOURCE 2 SOURCE 3 SOURCE 4 SOURCE 5 SOURCE 6 SOURCE 7 SOURCE 8 SOURCE...

Owners Guide
Page 66
... DVD 3 softkey to learn . (Example: PLAY ̈ button). 10. Select NEXT to continue setup. If the IR Code transfer was successful. Custom Device DVD3 9. TV Softkeys POWER ̇̇ ̈̈ MENU ̇̇ ̈ ̈̈ SELECT ̆ ̈ EXIT ̄ ̇ Move SEL Select Back...: Custom Settings Press and hold the ̈ "Play button" of the DVD remote control while pointing directly at the learning AV NET sensor of the Plasma TV (located at the lower right corner of the screen) at a distance of 3 to 6 feet or 1 to AV NET. ̈ Please wait ...
... DVD 3 softkey to learn . (Example: PLAY ̈ button). 10. Select NEXT to continue setup. If the IR Code transfer was successful. Custom Device DVD3 9. TV Softkeys POWER ̇̇ ̈̈ MENU ̇̇ ̈ ̈̈ SELECT ̆ ̈ EXIT ̄ ̇ Move SEL Select Back...: Custom Settings Press and hold the ̈ "Play button" of the DVD remote control while pointing directly at the learning AV NET sensor of the Plasma TV (located at the lower right corner of the screen) at a distance of 3 to 6 feet or 1 to AV NET. ̈ Please wait ...
Owners Guide
Page 69
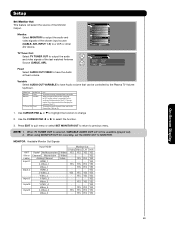
...Source (CABLE, AIR). YES S-Video_1 YES YES YES YES Video_1 - Setup Set Monitor Out This feature will not be controlled by the Plasma TV Volume Up/Down. Setup Menu Preference Screen Saver Set The Inputs Set AV NET Set Closed Captions Set Monitor Out Upgrades Set Stand-by...YES YES YES Input 2 HDMI_2 - - - YES Video_3 - YES YES YES On-Screen Display 69 Video Out Monitor Monitor Audio Out Fixed Variable TV Tuner Out Fixed Use To record currently viewed Video and Audio. MONITOR: Available Monitor Out Signals Input Mode Monitor Out S-Video Video L/R HiFi ANT Digital...
...Source (CABLE, AIR). YES S-Video_1 YES YES YES YES Video_1 - Setup Set Monitor Out This feature will not be controlled by the Plasma TV Volume Up/Down. Setup Menu Preference Screen Saver Set The Inputs Set AV NET Set Closed Captions Set Monitor Out Upgrades Set Stand-by...YES YES YES Input 2 HDMI_2 - - - YES Video_3 - YES YES YES On-Screen Display 69 Video Out Monitor Monitor Audio Out Fixed Variable TV Tuner Out Fixed Use To record currently viewed Video and Audio. MONITOR: Available Monitor Out Signals Input Mode Monitor Out S-Video Video L/R HiFi ANT Digital...


