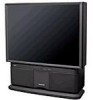
Owners Guide
Page 2
... USER SERVICEABLE PARTS INSIDE. If the television does not operate properly, unplug the television and call your HITACHI television. INSERT THE POWER CORD INTO A 120 VOLT 60Hz OUTLET. NOTE: This television receiver will be discovered in a computer room. CAUTION RISK OF ELECTRIC SHOCK DO NOT OPEN CAUTION: TO REDUCE THE RISK OF ELECTRIC SHOCK, DO NOT REMOVE COVER (OR BACK). CAUTION: Adjust only those controls that a safety problem...
... USER SERVICEABLE PARTS INSIDE. If the television does not operate properly, unplug the television and call your HITACHI television. INSERT THE POWER CORD INTO A 120 VOLT 60Hz OUTLET. NOTE: This television receiver will be discovered in a computer room. CAUTION RISK OF ELECTRIC SHOCK DO NOT OPEN CAUTION: TO REDUCE THE RISK OF ELECTRIC SHOCK, DO NOT REMOVE COVER (OR BACK). CAUTION: Adjust only those controls that a safety problem...
Owners Guide
Page 3
... television receivers. Do not defeat the safety purpose of the obsolete outlet. 10. Protect the power cord from being walked on -screen displays such as recommended by TV stations and cable companies, as well as practical. Servicing is damaged, liquid has been spilled or objects have fallen into your safety. PUBLIC VIEWING OF COPYRIGHTED MATERIAL Public viewing of time. 14. IMPORTANT SAFETY INSTRUCTIONS...
... television receivers. Do not defeat the safety purpose of the obsolete outlet. 10. Protect the power cord from being walked on -screen displays such as recommended by TV stations and cable companies, as well as practical. Servicing is damaged, liquid has been spilled or objects have fallen into your safety. PUBLIC VIEWING OF COPYRIGHTED MATERIAL Public viewing of time. 14. IMPORTANT SAFETY INSTRUCTIONS...
Owners Guide
Page 5
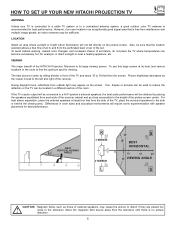
... light may appear on the picture screen. Also, be sure that is free from the screen. For best stereo separation, place the external speakers at its large viewing screen. Differences in an exceptionally good signal area that the location selected allows a free flow of air to and from the perforated back cover of the receiver cabinet and as close to the television. To avoid cabinet warping, cabinet color changes...
... light may appear on the picture screen. Also, be sure that is free from the screen. For best stereo separation, place the external speakers at its large viewing screen. Differences in an exceptionally good signal area that the location selected allows a free flow of air to and from the perforated back cover of the receiver cabinet and as close to the television. To avoid cabinet warping, cabinet color changes...
Owners Guide
Page 13
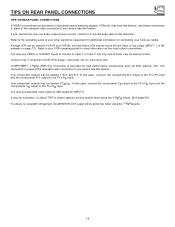
... left audio jack on connecting your device has this feature. Use this case, connect the components CB output to the TV s PB input and the components CR output to each input jack. In this connection in the example on line input-output connections. TIPS ON REAR PANEL CONNECTIONS TIPS ON REAR PANEL CONNECTIONS S-VIDEO connections are provided for high performance components, such as DVD players. Your component outputs may be necessary to adjust TINT to Input 1 or Input 2, but...
... left audio jack on connecting your device has this feature. Use this case, connect the components CB output to the TV s PB input and the components CR output to each input jack. In this connection in the example on line input-output connections. TIPS ON REAR PANEL CONNECTIONS TIPS ON REAR PANEL CONNECTIONS S-VIDEO connections are provided for high performance components, such as DVD players. Your component outputs may be necessary to adjust TINT to Input 1 or Input 2, but...
Owners Guide
Page 14
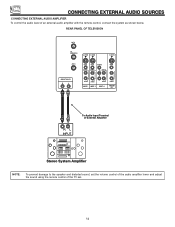
CONNECTING EXTERNAL AUDIO SOURCES CONNECTING EXTERNAL AUDIO AMPLIFIER To control the audio level of the TV set the volume control of the audio amplifier lower and adjust the sound using the remote control of an external audio amplifier with the remote control, connect the system as shown below. REAR PANEL OF TELEVISION ANT A TO CONVERTER S-VIDEO S-VIDEO S-VIDEO ANT B AUDIO TO HI-FI R L VIDEO VIDEO Y/VIDEO VIDEO (MONO) (MONO) L L R R AUDIO AUDIO INPUT 1 INPUT 2 PB (MONO) L L PR R AUDIO R AUDIO INPUT 4 MONITOR OUT RL INPUT To Audio Input Terminal of External ...
CONNECTING EXTERNAL AUDIO SOURCES CONNECTING EXTERNAL AUDIO AMPLIFIER To control the audio level of the TV set the volume control of the audio amplifier lower and adjust the sound using the remote control of an external audio amplifier with the remote control, connect the system as shown below. REAR PANEL OF TELEVISION ANT A TO CONVERTER S-VIDEO S-VIDEO S-VIDEO ANT B AUDIO TO HI-FI R L VIDEO VIDEO Y/VIDEO VIDEO (MONO) (MONO) L L R R AUDIO AUDIO INPUT 1 INPUT 2 PB (MONO) L L PR R AUDIO R AUDIO INPUT 4 MONITOR OUT RL INPUT To Audio Input Terminal of External ...
Owners Guide
Page 15
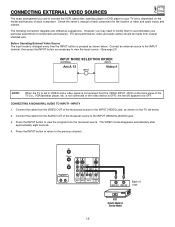
... and features. Check the owner's manual of each component. CONNECTING A MONAURAL AUDIO TO INPUT1~INPUT4 1. Before Operating External Video Source The input mode is changed every time the INPUT button is OFF), the set is dependent on the back panel of each component for the location of the monoaural source to the INPUT (VIDEO) jack, as necessary to VIDEO and a video signal is not received from the VIDEO INPUT JACK on the model and features of...
... and features. Check the owner's manual of each component. CONNECTING A MONAURAL AUDIO TO INPUT1~INPUT4 1. Before Operating External Video Source The input mode is changed every time the INPUT button is OFF), the set is dependent on the back panel of each component for the location of the monoaural source to the INPUT (VIDEO) jack, as necessary to VIDEO and a video signal is not received from the VIDEO INPUT JACK on the model and features of...
Owners Guide
Page 18
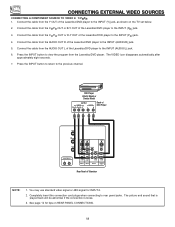
.../DVD player to the INPUT (PR) jack. 4. Press the INPUT button to the INPUT (AUDIO/R) jack. 5. DVD Player Hitachi Model or Similar Model OUTPUT VIDEO AUDIO PR/CR PB/CB Y L R Back of DVD Player ANT A TO CONVERTER S-VIDEO S-VIDEO S-VIDEO ANT B AUDIO TO HI-FI R L VIDEO VIDEO Y/VIDEO VIDEO (MONO) (MONO) L L R R AUDIO AUDIO INPUT 1 INPUT 2 PB (MONO) L L PR R AUDIO R AUDIO INPUT 4 MONITOR OUT Rear Panel of the Laserdisc/DVD player to the previous channel. You may use standard video signal or 480i signal for tips on the TV set below. 2. Connect the cable...
.../DVD player to the INPUT (PR) jack. 4. Press the INPUT button to the INPUT (AUDIO/R) jack. 5. DVD Player Hitachi Model or Similar Model OUTPUT VIDEO AUDIO PR/CR PB/CB Y L R Back of DVD Player ANT A TO CONVERTER S-VIDEO S-VIDEO S-VIDEO ANT B AUDIO TO HI-FI R L VIDEO VIDEO Y/VIDEO VIDEO (MONO) (MONO) L L R R AUDIO AUDIO INPUT 1 INPUT 2 PB (MONO) L L PR R AUDIO R AUDIO INPUT 4 MONITOR OUT Rear Panel of the Laserdisc/DVD player to the previous channel. You may use standard video signal or 480i signal for tips on the TV set below. 2. Connect the cable...
Owners Guide
Page 19
... best performance. The TV button will blink, indicating that the remote will not appear to light if the room is not pressed again. NOTE: 1. Use AV1 to control your cable box.) To operate your Audio/Video components as AV1, AV2 and AV3, or CD, TAPE, and AMP. To operate your VCR, point the remote at the remote sensor of the component you have a satellite receiver, use AV3 to program...
... best performance. The TV button will blink, indicating that the remote will not appear to light if the room is not pressed again. NOTE: 1. Use AV1 to control your cable box.) To operate your Audio/Video components as AV1, AV2 and AV3, or CD, TAPE, and AMP. To operate your VCR, point the remote at the remote sensor of the component you have a satellite receiver, use AV3 to program...

Owners Guide
Page 21
... in MENU mode, this button will exit all On-Screen Displays. 21 Stereo ST/SA Ant A 28 TAKA INPUT Video:1 VID1 INPUT INPUT Ant B 32 TAJK INPUT Video:4 VID4 INPUT Video:2 VID2 INPUT Video:3 VID3 ቮ HELP button Press this button to view HELP text, which gives a description of three hours. If your remote control SOURCE WIZARD buttons are used to set , use AV3 to view time remaining. Enter one, two, or three numbers to tune. Use AV2 to program...
... in MENU mode, this button will exit all On-Screen Displays. 21 Stereo ST/SA Ant A 28 TAKA INPUT Video:1 VID1 INPUT INPUT Ant B 32 TAJK INPUT Video:4 VID4 INPUT Video:2 VID2 INPUT Video:3 VID3 ቮ HELP button Press this button to view HELP text, which gives a description of three hours. If your remote control SOURCE WIZARD buttons are used to set , use AV3 to view time remaining. Enter one, two, or three numbers to tune. Use AV2 to program...

Owners Guide
Page 22
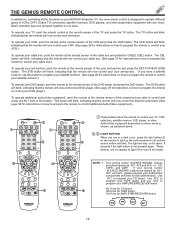
... CHANNEL ID Time Sub-Picture Source PIP S - Y PbPr: 4 When a COMPONENT VIDEO: Y PbPr Input is connected to answer the telephone, etc., press the MUTE button. HOW TO USE THE GENIUS REMOTE TO CONTROL YOUR TV ቲ THUMB STICK/SELECT button All the On-Screen Display features can be set different features. To restore the sound, press the MUTE button one half of normal volume (SOFT MUTE) to VIDEO: 4. ት PICTURE-IN-PICTURE buttons See...
... CHANNEL ID Time Sub-Picture Source PIP S - Y PbPr: 4 When a COMPONENT VIDEO: Y PbPr Input is connected to answer the telephone, etc., press the MUTE button. HOW TO USE THE GENIUS REMOTE TO CONTROL YOUR TV ቲ THUMB STICK/SELECT button All the On-Screen Display features can be set different features. To restore the sound, press the MUTE button one half of normal volume (SOFT MUTE) to VIDEO: 4. ት PICTURE-IN-PICTURE buttons See...
Owners Guide
Page 23
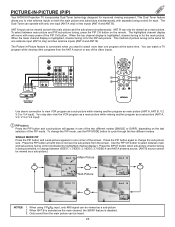
... change the sub-picture size. Only sound from the screen. ANT A TO CONVERTER S-VIDEO S-VIDEO S-VIDEO ANT B Back of VCR V L R OUTPUT AUDIO TO HI-FI R L VIDEO VIDEO Y/VIDEO VIDEO (MONO) (MONO) L L R R AUDIO AUDIO INPUT 1 INPUT 2 PB (MONO) L L PR R AUDIO R AUDIO INPUT 4 MONITOR OUT ቢ ቤ MENU EXIT VOL SELECT CH SVCS MUTE STATUS SCHD VCR PLUS+ INFO GUIDE/TV PIP PIP CH FREEZE PIP MODE PIP ACCESS SWAP PROG TV/VCR SLOW ብ,ቦ ባ REC VCR Hitachi Model or Similar Model Use above connection to watch a TV program while viewing...
... change the sub-picture size. Only sound from the screen. ANT A TO CONVERTER S-VIDEO S-VIDEO S-VIDEO ANT B Back of VCR V L R OUTPUT AUDIO TO HI-FI R L VIDEO VIDEO Y/VIDEO VIDEO (MONO) (MONO) L L R R AUDIO AUDIO INPUT 1 INPUT 2 PB (MONO) L L PR R AUDIO R AUDIO INPUT 4 MONITOR OUT ቢ ቤ MENU EXIT VOL SELECT CH SVCS MUTE STATUS SCHD VCR PLUS+ INFO GUIDE/TV PIP PIP CH FREEZE PIP MODE PIP ACCESS SWAP PROG TV/VCR SLOW ብ,ቦ ባ REC VCR Hitachi Model or Similar Model Use above connection to watch a TV program while viewing...
Owners Guide
Page 26
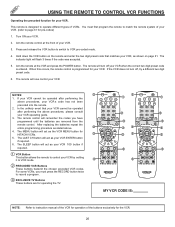
... PIP MODE PROG PIP ACCESS SWAP TV/VCR SLOW REC ቤ CLU-5712TSI CLU-5714TSI MY VCR CODE IS: NOTE: Refer to instruction manual of the VCR for the VCR. 26 Press and release the VCR button to switch to operate different types of your VCR operating guide. 3. Hold down the VCR button on page 31. NOTES: 1. Aim the remote control at the VCR and press the POWER button. After replacing...
... PIP MODE PROG PIP ACCESS SWAP TV/VCR SLOW REC ቤ CLU-5712TSI CLU-5714TSI MY VCR CODE IS: NOTE: Refer to instruction manual of the VCR for the VCR. 26 Press and release the VCR button to switch to operate different types of your VCR operating guide. 3. Hold down the VCR button on page 31. NOTES: 1. Aim the remote control at the VCR and press the POWER button. After replacing...
Owners Guide
Page 27
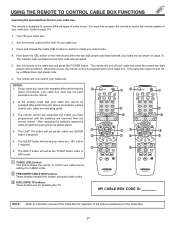
... of cable boxes. If the cable box does not turn off , try a different two digit preset code. 6. REC CLU-5712TSI REC CLU-5714TSI MY CABLE BOX CODE IS: NOTE: Refer to instruction manual of the Cable Box for operation of your cable box. (refer to page 31) 1. You must first program the remote to CABLE mode. ባ PRECODED CABLE BOX buttons These buttons transmit the chosen precoded cable codes. ቤ EXCLUSIVE TV buttons These buttons are removed from the remote control. The remote will flash 3 times if the code...
... of cable boxes. If the cable box does not turn off , try a different two digit preset code. 6. REC CLU-5712TSI REC CLU-5714TSI MY CABLE BOX CODE IS: NOTE: Refer to instruction manual of the Cable Box for operation of your cable box. (refer to page 31) 1. You must first program the remote to CABLE mode. ባ PRECODED CABLE BOX buttons These buttons transmit the chosen precoded cable codes. ቤ EXCLUSIVE TV buttons These buttons are removed from the remote control. The remote will flash 3 times if the code...
Owners Guide
Page 28
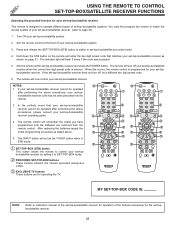
... GUIDE/TV ባ ቤ ባ ቤ PIP PIP CH FREEZE PIP MODE PIP ACCESS SWAP PROG TV/VCR SLOW REC REC CLU-5712TSI CLU-5714TSI MY SET-TOP-BOX CODE IS: NOTE: Refer to control your set -topbox/satellite receiver code has not been precoded into the remote. 2. After replacing the batteries repeat the entire programming procedure as the TV/SAT button when in STB mode. ቢ SET-TOP-BOX (STB) button This button allows the remote to instruction manual of...
... GUIDE/TV ባ ቤ ባ ቤ PIP PIP CH FREEZE PIP MODE PIP ACCESS SWAP PROG TV/VCR SLOW REC REC CLU-5712TSI CLU-5714TSI MY SET-TOP-BOX CODE IS: NOTE: Refer to control your set -topbox/satellite receiver code has not been precoded into the remote. 2. After replacing the batteries repeat the entire programming procedure as the TV/SAT button when in STB mode. ቢ SET-TOP-BOX (STB) button This button allows the remote to instruction manual of...
Owners Guide
Page 30
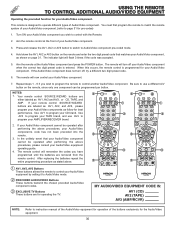
... GUIDE/TV PIP PIP CH FREEZE PIP MODE PIP ACCESS SWAP PROG TV/VCR SLOW REC ቤ CLU-5712TSI CLU-5714TSI MY AUDIO/VIDEO EQUIPMENT CODE IS: AV1 (CD) AV2 (TAPE) AV3 (AMP/RCVR) NOTE: Refer to control your Audio/Video component. 7. The remote control will flash 3 times if the code was accepted. 5. After replacing the batteries repeat the entire programming procedure as AV1, AV2 and AV3, or CD, TAPE, and AMP. Turn ON your Audio/Video...
... GUIDE/TV PIP PIP CH FREEZE PIP MODE PIP ACCESS SWAP PROG TV/VCR SLOW REC ቤ CLU-5712TSI CLU-5714TSI MY AUDIO/VIDEO EQUIPMENT CODE IS: AV1 (CD) AV2 (TAPE) AV3 (AMP/RCVR) NOTE: Refer to control your Audio/Video component. 7. The remote control will flash 3 times if the code was accepted. 5. After replacing the batteries repeat the entire programming procedure as AV1, AV2 and AV3, or CD, TAPE, and AMP. Turn ON your Audio/Video...

Owners Guide
Page 33
... THEATER Menu Language Signal Source Auto Channel Set Channel Memory Channel List Clock Set Magic Focus Channel Id. Select Antenna or Cable TV. Feature to make white. Improve picture performance. Adjust balance. Special Sound effects with VIDEO:4 input. Automatically turn TV on and off once, daily, or weekly. Adjust tint. Improve sound performance. Adjust brightness. Channel buttons, add, skip. Turn TV on with (b)® Technology. 33 Select from two types of backgrounds. Adjust color. Automatically match red, green, and blue colors to display...
... THEATER Menu Language Signal Source Auto Channel Set Channel Memory Channel List Clock Set Magic Focus Channel Id. Select Antenna or Cable TV. Feature to make white. Improve picture performance. Adjust balance. Special Sound effects with VIDEO:4 input. Automatically turn TV on and off once, daily, or weekly. Adjust tint. Improve sound performance. Adjust brightness. Channel buttons, add, skip. Turn TV on with (b)® Technology. 33 Select from two types of backgrounds. Adjust color. Automatically match red, green, and blue colors to display...

Owners Guide
Page 36
... To M e n u B a r To Q u i t E x i t SETUP CUSTOMIZE VIDEO SEL AUDIO THEATER Menu Language Signal Source Auto Channel Set Channel Memory Channel List Clock Set Magic Focus Begin THUMB STICK SELECT SETUP CUSTOMIZE VIDEO AUDIO THEATER Auto Channel Set Installing Channel 110 88% Complete M e n u To M e n u B a r To Q u i t E x i t M e n u To M e n u B a r To Q u i t E x i t If the EXIT button is pressed while the AUTO CHANNEL SET function is engaged, programming will automatically store active TV channels in CHANNEL MEMORY. SETUP SET UP AUTO CHANNEL SET This feature will stop...
... To M e n u B a r To Q u i t E x i t SETUP CUSTOMIZE VIDEO SEL AUDIO THEATER Menu Language Signal Source Auto Channel Set Channel Memory Channel List Clock Set Magic Focus Begin THUMB STICK SELECT SETUP CUSTOMIZE VIDEO AUDIO THEATER Auto Channel Set Installing Channel 110 88% Complete M e n u To M e n u B a r To Q u i t E x i t M e n u To M e n u B a r To Q u i t E x i t If the EXIT button is pressed while the AUTO CHANNEL SET function is engaged, programming will automatically store active TV channels in CHANNEL MEMORY. SETUP SET UP AUTO CHANNEL SET This feature will stop...

Owners Guide
Page 45
... SETUP CUSTOMIZE VIDEO SEL AUDIO THEATER 0 0 0 0 Parental Control ---- Video Id. To change the secret code number, select CHANGE SECRET CODE. When QUICK LOCK is turned on , you set the BEGIN and END times and the TV cannot be deactivated, except the Power button. Family Favorites Parental Control 4 Event Program Auto Link Closed Caption Menu Background M e n u To M e n u B a r To Q u i t E x i t THUMB STICK CUSTOMIZE Use number buttons to select secret code. To lock the video inputs, you must be blocked out. When FRONT PANEL LOCK is turned...
... SETUP CUSTOMIZE VIDEO SEL AUDIO THEATER 0 0 0 0 Parental Control ---- Video Id. To change the secret code number, select CHANGE SECRET CODE. When QUICK LOCK is turned on , you set the BEGIN and END times and the TV cannot be deactivated, except the Power button. Family Favorites Parental Control 4 Event Program Auto Link Closed Caption Menu Background M e n u To M e n u B a r To Q u i t E x i t THUMB STICK CUSTOMIZE Use number buttons to select secret code. To lock the video inputs, you must be blocked out. When FRONT PANEL LOCK is turned...

Owners Guide
Page 47
... Parental Control 4 Event Program Auto Link Closed Caption Menu Background Video:4 Auto Remote Off M e n u To M e n u B a r To Q u i t E x i t M e n u To M e n u B a r To Q u i t E x i t Use THUMB STICK ̆ or ̄, then press down on THUMB STICK, to previous menu. Press EXIT to quit menu or THUMB STICK ̇ to return to change AUTO LINK setting. Once the TV has been turned on using REMOTE mode, any remote control button will only work with Video: 4 input. 2. To do this function. When using the AUTO LINK...
... Parental Control 4 Event Program Auto Link Closed Caption Menu Background Video:4 Auto Remote Off M e n u To M e n u B a r To Q u i t E x i t M e n u To M e n u B a r To Q u i t E x i t Use THUMB STICK ̆ or ̄, then press down on THUMB STICK, to previous menu. Press EXIT to quit menu or THUMB STICK ̇ to return to change AUTO LINK setting. Once the TV has been turned on using REMOTE mode, any remote control button will only work with Video: 4 input. 2. To do this function. When using the AUTO LINK...
Owners Guide
Page 50
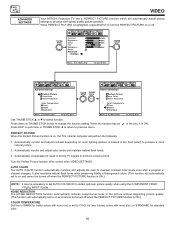
Press down on or off to control other VIDEO SETTINGS. When the function has an Press EXIT to quit menu or THUMB STICK ̇ to return to maintain constant color levels even after a program or channel changes. Automatically monitor and adjust contrast depending on room lighting (sensor is located in the front panel) to produce a more blue, or STANDARD for standard color. 50 It also maintains...
Press down on or off to control other VIDEO SETTINGS. When the function has an Press EXIT to quit menu or THUMB STICK ̇ to return to maintain constant color levels even after a program or channel changes. Automatically monitor and adjust contrast depending on room lighting (sensor is located in the front panel) to produce a more blue, or STANDARD for standard color. 50 It also maintains...


