
Owners Guide
Page 2
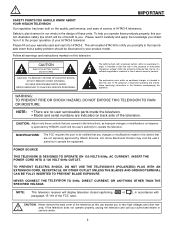
... to operate the television. CAUTION: Adjust only those controls that are indicated on back side of these products properly, this section illustrates safety tips which will enable HITACHI to this device that are not expressly approved by HITACHI could void the user's authority to you. NOTE: This television receiver will display television closed captioning, ( or ), in the literature accompanying the appliance. INSERT THE POWER CORD...
... to operate the television. CAUTION: Adjust only those controls that are indicated on back side of these products properly, this section illustrates safety tips which will enable HITACHI to this device that are not expressly approved by HITACHI could void the user's authority to you. NOTE: This television receiver will display television closed captioning, ( or ), in the literature accompanying the appliance. INSERT THE POWER CORD...
Owners Guide
Page 3
...- Televisions are NOT COVERED by TV stations and cable companies, as well as programs from other electrical circuits. 18. Do not apply excessive pulling force to the front, or top, of overhead power lines or other sources, may require specific instructions pertaining to the point of the phosphors. Follow instructions for your HITACHI Factory Warranty. • When using the Picture-in-Picture function, the sub-picture...
...- Televisions are NOT COVERED by TV stations and cable companies, as well as programs from other electrical circuits. 18. Do not apply excessive pulling force to the front, or top, of overhead power lines or other sources, may require specific instructions pertaining to the point of the phosphors. Follow instructions for your HITACHI Factory Warranty. • When using the Picture-in-Picture function, the sub-picture...
Owners Guide
Page 5
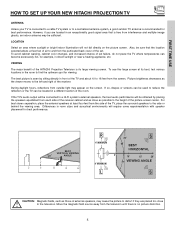
... TV's audio output will be sufficient. To see this large screen at least four feet from interference and multiple image ghosts, an indoor antenna may appear on the picture screen. Picture brightness decreases as possible to the height of the receiver. FIRST TIME USE HOW TO SET UP YOUR NEW HITACHI PROJECTION TV ANTENNA Unless your TV is connected to a cable TV system or to a centralized antenna system, a good outdoor TV antenna is recommended for viewing. BEST VERTICAL VIEWING...
... TV's audio output will be sufficient. To see this large screen at least four feet from interference and multiple image ghosts, an indoor antenna may appear on the picture screen. Picture brightness decreases as possible to the height of the receiver. FIRST TIME USE HOW TO SET UP YOUR NEW HITACHI PROJECTION TV ANTENNA Unless your TV is connected to a cable TV system or to a centralized antenna system, a good outdoor TV antenna is recommended for viewing. BEST VERTICAL VIEWING...
Owners Guide
Page 7
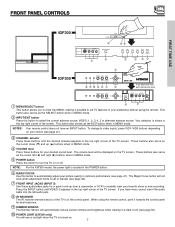
... INPUT button. To change to video inputs, press VID1~VID5 buttons depending on the TV screen. The volume level will be displayed on your desired sound level. Press the INPUT button until the desired channel appears in a dark room (see page 35). ቫ POWER LIGHT (53F300 only) You will not work when adjustment mode is located in MENU mode. FRONT PANEL CONTROLS FIRST TIME USE 43F300 INPUT 5 S-VIDEO -AUDIO- These buttons also serve as the cursor left audio jack. ቩ IR RECEIVER The IR receiver (remote...
... INPUT button. To change to video inputs, press VID1~VID5 buttons depending on the TV screen. The volume level will be displayed on your desired sound level. Press the INPUT button until the desired channel appears in a dark room (see page 35). ቫ POWER LIGHT (53F300 only) You will not work when adjustment mode is located in MENU mode. FRONT PANEL CONTROLS FIRST TIME USE 43F300 INPUT 5 S-VIDEO -AUDIO- These buttons also serve as the cursor left audio jack. ቩ IR RECEIVER The IR receiver (remote...

Owners Guide
Page 11
...input jack. 2. REAR PANEL CONNECTIONS TYPICAL FULL-FEATURE SETUP Outside antenna or cable TV coaxial cable 2-Way signal splitter DVD Player OUTPUT Y PB/CB PR/CR L R HDTV Set-Top Box Y PB PR L R OUTPUT FIRST TIME USE ANT A TO CONVERTER ANT B AUDIO TO HI-FI L R INPUT 1 PR PB Y R (MONO)/L AUDIO INPUT 2 PR PB Y/VIDEO R (MONO)/L AUDIO INPUT 3 INPUT 4 R (MONO)/L VIDEO R (MONO)/L VIDEO MONITOR OUT R L VIDEO AUDIO S-VIDEO S-VIDEO S-VIDEO VCR #1 ANT OUTPUT IN S-VIDEO V L R OUTPUT INPUT Cable TV Box LR INPUT Stereo System Amplifier S-VIDEO V L R INPUT S-VIDEO V L R OUTPUT...
...input jack. 2. REAR PANEL CONNECTIONS TYPICAL FULL-FEATURE SETUP Outside antenna or cable TV coaxial cable 2-Way signal splitter DVD Player OUTPUT Y PB/CB PR/CR L R HDTV Set-Top Box Y PB PR L R OUTPUT FIRST TIME USE ANT A TO CONVERTER ANT B AUDIO TO HI-FI L R INPUT 1 PR PB Y R (MONO)/L AUDIO INPUT 2 PR PB Y/VIDEO R (MONO)/L AUDIO INPUT 3 INPUT 4 R (MONO)/L VIDEO R (MONO)/L VIDEO MONITOR OUT R L VIDEO AUDIO S-VIDEO S-VIDEO S-VIDEO VCR #1 ANT OUTPUT IN S-VIDEO V L R OUTPUT INPUT Cable TV Box LR INPUT Stereo System Amplifier S-VIDEO V L R INPUT S-VIDEO V L R OUTPUT...

Owners Guide
Page 12
... inputs (see page 33). Input 2 accepts both composite and component video signals. Your component outputs may be necessary to adjust TINT to the TV's PR input. You may be labeled Y-CBCR. FIRST TIME USE TIPS ON REAR PANEL CONNECTIONS S-VIDEO connections are provided for more information on line input-output connections. that a VCR cannot record its own video or line output (INPUT: 3 in place of your VCR operating guide for high performance components, such as DVD players and set...
... inputs (see page 33). Input 2 accepts both composite and component video signals. Your component outputs may be necessary to adjust TINT to the TV's PR input. You may be labeled Y-CBCR. FIRST TIME USE TIPS ON REAR PANEL CONNECTIONS S-VIDEO connections are provided for more information on line input-output connections. that a VCR cannot record its own video or line output (INPUT: 3 in place of your VCR operating guide for high performance components, such as DVD players and set...

Owners Guide
Page 14
... location of video and audio inputs and outputs. is not connected or the video device is OFF), the set to VIDEO and a video signal is not received from coaxial shielded wire. For best performance, video and audio cables should be OFF. 14 Connect an external source to the INPUT terminal, then press the VID1~VID5 button as shown below. Check the owner's manual of each component. FIRST TIME USE CONNECTING EXTERNAL VIDEO SOURCES The exact arrangement you may need...
... location of video and audio inputs and outputs. is not connected or the video device is OFF), the set to VIDEO and a video signal is not received from coaxial shielded wire. For best performance, video and audio cables should be OFF. 14 Connect an external source to the INPUT terminal, then press the VID1~VID5 button as shown below. Check the owner's manual of each component. FIRST TIME USE CONNECTING EXTERNAL VIDEO SOURCES The exact arrangement you may need...

Owners Guide
Page 18
...PB Y R (MONO)/L INPUT 2 PR PB Y/VIDEO R (MONO)/L AUDIO INPUT 3 R (MONO)/L VIDEO INPUT 4 R (MONO)/L VIDEO MONITOR OUT R L AUDIO VIDEO S-VIDEO S-VIDEO S-VIDEO NOTE: 1. FIRST TIME USE CONNECTING EXTERNAL VIDEO SOURCES CONNECTING A COMPONENT SOURCE TO INPUT 1 OR 2: Y-PBPR. 1. Connect the cable from the Laserdisc/DVD player or HDTV set top box to the INPUT (PB) jack. 3. Completely insert the connection cord plugs when connecting to the previous channel. Press the VID1~VID2 button, to the INPUT (AUDIO/R) jack. 5. Press the ANT button to return to rear panel jacks. See...
...PB Y R (MONO)/L INPUT 2 PR PB Y/VIDEO R (MONO)/L AUDIO INPUT 3 R (MONO)/L VIDEO INPUT 4 R (MONO)/L VIDEO MONITOR OUT R L AUDIO VIDEO S-VIDEO S-VIDEO S-VIDEO NOTE: 1. FIRST TIME USE CONNECTING EXTERNAL VIDEO SOURCES CONNECTING A COMPONENT SOURCE TO INPUT 1 OR 2: Y-PBPR. 1. Connect the cable from the Laserdisc/DVD player or HDTV set top box to the INPUT (PB) jack. 3. Completely insert the connection cord plugs when connecting to the previous channel. Press the VID1~VID2 button, to the INPUT (AUDIO/R) jack. 5. Press the ANT button to return to rear panel jacks. See...
Owners Guide
Page 19
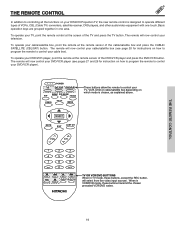
... ASPECT VIRTUAL HD TV OR VCR/DVD BUTTONS When in TV mode, these buttons transmit the chosen precoded VCR/DVD codes. THE REMOTE CONTROL 19 To operate your television. To operate your TV, VCR, DVD or cable/satellite box depending on which mode is designed to control your DVD/VCR player, point the remote at the remote sensor of VCRs, CBL (Cable TV) converters, satellite receiver, DVD players, and other audio/video equipment with one area. POWER TV CBL/SAT DVD/VCR SWAP PIP MODE PIP FREEZE VIDEO PIP CH MENU...
... ASPECT VIRTUAL HD TV OR VCR/DVD BUTTONS When in TV mode, these buttons transmit the chosen precoded VCR/DVD codes. THE REMOTE CONTROL 19 To operate your television. To operate your TV, VCR, DVD or cable/satellite box depending on which mode is designed to control your DVD/VCR player, point the remote at the remote sensor of VCRs, CBL (Cable TV) converters, satellite receiver, DVD players, and other audio/video equipment with one area. POWER TV CBL/SAT DVD/VCR SWAP PIP MODE PIP FREEZE VIDEO PIP CH MENU...

Owners Guide
Page 23
... AM PIP Ant A 10 Channel ID/Video ID Time PIP/Sub-Picture Source YPBPR:1 When a COMPONENT VIDEO: Y-PBPR Input is good for displaying detailed images like the smooth and detailed 1080i. With the progressive format the complete picture is created by drawing lines across the screen from the top to check the channel being controlled. ቱ MENU button The MENU button will notice a smoother image than with a 1080i HDTV input. The TV draws the lines...
... AM PIP Ant A 10 Channel ID/Video ID Time PIP/Sub-Picture Source YPBPR:1 When a COMPONENT VIDEO: Y-PBPR Input is good for displaying detailed images like the smooth and detailed 1080i. With the progressive format the complete picture is created by drawing lines across the screen from the top to check the channel being controlled. ቱ MENU button The MENU button will notice a smoother image than with a 1080i HDTV input. The TV draws the lines...

Owners Guide
Page 24
... CONVERTER ANT B AUDIO TO HI-FI L R INPUT 1 INPUT 2 PR PB Y R (MONO)/L AUDIO PR PB Y/VIDEO R (MONO)/L AUDIO INPUT 3 R (MONO)/L VIDEO INPUT 4 R (MONO)/L VIDEO MONITOR OUT R L AUDIO VIDEO S-VIDEO S-VIDEO S-VIDEO ባ ቢ POWER TV CBL/SAT DVD/VCR SWAP PIP MODE PIP FREEZE VIDEO PIP CH MENU ቤ ብ,ቦ SELECT Audio Video OUTPUT MUTE EXIT LAST CH VCR Use above connection to view VCR program as a sub-picture while viewing another program as both the main picture and sub-picture simultaneously, with separate tuning control for improved viewing...
... CONVERTER ANT B AUDIO TO HI-FI L R INPUT 1 INPUT 2 PR PB Y R (MONO)/L AUDIO PR PB Y/VIDEO R (MONO)/L AUDIO INPUT 3 R (MONO)/L VIDEO INPUT 4 R (MONO)/L VIDEO MONITOR OUT R L AUDIO VIDEO S-VIDEO S-VIDEO S-VIDEO ባ ቢ POWER TV CBL/SAT DVD/VCR SWAP PIP MODE PIP FREEZE VIDEO PIP CH MENU ቤ ብ,ቦ SELECT Audio Video OUTPUT MUTE EXIT LAST CH VCR Use above connection to view VCR program as a sub-picture while viewing another program as both the main picture and sub-picture simultaneously, with separate tuning control for improved viewing...
Owners Guide
Page 28
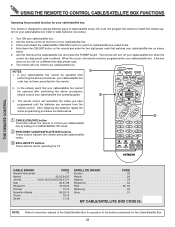
...) button to switch to instruction manual of the Cable/Satellite Box for operation of cable/satellite boxes. After replacing the batteries repeat the entire programming procedure as shown below for pre-codes). 1. NOTES: ቢ 1. In the unlikely event that matches your cable/satellite box as stated above. ቢ CABLE (CBL/SAT) button This button allows the remote to control your cable/satellite box by setting it to CABLE/SATELLITE mode. ባ PRECODED CABLE/SATELLITE BOX buttons These buttons...
...) button to switch to instruction manual of the Cable/Satellite Box for operation of cable/satellite boxes. After replacing the batteries repeat the entire programming procedure as shown below for pre-codes). 1. NOTES: ቢ 1. In the unlikely event that matches your cable/satellite box as stated above. ቢ CABLE (CBL/SAT) button This button allows the remote to control your cable/satellite box by setting it to CABLE/SATELLITE mode. ባ PRECODED CABLE/SATELLITE BOX buttons These buttons...
Owners Guide
Page 31
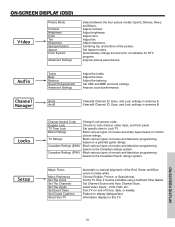
...make white. Set Aspect modes Automatically change tint and color coordinates for this TV. Audio Treble Bass Balance Sound Enhancement Advanced Settings Adjust the treble. Adjust color. View/edit Channel ID, Scan, and Lock settings in antenna A. Set specific time to lock channel, video input, and front panel. ON-SCREEN DISPLAY 31 Improve sound performance. Choose to Lock TV. Information display for DTV program. Adjust brightness. Improve picture performance. Block various types of the Red, Green and Blue colors to display dialogue/text. Label Video Inputs , VCR, DVD...
...make white. Set Aspect modes Automatically change tint and color coordinates for this TV. Audio Treble Bass Balance Sound Enhancement Advanced Settings Adjust the treble. Adjust color. View/edit Channel ID, Scan, and Lock settings in antenna A. Set specific time to lock channel, video input, and front panel. ON-SCREEN DISPLAY 31 Improve sound performance. Choose to Lock TV. Information display for DTV program. Adjust brightness. Improve picture performance. Block various types of the Red, Green and Blue colors to display dialogue/text. Label Video Inputs , VCR, DVD...

Owners Guide
Page 35
... a program or channel changes. Press the SELECT button to Medium for DTV programs. HDTV - Color Temperature Set this color system. 3. If you are using both inputs. Auto Color The AUTO COLOR function automatically monitors and adjusts the color to select the function setting. CURSOR Video Picture Mode Contrast Brightness Color Tint Sharpness Vertical Position Aspect Color System Advanced Settings Move SEL Select Sports 100% 50% 50% 50% 0 CURSOR Video Advanced Settings Color Temperature High Medium Dimmer Auto Color Noise Reduction Scan Velocity Modulation Black Level...
... a program or channel changes. Press the SELECT button to Medium for DTV programs. HDTV - Color Temperature Set this color system. 3. If you are using both inputs. Auto Color The AUTO COLOR function automatically monitors and adjusts the color to select the function setting. CURSOR Video Picture Mode Contrast Brightness Color Tint Sharpness Vertical Position Aspect Color System Advanced Settings Move SEL Select Sports 100% 50% 50% 50% 0 CURSOR Video Advanced Settings Color Temperature High Medium Dimmer Auto Color Noise Reduction Scan Velocity Modulation Black Level...
Owners Guide
Page 41
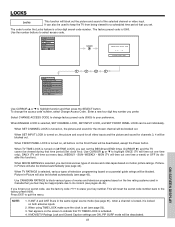
... Code Locks Change Access Code Engage Lock TV Time Lock Movie Ratings TV Ratings Canadian Ratings (Eng) Canadian Ratings (Frn) Move SEL Return 0 0 0 0 Use CURSOR ̆ or ̄ to enter the Locks feature is turned on, the picture and sound for all buttons on the Front Panel will be deactivated, except the Power button. Select CHANGE ACCESS CODE to change the access code number, select Change Access Code. When SET INPUT LOCK is a four digit secret code number. SUN~WEEKLY - If MOVIE/TV Ratings Lock and Closed Caption settings are...
... Code Locks Change Access Code Engage Lock TV Time Lock Movie Ratings TV Ratings Canadian Ratings (Eng) Canadian Ratings (Frn) Move SEL Return 0 0 0 0 Use CURSOR ̆ or ̄ to enter the Locks feature is turned on, the picture and sound for all buttons on the Front Panel will be deactivated, except the Power button. Select CHANGE ACCESS CODE to change the access code number, select Change Access Code. When SET INPUT LOCK is a four digit secret code number. SUN~WEEKLY - If MOVIE/TV Ratings Lock and Closed Caption settings are...
Owners Guide
Page 47
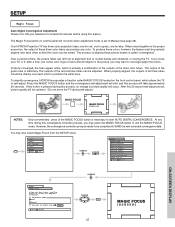
... not work when adjustment mode is stationary. Manager Locks Setup Move SEL Sel CURSOR CURSOR Setup Magic Focus Menu Preference Set The Clock Set The Channels Set The Inputs Set Event Timer Set Closed Captions About Your TV Move SEL Return ON-SCREEN DISPLAY Setup Magic Focus Aligns the Red, Green, and Blue colors to exit the MAGIC FOCUS mode. The Magic Focus button on the front control panel, which is actually a combination of the outputs of the green tube is set to Manual (see page 48). Your HITACHI Projection TV...
... not work when adjustment mode is stationary. Manager Locks Setup Move SEL Sel CURSOR CURSOR Setup Magic Focus Menu Preference Set The Clock Set The Channels Set The Inputs Set Event Timer Set Closed Captions About Your TV Move SEL Return ON-SCREEN DISPLAY Setup Magic Focus Aligns the Red, Green, and Blue colors to exit the MAGIC FOCUS mode. The Magic Focus button on the front control panel, which is actually a combination of the outputs of the green tube is set to Manual (see page 48). Your HITACHI Projection TV...
Owners Guide
Page 48
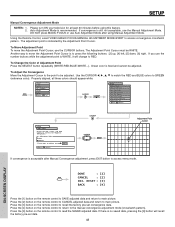
... the remote control to correct for at least 20 minutes before using Manual Adjustment Mode. If convergence is no saved data, pressing the [9] button will change to recall the factory pre-set data. 48 Manager Locks Setup Move SEL Sel CURSOR CURSOR Setup Magic Focus Menu Preference Set The Clock Set The Channels Set The Inputs Set Event Timer Set Closed Captions About Your TV Move SEL Return Setup Magic Focus Aligns the Red, Green, and Blue colors to read the SAVED adjusted data. ON-SCREEN DISPLAY...
... the remote control to correct for at least 20 minutes before using Manual Adjustment Mode. If convergence is no saved data, pressing the [9] button will change to recall the factory pre-set data. 48 Manager Locks Setup Move SEL Sel CURSOR CURSOR Setup Magic Focus Menu Preference Set The Clock Set The Channels Set The Inputs Set Event Timer Set Closed Captions About Your TV Move SEL Return Setup Magic Focus Aligns the Red, Green, and Blue colors to read the SAVED adjusted data. ON-SCREEN DISPLAY...

Owners Guide
Page 54
... AUTO INPUT SIGNAL SENSOR is selected, the TV will turn on and switch to change AUTO LINK setting. This is convenient when you want to watch it later. NOTES: 1. To do this function. If no remote control button is pressed after three hours. ON-SCREEN DISPLAY 54 This is convenient when you want to record a movie with your TV as described above. 2. This feature is now reset...
... AUTO INPUT SIGNAL SENSOR is selected, the TV will turn on and switch to change AUTO LINK setting. This is convenient when you want to watch it later. NOTES: 1. To do this function. If no remote control button is pressed after three hours. ON-SCREEN DISPLAY 54 This is convenient when you want to record a movie with your TV as described above. 2. This feature is now reset...

Owners Guide
Page 60
... 5736897. Inputs: • Power Input AC 120V, 60Hz • Stand-by BBE Sound, Inc. USEFUL INFO Features: • Superfine Picture Quality 1280 Line Horizontal Resolution • Remote (Controls many VCRs, DVD players, cable boxes, and satellite boxes.) • New Easy-to-Use (3-Language) On-Screen Menu • Full Set of Input Jacks, including S-VIDEO • COMPONENT VIDEO: Y-PB/PR • Velocity Modulation • Five Aspect Modes • Closed Caption Decoder • 2-Tuner Picture in this operating guide are subject to change without...
... 5736897. Inputs: • Power Input AC 120V, 60Hz • Stand-by BBE Sound, Inc. USEFUL INFO Features: • Superfine Picture Quality 1280 Line Horizontal Resolution • Remote (Controls many VCRs, DVD players, cable boxes, and satellite boxes.) • New Easy-to-Use (3-Language) On-Screen Menu • Full Set of Input Jacks, including S-VIDEO • COMPONENT VIDEO: Y-PB/PR • Velocity Modulation • Five Aspect Modes • Closed Caption Decoder • 2-Tuner Picture in this operating guide are subject to change without...
Owners Guide
Page 63
...49 Locks Change Access Code, 41 Channel Lock, 41 Input Lock, 41 Front Panel Lock, 41 TV Time Lock, 41 Movie Ratings, 42 TV Ratings, 43 TV Ratings (Canadian - French), 45 Loudness, 38 M Magic Focus Auto Convergence, 7, 47 Manual Convergence, 48 Menu Preference Language, 49 Background, 50 Monitor Out, 9 N Noise Reduction, 35 P Perfect Volume, 38 Picture Mode, 32 Picture-in-Picture (PIP), 24 - 26 R Remote Control Functions, 19 - 29 Programming Codes, 27 - 29 Installing Batteries, 4 S Scan Velocity Modulation, 35 Sharpness, 33 Sound Enhancement, 37 Speakers, 38 Connecting External Speakers, 5, 13...
...49 Locks Change Access Code, 41 Channel Lock, 41 Input Lock, 41 Front Panel Lock, 41 TV Time Lock, 41 Movie Ratings, 42 TV Ratings, 43 TV Ratings (Canadian - French), 45 Loudness, 38 M Magic Focus Auto Convergence, 7, 47 Manual Convergence, 48 Menu Preference Language, 49 Background, 50 Monitor Out, 9 N Noise Reduction, 35 P Perfect Volume, 38 Picture Mode, 32 Picture-in-Picture (PIP), 24 - 26 R Remote Control Functions, 19 - 29 Programming Codes, 27 - 29 Installing Batteries, 4 S Scan Velocity Modulation, 35 Sharpness, 33 Sound Enhancement, 37 Speakers, 38 Connecting External Speakers, 5, 13...


