
Owners Guide
Page 10
...connect the component CB output to the TV's PB input and the component CR output to Input 3, 4 or 5 at the same time. Hitachi will be necessary to adjust TINT to control basic equipment functions (such as VCR play, rewind, fast forward, stop, etc.) from Dolby Laboratories.... Do not connect composite VIDEO and S-VIDEO to the TV's PR input. 4. When using IEEE1394 connections, you if a software upgrade is for future software upgrades. In order to the TV's PR input. 3. "Dolby" and the double-D symbol are available for DVI-HDTV input. 2. NOTES: 1....
...connect the component CB output to the TV's PB input and the component CR output to Input 3, 4 or 5 at the same time. Hitachi will be necessary to adjust TINT to control basic equipment functions (such as VCR play, rewind, fast forward, stop, etc.) from Dolby Laboratories.... Do not connect composite VIDEO and S-VIDEO to the TV's PR input. 4. When using IEEE1394 connections, you if a software upgrade is for future software upgrades. In order to the TV's PR input. 3. "Dolby" and the double-D symbol are available for DVI-HDTV input. 2. NOTES: 1....
Owners Guide
Page 42
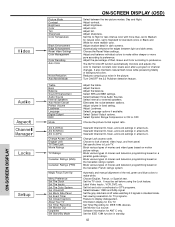
... The Color System Set Virtual HD Set Black Side Panel Set Event Timer Set Closed Captions About Your TV Set Timer Recording Set Monitor Out Upgrades Set Stand-By Mode ON-SCREEN DISPLAY (OSD) Select between stations. Adjust contrast. Choose the Reset Video settings. Turn ON/OFF the 3:2 Pulldown detection feature...
... The Color System Set Virtual HD Set Black Side Panel Set Event Timer Set Closed Captions About Your TV Set Timer Recording Set Monitor Out Upgrades Set Stand-By Mode ON-SCREEN DISPLAY (OSD) Select between stations. Adjust contrast. Choose the Reset Video settings. Turn ON/OFF the 3:2 Pulldown detection feature...

Owners Guide
Page 62
Press down on the remote to select. Setup Set Timer Recording Set Monitor Out Upgrades Set Stand-By Mode Move SEL Select ON-SCREEN DISPLAY 62 SETUP Setup Select SETUP when setting your choice. Use the THUMB STICK ̆ or &#...
Press down on the remote to select. Setup Set Timer Recording Set Monitor Out Upgrades Set Stand-By Mode Move SEL Select ON-SCREEN DISPLAY 62 SETUP Setup Select SETUP when setting your choice. Use the THUMB STICK ̆ or &#...

Owners Guide
Page 71
... Time and connect the IEEE1394 devices before using this feature to highlight and select FINISH TIME AM/PM. Setup Set Timer Recording Set Monitor Out Upgrades Set Stand-By Mode Move SEL Return THUMB STICK SELECT Setup Set Timer Recording Record1 --:--AM --:--AM Jan.01, 2003 Ant C ------- The dimensions of the... select START TIME Hour/Minute. Use THUMBSTICK ̈, ̆, ̄ to highlight and select the DAY of each TV model are not covered by your Hitachi Factory Warranty. ON-SCREEN DISPLAY 71
... Time and connect the IEEE1394 devices before using this feature to highlight and select FINISH TIME AM/PM. Setup Set Timer Recording Set Monitor Out Upgrades Set Stand-By Mode Move SEL Return THUMB STICK SELECT Setup Set Timer Recording Record1 --:--AM --:--AM Jan.01, 2003 Ant C ------- The dimensions of the... select START TIME Hour/Minute. Use THUMBSTICK ̈, ̆, ̄ to highlight and select the DAY of each TV model are not covered by your Hitachi Factory Warranty. ON-SCREEN DISPLAY 71

Owners Guide
Page 72
...STICK ̆, ̄ to highlight the function to change then press down on THUMB STICK to select the function. If a future software upgrade is required for your TV, Hitachi will select the source of the Monitor Output. In order to previous menu. Press down on THUMBSTICK to a VCR or other A/V device.... Setup Set Timer Recording Set Monitor Out Upgrades Set Stand-By Mode Move SEL Return THUMB STICK SELECT Setup Set Stand-By ...
...STICK ̆, ̄ to highlight the function to change then press down on THUMB STICK to select the function. If a future software upgrade is required for your TV, Hitachi will select the source of the Monitor Output. In order to previous menu. Press down on THUMBSTICK to a VCR or other A/V device.... Setup Set Timer Recording Set Monitor Out Upgrades Set Stand-By Mode Move SEL Return THUMB STICK SELECT Setup Set Stand-By ...

Owners Guide
Page 74
... contrast in the antenna system such as a radio. RECEPTION PROBLEMS • IGNITION NOISE: Black spots or horizontal streaks may appear, picture may be necessary to upgrade your antenna. One is the direct path and the other objects. NOTE: The TV set can generate sound distortion in some other is usually caused...
... contrast in the antenna system such as a radio. RECEPTION PROBLEMS • IGNITION NOISE: Black spots or horizontal streaks may appear, picture may be necessary to upgrade your antenna. One is the direct path and the other objects. NOTE: The TV set can generate sound distortion in some other is usually caused...

Owners Guide
Page 79
...-33 Programming Codes 34-40 Installing Batteries 4 S Sharpness 44 Sound Enhancement 48 Speakers 47 Connecting External Speakers 5, 13-14 T Time 66 Tint 44 Treble 47 U Upgrades 72 V Vertical Position 50 Video Settings 43-46 Virtual HD 28 79 INDEX A Accessories 4 Antennas (Connecting 5,6 Aspect Ratio 27 Audio (Advanced Digital) Languages 49 Dolby...
...-33 Programming Codes 34-40 Installing Batteries 4 S Sharpness 44 Sound Enhancement 48 Speakers 47 Connecting External Speakers 5, 13-14 T Time 66 Tint 44 Treble 47 U Upgrades 72 V Vertical Position 50 Video Settings 43-46 Virtual HD 28 79 INDEX A Accessories 4 Antennas (Connecting 5,6 Aspect Ratio 27 Audio (Advanced Digital) Languages 49 Dolby...

