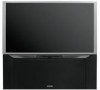
Owners Guide
Page 3
... Read before operating equipment Follow all instructions. 5. Unplug this television. 1. Televisions are NOT COVERED by the manufacturer. 12. Projection TV's are provided for long periods of cable entry as close to television receivers. Read these instructions. 3. The wide blade or the third prong are heavy and can cause permanent damage to the point of time. 14. Servicing is connected to the receiver be viewed mostly in any...
... Read before operating equipment Follow all instructions. 5. Unplug this television. 1. Televisions are NOT COVERED by the manufacturer. 12. Projection TV's are provided for long periods of cable entry as close to television receivers. Read these instructions. 3. The wide blade or the third prong are heavy and can cause permanent damage to the point of time. 14. Servicing is connected to the receiver be viewed mostly in any...

Owners Guide
Page 6
... adapter. For best performance, video cables should use 75-Ohm coaxial shielded wire. Phono Connector Used on all standard video and audio cables which connect to the antenna jack on the television's rear jack panel and front control panel. Use this cable for the antenna mixer. 6 ANT A/ANT B From UHF antenna From outdoor antenna or CATV System Antenna Mixer "F" Type 75-Ohm Coaxial Antenna Connector For connecting RF signals (antenna or cable TV) to inputs and outputs located on the...
... adapter. For best performance, video cables should use 75-Ohm coaxial shielded wire. Phono Connector Used on all standard video and audio cables which connect to the antenna jack on the television's rear jack panel and front control panel. Use this cable for the antenna mixer. 6 ANT A/ANT B From UHF antenna From outdoor antenna or CATV System Antenna Mixer "F" Type 75-Ohm Coaxial Antenna Connector For connecting RF signals (antenna or cable TV) to inputs and outputs located on the...

Owners Guide
Page 9
... controlled by selecting "TV as a center channel by the television's main volume. ቦ CENTER IN (Input) This jack is for high quality video output. Use the audio and video inputs to a different source, such as a cable box, only when ANT B is used as a main picture. ANT A can be used at a time. ቤ MONITOR OUT These jacks provide fixed audio and video signals which are used for connecting equipment with center signal capability. ANT C is displayed as a center speaker. This antenna output...
... controlled by selecting "TV as a center channel by the television's main volume. ቦ CENTER IN (Input) This jack is for high quality video output. Use the audio and video inputs to a different source, such as a cable box, only when ANT B is used as a main picture. ANT A can be used at a time. ቤ MONITOR OUT These jacks provide fixed audio and video signals which are used for connecting equipment with center signal capability. ANT C is displayed as a center speaker. This antenna output...

Owners Guide
Page 10
... cable (see page 44). 5. NOTE: *Manufactured under license from your TV On-Screen Display. ቭ Multi Media Card Slot This card slot is required for your external devices with DVI-HDTV output such as a DVD player or Set Top Box. Do not connect composite VIDEO and S-VIDEO to obtain optimum picture quality when using IEEE1394 connections, you if a software upgrade is for future software upgrades. It may use composite video signal for INPUT:2. FIRST TIME USE REAR PANEL JACKS ቨ Component: Y-PBPR Inputs Inputs...
... cable (see page 44). 5. NOTE: *Manufactured under license from your TV On-Screen Display. ቭ Multi Media Card Slot This card slot is required for your external devices with DVI-HDTV output such as a DVD player or Set Top Box. Do not connect composite VIDEO and S-VIDEO to obtain optimum picture quality when using IEEE1394 connections, you if a software upgrade is for future software upgrades. It may use composite video signal for INPUT:2. FIRST TIME USE REAR PANEL JACKS ቨ Component: Y-PBPR Inputs Inputs...

Owners Guide
Page 12
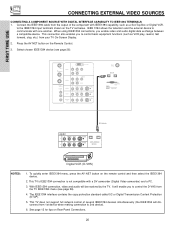
... using IEEE1394 connections, you to control basic equipment functions (such as DVD players and set- Use these connections in the example on connecting your hook-up cables. • A single VCR can be used at a time. • Connect only 1 component (VCR, DVD player, camcorder, etc.) to each input jack. • COMPONENT: Y-PBPR (Input 1 & 2) connections are provided for VCR #1 and VCR #2, but only one audio output (mono sound), connect it is recommended to use composite video signal for high...
... using IEEE1394 connections, you to control basic equipment functions (such as DVD players and set- Use these connections in the example on connecting your hook-up cables. • A single VCR can be used at a time. • Connect only 1 component (VCR, DVD player, camcorder, etc.) to each input jack. • COMPONENT: Y-PBPR (Input 1 & 2) connections are provided for VCR #1 and VCR #2, but only one audio output (mono sound), connect it is recommended to use composite video signal for high...
Owners Guide
Page 13
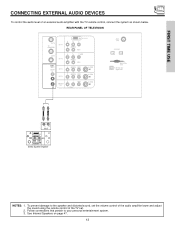
... volume control of the audio amplifier lower and adjust the sound using the remote control of an external audio amplifier with the TV remote control, connect the system as shown below. To prevent damage to your personal entertainment system. 3. FIRST TIME USE CONNECTING EXTERNAL AUDIO DEVICES To control the audio level of the TV set. 2. REAR PANEL OF TELEVISION ANT A TO CONVERTER INPUT 1 DVI-HDTV PR PB Y R (MONO)/L AUDIO ANT B INPUT 2 AUDIO TO HI-FI CENTER IN INPUT 3 INPUT 4 L R MONITOR OUT PR PB Y/VIDEO R (MONO)/L AUDIO R (MONO)/L VIDEO R (MONO)/L VIDEO R L VIDEO...
... volume control of the audio amplifier lower and adjust the sound using the remote control of an external audio amplifier with the TV remote control, connect the system as shown below. To prevent damage to your personal entertainment system. 3. FIRST TIME USE CONNECTING EXTERNAL AUDIO DEVICES To control the audio level of the TV set. 2. REAR PANEL OF TELEVISION ANT A TO CONVERTER INPUT 1 DVI-HDTV PR PB Y R (MONO)/L AUDIO ANT B INPUT 2 AUDIO TO HI-FI CENTER IN INPUT 3 INPUT 4 L R MONITOR OUT PR PB Y/VIDEO R (MONO)/L AUDIO R (MONO)/L VIDEO R (MONO)/L VIDEO R L VIDEO...
Owners Guide
Page 15
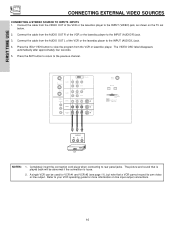
.... Before Operating External Video Source The input mode is changed every time the VID1~VID5 button is OFF), the set to your particular assortment of video and audio inputs and outputs. However, you use to connect the VCR, camcorder, laserdisc player, DVD player, or HDTV Set Top Box to VIDEO and a video signal is dependent on the back panel of each component for the location of components and features. Connect an external source to the previous channel. The VIDEO OSD...
.... Before Operating External Video Source The input mode is changed every time the VID1~VID5 button is OFF), the set to your particular assortment of video and audio inputs and outputs. However, you use to connect the VCR, camcorder, laserdisc player, DVD player, or HDTV Set Top Box to VIDEO and a video signal is dependent on the back panel of each component for the location of components and features. Connect an external source to the previous channel. The VIDEO OSD...
Owners Guide
Page 16
... TV set below. 2. Connect the cable from the AUDIO OUT L of the VCR or the laserdisc player to the INPUT (AUDIO/R) jack. 3. ANT A TO CONVERTER INPUT 1 ANT B INPUT 2 AUDIO TO HI-FI CENTER IN INPUT 3 INPUT 4 L R MONITOR OUT DVI-HDTV PR PB Y R (MONO)/L AUDIO PR PB Y/VIDEO R (MONO)/L AUDIO R (MONO)/L VIDEO S-VIDEO R (MONO)/L VIDEO S-VIDEO R L VIDEO AUDIO S-VIDEO ANT C (DTV) IEEE1394 Multi Media Card OPTICAL OUT Digital Audio OUTPUT RL V VCR NOTES: 1. Refer to the INPUT (AUDIO/L) jack. 4. Press the VID2~VID5 button to view the program...
... TV set below. 2. Connect the cable from the AUDIO OUT L of the VCR or the laserdisc player to the INPUT (AUDIO/R) jack. 3. ANT A TO CONVERTER INPUT 1 ANT B INPUT 2 AUDIO TO HI-FI CENTER IN INPUT 3 INPUT 4 L R MONITOR OUT DVI-HDTV PR PB Y R (MONO)/L AUDIO PR PB Y/VIDEO R (MONO)/L AUDIO R (MONO)/L VIDEO S-VIDEO R (MONO)/L VIDEO S-VIDEO R L VIDEO AUDIO S-VIDEO ANT C (DTV) IEEE1394 Multi Media Card OPTICAL OUT Digital Audio OUTPUT RL V VCR NOTES: 1. Refer to the INPUT (AUDIO/L) jack. 4. Press the VID2~VID5 button to view the program...
Owners Guide
Page 18
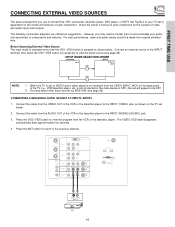
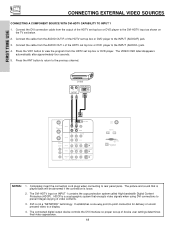
... the HDTV set top box or DVD player to the DVI-HDTV input as shown on INPUT 1 contains the copy protection system called High-bandwidth Digital Content Protection (HDCP). Connect the cable from the output of the HDTV set top box or DVD player to the INPUT (AUDIO/L) jack. 4. Completely insert the connection cord plugs when connecting to the previous channel. DVI is loose. 2. FIRST TIME USE CONNECTING EXTERNAL VIDEO SOURCES CONNECTING A COMPONENT SOURCE WITH DVI-HDTV CAPABILITY TO INPUT 1 1. D-VHS RL OUTPUT DIGITAL OUTPUT ANT A TO CONVERTER INPUT 1 ANT B INPUT 2 AUDIO...
... the HDTV set top box or DVD player to the DVI-HDTV input as shown on INPUT 1 contains the copy protection system called High-bandwidth Digital Content Protection (HDCP). Connect the cable from the output of the HDTV set top box or DVD player to the INPUT (AUDIO/L) jack. 4. Completely insert the connection cord plugs when connecting to the previous channel. DVI is loose. 2. FIRST TIME USE CONNECTING EXTERNAL VIDEO SOURCES CONNECTING A COMPONENT SOURCE WITH DVI-HDTV CAPABILITY TO INPUT 1 1. D-VHS RL OUTPUT DIGITAL OUTPUT ANT A TO CONVERTER INPUT 1 ANT B INPUT 2 AUDIO...
Owners Guide
Page 19
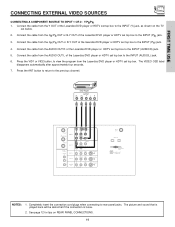
... or VID2 button, to view the program from the AUDIO OUT R of the Laserdisc/DVD player or HDTV set top box to the INPUT (PB) jack. 3. Completely insert the connection cord plugs when connecting to the previous channel. FIRST TIME USE CONNECTING EXTERNAL VIDEO SOURCES CONNECTING A COMPONENT SOURCE TO INPUT 1 OR 2: Y-PBPR. 1. The picture and sound that is played back will be abnormal if the connection is loose. 2. DVD Player OUTPUT PR PB Y L R ANT A TO CONVERTER INPUT 1 ANT B INPUT 2 AUDIO TO...
... or VID2 button, to view the program from the AUDIO OUT R of the Laserdisc/DVD player or HDTV set top box to the INPUT (PB) jack. 3. Completely insert the connection cord plugs when connecting to the previous channel. FIRST TIME USE CONNECTING EXTERNAL VIDEO SOURCES CONNECTING A COMPONENT SOURCE TO INPUT 1 OR 2: Y-PBPR. 1. The picture and sound that is played back will be abnormal if the connection is loose. 2. DVD Player OUTPUT PR PB Y L R ANT A TO CONVERTER INPUT 1 ANT B INPUT 2 AUDIO TO...
Owners Guide
Page 20
...the TV IEEE1394 menu (see page 26). Select chosen IEEE1394 device (see page 26). 4. ANT A TO CONVERTER INPUT 1 DVI-HDTV PR PB Y R (MONO)/L ANT B INPUT 2 AUDIO TO HI-FI CENTER IN INPUT 3 INPUT 4 L R MONITOR OUT PB Y/VIDEO R (MONO)/L AUDIO R (MONO)/L VIDEO R (MONO)/L VIDEO R L VIDEO AUDIO S-VIDEO S-VIDEO S-VIDEO ANT C (DTV) IEEE1394 Multi Media Card OPTICAL OUT Digital Audio IEEE1394 Cable LINE OUT R (MONO)/L VIDEO 1 R (MONO)/L VIDEO 2 S-VIDEO S-VIDEO DIGITAL INTERFACE IEEE1394 Digital VCR (D-VHS) NOTES: 1. With IEEE1394 connection, video and audio will...
...the TV IEEE1394 menu (see page 26). Select chosen IEEE1394 device (see page 26). 4. ANT A TO CONVERTER INPUT 1 DVI-HDTV PR PB Y R (MONO)/L ANT B INPUT 2 AUDIO TO HI-FI CENTER IN INPUT 3 INPUT 4 L R MONITOR OUT PB Y/VIDEO R (MONO)/L AUDIO R (MONO)/L VIDEO R (MONO)/L VIDEO R L VIDEO AUDIO S-VIDEO S-VIDEO S-VIDEO ANT C (DTV) IEEE1394 Multi Media Card OPTICAL OUT Digital Audio IEEE1394 Cable LINE OUT R (MONO)/L VIDEO 1 R (MONO)/L VIDEO 2 S-VIDEO S-VIDEO DIGITAL INTERFACE IEEE1394 Digital VCR (D-VHS) NOTES: 1. With IEEE1394 connection, video and audio will...
Owners Guide
Page 21
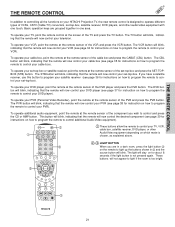
... GUIDE ASPECT VIRTUAL HD MENU EXIT ቢ These buttons allow the remote to control your TV, VCR, cable box, satellite receiver, DVD player, or other audio/video equipment with one area. The STB button will blink, indicating that the remote will now control your VCR (see page 38 for instruction on for instructions on how to program the remote to operate different types of the PVR and press the PVR button. THE REMOTE CONTROL THE REMOTE CONTROL In...
... GUIDE ASPECT VIRTUAL HD MENU EXIT ቢ These buttons allow the remote to control your TV, VCR, cable box, satellite receiver, DVD player, or other audio/video equipment with one area. The STB button will blink, indicating that the remote will now control your VCR (see page 38 for instruction on for instructions on how to program the remote to operate different types of the PVR and press the PVR button. THE REMOTE CONTROL THE REMOTE CONTROL In...

Owners Guide
Page 31
... button when sub-picture channel tuning is available with a 1080i component input or ANT C signal. ANT A TO CONVERTER INPUT 1 ANT B INPUT 2 AUDIO TO HI-FI CENTER IN INPUT 3 INPUT 4 L R MONITOR OUT DVI-HDTV PR PB Y R (MONO)/L AUDIO PR PB Y/VIDEO R (MONO)/L AUDIO R (MONO)/L VIDEO S-VIDEO R (MONO)/L VIDEO S-VIDEO R L VIDEO AUDIO S-VIDEO ANT C (DTV) IEEE1394 Multi Media Card OPTICAL OUT Digital Audio MENU EXIT VOL SELECT CH ቤ ቢ ቤ MUTE LAST CH VID 1 VID 2 PIP VID 3 SURF VID 5 VID 4 FREEZE PIP MODE PIP ACCESS...
... button when sub-picture channel tuning is available with a 1080i component input or ANT C signal. ANT A TO CONVERTER INPUT 1 ANT B INPUT 2 AUDIO TO HI-FI CENTER IN INPUT 3 INPUT 4 L R MONITOR OUT DVI-HDTV PR PB Y R (MONO)/L AUDIO PR PB Y/VIDEO R (MONO)/L AUDIO R (MONO)/L VIDEO S-VIDEO R (MONO)/L VIDEO S-VIDEO R L VIDEO AUDIO S-VIDEO ANT C (DTV) IEEE1394 Multi Media Card OPTICAL OUT Digital Audio MENU EXIT VOL SELECT CH ቤ ቢ ቤ MUTE LAST CH VID 1 VID 2 PIP VID 3 SURF VID 5 VID 4 FREEZE PIP MODE PIP ACCESS...

Owners Guide
Page 36
... light will turn off your set-top-box/satellite receiver when the correct two digit preset code is designed to operate different types of set-top-box/satellite systems. You must first program the remote to match the remote system of your settop-box/satellite receiver. NOTES: 1. The remote will act as the TV/STB button when in STB mode. ቢ SET-TOP-BOX (STB) button This button allows the remote to control your set-top-box...
... light will turn off your set-top-box/satellite receiver when the correct two digit preset code is designed to operate different types of set-top-box/satellite systems. You must first program the remote to match the remote system of your settop-box/satellite receiver. NOTES: 1. The remote will act as the TV/STB button when in STB mode. ቢ SET-TOP-BOX (STB) button This button allows the remote to control your set-top-box...
Owners Guide
Page 42
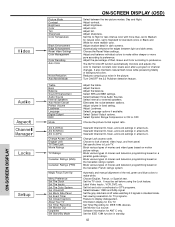
... Internal Speakers Auto Noise Cancel Perfect Volume Loudness Language Digital Output DRC Mode Ant A (NTSC) Ant B (NTSC) Ant C (DTV) Change Access Code Engage Lock TV Time Lock Movie Ratings TV Ratings Canadian Ratings (ENG) Canadian Ratings (FRN) Magic Focus Tune Up Menu Preference Set The Clock Set The Inputs Set The Color System Set Virtual HD Set Black Side Panel Set Event Timer Set Closed Captions About Your TV Set Timer Recording Set Monitor Out Upgrades Set Stand-By Mode ON-SCREEN DISPLAY (OSD) Select between light and dark areas. Select between three Audio Sources. Adjust...
... Internal Speakers Auto Noise Cancel Perfect Volume Loudness Language Digital Output DRC Mode Ant A (NTSC) Ant B (NTSC) Ant C (DTV) Change Access Code Engage Lock TV Time Lock Movie Ratings TV Ratings Canadian Ratings (ENG) Canadian Ratings (FRN) Magic Focus Tune Up Menu Preference Set The Clock Set The Inputs Set The Color System Set Virtual HD Set Black Side Panel Set Event Timer Set Closed Captions About Your TV Set Timer Recording Set Monitor Out Upgrades Set Stand-By Mode ON-SCREEN DISPLAY (OSD) Select between light and dark areas. Select between three Audio Sources. Adjust...

Owners Guide
Page 45
...balance the listed individual colors to access other video settings. THUMB STICK SELECT Video Picture Mode Contrast Brightness Color Tint Sharpness Color Temperature Black Enhancement Edge Enhancement Reset Video Settings Move SEL Select Ant A/B Day 100% 50% 50% Night 50% High High High THUMB STICK Video Color Management Color Decoding Auto Color Noise Reduction Auto Movie Mode Move SEL Select Off Off Off ON-SCREEN DISPLAY Color Management Use this input to highlight and adjust individual colors. THUMB STICK SELECT Video Picture Mode Contrast Brightness Color Tint Sharpness...
...balance the listed individual colors to access other video settings. THUMB STICK SELECT Video Picture Mode Contrast Brightness Color Tint Sharpness Color Temperature Black Enhancement Edge Enhancement Reset Video Settings Move SEL Select Ant A/B Day 100% 50% 50% Night 50% High High High THUMB STICK Video Color Management Color Decoding Auto Color Noise Reduction Auto Movie Mode Move SEL Select Off Off Off ON-SCREEN DISPLAY Color Management Use this input to highlight and adjust individual colors. THUMB STICK SELECT Video Picture Mode Contrast Brightness Color Tint Sharpness...
Owners Guide
Page 57
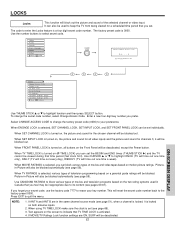
... types of movies and television programs based on the two rating systems used to keep the TV from being viewed for the chosen channel will also be blocked automatically (see page 59). Use the number buttons to your preference. Video Audio Aspect Chan. Select CHANGE ACCESS CODE to change the secret code number, select Change Access Code. Picturein-Picture will be blocked out. When TV RATINGS is turned on, the picture and sound for channels 3, 4 will be blocked...
... types of movies and television programs based on the two rating systems used to keep the TV from being viewed for the chosen channel will also be blocked automatically (see page 59). Use the number buttons to your preference. Video Audio Aspect Chan. Select CHANGE ACCESS CODE to change the secret code number, select Change Access Code. Picturein-Picture will be blocked out. When TV RATINGS is turned on, the picture and sound for channels 3, 4 will be blocked...
Owners Guide
Page 63
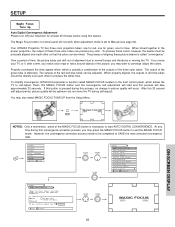
... SELECT Setup Magic Focus Tune Up Menu Preference Set The Clock Set The Inputs Set The Color System Set Virtual HD Set Black Side Panel Set Event Timer Set Closed Caption About Your TV Move SEL Select THUMB STICK THUMB STICK SELECT MAGIC FOCUS 63 At any color. Adjustment Mode Auto Manual At turn ON your TV, or if, after a time, you notice color rings or halos around objects in the proper proportion, the output of the red and blue tubes can...
... SELECT Setup Magic Focus Tune Up Menu Preference Set The Clock Set The Inputs Set The Color System Set Virtual HD Set Black Side Panel Set Event Timer Set Closed Caption About Your TV Move SEL Select THUMB STICK THUMB STICK SELECT MAGIC FOCUS 63 At any color. Adjustment Mode Auto Manual At turn ON your TV, or if, after a time, you notice color rings or halos around objects in the proper proportion, the output of the red and blue tubes can...
Owners Guide
Page 64
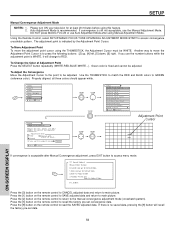
... (WHITE-RED-BLUE-WHITE...). Press the [1] button on the remote control to main picture. Green color is still not acceptable, use Auto Adjustment Mode after Manual Convergence adjustment, press EXIT button to access menu mode. 117 Manual Adjust Please Enter Number. 0.Cancel and go to Normal Mode. 1.Done and go to press the following buttons: [2] up, [4] left, [5] down, [6] right. Video Aspect Audio Chan. Press the [3] button on the remote control to SAVE adjusted data and return to recall the factory pre-set data. Using the Remote Control, select SETUP-MAGIC FOCUS...
... (WHITE-RED-BLUE-WHITE...). Press the [1] button on the remote control to main picture. Green color is still not acceptable, use Auto Adjustment Mode after Manual Convergence adjustment, press EXIT button to access menu mode. 117 Manual Adjust Please Enter Number. 0.Cancel and go to Normal Mode. 1.Done and go to press the following buttons: [2] up, [4] left, [5] down, [6] right. Video Aspect Audio Chan. Press the [3] button on the remote control to SAVE adjusted data and return to recall the factory pre-set data. Using the Remote Control, select SETUP-MAGIC FOCUS...

Owners Guide
Page 79
... Monitor Out 9, 72 N Noise Reduction 46 P Perfect Volume 47 Photo MC 7, 24-25 Picture Mode 43 Picture-in-Picture (PIP 31-33 Picture-outside-Picture (POP 31 R Remote Control Functions 21-33 Programming Codes 34-40 Installing Batteries 4 S Sharpness 44 Sound Enhancement 48 Speakers 47 Connecting External Speakers 5, 13-14 T Time 66 Tint 44 Treble 47 U Upgrades 72 V Vertical Position 50 Video Settings 43-46 Virtual HD 28 79 English 60 TV Ratings (Canadian - INDEX A Accessories 4 Antennas (Connecting 5,6 Aspect...
... Monitor Out 9, 72 N Noise Reduction 46 P Perfect Volume 47 Photo MC 7, 24-25 Picture Mode 43 Picture-in-Picture (PIP 31-33 Picture-outside-Picture (POP 31 R Remote Control Functions 21-33 Programming Codes 34-40 Installing Batteries 4 S Sharpness 44 Sound Enhancement 48 Speakers 47 Connecting External Speakers 5, 13-14 T Time 66 Tint 44 Treble 47 U Upgrades 72 V Vertical Position 50 Video Settings 43-46 Virtual HD 28 79 English 60 TV Ratings (Canadian - INDEX A Accessories 4 Antennas (Connecting 5,6 Aspect...


