
Owners Guide
Page 4
...(NOT INCLUDED, ORDER SEPARATELY) PART NAME PART NO. 50" LCD Rear PTV Stand H520447 SPX50W 60" LCD Rear PTV Stand H520448 SPX60W CUSTOM HITACHI TELEVISION STAND Excellent for the remote control. Remote Control... CLU-5729TSI 1. 2. 4. 5. This SPX60W LCD stand for use only with other apparatus is incorrectly replaced. Two IR Mouse Cables (Part No. Replace the cover. Use with Hitachi 50VX500. When replacing old batteries, push them towards the... ANT POWER REMOTE CONTROL POWER TV DVD VCR CBL SOURCE WIZARD CD PVR STB AMP 1 2 3 4 5 6 7 8 9 SLEEP C.C.
...(NOT INCLUDED, ORDER SEPARATELY) PART NAME PART NO. 50" LCD Rear PTV Stand H520447 SPX50W 60" LCD Rear PTV Stand H520448 SPX60W CUSTOM HITACHI TELEVISION STAND Excellent for the remote control. Remote Control... CLU-5729TSI 1. 2. 4. 5. This SPX60W LCD stand for use only with other apparatus is incorrectly replaced. Two IR Mouse Cables (Part No. Replace the cover. Use with Hitachi 50VX500. When replacing old batteries, push them towards the... ANT POWER REMOTE CONTROL POWER TV DVD VCR CBL SOURCE WIZARD CD PVR STB AMP 1 2 3 4 5 6 7 8 9 SLEEP C.C.
Owners Guide
Page 5
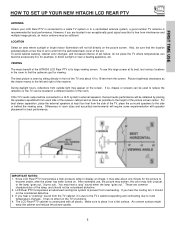
... the cabinet and reduce the picture quality. 5 FIRST TIME USE HOW TO SET UP YOUR NEW HITACHI LCD REAR PTV ANTENNA Unless your LCD Rear PTV is connected to a cable TV system or to a centralized antenna system, a good outdoor TV antenna is its best, test various locations in the room to find the optimum spot for viewing...
... the cabinet and reduce the picture quality. 5 FIRST TIME USE HOW TO SET UP YOUR NEW HITACHI LCD REAR PTV ANTENNA Unless your LCD Rear PTV is connected to a cable TV system or to a centralized antenna system, a good outdoor TV antenna is its best, test various locations in the room to find the optimum spot for viewing...

Owners Guide
Page 8
... lights up and about one minute for long lasting performance. 4. Please call service. ቭ LAMP indicator - Consult your Hitachi dealer for lamp replacement procedure. Your Hitachi LCD Rear Projection Television may take about 2 minutes to turn the TV on or off. ቪ POWER light This light is lit, the lamp has failed. If this indicator is...
... lights up and about one minute for long lasting performance. 4. Please call service. ቭ LAMP indicator - Consult your Hitachi dealer for lamp replacement procedure. Your Hitachi LCD Rear Projection Television may take about 2 minutes to turn the TV on or off. ቪ POWER light This light is lit, the lamp has failed. If this indicator is...

Owners Guide
Page 20
...rear panel has two IR BLASTER inputs which can connect up to four components and control them with up to control. The correct codes must be entered for each of the Audio/Video components for the AV Network to work. 3. You can use . FIRST TIME USE CONNECTING AV NETWORK Your Hitachi LCD TV... is setup, it allows your IR Mouse connector to control your equipment using your Hitachi TV Remote Control. Use THUMB STICK ̆ or ̄ to highlight the component you can access ...
...rear panel has two IR BLASTER inputs which can connect up to four components and control them with up to control. The correct codes must be entered for each of the Audio/Video components for the AV Network to work. 3. You can use . FIRST TIME USE CONNECTING AV NETWORK Your Hitachi LCD TV... is setup, it allows your IR Mouse connector to control your equipment using your Hitachi TV Remote Control. Use THUMB STICK ̆ or ̄ to highlight the component you can access ...
Owners Guide
Page 23
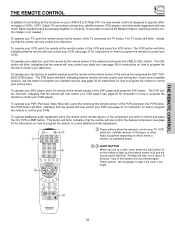
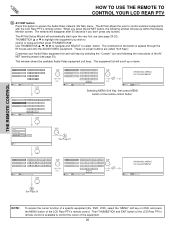
... button to program your satellite receiver (see page 37 for instructions on how to program the remote to control additional Audio equipment). ቢ POWER ባ TV DVD VCR CBL SOURCE WIZARD CD PVR STB AMP 1 2 3 4 5 6 ቤ 7 8 9 SLEEP C.C. The DVD button will blink, indicating that the...buttons are not pressed again. THE REMOTE CONTROL THE REMOTE CONTROL In addition to controlling all the functions on your HITACHI LCD Rear PTV, the new remote control is designed to control your PVR). The TV button will blink, indicating that the remote will blink.
... button to program your satellite receiver (see page 37 for instructions on how to program the remote to control additional Audio equipment). ቢ POWER ባ TV DVD VCR CBL SOURCE WIZARD CD PVR STB AMP 1 2 3 4 5 6 ቤ 7 8 9 SLEEP C.C. The DVD button will blink, indicating that the...buttons are not pressed again. THE REMOTE CONTROL THE REMOTE CONTROL In addition to controlling all the functions on your HITACHI LCD Rear PTV, the new remote control is designed to control your PVR). The TV button will blink, indicating that the remote will blink.

Owners Guide
Page 24
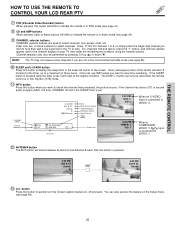
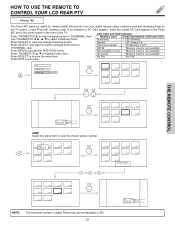
If you have a Satellite receiver, use this button to turn the TV set on or off when the remote is in TV mode (see page 23 for instructions on how to set the remote control to TV mode). ባ TV button When the TV button is pressed, it will blink, to indicate the remote is in... is pressed, it will blink to indicate the remote is in STB mode (see page 40). 24 HOW TO USE THE REMOTE TO CONTROL YOUR LCD REAR PTV ቶ 23 POWER TV DVD VCR CBL SOURCE WIZARD CD PVR STB AMP 1 2 3 4 5 6 7 8 9 SLEEP C.C.
If you have a Satellite receiver, use this button to turn the TV set on or off when the remote is in TV mode (see page 23 for instructions on how to set the remote control to TV mode). ባ TV button When the TV button is pressed, it will blink, to indicate the remote is in... is pressed, it will blink to indicate the remote is in STB mode (see page 40). 24 HOW TO USE THE REMOTE TO CONTROL YOUR LCD REAR PTV ቶ 23 POWER TV DVD VCR CBL SOURCE WIZARD CD PVR STB AMP 1 2 3 4 5 6 7 8 9 SLEEP C.C.
Owners Guide
Page 25
... , off and auto. Enter "0" first for channels 1 to 9, or simply press the single digit channel you want to view time remaining. Channel selection may not receive some channels if you want...second audio program (SAP), the time, CHANNEL ID and if the SLEEP timer is set. NOTE: The TV may also be used to select channels, lock access code, etc. Day/Night Mode Closed Captioning 3:32 PM... lower left corner of the screen. THE REMOTE CONTROL HOW TO USE THE REMOTE TO CONTROL YOUR LCD REAR PTV ቨ PVR (Personal Video Recorder) button When pressed, this button will blink to indicate ...
... , off and auto. Enter "0" first for channels 1 to 9, or simply press the single digit channel you want to view time remaining. Channel selection may not receive some channels if you want...second audio program (SAP), the time, CHANNEL ID and if the SLEEP timer is set. NOTE: The TV may also be used to select channels, lock access code, etc. Day/Night Mode Closed Captioning 3:32 PM... lower left corner of the screen. THE REMOTE CONTROL HOW TO USE THE REMOTE TO CONTROL YOUR LCD REAR PTV ቨ PVR (Personal Video Recorder) button When pressed, this button will blink to indicate ...
Owners Guide
Page 26
... passed through the IR mouse and onto the AUDIO/VIDEO equipment. VCR PV Recorder AV Receiver POWER CH ̄ CH ̆ MENU THUMB STICK 1 2 3 TV/VCR SELECT 4 5 6 MORE 7 8 9 MENU MENU 0 Move SEL Previous Page B See Page 29 ORIGINAL MENU OF EQUIPMENT Move AV NET Return NOTE:...the instructions of the AV NET learning wizard (see page 20-22). Use THUMBSTICK to navigate and SELECT to control external components with the LCD Rear PTV's remote control. This window shows the available Audio/Video equipment soft keys. Move INFO Device Setting THUMB STICK DVD POWER CH &#...
... passed through the IR mouse and onto the AUDIO/VIDEO equipment. VCR PV Recorder AV Receiver POWER CH ̄ CH ̆ MENU THUMB STICK 1 2 3 TV/VCR SELECT 4 5 6 MORE 7 8 9 MENU MENU 0 Move SEL Previous Page B See Page 29 ORIGINAL MENU OF EQUIPMENT Move AV NET Return NOTE:...the instructions of the AV NET learning wizard (see page 20-22). Use THUMBSTICK to navigate and SELECT to control external components with the LCD Rear PTV's remote control. This window shows the available Audio/Video equipment soft keys. Move INFO Device Setting THUMB STICK DVD POWER CH &#...
Owners Guide
Page 27
...Enter Picture Number - - - 0 1/10 5/10 2/10 6/10 3/10 7/10 4/10 8/10 9/10 10/10 THUMB STICK SELECT NOTE: The maximum number of the TV. Normal LED always On Press SELECT once again to switch enlarged photo back to highlight menu item. Press THUMBSTICK ̆, ̄ to Card not inserted...Accessing Detail Information (OSD and LED) LED Blinking Press SELECT to view the digital photos in the front of digital Photos that can be viewed to a PC Card adapter. HOW TO USE THE REMOTE TO CONTROL YOUR LCD REAR PTV Photo MC The Photo MC feature is not available" Press SELECT to ...
...Enter Picture Number - - - 0 1/10 5/10 2/10 6/10 3/10 7/10 4/10 8/10 9/10 10/10 THUMB STICK SELECT NOTE: The maximum number of the TV. Normal LED always On Press SELECT once again to switch enlarged photo back to highlight menu item. Press THUMBSTICK ̆, ̄ to Card not inserted...Accessing Detail Information (OSD and LED) LED Blinking Press SELECT to view the digital photos in the front of digital Photos that can be viewed to a PC Card adapter. HOW TO USE THE REMOTE TO CONTROL YOUR LCD REAR PTV Photo MC The Photo MC feature is not available" Press SELECT to ...
Owners Guide
Page 28
... 5/10 6/10 7/10 4/10 8/10 9/10 10/10 5 seconds 5 seconds.. While interval is highlighted, press SELECT to change interval time from digital cameras which meet DCF Standard. Press SELECT to stop on a sub directory name with 8 characters (Ex. 123ABCDE). 1st to 3rd: number; 4th to...numbers; 5th to exit the slideshow. Photo file names modified on the TV set displays only digital pictures from the three mentioned choices. THE REMOTE CONTROL HOW TO USE THE REMOTE TO CONTROL YOUR LCD REAR PTV SLIDESHOW Select this menu item to rotate selected photos either clockwise (THUMBSTICK...
... 5/10 6/10 7/10 4/10 8/10 9/10 10/10 5 seconds 5 seconds.. While interval is highlighted, press SELECT to change interval time from digital cameras which meet DCF Standard. Press SELECT to stop on a sub directory name with 8 characters (Ex. 123ABCDE). 1st to 3rd: number; 4th to...numbers; 5th to exit the slideshow. Photo file names modified on the TV set displays only digital pictures from the three mentioned choices. THE REMOTE CONTROL HOW TO USE THE REMOTE TO CONTROL YOUR LCD REAR PTV SLIDESHOW Select this menu item to rotate selected photos either clockwise (THUMBSTICK...
Owners Guide
Page 29
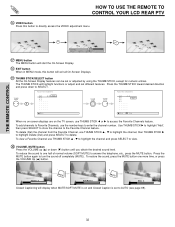
... of a specific equipment (Ex. THE REMOTE CONTROL HOW TO USE THE REMOTE TO CONTROL YOUR LCD REAR PTV B VCR PV Recorder AV Receiver POWER CH ̆ Move INFO Device Setting CH ̄ MENU TV/VCR b INFO GUIDE MORE.. Move INFO Device Setting NOTE: To access the cursor function of... Then THUMBSTICK and EXIT button of the LCD Rear PTV's remote control is available to manually learn or modify your AV NET soft keys. MENU INFO GUIDE THUMB STICK Set Top Box Custom SETUP Move INFO Device Setting THUMB STICK THUMB STICK HITACHI AV NET WIZARD (Learning) Use this wizard...
... of a specific equipment (Ex. THE REMOTE CONTROL HOW TO USE THE REMOTE TO CONTROL YOUR LCD REAR PTV B VCR PV Recorder AV Receiver POWER CH ̆ Move INFO Device Setting CH ̄ MENU TV/VCR b INFO GUIDE MORE.. Move INFO Device Setting NOTE: To access the cursor function of... Then THUMBSTICK and EXIT button of the LCD Rear PTV's remote control is available to manually learn or modify your AV NET soft keys. MENU INFO GUIDE THUMB STICK Set Top Box Custom SETUP Move INFO Device Setting THUMB STICK THUMB STICK HITACHI AV NET WIZARD (Learning) Use this wizard...
Owners Guide
Page 30
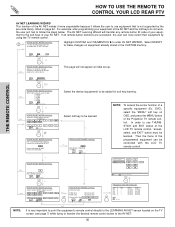
...NET WIZARD (Learning) Select the device (equipment) to be learned. NO Move YES SEL Select NOTE: To access the cursor function of the Projection TV remote control. HITACHI AV NET WIZARD (Learning) C Use this wizard to manually learn or modify your equipment to the AV NET and the soft keys do you... To learn ? DVD), select the "MENU" soft key on page 22. Select soft key to be controlled with the LCD TV remote control. HOW TO USE THE REMOTE TO CONTROL YOUR LCD REAR PTV THE REMOTE CONTROL AV NET LEARNING WIZARD This function of the AV NET makes it more expandable because it...
...NET WIZARD (Learning) Select the device (equipment) to be learned. NO Move YES SEL Select NOTE: To access the cursor function of the Projection TV remote control. HITACHI AV NET WIZARD (Learning) C Use this wizard to manually learn or modify your equipment to the AV NET and the soft keys do you... To learn ? DVD), select the "MENU" soft key on page 22. Select soft key to be controlled with the LCD TV remote control. HOW TO USE THE REMOTE TO CONTROL YOUR LCD REAR PTV THE REMOTE CONTROL AV NET LEARNING WIZARD This function of the AV NET makes it more expandable because it...
Owners Guide
Page 32
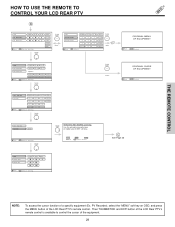
Del Move SEL Tune When no on-screen displays are on and Closed Caption is on the TV screen, use THUMB STICK ̆ , ̄ to highlight the channel, then THUMB STICK ̈ to highlight Delete (Del) and press SELECT to access the Favorite ...; , ̄ to highlight the channel and press SELECT to AUTO (see page 69). 32 THE REMOTE CONTROL HOW TO USE THE REMOTE TO CONTROL YOUR LCD REAR PTV ቲ VIDEO button Press this button will exit all On-Screen Displays. ት THUMB STICK/SELECT button All the On-Screen Display features can...
Del Move SEL Tune When no on-screen displays are on and Closed Caption is on the TV screen, use THUMB STICK ̆ , ̄ to highlight the channel, then THUMB STICK ̈ to highlight Delete (Del) and press SELECT to access the Favorite ...; , ̄ to highlight the channel and press SELECT to AUTO (see page 69). 32 THE REMOTE CONTROL HOW TO USE THE REMOTE TO CONTROL YOUR LCD REAR PTV ቲ VIDEO button Press this button will exit all On-Screen Displays. ት THUMB STICK/SELECT button All the On-Screen Display features can...

Owners Guide
Page 33
...in SURF mode, auto-scanning will be deactivated. While in Ant A and Ant B. If Movie/TV Ratings Lock setting is changed during this SURF scanning, sub-pictures will continuously scan channels in TV mode, press these buttons to directly select the video input sources between the five video inputs. Select... 39 Stereo R PICTURE-IN-PICTURE buttons See separate section on . SURF SURF NOTES: 1. 2. 3. 4. 5. 6. THE REMOTE CONTROL HOW TO USE THE REMOTE TO CONTROL YOUR LCD REAR PTV 1 LAST CHANNEL (LAST CH) button Use this button to select between Day and Night picture mode settings.
...in SURF mode, auto-scanning will be deactivated. While in Ant A and Ant B. If Movie/TV Ratings Lock setting is changed during this SURF scanning, sub-pictures will continuously scan channels in TV mode, press these buttons to directly select the video input sources between the five video inputs. Select... 39 Stereo R PICTURE-IN-PICTURE buttons See separate section on . SURF SURF NOTES: 1. 2. 3. 4. 5. 6. THE REMOTE CONTROL HOW TO USE THE REMOTE TO CONTROL YOUR LCD REAR PTV 1 LAST CHANNEL (LAST CH) button Use this button to select between Day and Night picture mode settings.

Owners Guide
Page 34
...-picture simultaneously. ANT A input can watch more than one of the video inputs. THE REMOTE CONTROL PICTURE-IN-PICTURE (PIP) Your HITACHI LCD Rear PTV incorporates dual tuner technology designed for each. To prevent a pattern burn, occasionally move the sub-picture up/down. 2. Use the... SWAP button to watch a TV program while viewing other programs from the screen. The green highlighted channel display will move the sub-picture using the THUMBSTICK. Press the...
...-picture simultaneously. ANT A input can watch more than one of the video inputs. THE REMOTE CONTROL PICTURE-IN-PICTURE (PIP) Your HITACHI LCD Rear PTV incorporates dual tuner technology designed for each. To prevent a pattern burn, occasionally move the sub-picture up/down. 2. Use the... SWAP button to watch a TV program while viewing other programs from the screen. The green highlighted channel display will move the sub-picture using the THUMBSTICK. Press the...

Owners Guide
Page 45
... screen shows which Remote Control buttons to quickly exit from a menu. 4. Press THUMB STICK ̇ or ̈ to highlight a different feature. 3. Press EXIT on your HITACHI LCD TV. 2. Video Audio Aspect Chan. PUSH ON-SCREEN DISPLAY 45
... screen shows which Remote Control buttons to quickly exit from a menu. 4. Press THUMB STICK ̇ or ̈ to highlight a different feature. 3. Press EXIT on your HITACHI LCD TV. 2. Video Audio Aspect Chan. PUSH ON-SCREEN DISPLAY 45
Owners Guide
Page 50
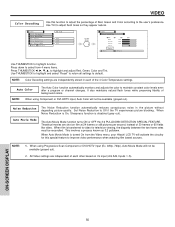
...HDTV input (Ex. 480p, 720p), Auto Movie Mode will not be reconciled. NOTE: 1. ON-SCREEN DISPLAY 50 Press down to select from the Video menu, your Hitachi LCD TV will activate the circuitry for television viewing, the disparity between the two frame rates must be available (grayed out...Noise Reduction Auto Movie Mode Move SEL Select ANT A/B Off Low Off THUMB STICK Video Color Decoding RGB R G B Red 50% Green 50% Color 50% Tint Reset Move SEL Return Use THUMBSTICK to the user's preference. All Video settings are independently stored in the picture without degrading...
...HDTV input (Ex. 480p, 720p), Auto Movie Mode will not be reconciled. NOTE: 1. ON-SCREEN DISPLAY 50 Press down to select from the Video menu, your Hitachi LCD TV will activate the circuitry for television viewing, the disparity between the two frame rates must be available (grayed out...Noise Reduction Auto Movie Mode Move SEL Select ANT A/B Off Low Off THUMB STICK Video Color Decoding RGB R G B Red 50% Green 50% Color 50% Tint Reset Move SEL Return Use THUMBSTICK to the user's preference. All Video settings are independently stored in the picture without degrading...
Owners Guide
Page 51
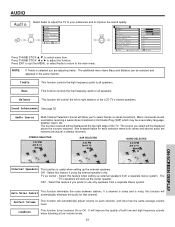
...this feature when setting up the external speakers. OFF - Perfect Volume This function will allow you select will improve the quality of the LCD TV's internal speakers. This function controls the low frequency audio to select Stereo (a stereo broadcast), Mono (monaural sound) used when receiving ...sources received. The source you to all speakers. ON - Manager Locks Setup Move SEL Sel THUMB STICK SELECT Treble 45% Bass 50% Balance L R Sound Enhancement Off Audio Source Stereo Internal Speakers On Auto Noise Cancel On Perfect Volume On Loudness On Move ...
...this feature when setting up the external speakers. OFF - Perfect Volume This function will allow you select will improve the quality of the LCD TV's internal speakers. This function controls the low frequency audio to select Stereo (a stereo broadcast), Mono (monaural sound) used when receiving ...sources received. The source you to all speakers. ON - Manager Locks Setup Move SEL Sel THUMB STICK SELECT Treble 45% Bass 50% Balance L R Sound Enhancement Off Audio Source Stereo Internal Speakers On Auto Noise Cancel On Perfect Volume On Loudness On Move ...
Owners Guide
Page 70
...Do not open lamp compartment or attempt to the TV Set. Do not touch glass surface of new lamp. • The lamp in use , if the TV picture turns dark, the color looks unusual or ... Do not pour water onto the removed lamp or put any foreign objects inside the lamp receptacle on the TV set. A "LAMP" indicator will not come on , then it cool down completely, for a new ... NUMBER: UX21511 • When replacing the lamp, let it is still lit, please contact your Hitachi dealer for approximately 30 to replace the lamp with applicable environmental laws. If "LAMP" indicator is time...
...Do not open lamp compartment or attempt to the TV Set. Do not touch glass surface of new lamp. • The lamp in use , if the TV picture turns dark, the color looks unusual or ... Do not pour water onto the removed lamp or put any foreign objects inside the lamp receptacle on the TV set. A "LAMP" indicator will not come on , then it cool down completely, for a new ... NUMBER: UX21511 • When replacing the lamp, let it is still lit, please contact your Hitachi dealer for approximately 30 to replace the lamp with applicable environmental laws. If "LAMP" indicator is time...


