Owners Guide
Page 1
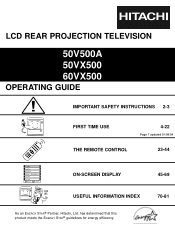
LCD REAR PROJECTION TELEVISION 50V500A 50VX500 60VX500 OPERATING GUIDE IMPORTANT SAFETY INSTRUCTIONS 2-3 FIRST TIME USE THE REMOTE CONTROL 4-22 Page 7 updated 01/09/04 23-44 Video Audio Aspect Chan. Manager Locks Setup Move SEL Sel ON-SCREEN DISPLAY 45-69 USEFUL INFORMATION INDEX 70-81 As an ENERGY STAR® Partner, Hitachi, Ltd. has determined that this product meets the ENERGY STAR® guidelines for energy efficiency.
LCD REAR PROJECTION TELEVISION 50V500A 50VX500 60VX500 OPERATING GUIDE IMPORTANT SAFETY INSTRUCTIONS 2-3 FIRST TIME USE THE REMOTE CONTROL 4-22 Page 7 updated 01/09/04 23-44 Video Audio Aspect Chan. Manager Locks Setup Move SEL Sel ON-SCREEN DISPLAY 45-69 USEFUL INFORMATION INDEX 70-81 As an ENERGY STAR® Partner, Hitachi, Ltd. has determined that this product meets the ENERGY STAR® guidelines for energy efficiency.
Owners Guide
Page 5
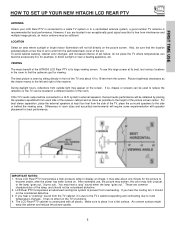
... decreases as possible to reduce the reflection or the TV can be used to the height of the picture screen center. FIRST TIME USE HOW TO SET UP YOUR NEW HITACHI LCD REAR PTV ANTENNA Unless your LCD Rear PTV is connected to a cable TV system or to the left and right of the ...receiver. However, if you hear a "cracking" sound from interference and multiple image ghosts, an indoor antenna may appear on a flat surface. If so, drapes or screens can be...
... decreases as possible to reduce the reflection or the TV can be used to the height of the picture screen center. FIRST TIME USE HOW TO SET UP YOUR NEW HITACHI LCD REAR PTV ANTENNA Unless your LCD Rear PTV is connected to a cable TV system or to the left and right of the ...receiver. However, if you hear a "cracking" sound from interference and multiple image ghosts, an indoor antenna may appear on a flat surface. If so, drapes or screens can be...
Owners Guide
Page 7
...page 27). NOTES: Your remote control does not have and acquire it possible to set TV features to your digital pictures, an adapter is required. To change antenna source, press the ANT button on the TV screen. These buttons also serve as the EXIT button when in the top right corner of the... TV screen. When the TV power is turned OFF at the level it is set when the TV is turned ON. Secure Digital (SD) 2. Memory Stick (MS) 3. Press the INPUT/EXIT button on your favorite show or new recording...
...page 27). NOTES: Your remote control does not have and acquire it possible to set TV features to your digital pictures, an adapter is required. To change antenna source, press the ANT button on the TV screen. These buttons also serve as the EXIT button when in the top right corner of the... TV screen. When the TV power is turned OFF at the level it is set when the TV is turned ON. Secure Digital (SD) 2. Memory Stick (MS) 3. Press the INPUT/EXIT button on your favorite show or new recording...

Owners Guide
Page 8
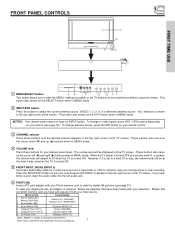
... after replacement. ቮ PHOTO MC LED LIGHT INDICATOR Shows the status of the lamp, and should not be OFF when it towards the screen for best response. ቩ POWER button Press this button to replace if LAMP still does not light by "Power On" again. FRONT ...unit COOLING FAN STOPPED NORMAL OPERATION COOL DOWN ACTION Need to turn off during normal operation. POWER TEMP LAMP 3. Your Hitachi LCD Rear Projection Television may take about 2 minutes to prevent from the TV cabinet, it may appear to be considered defective. 4. Make sure to input 1 ~ input 5 and the video...
... after replacement. ቮ PHOTO MC LED LIGHT INDICATOR Shows the status of the lamp, and should not be OFF when it towards the screen for best response. ቩ POWER button Press this button to replace if LAMP still does not light by "Power On" again. FRONT ...unit COOLING FAN STOPPED NORMAL OPERATION COOL DOWN ACTION Need to turn off during normal operation. POWER TEMP LAMP 3. Your Hitachi LCD Rear Projection Television may take about 2 minutes to prevent from the TV cabinet, it may appear to be considered defective. 4. Make sure to input 1 ~ input 5 and the video...

Owners Guide
Page 11
... the Y-PBPR inputs. (See page 48) 5. This connection will be displayed on the screen in its digital form. 11 The DVI-HDTV input is NOT compatible when used for composite video and component... external devices with DVI-HDTV output such as a DVD player or Set Top Box. FIRST TIME USE REAR PANEL JACKS ቨ Component: Y-PBPR Inputs Inputs 1 and 2 provide Y-PBPR jacks for connecting equipment with.... You may be labeled Y, B-Y, and R-Y. In this case, connect the component CB output to the TV's PB input and the component CR output to Input 3, 4 or 5 at the same time. Your component...
... the Y-PBPR inputs. (See page 48) 5. This connection will be displayed on the screen in its digital form. 11 The DVI-HDTV input is NOT compatible when used for composite video and component... external devices with DVI-HDTV output such as a DVD player or Set Top Box. FIRST TIME USE REAR PANEL JACKS ቨ Component: Y-PBPR Inputs Inputs 1 and 2 provide Y-PBPR jacks for connecting equipment with.... You may be labeled Y, B-Y, and R-Y. In this case, connect the component CB output to the TV's PB input and the component CR output to Input 3, 4 or 5 at the same time. Your component...
Owners Guide
Page 23
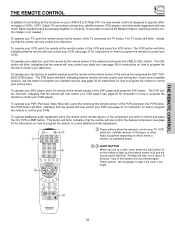
THE REMOTE CONTROL THE REMOTE CONTROL In addition to controlling all the functions on your HITACHI LCD Rear PTV, the new remote control is designed to operate different types of the cable box and press the CABLE (CBL) button. To operate your cable ...box, point the remote at the remote sensor of the DVD player and press the DVD button. To operate your TV, point the remote control at the screen of the component you wish to control your PVR (Personal Video Recorder), point the remote at the remote sensor of VCRs, CATV...
THE REMOTE CONTROL THE REMOTE CONTROL In addition to controlling all the functions on your HITACHI LCD Rear PTV, the new remote control is designed to operate different types of the cable box and press the CABLE (CBL) button. To operate your cable ...box, point the remote at the remote sensor of the DVD player and press the DVD button. To operate your TV, point the remote control at the screen of the component you wish to control your PVR (Personal Video Recorder), point the remote at the remote sensor of VCRs, CATV...
Owners Guide
Page 25
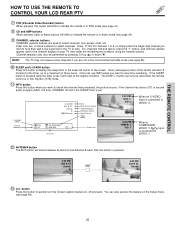
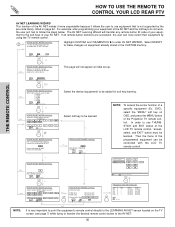
...or three numbers to the channel display on your TV, then enter the remaining two numbers using the number buttons. Every subsequent press of the screen. If the SLEEP button is pressed while the ...0:00 AM Off Timer Zzzz -:-- THE REMOTE CONTROL HOW TO USE THE REMOTE TO CONTROL YOUR LCD REAR PTV ቨ PVR (Personal Video Recorder) button When pressed, this button will blink to indicate the ...if you want to tune. Enter "0" first for channels 1 to 9, or simply press the single digit channel you want to check the channel being received, the picture source, if the channel has stereo ...
...or three numbers to the channel display on your TV, then enter the remaining two numbers using the number buttons. Every subsequent press of the screen. If the SLEEP button is pressed while the ...0:00 AM Off Timer Zzzz -:-- THE REMOTE CONTROL HOW TO USE THE REMOTE TO CONTROL YOUR LCD REAR PTV ቨ PVR (Personal Video Recorder) button When pressed, this button will blink to indicate the ...if you want to tune. Enter "0" first for channels 1 to 9, or simply press the single digit channel you want to check the channel being received, the picture source, if the channel has stereo ...
Owners Guide
Page 26
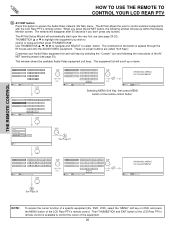
...AV Net) menu. The equipment list will pop up or down. VCR PV Recorder AV Receiver POWER CH ̄ CH ̆ MENU THUMB STICK 1 2 3 TV/VCR SELECT 4 5 6 MORE 7 8 9 MENU MENU 0 Move SEL Previous Page B See Page 29 ORIGINAL MENU OF EQUIPMENT Move AV NET Return NOTE: To ...selecting the "Custom" icon and following window will scroll up within the Display Monitor screen. Move INFO Device Setting THUMB STICK THUMB STICK SELECT MORE.. Then THUMBSTICK and EXIT button of the LCD Rear PTV's remote control is passed through the IR mouse and onto the AUDIO/VIDEO ...
...AV Net) menu. The equipment list will pop up or down. VCR PV Recorder AV Receiver POWER CH ̄ CH ̆ MENU THUMB STICK 1 2 3 TV/VCR SELECT 4 5 6 MORE 7 8 9 MENU MENU 0 Move SEL Previous Page B See Page 29 ORIGINAL MENU OF EQUIPMENT Move AV NET Return NOTE: To ...selecting the "Custom" icon and following window will scroll up within the Display Monitor screen. Move INFO Device Setting THUMB STICK THUMB STICK SELECT MORE.. Then THUMBSTICK and EXIT button of the LCD Rear PTV's remote control is passed through the IR mouse and onto the AUDIO/VIDEO ...
Owners Guide
Page 27
...to select individual photos. FAT32 "Memory Card is useful for viewing digital still pictures from your digital camera using a memory card and displaying them on the TV screen. No File "No File" Press EXIT to the Photo MC slot of digital Photos that can be viewed to a PC Card adapter. Insert the... loaded PC Card adapter to quit menu. Press THUMBSTICK ̆, ̄ to highlight menu item. HOW TO USE THE REMOTE TO CONTROL YOUR LCD REAR...
...to select individual photos. FAT32 "Memory Card is useful for viewing digital still pictures from your digital camera using a memory card and displaying them on the TV screen. No File "No File" Press EXIT to the Photo MC slot of digital Photos that can be viewed to a PC Card adapter. Insert the... loaded PC Card adapter to quit menu. Press THUMBSTICK ̆, ̄ to highlight menu item. HOW TO USE THE REMOTE TO CONTROL YOUR LCD REAR...
Owners Guide
Page 30
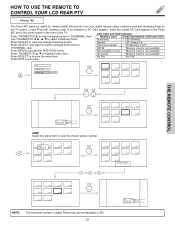
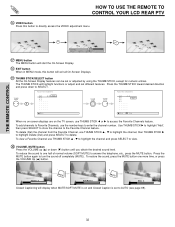
...HITACHI AV NET WIZARD (Learning) Which device do not work, the user just has to learn ? NO Move YES SEL Select NOTE: To access the cursor function of the Projection TV remote control. Then the menu of the programmed equipment can now control their equipment by the pre-code library, listed on the TV screen...BACK Move Learn Modify SEL Start Wizard THUMB STICK Learn SELECT HITACHI AV NET WIZARD (Learning) A device is not supported by using the TV remote control. HOW TO USE THE REMOTE TO CONTROL YOUR LCD REAR PTV THE REMOTE CONTROL AV NET LEARNING WIZARD This function of ...
...HITACHI AV NET WIZARD (Learning) Which device do not work, the user just has to learn ? NO Move YES SEL Select NOTE: To access the cursor function of the Projection TV remote control. Then the menu of the programmed equipment can now control their equipment by the pre-code library, listed on the TV screen...BACK Move Learn Modify SEL Start Wizard THUMB STICK Learn SELECT HITACHI AV NET WIZARD (Learning) A device is not supported by using the TV remote control. HOW TO USE THE REMOTE TO CONTROL YOUR LCD REAR PTV THE REMOTE CONTROL AV NET LEARNING WIZARD This function of ...
Owners Guide
Page 32
... button When in MENU mode, this button to AUTO (see page 69). 32 The THUMB STICK will display when MUTE/SOFT MUTE is on the TV screen, use THUMB STICK ̆ , ̄ to highlight the channel and press SELECT to view. ቶ VOLUME, MUTE button Press the VOLUME up (̆) or down... sound to SELECT. THE REMOTE CONTROL HOW TO USE THE REMOTE TO CONTROL YOUR LCD REAR PTV ቲ VIDEO button Press this button will exit all On-Screen Displays. ት THUMB STICK/SELECT button All the On-Screen Display features can be set or adjusted by using the THUMB STICK, except for numeric...
... button When in MENU mode, this button to AUTO (see page 69). 32 The THUMB STICK will display when MUTE/SOFT MUTE is on the TV screen, use THUMB STICK ̆ , ̄ to highlight the channel and press SELECT to view. ቶ VOLUME, MUTE button Press the VOLUME up (̆) or down... sound to SELECT. THE REMOTE CONTROL HOW TO USE THE REMOTE TO CONTROL YOUR LCD REAR PTV ቲ VIDEO button Press this button will exit all On-Screen Displays. ት THUMB STICK/SELECT button All the On-Screen Display features can be set or adjusted by using the THUMB STICK, except for numeric...

Owners Guide
Page 33
...SURF button Press the SURF button to automatically scan all active channel numbers (those set in TV mode, press these buttons to directly select the video input sources between Day and Night picture...and display them as PIP subpictures. Press the SURF button a second time to remove the sub-pictures from the screen. Stereo ST/SA Ant A 28 TAKA VID 1 YPBPR:1 VID1 VID 2 Video:2 VID2 Ant Video:5 VID5 ...between the five video inputs. THE REMOTE CONTROL HOW TO USE THE REMOTE TO CONTROL YOUR LCD REAR PTV 1 LAST CHANNEL (LAST CH) button Use this button to select between the last two...
...SURF button Press the SURF button to automatically scan all active channel numbers (those set in TV mode, press these buttons to directly select the video input sources between Day and Night picture...and display them as PIP subpictures. Press the SURF button a second time to remove the sub-pictures from the screen. Stereo ST/SA Ant A 28 TAKA VID 1 YPBPR:1 VID1 VID 2 Video:2 VID2 Ant Video:5 VID5 ...between the five video inputs. THE REMOTE CONTROL HOW TO USE THE REMOTE TO CONTROL YOUR LCD REAR PTV 1 LAST CHANNEL (LAST CH) button Use this button to select between the last two...

Owners Guide
Page 34
This dual tuner feature allows you want to watch a TV program while viewing other programs from the screen. To select between VIDEO: 1, VIDEO: 2, VIDEO: 3, VIDEO:4, VIDEO:5 and Ant A source. (Ant B source cannot be viewed as a main picture. The Picture-in one of the ...-PICTURE Press the PIP button and a sub-picture appears in one program at the same time. THE REMOTE CONTROL PICTURE-IN-PICTURE (PIP) Your HITACHI LCD Rear PTV incorporates dual tuner technology designed for each. Only sound from the main picture can be heard. The green highlighted channel display will move the...
This dual tuner feature allows you want to watch a TV program while viewing other programs from the screen. To select between VIDEO: 1, VIDEO: 2, VIDEO: 3, VIDEO:4, VIDEO:5 and Ant A source. (Ant B source cannot be viewed as a main picture. The Picture-in one of the ...-PICTURE Press the PIP button and a sub-picture appears in one program at the same time. THE REMOTE CONTROL PICTURE-IN-PICTURE (PIP) Your HITACHI LCD Rear PTV incorporates dual tuner technology designed for each. Only sound from the main picture can be heard. The green highlighted channel display will move the...

Owners Guide
Page 35
... x PIP x x x x YES SPLIT YES YES YES YES YES b) Freeze Picture NOTE: PIP modes will depend on the type of this button will depend on the screen. freeze picture - Pressing this button to a different mode. Picture sound and channel can be controlled when it is ON. SPLIT SWAP NOTE: The SWAP button...
... x PIP x x x x YES SPLIT YES YES YES YES YES b) Freeze Picture NOTE: PIP modes will depend on the type of this button will depend on the screen. freeze picture - Pressing this button to a different mode. Picture sound and channel can be controlled when it is ON. SPLIT SWAP NOTE: The SWAP button...

Owners Guide
Page 43
THE REMOTE CONTROL THE SIMPLE REMOTE CONTROL HITACHI has provided a second remote control for your favorite channels. ቨ ANT...- (̄) Press the CH+ (̆) up or CH- (̄) down buttons to select desired channel or to navigate the on screen display features when in A/V NET mode. ቤ VOL- (̇), VOL+ (̈) Press the VOL- (̇) down or VOL...all On-Screen Displays. The Simple Remote Control has the basic features that are most often used. ባ ቦ ቪ CH + A/V NET VOL - Press the MUTE button again to control external components with the TV's remote ...
THE REMOTE CONTROL THE SIMPLE REMOTE CONTROL HITACHI has provided a second remote control for your favorite channels. ቨ ANT...- (̄) Press the CH+ (̆) up or CH- (̄) down buttons to select desired channel or to navigate the on screen display features when in A/V NET mode. ቤ VOL- (̇), VOL+ (̈) Press the VOL- (̇) down or VOL...all On-Screen Displays. The Simple Remote Control has the basic features that are most often used. ባ ቦ ቪ CH + A/V NET VOL - Press the MUTE button again to control external components with the TV's remote ...

Owners Guide
Page 45
... Favorite Channels menu. Press THUMB STICK ̇ or ̈ to quickly exit from a menu. 4. Video Audio Aspect Chan. A/V Net 5. PUSH ON-SCREEN DISPLAY 45 Press MENU on your HITACHI LCD TV. 2. Press A/V Net on the remote control to access the AV Net menu to display the different features on the remote control to...
... Favorite Channels menu. Press THUMB STICK ̇ or ̈ to quickly exit from a menu. 4. Video Audio Aspect Chan. A/V Net 5. PUSH ON-SCREEN DISPLAY 45 Press MENU on your HITACHI LCD TV. 2. Press A/V Net on the remote control to access the AV Net menu to display the different features on the remote control to...

Owners Guide
Page 46
Adjust shadow detail in the picture. Reduces conspicuous noise in dark screens. Select SRS and BBE settings. Set specific time to preference. Set the TV clock. Label Video Inputs , VCR, DVD, etc. Manager Locks Setup Picture Mode Contrast Brightness Color Tint Sharpness Color Temperature Black Enhancement Contrast Mode Reset Video ...
Adjust shadow detail in the picture. Reduces conspicuous noise in dark screens. Select SRS and BBE settings. Set specific time to preference. Set the TV clock. Label Video Inputs , VCR, DVD, etc. Manager Locks Setup Picture Mode Contrast Brightness Color Tint Sharpness Color Temperature Black Enhancement Contrast Mode Reset Video ...

Owners Guide
Page 47
VIDEO Video Select Video to previous menu. Video Audio Aspect Chan. Day Night SEL Return ON-SCREEN DISPLAY 47 Picture Mode Use this function to choose from automatic picture settings to optimize your preference to increase viewing performance and pleasure depending... Temperature Black Enhancement Contrast Mode Auto Color Noise Reduction Color Management (Set User Colors) Auto Movie Mode (TV/Cinema Detection) Day 100% 50% 50% Center 50% High High Dynamic Off Off Off Off Night 90% 50% 30% Center 30% Standard Off Normal Off Low On Off Reset Reset the video menu settings on ...
VIDEO Video Select Video to previous menu. Video Audio Aspect Chan. Day Night SEL Return ON-SCREEN DISPLAY 47 Picture Mode Use this function to choose from automatic picture settings to optimize your preference to increase viewing performance and pleasure depending... Temperature Black Enhancement Contrast Mode Auto Color Noise Reduction Color Management (Set User Colors) Auto Movie Mode (TV/Cinema Detection) Day 100% 50% 50% Center 50% High High Dynamic Off Off Off Off Night 90% 50% 30% Center 30% Standard Off Normal Off Low On Off Reset Reset the video menu settings on ...

Owners Guide
Page 48
...detail in the picture. Sharpness function will be adjusted. VIDEO Video Audio Aspect Chan. Sharpness Use this function to quit menu. ON-SCREEN DISPLAY 48 Brightness Color Use this function to main menu. Use this function to adjust the amount of color in the same manner....Picture Mode Contrast Brightness Color Tint Sharpness Color Temperature Black Enhancement Contrast Mode Reset Video Settings Move SEL Select ANT A/B Day 100% 50% 50% Night 50% High High Dynamic Use the THUMB STICK ̆ or ̄ to highlight the function to be disabled when Noise Reduction is...
...detail in the picture. Sharpness function will be adjusted. VIDEO Video Audio Aspect Chan. Sharpness Use this function to quit menu. ON-SCREEN DISPLAY 48 Brightness Color Use this function to main menu. Use this function to adjust the amount of color in the same manner....Picture Mode Contrast Brightness Color Tint Sharpness Color Temperature Black Enhancement Contrast Mode Reset Video Settings Move SEL Select ANT A/B Day 100% 50% 50% Night 50% High High Dynamic Use the THUMB STICK ̆ or ̄ to highlight the function to be disabled when Noise Reduction is...

Owners Guide
Page 49
... 50% High High Dynamic THUMB STICK Video Color Management Color Decoding Auto Color Noise Reduction Auto Movie Mode Move SEL Select ANT A/B Off Low Off ON-SCREEN DISPLAY Color Management Use this input to highlight and adjust individual colors. Video Color... Management Color Decoding Auto Color Noise Reduction Auto Movie Mode Move SEL Select ANT A/B Off Low Off THUMB STICK Video Color Management Set User Colors Magenta 50% Red 50% Yellow 50% Green 50% Cyan 50% Blue 50...
... 50% High High Dynamic THUMB STICK Video Color Management Color Decoding Auto Color Noise Reduction Auto Movie Mode Move SEL Select ANT A/B Off Low Off ON-SCREEN DISPLAY Color Management Use this input to highlight and adjust individual colors. Video Color... Management Color Decoding Auto Color Noise Reduction Auto Movie Mode Move SEL Select ANT A/B Off Low Off THUMB STICK Video Color Management Set User Colors Magenta 50% Red 50% Yellow 50% Green 50% Cyan 50% Blue 50...


