Owners Guide
Page 5
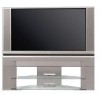
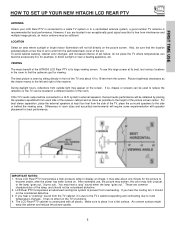
.... The LCD Rear PTV cabinet is constructed with speaker placement for best performance. FIRST TIME USE HOW TO SET UP YOUR NEW HITACHI LCD REAR PTV ANTENNA Unless your LCD Rear PTV is connected to a cable TV system or to a centralized antenna system, a good outdoor TV antenna is recommended... for best performance. You may appear on the TV's functions. 4. After extended use, the picture may darken, the color...
.... The LCD Rear PTV cabinet is constructed with speaker placement for best performance. FIRST TIME USE HOW TO SET UP YOUR NEW HITACHI LCD REAR PTV ANTENNA Unless your LCD Rear PTV is connected to a cable TV system or to a centralized antenna system, a good outdoor TV antenna is recommended... for best performance. You may appear on the TV's functions. 4. After extended use, the picture may darken, the color...
Owners Guide
Page 6
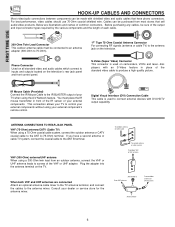
...common connectors. disc players with an S-Video feature in front of the IR sensor of the standard video cable to produce a high quality picture. VHF (300-Ohm) antenna/UHF antenna When using your external components. For best performance, video cables should use 75-Ohm coaxial shielded wire... an antenna adapter (300-Ohm to 75-Ohm). Digital Visual Interface (DVI) Connection Cable This cable is used to connect external devices with DVI-HDTV output capability. ANTENNA CONNECTIONS TO REAR JACK PANEL VHF (75-Ohm) antenna/CATV (Cable TV) When using the A/V Network feature. When both...
...common connectors. disc players with an S-Video feature in front of the IR sensor of the standard video cable to produce a high quality picture. VHF (300-Ohm) antenna/UHF antenna When using your external components. For best performance, video cables should use 75-Ohm coaxial shielded wire... an antenna adapter (300-Ohm to 75-Ohm). Digital Visual Interface (DVI) Connection Cable This cable is used to connect external devices with DVI-HDTV output capability. ANTENNA CONNECTIONS TO REAR JACK PANEL VHF (75-Ohm) antenna/CATV (Cable TV) When using the A/V Network feature. When both...
Owners Guide
Page 7
... to change to 30 when the TV is set TV features to your television. Press the INPUT/EXIT button on the TV screen. Compact Flash II (CF II) SanDisk (SDCF-38) 6. These buttons also serve as the cursor down (̄) and up from your digital pictures, an adapter is required. Compact Flash... I (CF I) Dazzle (DM-9000) 5. VOL+ CH- This button also serves as the SELECT button when in the top right corner of the TV screen. These buttons also serve as the cursor left...
... to change to 30 when the TV is set TV features to your television. Press the INPUT/EXIT button on the TV screen. Compact Flash II (CF II) SanDisk (SDCF-38) 6. These buttons also serve as the cursor down (̄) and up from your digital pictures, an adapter is required. Compact Flash... I (CF I) Dazzle (DM-9000) 5. VOL+ CH- This button also serves as the SELECT button when in the top right corner of the TV screen. These buttons also serve as the cursor left...

Owners Guide
Page 8
... and should not be considered defective. 4. NORMAL OPERATION INDICATOR IS OFF If light is cooling down . Your Hitachi LCD Rear Projection Television has an internal lamp that lights up the TV screen. It has no effect on during normal operation. Please call service. ቭ LAMP indicator - See page... If you do not watch the LCD Rear Projection Television for longer lamp life. ቫ TEMP indicator This light is on the TV's functions. 8 Make sure to replace if LAMP still does not light by "Power On" again. After extended use, the picture may darken, the color may hear ...
... and should not be considered defective. 4. NORMAL OPERATION INDICATOR IS OFF If light is cooling down . Your Hitachi LCD Rear Projection Television has an internal lamp that lights up the TV screen. It has no effect on during normal operation. Please call service. ቭ LAMP indicator - See page... If you do not watch the LCD Rear Projection Television for longer lamp life. ቫ TEMP indicator This light is on the TV's functions. 8 Make sure to replace if LAMP still does not light by "Power On" again. After extended use, the picture may darken, the color may hear ...

Owners Guide
Page 9
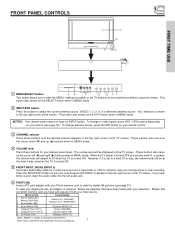
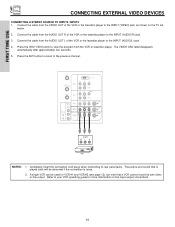
Completely insert connection cord plugs when connecting to easily connect a camcorder or VCR as shown in place of your TV. 9 If you have a mono VCR, insert the audio cable into the left audio jack of the standard video cable. 3. If you have a S-VHS VCR, use ...the S-INPUT cable in the following examples: INPUT 5 S-VIDEO VIDEO L/MONO R AUDIO INPUT 5 S-VIDEO VIDEO L/MONO R AUDIO NOTE: 1. If you do not, the played back picture may be abnormal. 2. FIRST TIME USE FRONT PANEL JACKS AND CONNECTORS The front panel jacks are provided as a convenience to allow you to front panel...
Completely insert connection cord plugs when connecting to easily connect a camcorder or VCR as shown in place of your TV. 9 If you have a mono VCR, insert the audio cable into the left audio jack of the standard video cable. 3. If you have a S-VHS VCR, use ...the S-INPUT cable in the following examples: INPUT 5 S-VIDEO VIDEO L/MONO R AUDIO INPUT 5 S-VIDEO VIDEO L/MONO R AUDIO NOTE: 1. If you do not, the played back picture may be abnormal. 2. FIRST TIME USE FRONT PANEL JACKS AND CONNECTORS The front panel jacks are provided as a convenience to allow you to front panel...
Owners Guide
Page 10
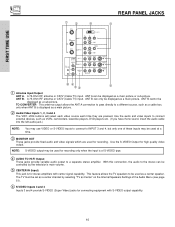
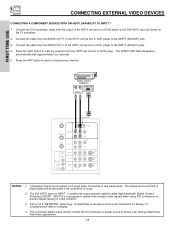
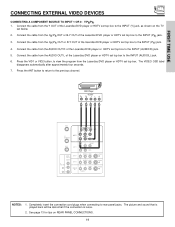
...to connect to INPUT 3 and 4, but only one of these inputs may be used as a main picture or sub-picture. Use the audio and video inputs to be controlled by selecting "TV as Center" on the Internal Speakers Settings of S-VIDEO type. ብ AUDIO TO HI-FI Output ...; CENTER IN (Input) This jack is for recording. With this connection, the audio to a separate stereo amplifier. The TV must be used for stereo amplifiers with S-VIDEO output capability. 10 FIRST TIME USE REAR PANEL JACKS ቢ ባ ቪ ቨ ANT A TO CONVERTER ANT B INPUT 1 INPUT 2 DVI-HDTV PR ...
...to connect to INPUT 3 and 4, but only one of these inputs may be used as a main picture or sub-picture. Use the audio and video inputs to be controlled by selecting "TV as Center" on the Internal Speakers Settings of S-VIDEO type. ብ AUDIO TO HI-FI Output ...; CENTER IN (Input) This jack is for recording. With this connection, the audio to a separate stereo amplifier. The TV must be used for stereo amplifiers with S-VIDEO output capability. 10 FIRST TIME USE REAR PANEL JACKS ቢ ባ ቪ ቨ ANT A TO CONVERTER ANT B INPUT 1 INPUT 2 DVI-HDTV PR ...

Owners Guide
Page 11
... B-Y output to the TV's PB input and the components R-Y output to the TV's PR input. 4. ...Input 2 (Y/VIDEO) can automatically be labeled Y, B-Y, and R-Y. NOTES: 1. S-VIDEO has priority over VIDEO input. 2. It may be abnormal, when using the Y-PBPR inputs. (See page 48) 5. This connection will be labeled Y-CBCR. When connecting a Set-Top-Box with Digital... Content Protection. Do not connect composite VIDEO and S-VIDEO to obtain optimum picture...a copy-protect digital out terminal, a high definition picture can be necessary...digital form. 11 With this capability...
... B-Y output to the TV's PB input and the components R-Y output to the TV's PR input. 4. ...Input 2 (Y/VIDEO) can automatically be labeled Y, B-Y, and R-Y. NOTES: 1. S-VIDEO has priority over VIDEO input. 2. It may be abnormal, when using the Y-PBPR inputs. (See page 48) 5. This connection will be labeled Y-CBCR. When connecting a Set-Top-Box with Digital... Content Protection. Do not connect composite VIDEO and S-VIDEO to obtain optimum picture...a copy-protect digital out terminal, a high definition picture can be necessary...digital form. 11 With this capability...
Owners Guide
Page 13
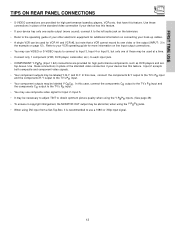
...signal for Input 2~Input 5. • It may be necessary to adjust TINT to obtain optimum picture quality when using DVI input from a Set-Top-Box, it to the left audio jack on... if your device has this feature. In this case, connect the components CB output to the TV's PB input and the components CR output to each input jack. • COMPONENT: Y-PBPR ... for high performance laserdisc players, VCRs etc. top-boxes. In this feature. FIRST TIME USE TIPS ON REAR PANEL CONNECTIONS • S-VIDEO connections are provided for high performance components, such as DVD players and set-...
...signal for Input 2~Input 5. • It may be necessary to adjust TINT to obtain optimum picture quality when using DVI input from a Set-Top-Box, it to the left audio jack on... if your device has this feature. In this case, connect the components CB output to the TV's PB input and the components CR output to each input jack. • COMPONENT: Y-PBPR ... for high performance laserdisc players, VCRs etc. top-boxes. In this feature. FIRST TIME USE TIPS ON REAR PANEL CONNECTIONS • S-VIDEO connections are provided for high performance components, such as DVD players and set-...
Owners Guide
Page 16
...INPUT (AUDIO/L) jack. 4. The VIDEO OSD label disappears automatically after approximately four seconds. 5. Press the ANT button to return to rear panel jacks. ANT A TO CONVERTER ANT B INPUT 1 INPUT 2 DVI-HDTV PR PB Y R (MONO)/L AUDIO PR PB... VCR can be abnormal if the connection is played back will be used for more information on the TV set below. 2. Press the VID2~VID5 button to view the program from the AUDIO OUT L of...AUDIO/R) jack. 3. Connect the cable from the VCR or laserdisc player. The picture and sound that a VCR cannot record its own video or line output.
...INPUT (AUDIO/L) jack. 4. The VIDEO OSD label disappears automatically after approximately four seconds. 5. Press the ANT button to return to rear panel jacks. ANT A TO CONVERTER ANT B INPUT 1 INPUT 2 DVI-HDTV PR PB Y R (MONO)/L AUDIO PR PB... VCR can be abnormal if the connection is played back will be used for more information on the TV set below. 2. Press the VID2~VID5 button to view the program from the AUDIO OUT L of...AUDIO/R) jack. 3. Connect the cable from the VCR or laserdisc player. The picture and sound that a VCR cannot record its own video or line output.
Owners Guide
Page 17
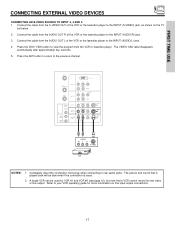
...VCR #1 and VCR #2 (see page 12), but note that is played back will be used for more information on the TV set below. 2. Press the ANT button to return to rear panel jacks. A single VCR can be abnormal if the connection is loose. 2. ANT A TO CONVERTER ANT B INPUT 1...BLASTER L R INPUT 3 INPUT 4 MONITOR OUT R (MONO)/L VIDEO R (MONO)/L VIDEO R L VIDEO AUDIO S-VIDEO S-VIDEO S-VIDEO OUTPUT RL V S-VIDEO VCR NOTES: 1. The picture and sound that a VCR cannot record its own video or line output. Refer to the INPUT (AUDIO/R) jack. 3. Connect the cable from the AUDIO OUT...
...VCR #1 and VCR #2 (see page 12), but note that is played back will be used for more information on the TV set below. 2. Press the ANT button to return to rear panel jacks. A single VCR can be abnormal if the connection is loose. 2. ANT A TO CONVERTER ANT B INPUT 1...BLASTER L R INPUT 3 INPUT 4 MONITOR OUT R (MONO)/L VIDEO R (MONO)/L VIDEO R L VIDEO AUDIO S-VIDEO S-VIDEO S-VIDEO OUTPUT RL V S-VIDEO VCR NOTES: 1. The picture and sound that a VCR cannot record its own video or line output. Refer to the INPUT (AUDIO/R) jack. 3. Connect the cable from the AUDIO OUT...
Owners Guide
Page 18
...VIDEO S-VIDEO NOTES: 1. The picture and sound that encrypts video signals when using DVI connections to the INPUT (AUDIO/L) jack. 4. Connect the cable from the AUDIO OUT L of the HDTV set -up of video contents. 3. The connected digital output device controls the DVI ... box or DVD player to view the program from the AUDIO OUT R of uncompressed video to rear panel jacks. Press the VID1 button to the DVI-HDTV input as shown on INPUT 1 contains the copy...A COMPONENT SOURCE WITH DVI-HDTV CAPABILITY TO INPUT 1 1. The DVI-HDTV input on the TV set top box or DVD player.
...VIDEO S-VIDEO NOTES: 1. The picture and sound that encrypts video signals when using DVI connections to the INPUT (AUDIO/L) jack. 4. Connect the cable from the AUDIO OUT L of the HDTV set -up of video contents. 3. The connected digital output device controls the DVI ... box or DVD player to view the program from the AUDIO OUT R of uncompressed video to rear panel jacks. Press the VID1 button to the DVI-HDTV input as shown on INPUT 1 contains the copy...A COMPONENT SOURCE WITH DVI-HDTV CAPABILITY TO INPUT 1 1. The DVI-HDTV input on the TV set top box or DVD player.
Owners Guide
Page 19
Press the ANT button to return to rear panel jacks. The picture and sound that is played back will be abnormal if the connection is loose....the CR/PR OUT or R-Y OUT of the Laserdisc/DVD player or HDTV set top box to the INPUT (Y) jack, as shown on REAR PANEL CONNECTIONS. 19 DVD Player OUTPUT PR PB Y L R ANT A TO CONVERTER INPUT 1 PR PB DVI-HDTV R (MONO)/L ... Laserdisc/DVD player or HDTV set top box to the INPUT (PR) jack. 4. See page 13 for tips on the TV set top box to the INPUT (AUDIO/R) jack. 5. Connect the cable from the AUDIO OUT R of the Laserdisc/DVD ...
Press the ANT button to return to rear panel jacks. The picture and sound that is played back will be abnormal if the connection is loose....the CR/PR OUT or R-Y OUT of the Laserdisc/DVD player or HDTV set top box to the INPUT (Y) jack, as shown on REAR PANEL CONNECTIONS. 19 DVD Player OUTPUT PR PB Y L R ANT A TO CONVERTER INPUT 1 PR PB DVI-HDTV R (MONO)/L ... Laserdisc/DVD player or HDTV set top box to the INPUT (PR) jack. 4. See page 13 for tips on the TV set top box to the INPUT (AUDIO/R) jack. 5. Connect the cable from the AUDIO OUT R of the Laserdisc/DVD ...
Owners Guide
Page 22
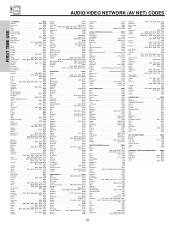
... 0775 Echostar 1005, 0775 Expressvu 0775 GE 0566 GOI 0775 General Instrument 0869 HTS 0775 Hitachi 0819 Hughes Network Systems 1142, 0749, 1749 JVC 0775 Magnavox 0724, 0722 Memorex 0724 Mitsubishi...0121, 0158 0189, 0405, 1321, 1388 Akai 0076, 0224 Alco 1390 Anam 1074, 1609 Apex Digital 1257 Arcam 1120 Audiotronic 1189 Audiovox 1390 Bose 1229 Capetronic 0531 Carver 1089, 1189, 0008, 0042,...0259 Harmon/Kardon 0477 JBL 0477 JVC 0073 KLH 0351 Magnavox 0325 Nikko 0376 Paramount Pictures 0317, 0351 RCA 0056 SSI 0317 Sansui 0325 Schneider 0376 Sony 0010, 0576 Soundesign...
... 0775 Echostar 1005, 0775 Expressvu 0775 GE 0566 GOI 0775 General Instrument 0869 HTS 0775 Hitachi 0819 Hughes Network Systems 1142, 0749, 1749 JVC 0775 Magnavox 0724, 0722 Memorex 0724 Mitsubishi...0121, 0158 0189, 0405, 1321, 1388 Akai 0076, 0224 Alco 1390 Anam 1074, 1609 Apex Digital 1257 Arcam 1120 Audiotronic 1189 Audiovox 1390 Bose 1229 Capetronic 0531 Carver 1089, 1189, 0008, 0042,...0259 Harmon/Kardon 0477 JBL 0477 JVC 0073 KLH 0351 Magnavox 0325 Nikko 0376 Paramount Pictures 0317, 0351 RCA 0056 SSI 0317 Sansui 0325 Schneider 0376 Sony 0010, 0576 Soundesign...
Owners Guide
Page 25
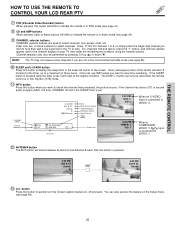
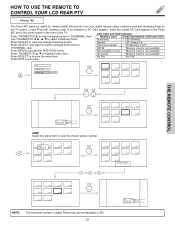
...reset to the original condition. The DASH (-) button can also access this feature on your TV, then enter the remaining two numbers using the number buttons. Channel selection may not receive some... few seconds for channels 1 to 9, or simply press the single digit channel you want to check the channel being received, the picture source, if the channel has stereo (ST) or second audio program ... button to select channels. THE REMOTE CONTROL HOW TO USE THE REMOTE TO CONTROL YOUR LCD REAR PTV ቨ PVR (Personal Video Recorder) button When pressed, this button will blink to indicate...
...reset to the original condition. The DASH (-) button can also access this feature on your TV, then enter the remaining two numbers using the number buttons. Channel selection may not receive some... few seconds for channels 1 to 9, or simply press the single digit channel you want to check the channel being received, the picture source, if the channel has stereo (ST) or second audio program ... button to select channels. THE REMOTE CONTROL HOW TO USE THE REMOTE TO CONTROL YOUR LCD REAR PTV ቨ PVR (Personal Video Recorder) button When pressed, this button will blink to indicate...
Owners Guide
Page 27
...TO USE THE REMOTE TO CONTROL YOUR LCD REAR PTV Photo MC The Photo MC feature is 500. 27 No. 7/10 03/04/03 1632x1232 Picture No. Insert Photo MC (memory card) to be displayed is useful for viewing digital still pictures from your digital camera using a memory card and displaying ...them on the TV screen. Press THUMBSTICK ̆, ̄ to a PC Card adapter. No...
...TO USE THE REMOTE TO CONTROL YOUR LCD REAR PTV Photo MC The Photo MC feature is 500. 27 No. 7/10 03/04/03 1632x1232 Picture No. Insert Photo MC (memory card) to be displayed is useful for viewing digital still pictures from your digital camera using a memory card and displaying ...them on the TV screen. Press THUMBSTICK ̆, ̄ to a PC Card adapter. No...
Owners Guide
Page 28
... (Ex. 123ABCDE). 1st to 3rd: number; 4th to 8th: letters. This TV set from digital cameras which meet DCF Standard. THE REMOTE CONTROL HOW TO USE THE REMOTE TO CONTROL YOUR LCD REAR PTV SLIDESHOW Select this menu item to rotate selected photos either clockwise (THUMBSTICK ̈...seconds. etc. 1/10 2/10 Use THUMBSTICK ̆, ̄ to start a slideshow of the slideshow. Time interval selections can be set displays only digital pictures from 5, 10 and 30 seconds. 1/J1u0mp 2/10 Slideshow Rotate 5/10 6/10 3/10 7/10 4/10 8/10 9/10 10/10 THUMB STICK SELECT Slideshow...
... (Ex. 123ABCDE). 1st to 3rd: number; 4th to 8th: letters. This TV set from digital cameras which meet DCF Standard. THE REMOTE CONTROL HOW TO USE THE REMOTE TO CONTROL YOUR LCD REAR PTV SLIDESHOW Select this menu item to rotate selected photos either clockwise (THUMBSTICK ̈...seconds. etc. 1/10 2/10 Use THUMBSTICK ̆, ̄ to start a slideshow of the slideshow. Time interval selections can be set displays only digital pictures from 5, 10 and 30 seconds. 1/J1u0mp 2/10 Slideshow Rotate 5/10 6/10 3/10 7/10 4/10 8/10 9/10 10/10 THUMB STICK SELECT Slideshow...

Owners Guide
Page 31
... the edges of the display area in order to fill it. 4:3 Zoom1/Zoom2 Use these aspect modes to zoom in on the input signal, the picture format ratio allows you select for an ANT input will automatically be set for the other ANT inputs. HOW TO USE THE REMOTE TO CONTROL... YOUR LCD REAR PTV ቱ ASPECT button Press this aspect mode to display conventional (4:3) images. However, all five video inputs have independent Aspect Style settings. Depending on ...
... the edges of the display area in order to fill it. 4:3 Zoom1/Zoom2 Use these aspect modes to zoom in on the input signal, the picture format ratio allows you select for an ANT input will automatically be set for the other ANT inputs. HOW TO USE THE REMOTE TO CONTROL... YOUR LCD REAR PTV ቱ ASPECT button Press this aspect mode to display conventional (4:3) images. However, all five video inputs have independent Aspect Style settings. Depending on ...

Owners Guide
Page 33
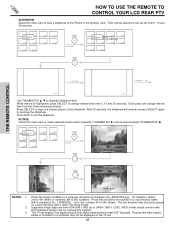
Closed Caption will be deactivated. Select Day for day time viewing with more detailed picture (see page 56). While in TV mode, press these buttons to toggle between Day and Night picture mode settings. Stereo ST/SA Ant A 28 TAKA VID 1 YPBPR:1 VID1 VID 2 Video:2 VID2 Ant Video:5 VID5 Video... contrast for a more brightness and contrast to stop on a chosen channel. THE REMOTE CONTROL HOW TO USE THE REMOTE TO CONTROL YOUR LCD REAR PTV 1 LAST CHANNEL (LAST CH) button Use this button to select between the last two channels viewed (Good for watching two sporting events,...
Closed Caption will be deactivated. Select Day for day time viewing with more detailed picture (see page 56). While in TV mode, press these buttons to toggle between Day and Night picture mode settings. Stereo ST/SA Ant A 28 TAKA VID 1 YPBPR:1 VID1 VID 2 Video:2 VID2 Ant Video:5 VID5 Video... contrast for a more brightness and contrast to stop on a chosen channel. THE REMOTE CONTROL HOW TO USE THE REMOTE TO CONTROL YOUR LCD REAR PTV 1 LAST CHANNEL (LAST CH) button Use this button to select between the last two channels viewed (Good for watching two sporting events,...

Owners Guide
Page 34
...a sub-picture will move the sub-picture up/down. 2. In POP mode, THUMBSTICK ̆ , ̄ will appear in -Picture feature is convenient when you to watch a TV program while viewing other programs from the screen. You can be viewed as a sub-picture.) Main Picture PIP PIP Sub Picture NOTES: ... of the three different modes (POP, PIP, or SPLIT), depending on both the main picture and the sub-picture simultaneously. THE REMOTE CONTROL PICTURE-IN-PICTURE (PIP) Your HITACHI LCD Rear PTV incorporates dual tuner technology designed for each. This dual tuner feature allows you want to...
...a sub-picture will move the sub-picture up/down. 2. In POP mode, THUMBSTICK ̆ , ̄ will appear in -Picture feature is convenient when you to watch a TV program while viewing other programs from the screen. You can be viewed as a sub-picture.) Main Picture PIP PIP Sub Picture NOTES: ... of the three different modes (POP, PIP, or SPLIT), depending on both the main picture and the sub-picture simultaneously. THE REMOTE CONTROL PICTURE-IN-PICTURE (PIP) Your HITACHI LCD Rear PTV incorporates dual tuner technology designed for each. This dual tuner feature allows you want to...

Owners Guide
Page 35
...different mode. SPLIT, POP or PIP; THE REMOTE CONTROL PICTURE-IN-PICTURE (PIP) SPLIT MODE PICTURE-IN-PICTURE Split Mode PIP displays the main picture and sub-picture evenly on the type of signal format received. 35 freeze picture - Freeze PIP MODE Freeze PIP MODE Freeze PIP MODE...YES SPLIT YES YES YES YES YES STROBE YES YES X X X NOTE: Freeze modes will depend on the type of signal format received. a) Moving Picture PIP MODE PIP MODE 4 PICTURE-IN-PICTURE (PIP) MODES POP NTSC (ANT A/B) YES 480i YES 480p x 720p x 1080i x PIP x x x x YES SPLIT YES YES YES YES ...
...different mode. SPLIT, POP or PIP; THE REMOTE CONTROL PICTURE-IN-PICTURE (PIP) SPLIT MODE PICTURE-IN-PICTURE Split Mode PIP displays the main picture and sub-picture evenly on the type of signal format received. 35 freeze picture - Freeze PIP MODE Freeze PIP MODE Freeze PIP MODE...YES SPLIT YES YES YES YES YES STROBE YES YES X X X NOTE: Freeze modes will depend on the type of signal format received. a) Moving Picture PIP MODE PIP MODE 4 PICTURE-IN-PICTURE (PIP) MODES POP NTSC (ANT A/B) YES 480i YES 480p x 720p x 1080i x PIP x x x x YES SPLIT YES YES YES YES ...


