Owners Guide
Page 1
LCD REAR PROJECTION TELEVISION Operating Guide for energy efficiency. has determined that this product meets the Energy Star® guidelines for 50VG825, 55VG825, 60VG825 IMPORTANT SAFETY INSTRUCTIONS 2-3 FIRST TIME USE ...4-20 THE REMOTE CONTROL ...21-38 ON-SCREEN DISPLAY ...39-88 LAMP REPLACEMENT ...88-91 USEFUL INFORMATION...92-97 LICENSE AGREEMENT...98 APPENDIXES ...99-100 INDEX ...101 As an Energy Star® Partner, Hitachi, Ltd.
LCD REAR PROJECTION TELEVISION Operating Guide for energy efficiency. has determined that this product meets the Energy Star® guidelines for 50VG825, 55VG825, 60VG825 IMPORTANT SAFETY INSTRUCTIONS 2-3 FIRST TIME USE ...4-20 THE REMOTE CONTROL ...21-38 ON-SCREEN DISPLAY ...39-88 LAMP REPLACEMENT ...88-91 USEFUL INFORMATION...92-97 LICENSE AGREEMENT...98 APPENDIXES ...99-100 INDEX ...101 As an Energy Star® Partner, Hitachi, Ltd.

Owners Guide
Page 9
... OF WARM UP AFTER THE POWER ON. POWER TEMP LAMP 3. See page 89-92 for Service LONG BLINKING (1 SEC CYCLE) COOL DOWN (FOR 6 MINUTES) (TV CAN ACCEPT REMOTE CONTROL AND SIDE BUTTONS) 2. NOTES: 1. Your Hitachi LCD Rear Projection Television has an internal lamp that may appear to be OFF when it is set... failed. First time use Front Panel Controls ¾ POWER Light This light is on during normal operation. It takes 12-15 seconds to replace if LAMP still does not light by ìPower On " again. If this indicator is cooling down . µ TEMP Indicator This light is too hot...
... OF WARM UP AFTER THE POWER ON. POWER TEMP LAMP 3. See page 89-92 for Service LONG BLINKING (1 SEC CYCLE) COOL DOWN (FOR 6 MINUTES) (TV CAN ACCEPT REMOTE CONTROL AND SIDE BUTTONS) 2. NOTES: 1. Your Hitachi LCD Rear Projection Television has an internal lamp that may appear to be OFF when it is set... failed. First time use Front Panel Controls ¾ POWER Light This light is on during normal operation. It takes 12-15 seconds to replace if LAMP still does not light by ìPower On " again. If this indicator is cooling down . µ TEMP Indicator This light is too hot...
Owners Guide
Page 88
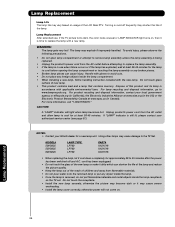
..., call "1-800-HITACHI." MODEL# 50VG825 55VG825 60VG825 LAMP TYPE LP700 LP700 LP700 PART# UX21516 UX21516 UX21516 • When replacing the lamp, let it is being replaced. • Unplug the product's power cord from flammable materials. • Do not pour water onto the removed lamp or put any foreign objects inside the lamp receptacle on the TV set. To avoid...
..., call "1-800-HITACHI." MODEL# 50VG825 55VG825 60VG825 LAMP TYPE LP700 LP700 LP700 PART# UX21516 UX21516 UX21516 • When replacing the lamp, let it is being replaced. • Unplug the product's power cord from flammable materials. • Do not pour water onto the removed lamp or put any foreign objects inside the lamp receptacle on the TV set. To avoid...

Owners Guide
Page 89
Locate the Lamp Compartment on the left side of the LCD TV. Wait at least 30~45 minutes to allow the lamp to cool before proceeding with lamp removal. 2. Turn off the main power switch and unplug the power cord. 120V Lamp Temp Power CAUTION: The lamp is very hot and may cause fire or severe burns. Lamp Replacement Lamp Compartment 89 Lamp Replacement Lamp Replacement 1.
Locate the Lamp Compartment on the left side of the LCD TV. Wait at least 30~45 minutes to allow the lamp to cool before proceeding with lamp removal. 2. Turn off the main power switch and unplug the power cord. 120V Lamp Temp Power CAUTION: The lamp is very hot and may cause fire or severe burns. Lamp Replacement Lamp Compartment 89 Lamp Replacement Lamp Replacement 1.

Owners Guide
Page 90
...the TV may shorten the life of the lamp and reduce the picture quality. • Push the lamp unit back to its receptacle. Exercise caution when removing the lamp unit to avoid injury to cool before proceeding with lamp removal. 4. Do not touch the front glass of the replacement lamp. ...This may not operate correctly. Remove the lamp cover. Wait at least ...
...the TV may shorten the life of the lamp and reduce the picture quality. • Push the lamp unit back to its receptacle. Exercise caution when removing the lamp unit to avoid injury to cool before proceeding with lamp removal. 4. Do not touch the front glass of the replacement lamp. ...This may not operate correctly. Remove the lamp cover. Wait at least ...
Owners Guide
Page 91
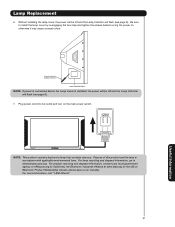
...AC outlet and turn on , otherwise it may cause unusual colors. PHILLIPS HEAD SCREW DRIVER LAMP COMPARTMENT NOTE: If power is installed, the power will be off and the Lamp Indicator will flash (see page 9). 7. For product recycling and disposal information, contact your... atwww.epsc.ca (in accordance with applicable environmental laws. For more information, call "1-800-Hitachi". 91 Useful Information Dispose of this product and its lamp in Canada). Without installing the lamp cover, the power will be off and the Lamp Indicator will flash (see page 9). Lamp Replacement 6.
...AC outlet and turn on , otherwise it may cause unusual colors. PHILLIPS HEAD SCREW DRIVER LAMP COMPARTMENT NOTE: If power is installed, the power will be off and the Lamp Indicator will flash (see page 9). 7. For product recycling and disposal information, contact your... atwww.epsc.ca (in accordance with applicable environmental laws. For more information, call "1-800-Hitachi". 91 Useful Information Dispose of this product and its lamp in Canada). Without installing the lamp cover, the power will be off and the Lamp Indicator will flash (see page 9). Lamp Replacement 6.
Owners Guide
Page 101
... 21-38 Programming Codes 31-38 Installing Batteries 4 S Sharpness 41 Speakers 14 T Timers 72-73 Time 72 Tint 41 Treble 44 Troubleshooting 93-94 TV Guide On Screen 47-64 Troubleshooting 93-94 U Upgrades 87 V Video Settings 41-43 Volume 7, 27 Index 101 Index A Accessories 4 Antennas (Connecting... 41 Contrast Mode 42 D Date 72 Daylight Saving Correction 72 G Guide Button 7, 24 H HDMI 11, 13, 17 I Input button 7, 24 L Lamp Replacement 88-91 Language Menu Language 74 Audio Language 46 Locks Change Access Code 67 Channel Lock 67 Front Panel Lock 67 Movie Ratings 68...
... 21-38 Programming Codes 31-38 Installing Batteries 4 S Sharpness 41 Speakers 14 T Timers 72-73 Time 72 Tint 41 Treble 44 Troubleshooting 93-94 TV Guide On Screen 47-64 Troubleshooting 93-94 U Upgrades 87 V Video Settings 41-43 Volume 7, 27 Index 101 Index A Accessories 4 Antennas (Connecting... 41 Contrast Mode 42 D Date 72 Daylight Saving Correction 72 G Guide Button 7, 24 H HDMI 11, 13, 17 I Input button 7, 24 L Lamp Replacement 88-91 Language Menu Language 74 Audio Language 46 Locks Change Access Code 67 Channel Lock 67 Front Panel Lock 67 Movie Ratings 68...


