
Owners Guide
Page 1
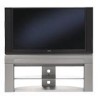
LCD REAR PROJECTION TELEVISION Operating Guide for energy efficiency. has determined that this product meets the Energy Star¤ guidelines for 50V720 IMPORTANT SAFETY INSTRUCTIONS 2-3 FIRST TIME USE ...4-19 THE REMOTE CONTROL ...20-31 ON-SCREEN DISPLAY ...32-55 LAMP REPLACEMENT ...56-59 USEFUL INFORMATION...59-62 LICENSE AGREEMENT...64 APPENDIXES ...65 INDEX ...66 As an Energy Star¤ Partner, Hitachi, Ltd.
LCD REAR PROJECTION TELEVISION Operating Guide for energy efficiency. has determined that this product meets the Energy Star¤ guidelines for 50V720 IMPORTANT SAFETY INSTRUCTIONS 2-3 FIRST TIME USE ...4-19 THE REMOTE CONTROL ...20-31 ON-SCREEN DISPLAY ...32-55 LAMP REPLACEMENT ...56-59 USEFUL INFORMATION...59-62 LICENSE AGREEMENT...64 APPENDIXES ...65 INDEX ...66 As an Energy Star¤ Partner, Hitachi, Ltd.
Owners Guide
Page 3
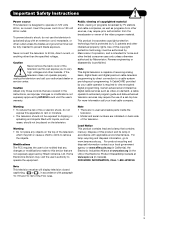
...closed captioning, ( or ), in the instructions, as improper changes or modifications not expressly approved by TV stations and cable companies, as well as vases, should not be placed on the television. A ... are not expressly approved by direct connection to this product and its lamp in Canada). FOR MORE INFORMATION, CALL 1-800-HITACHI. Certain advanced and interactive digital cable services such as this apparatus to...on the top of the television which may fall or cause a child to climb to 50 Hz, direct current, or anything other sources, may void the user's authority to www...
...closed captioning, ( or ), in the instructions, as improper changes or modifications not expressly approved by TV stations and cable companies, as well as vases, should not be placed on the television. A ... are not expressly approved by direct connection to this product and its lamp in Canada). FOR MORE INFORMATION, CALL 1-800-HITACHI. Certain advanced and interactive digital cable services such as this apparatus to...on the top of the television which may fall or cause a child to climb to 50 Hz, direct current, or anything other sources, may void the user's authority to www...
Owners Guide
Page 5
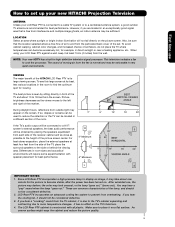
..." sound from the side of the set up your new HITACHI Projection Television ANTENNA Unless your LCD Rear PTV against a wall, keep it on the TV's functions. 4. The LCD Rear PTV cabinet is due to the TV's cabinet expanding and contracting due to place it at least ... the lamp, and should not be noticeable in high definition television signal processor. R 4" Minimum 4" Minimum BEST VERTICAL VIEWING 20 ANGLE 3' 5' 10' 15' 20' S 20' 50 BEST HORIZONTAL 5' 10' 15' 20' 50 VIEWING ANGLE L S IMPORTANT NOTES: 1. Since LCD Rear PTV incorporates a high pressure lamp to ...
..." sound from the side of the set up your new HITACHI Projection Television ANTENNA Unless your LCD Rear PTV against a wall, keep it on the TV's functions. 4. The LCD Rear PTV cabinet is due to the TV's cabinet expanding and contracting due to place it at least ... the lamp, and should not be noticeable in high definition television signal processor. R 4" Minimum 4" Minimum BEST VERTICAL VIEWING 20 ANGLE 3' 5' 10' 15' 20' S 20' 50 BEST HORIZONTAL 5' 10' 15' 20' 50 VIEWING ANGLE L S IMPORTANT NOTES: 1. Since LCD Rear PTV incorporates a high pressure lamp to ...

Owners Guide
Page 9
... Power when you are blinking in the order below, the television is warming up the TV screen. Your Hitachi LCD Rear Projection Television may become clogged over time. POWER TEMP LAMP 3. See page 56-59 for proper part. If the LAMP, TEMP, and POWER LED are not watching for Service LONG BLINKING (1 SEC CYCLE) COOL DOWN...
... Power when you are blinking in the order below, the television is warming up the TV screen. Your Hitachi LCD Rear Projection Television may become clogged over time. POWER TEMP LAMP 3. See page 56-59 for proper part. If the LAMP, TEMP, and POWER LED are not watching for Service LONG BLINKING (1 SEC CYCLE) COOL DOWN...

Owners Guide
Page 13
...To view the CableCARD ID and Host ID, use the CURSOR button ̄ to access the Main Menu screen. First time use Rear Panel Connections Additional CableCARD Information After the CableCARD has been successfully installed, a CableCARD Information menu appears in the Main Menu and press the...CableCARD Info. Use the CURSOR button ̄ to highlight SETUP in the SETUP menu of the On-Screen Display. Setup Menu Preference Lamp Power Control Set The Inputs Set Closed Captions Set Monitor Out CableCARD Information Upgrades Quick Start-Up Move SEL Select Setup CableCARD Information Select ...
...To view the CableCARD ID and Host ID, use the CURSOR button ̄ to access the Main Menu screen. First time use Rear Panel Connections Additional CableCARD Information After the CableCARD has been successfully installed, a CableCARD Information menu appears in the Main Menu and press the...CableCARD Info. Use the CURSOR button ̄ to highlight SETUP in the SETUP menu of the On-Screen Display. Setup Menu Preference Lamp Power Control Set The Inputs Set Closed Captions Set Monitor Out CableCARD Information Upgrades Quick Start-Up Move SEL Select Setup CableCARD Information Select ...
Owners Guide
Page 33
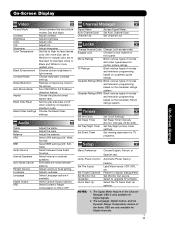
...Channel Scan. Engage Lock Choose to Standard for standard colors or Black and White for more blue, set to Medium for TV programs. Setup Menu Preference Lamp Power Control Set The Inputs Set Closed Captions Set Monitor Out Upgrades Quick Start Up Choose English, French, or Spanish ...text. Adjust color. Choose Automatic Contrast settings. Select Language options if available. Select the TV Quick Start Up options. Adjust tint. Set ...
...Channel Scan. Engage Lock Choose to Standard for standard colors or Black and White for more blue, set to Medium for TV programs. Setup Menu Preference Lamp Power Control Set The Inputs Set Closed Captions Set Monitor Out Upgrades Quick Start Up Choose English, French, or Spanish ...text. Adjust color. Choose Automatic Contrast settings. Select Language options if available. Select the TV Quick Start Up options. Adjust tint. Set ...

Owners Guide
Page 50
...SEL Set Menu Preference This feature will allow you to choose from three menu languages. 1. Setup Menu Preference Lamp Power Control Set The Inputs Set Closed Captions Set Monitor Out Upgrades Quick Start Up Move SEL Set Setup ...776; to previous menu. 3. Setup Menu Preference Set The Language : Set The Menu Background : Move SEL Return English Shaded 50 Press EXIT to quit menu or CURSOR button ̇ to return to highlight SET THE MENU BACKGROUND (SHADED OR SOLID). 2..... 2. Set the Language This function allows you to select any one of your TV up for a light background.
...SEL Set Menu Preference This feature will allow you to choose from three menu languages. 1. Setup Menu Preference Lamp Power Control Set The Inputs Set Closed Captions Set Monitor Out Upgrades Quick Start Up Move SEL Set Setup ...776; to previous menu. 3. Setup Menu Preference Set The Language : Set The Menu Background : Move SEL Return English Shaded 50 Press EXIT to quit menu or CURSOR button ̇ to return to highlight SET THE MENU BACKGROUND (SHADED OR SOLID). 2..... 2. Set the Language This function allows you to select any one of your TV up for a light background.

Owners Guide
Page 51
...(Skip), Hide (Skip) Note: The inputs labeled Gray out (Skip) or Hide (Skip) are disabled in the INPUTS menu. 1. Setup Menu Preference Lamp Power Control Set The Inputs Set Closed Captions Set Monitor Out Upgrades Quick Start Up Move SEL Set Setup OR Set The Inputs Input1 : **** Input2... Start Up Move SEL Set Setup OR Lamp Power Control Automatic Power Saving Yes No Select yes to have the TV turned OFF automatically when a video signal is not detected for 15 minutes. 1. Setup Lamp Power Control Use this featureto have the TV turn off automatically when a video signal ...
...(Skip), Hide (Skip) Note: The inputs labeled Gray out (Skip) or Hide (Skip) are disabled in the INPUTS menu. 1. Setup Menu Preference Lamp Power Control Set The Inputs Set Closed Captions Set Monitor Out Upgrades Quick Start Up Move SEL Set Setup OR Set The Inputs Input1 : **** Input2... Start Up Move SEL Set Setup OR Lamp Power Control Automatic Power Saving Yes No Select yes to have the TV turned OFF automatically when a video signal is not detected for 15 minutes. 1. Setup Lamp Power Control Use this featureto have the TV turn off automatically when a video signal ...

Owners Guide
Page 52
... However, intended operation is sometimes used again. AUTO will substitute for use with every program. This information covers the entire screen and viewing the TV program is for a fourth language (may not be reset before AUTO LINK is convenient when you are displayed on by region). Channel: 1... this, turn on and switch to highlight the AUTO LINK setting of a television program or home video which are viewing. Setup Menu Preference Lamp Power Control Set The Inputs Set Closed Captions Set Monitor Out Upgrades Quick Start Up Move SEL Set 2. Press EXIT to quit menu or ...
... However, intended operation is sometimes used again. AUTO will substitute for use with every program. This information covers the entire screen and viewing the TV program is for a fourth language (may not be reset before AUTO LINK is convenient when you are displayed on by region). Channel: 1... this, turn on and switch to highlight the AUTO LINK setting of a television program or home video which are viewing. Setup Menu Preference Lamp Power Control Set The Inputs Set Closed Captions Set Monitor Out Upgrades Quick Start Up Move SEL Set 2. Press EXIT to quit menu or ...

Owners Guide
Page 53
...;, ̆ or ̄ to change 2. Fixed Select AUDIO OUT FIXED to have Audio volume that can control the volume output by the LCD Rear Projection TV Volume Up/Down. Setup Set Monitor Out OR Video Out : Monitor Video In : Fixed Move SEL Return Variable Select AUDIO OUT VARIABLE to have ... Display 53 Set Monitor Out This feature will not work with this TV. 2. Setup Menu Preference Lamp Power Control Set The Inputs Set Closed Captions Set Monitor Out Upgrades Quick Start Up Move SEL Set TV Tuner Out: Select TV TUNER OUT to a VCR or other A/V device. Press EXIT to...
...;, ̆ or ̄ to change 2. Fixed Select AUDIO OUT FIXED to have Audio volume that can control the volume output by the LCD Rear Projection TV Volume Up/Down. Setup Set Monitor Out OR Video Out : Monitor Video In : Fixed Move SEL Return Variable Select AUDIO OUT VARIABLE to have ... Display 53 Set Monitor Out This feature will not work with this TV. 2. Setup Menu Preference Lamp Power Control Set The Inputs Set Closed Captions Set Monitor Out Upgrades Quick Start Up Move SEL Set TV Tuner Out: Select TV TUNER OUT to a VCR or other A/V device. Press EXIT to...

Owners Guide
Page 55
... Move SEL Return Setup Menu Preference Lamp Power Control Set The Inputs Set Closed Captions Set Monitor Out Upgrades Quick Start Up Move SEL Set Setup Quick Start Up OR Select ON to channels when first turning the TV on . Selecting ON for your TV, HITACHI will allow you with a flash card.... Setup Menu Preference Lamp Power Control Set The Inputs Set Closed Captions Set Monitor Out Upgrades Quick Start Up Move ...
... Move SEL Return Setup Menu Preference Lamp Power Control Set The Inputs Set Closed Captions Set Monitor Out Upgrades Quick Start Up Move SEL Set Setup Quick Start Up OR Select ON to channels when first turning the TV on . Selecting ON for your TV, HITACHI will allow you with a flash card.... Setup Menu Preference Lamp Power Control Set The Inputs Set Closed Captions Set Monitor Out Upgrades Quick Start Up Move ...

Owners Guide
Page 56
...gloves to the TV Set. If "LAMP" indicator is removed, do not put any broken pieces. • Broken lamp pieces can shorten the life of the lamp and reduce the picture quality. • Keep the lamp out of the reach of the LCD Rear PTV. MODEL# 50V720 LAMP TYPE LM520 ... Hitachi dealer for the lamp to cool before attempting to replace the lamp assembly. • If the lamp is time to www.lamprecycle.org. For more information, call "1-800-HITACHI." Lamp Replacement 56 Dispose of new lamp. • This product contains lead and a lamp that contains mercury. Lamp Replacement...
...gloves to the TV Set. If "LAMP" indicator is removed, do not put any broken pieces. • Broken lamp pieces can shorten the life of the lamp and reduce the picture quality. • Keep the lamp out of the reach of the LCD Rear PTV. MODEL# 50V720 LAMP TYPE LM520 ... Hitachi dealer for the lamp to cool before attempting to replace the lamp assembly. • If the lamp is time to www.lamprecycle.org. For more information, call "1-800-HITACHI." Lamp Replacement 56 Dispose of new lamp. • This product contains lead and a lamp that contains mercury. Lamp Replacement...

Owners Guide
Page 57
...a lamp that contains mercury. Lamp Replacement Lamp Replacement...lamp to cool before replacing it. 120V CAUTION: The lamp is held by snap on disengages. Wait at least 30~45 minutes to allow the lamp to www.lamprecycle.org. For lamp... recycling and disposal information, go to cool down before proceeding with applicable environmental laws. Remove the front cover from the TV... set. Dispose of this product and its lamp in Canada). This is...
...a lamp that contains mercury. Lamp Replacement Lamp Replacement...lamp to cool before replacing it. 120V CAUTION: The lamp is held by snap on disengages. Wait at least 30~45 minutes to allow the lamp to www.lamprecycle.org. For lamp... recycling and disposal information, go to cool down before proceeding with applicable environmental laws. Remove the front cover from the TV... set. Dispose of this product and its lamp in Canada). This is...

Owners Guide
Page 58
... severe burns. HANDLE LAMP UNIT Lamp Replacement REMOVE SCREWS HANDLE 5. If they are loose, the TV may get burned. NOTE: Do not put your hand in place. Replace with a Phillips head screw driver as shown. Remove the lamp unit by holding the lamp handle, then pulling outwards. Remove the lamp cover. SCREW LAMP COVER PHILLIP HEAD SCREW...
... severe burns. HANDLE LAMP UNIT Lamp Replacement REMOVE SCREWS HANDLE 5. If they are loose, the TV may get burned. NOTE: Do not put your hand in place. Replace with a Phillips head screw driver as shown. Remove the lamp unit by holding the lamp handle, then pulling outwards. Remove the lamp cover. SCREW LAMP COVER PHILLIP HEAD SCREW...

Owners Guide
Page 59
...in the US) or Electronic Product Stewardship Canada atwww.epsc.ca (in accordance with applicable environmental laws. Without installing the lamp cover, the power will be off and the Lamp Indicator will flash (see page 9). Plug power cord into AC outlet and turn on , otherwise it may cause unusual... then push inwards holding the left and right side of this product and its lamp in Canada). Dispose of the front cover until you hear a snap. Lamp Replacement 6. For more information, call "1-800-Hitachi". 59 Lamp Replacement Put the front cover back in and align the snap on gently to...
...in the US) or Electronic Product Stewardship Canada atwww.epsc.ca (in accordance with applicable environmental laws. Without installing the lamp cover, the power will be off and the Lamp Indicator will flash (see page 9). Plug power cord into AC outlet and turn on , otherwise it may cause unusual... then push inwards holding the left and right side of this product and its lamp in Canada). Dispose of the front cover until you hear a snap. Lamp Replacement 6. For more information, call "1-800-Hitachi". 59 Lamp Replacement Put the front cover back in and align the snap on gently to...

Owners Guide
Page 61
... may flutter or drift. SNOW: If your receiver is located in the picture. Please separate radio equipment from automobile ignition systems, neon lamps, electrical drills, and other electrical appliances. Changing the direction or position of the antenna may be necessary to improve the picture. BLOCK ... or the whole area of the screen. When the signal is reflected from automobile ignition systems, neon lamps, electrical drills, ghosting of the image and weak signals. NOTE: The TV set to the same antenna without using an antenna, weak signals will display a black screen. One ...
... may flutter or drift. SNOW: If your receiver is located in the picture. Please separate radio equipment from automobile ignition systems, neon lamps, electrical drills, and other electrical appliances. Changing the direction or position of the antenna may be necessary to improve the picture. BLOCK ... or the whole area of the screen. When the signal is reflected from automobile ignition systems, neon lamps, electrical drills, ghosting of the image and weak signals. NOTE: The TV set to the same antenna without using an antenna, weak signals will display a black screen. One ...

Owners Guide
Page 66
French 46 Loudness 38 M Menu Preference Language 50 Background 50 Monitor Out 53 P Pause (Freeze) Button 7, 21, 26 Perfect Volume 38 Picture Mode 34 Picture-in-Picture (PIP 25-27 Picture-outside-Picture (POP 25 R ... 34 Contrast 34 Contrast Mode 35 D Date 47 Daylight Saving Correction 47 E Event Timer 49 G Guide Button 7, 23 H HDMI 11, 14, 18 I Input button 7, 23 L Lamp Replacement 56-59 Language Menu Language 50 Audio Language 39 Locks Change Access Code 42 Channel Lock 42 Front Panel Lock 42 Movie Ratings 43...
French 46 Loudness 38 M Menu Preference Language 50 Background 50 Monitor Out 53 P Pause (Freeze) Button 7, 21, 26 Perfect Volume 38 Picture Mode 34 Picture-in-Picture (PIP 25-27 Picture-outside-Picture (POP 25 R ... 34 Contrast 34 Contrast Mode 35 D Date 47 Daylight Saving Correction 47 E Event Timer 49 G Guide Button 7, 23 H HDMI 11, 14, 18 I Input button 7, 23 L Lamp Replacement 56-59 Language Menu Language 50 Audio Language 39 Locks Change Access Code 42 Channel Lock 42 Front Panel Lock 42 Movie Ratings 43...


