
Owners Guide
Page 4
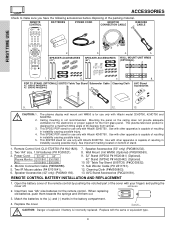
... 10. 11. 12. 13. The plasma display wall mount unit WM50 is for use only with Hitachi 42HDT50. Use with Hitachi model 32HDT50, 42HDT50 and 50HDT50. See important marking located on the ceiling does not provide adequate ventilation for the electronics or proper support ... When replacing old batteries, push them towards the springs and lift them out. 3. CAUTION: 1. 2. 3. 4. 5. Use with Hitachi 50HDT50. Power Cord: 32"/42" 50" Plasma Monitor EV01841 EV01861 AVC EV01841 EV01841 4. Insert two new "AA" size batteries for a maximum tilting angle of explosion if ...
... 10. 11. 12. 13. The plasma display wall mount unit WM50 is for use only with Hitachi 42HDT50. Use with Hitachi model 32HDT50, 42HDT50 and 50HDT50. See important marking located on the ceiling does not provide adequate ventilation for the electronics or proper support ... When replacing old batteries, push them towards the springs and lift them out. 3. CAUTION: 1. 2. 3. 4. 5. Use with Hitachi 50HDT50. Power Cord: 32"/42" 50" Plasma Monitor EV01841 EV01861 AVC EV01841 EV01841 4. Insert two new "AA" size batteries for a maximum tilting angle of explosion if ...
Owners Guide
Page 5
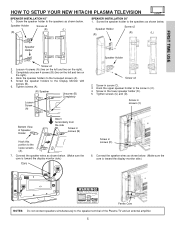
Speaker Holder Screw x2 (R) (L) (R) SPEAKER INSTALLATION 50" 1. Hook the upper speaker holder to the screw in screws (B) Hook this portion to the speaker terminal of Speaker Holder Insert horizontally from the side ... and an external amplifier. 5 Screw in screw (C). 3. Screw the speaker holder to the speakers as shown below . FIRST TIME USE HOW TO SETUP YOUR NEW HITACHI PLASMA TELEVISION SPEAKER INSTALLATION 42" 1. Completely unscrew 4 screws (B) (two on the left and two on the right). 4. Screw in the lower speaker holder...
Speaker Holder Screw x2 (R) (L) (R) SPEAKER INSTALLATION 50" 1. Hook the upper speaker holder to the screw in screws (B) Hook this portion to the speaker terminal of Speaker Holder Insert horizontally from the side ... and an external amplifier. 5 Screw in screw (C). 3. Screw the speaker holder to the speakers as shown below . FIRST TIME USE HOW TO SETUP YOUR NEW HITACHI PLASMA TELEVISION SPEAKER INSTALLATION 42" 1. Completely unscrew 4 screws (B) (two on the left and two on the right). 4. Screw in the lower speaker holder...
Owners Guide
Page 6
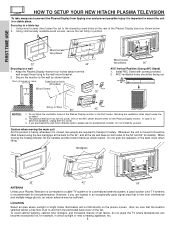
...rear of the Plasma Display stand as shown below . 10cm (4 inches) or more Stabilization bolts (Provided) Wood Screw 32" Wire Wood screw two places 50" AVC Vertical Position (Using AVC Stand) 1. Wood screw two places 32" 42" Securing to the wall mount bracket. 2. Blocking the ventilation holes ... is recommended for example, in a stable place. VOL+ STANDBY (RED) ON (GREEN) VOL- FIRST TIME USE HOW TO SETUP YOUR NEW HITACHI PLASMA TELEVISION To take measures to prevent the Plasma Display from tipping over and prevent possible injury it is important to mount the unit in...
...rear of the Plasma Display stand as shown below . 10cm (4 inches) or more Stabilization bolts (Provided) Wood Screw 32" Wire Wood screw two places 50" AVC Vertical Position (Using AVC Stand) 1. Wood screw two places 32" 42" Securing to the wall mount bracket. 2. Blocking the ventilation holes ... is recommended for example, in a stable place. VOL+ STANDBY (RED) ON (GREEN) VOL- FIRST TIME USE HOW TO SETUP YOUR NEW HITACHI PLASMA TELEVISION To take measures to prevent the Plasma Display from tipping over and prevent possible injury it is important to mount the unit in...
Owners Guide
Page 7
.... You can see lip motion that might trigger the power protection circuit. HOW TO SET UP YOUR NEW HITACHI PLASMA TELEVISION FIRST TIME USE VIEWING The major benefit of the HITACHI Plasma Television is its best, test various locations in the room to 18 feet from the screen. Tips ...to manufacture the plasma display panel; This is not a defect. 5 Display panel surface The plasma display panel is made from glass. For 50" only, brightness will ...
.... You can see lip motion that might trigger the power protection circuit. HOW TO SET UP YOUR NEW HITACHI PLASMA TELEVISION FIRST TIME USE VIEWING The major benefit of the HITACHI Plasma Television is its best, test various locations in the room to 18 feet from the screen. Tips ...to manufacture the plasma display panel; This is not a defect. 5 Display panel surface The plasma display panel is made from glass. For 50" only, brightness will ...
Owners Guide
Page 9
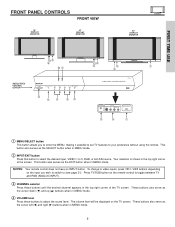
... TV screen. These buttons also serve as the SELECT button when in MENU mode. 9 FRONT PANEL CONTROLS FRONT VIEW 32" DISPLAY MONITOR 42" DISPLAY MONITOR 50" DISPLAY MONITOR FIRST TIME USE AUDIO VIDEO CONTROL CENTER STANDBY (RED) ON (GREEN) MAIN POWER ቨቦ ቧ ቫቨ POWER STANDBY (RED) ON (GREEN...
... TV screen. These buttons also serve as the SELECT button when in MENU mode. 9 FRONT PANEL CONTROLS FRONT VIEW 32" DISPLAY MONITOR 42" DISPLAY MONITOR 50" DISPLAY MONITOR FIRST TIME USE AUDIO VIDEO CONTROL CENTER STANDBY (RED) ON (GREEN) MAIN POWER ቨቦ ቧ ቫቨ POWER STANDBY (RED) ON (GREEN...
Owners Guide
Page 10
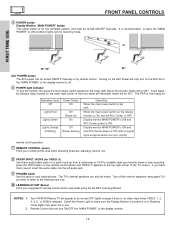
.... ቪ PHONES JACK Use this area when selecting channels, adjusting volume, etc. ቩ FRONT INPUT JACKS (for VIDEO: 5) Use these audio/video jacks for 50"). NOTES: 1. 2. Check the Power Light to instantly view your head-phones. The PDP is now ready for Indicating Lamp Power Status Off Off Lights Red... is OFF. When the main power switch on the lower right corner of the monitor (lower left for your favorite show or new recording. Your HITACHI Plasma TV will illuminate (lower left for a quick hook-up from a camcorder or VCR to make sure the Display Monitor is off or in ...
.... ቪ PHONES JACK Use this area when selecting channels, adjusting volume, etc. ቩ FRONT INPUT JACKS (for VIDEO: 5) Use these audio/video jacks for 50"). NOTES: 1. 2. Check the Power Light to instantly view your head-phones. The PDP is now ready for Indicating Lamp Power Status Off Off Lights Red... is OFF. When the main power switch on the lower right corner of the monitor (lower left for your favorite show or new recording. Your HITACHI Plasma TV will illuminate (lower left for a quick hook-up from a camcorder or VCR to make sure the Display Monitor is off or in ...

Owners Guide
Page 11
... necessary to adjust TINT to INPUT 3 and 4, but only one of SRS Labs, Inc. ቤ ባ ቧ ቪ ብቩ 2 50" Monitor Bottom View 2 ቢ Antenna Input/Output The remote control allows you have monitor output. ብ AUDIO OUT These jacks provide fixed audio output for...as a sub-picture). ANT A input can only be displayed as a main picture (ANT B cannot be used at the same time. S-VIDEO output may use HITACHI specified cable. You may be displayed as a main picture. ባ Audio/Video Inputs 1, 2, 3 and 4 The VID1~VID4 buttons will be displayed as ...
... necessary to adjust TINT to INPUT 3 and 4, but only one of SRS Labs, Inc. ቤ ባ ቧ ቪ ብቩ 2 50" Monitor Bottom View 2 ቢ Antenna Input/Output The remote control allows you have monitor output. ብ AUDIO OUT These jacks provide fixed audio output for...as a sub-picture). ANT A input can only be displayed as a main picture (ANT B cannot be used at the same time. S-VIDEO output may use HITACHI specified cable. You may be displayed as a main picture. ባ Audio/Video Inputs 1, 2, 3 and 4 The VID1~VID4 buttons will be displayed as ...
Owners Guide
Page 13
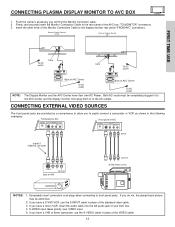
...jack of the standard video cable. 3. If you have a S-VHS VCR, use the S-INPUT cable in place of Display Monitor 50" NOTE: To AC outlet Core Core To AC outlet Please use HITACHI specified cable. Insert the other ends of AVC PHONES S-VIDEO INPUT 5 AUDIO VIDEO L/(MONO) R PHONES S-VIDEO INPUT 5 AUDIO...32/42" Back of the VIDEO cable. 13 To AC outlet The Display Monitor and the AVC Center have a VHS or 8mm camcorder, use HITACHI specified cable. If you do not, the played back picture may be completely plugged in to the AVC Center and the display monitor, then ...
...jack of the standard video cable. 3. If you have a S-VHS VCR, use the S-INPUT cable in place of Display Monitor 50" NOTE: To AC outlet Core Core To AC outlet Please use HITACHI specified cable. Insert the other ends of AVC PHONES S-VIDEO INPUT 5 AUDIO VIDEO L/(MONO) R PHONES S-VIDEO INPUT 5 AUDIO...32/42" Back of the VIDEO cable. 13 To AC outlet The Display Monitor and the AVC Center have a VHS or 8mm camcorder, use HITACHI specified cable. If you do not, the played back picture may be completely plugged in to the AVC Center and the display monitor, then ...
Owners Guide
Page 30
..., use THUMB STICK ̇ or ̈ to memory. THUMB STICK 8 Favorite Channels Ant A 8 A6 A3 - - - - - - - - - - - - - - - - - - - - - - - - - AUTO ADJUST function (see page 72) is treated as overscan). 4. 50" Only. ቱ VIDEO button Press this button to answer the telephone, etc., press the MUTE button. Press the MUTE button again to SELECT. To restore...
..., use THUMB STICK ̇ or ̈ to memory. THUMB STICK 8 Favorite Channels Ant A 8 A6 A3 - - - - - - - - - - - - - - - - - - - - - - - - - AUTO ADJUST function (see page 72) is treated as overscan). 4. 50" Only. ቱ VIDEO button Press this button to answer the telephone, etc., press the MUTE button. Press the MUTE button again to SELECT. To restore...
Owners Guide
Page 31
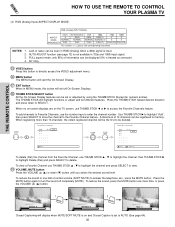
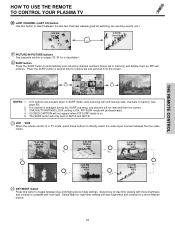
...-PICTURE buttons See separate section on . SURF button Press the SURF button to automatically scan all active channel numbers (those set in memory (see page 50). THE REMOTE CONTROL MODE EXIT MUTE VCR PLUS+ SVCS VID 2 VID 1 HOW TO USE THE REMOTE TO CONTROL YOUR PLASMA TV ቶ LAST CHANNEL (LAST...
...-PICTURE buttons See separate section on . SURF button Press the SURF button to automatically scan all active channel numbers (those set in memory (see page 50). THE REMOTE CONTROL MODE EXIT MUTE VCR PLUS+ SVCS VID 2 VID 1 HOW TO USE THE REMOTE TO CONTROL YOUR PLASMA TV ቶ LAST CHANNEL (LAST...
Owners Guide
Page 34
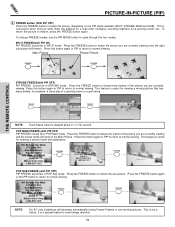
... PIP to return to avoid image retention. 34 Box 55512 Any Town, USA 98765 Check or Money Order Only 1-800-555-1212 FREEZE NOTE: For 50" only, brightness will show in POP Sub mode. Press this button again or PIP to return to freeze the sub-picture. POP MAIN FREEZE (with...
... PIP to return to avoid image retention. 34 Box 55512 Any Town, USA 98765 Check or Money Order Only 1-800-555-1212 FREEZE NOTE: For 50" only, brightness will show in POP Sub mode. Press this button again or PIP to return to freeze the sub-picture. POP MAIN FREEZE (with...

Owners Guide
Page 40
... 51 General Instrument 01, 12 Goldstar 10, 25 Hamlin 04, 13, 22, 23 Hitachi 01 Hytex 36 Jasco 11 Jerrold 01, 08, 12, 37, 49, 50, 51 Macom 35 Magnavox 15 Memorex 03 Movie Time 29, 31, 33 NSC 29...39 Videoway 47 Viewstar 15, 28, 29, 40 Zenith 03, 48 Zentek 52 SATELLITE BRAND CODE Echostar 04 Hitachi 01 Hughes 05 RCA 02 Sony 03 SET-TOP-BOX CODE Panasonic 06 RCA 07 Samsung 08 Zenith 09 ...AMPLIFIER BRAND CODE Aiwa 05, 06 Carver 01, 06, 08 Denon 10 Fisher 08, 11 Hitachi 12 JVC 13 Kenwood 14, 15, 17, 18 Magnavox 01, 06 Marantz 01, 06, 16 MCS 16 ...
... 51 General Instrument 01, 12 Goldstar 10, 25 Hamlin 04, 13, 22, 23 Hitachi 01 Hytex 36 Jasco 11 Jerrold 01, 08, 12, 37, 49, 50, 51 Macom 35 Magnavox 15 Memorex 03 Movie Time 29, 31, 33 NSC 29...39 Videoway 47 Viewstar 15, 28, 29, 40 Zenith 03, 48 Zentek 52 SATELLITE BRAND CODE Echostar 04 Hitachi 01 Hughes 05 RCA 02 Sony 03 SET-TOP-BOX CODE Panasonic 06 RCA 07 Samsung 08 Zenith 09 ...AMPLIFIER BRAND CODE Aiwa 05, 06 Carver 01, 06, 08 Denon 10 Fisher 08, 11 Hitachi 12 JVC 13 Kenwood 14, 15, 17, 18 Magnavox 01, 06 Marantz 01, 06, 16 MCS 16 ...
Owners Guide
Page 43
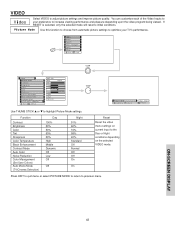
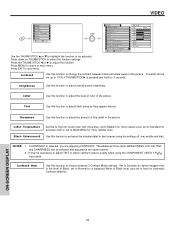
...Color Temperature Black Enhancement Contrast Mode Auto Color Noise Reduction Color Management (Set User Colors) Auto Movie Mode (TV/Cinema Detection) Day 100% 50% 50% 50% 50% High Middle Dynamic Off Low Off Off Night 91% 60% 16% 58% 40% Standard Off Normal Off Off On On Reset Reset...Video Picture Mode Contrast Brightness Color Tint Sharpness Color Temperature Black Enhancement Contrast Mode Reset Video Settings Move SEL Select ANT A/B Day 100% 50% 50% Night 50% High High Dynamic THUMB STICK Picture Mode Next/Prev Select Use THUMB STICK ̆ or ̄ to initial conditions. Day Night...
...Color Temperature Black Enhancement Contrast Mode Auto Color Noise Reduction Color Management (Set User Colors) Auto Movie Mode (TV/Cinema Detection) Day 100% 50% 50% 50% 50% High Middle Dynamic Off Low Off Off Night 91% 60% 16% 58% 40% Standard Off Normal Off Off On On Reset Reset...Video Picture Mode Contrast Brightness Color Tint Sharpness Color Temperature Black Enhancement Contrast Mode Reset Video Settings Move SEL Select ANT A/B Day 100% 50% 50% Night 50% High High Dynamic THUMB STICK Picture Mode Next/Prev Select Use THUMB STICK ̆ or ̄ to initial conditions. Day Night...
Owners Guide
Page 44
... STICK SELECT Video Picture Mode Contrast Brightness Color Tint Sharpness Color Temperature Black Enhancement Contrast Mode Reset Video Settings Move SEL Select ANT A/B Day 100% 50% 50% Night 50% High High Dynamic Use the THUMB STICK ̆ or ̄ to highlight the function to Auto for a balanced White to Black level, and set...
... STICK SELECT Video Picture Mode Contrast Brightness Color Tint Sharpness Color Temperature Black Enhancement Contrast Mode Reset Video Settings Move SEL Select ANT A/B Day 100% 50% 50% Night 50% High High Dynamic Use the THUMB STICK ̆ or ̄ to highlight the function to Auto for a balanced White to Black level, and set...
Owners Guide
Page 45
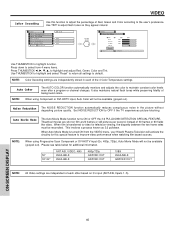
... Mode Contrast Brightness Color Tint Sharpness Color Temperature Black Enhancement Contrast Mode Reset Video Settings Move SEL Select ANT A/B Day 100% 50% 50% Night 50% High High Dynamic THUMB STICK SELECT Video Picture Mode Select "Reset" to Return the Video menu Settings on the selected VIDEO ...Auto Movie Mode Move SEL Select ANT A/B Off Low Off THUMB STICK Video Color Management Set User Colors Magenta 50% Red 50% Yellow 50% Green 50% Cyan 50% Blue 50% Reset Move SEL Select Use THUMBSTICK to make them either deeper or more pure depending on THUMB STICK to select...
... Mode Contrast Brightness Color Tint Sharpness Color Temperature Black Enhancement Contrast Mode Reset Video Settings Move SEL Select ANT A/B Day 100% 50% 50% Night 50% High High Dynamic THUMB STICK SELECT Video Picture Mode Select "Reset" to Return the Video menu Settings on the selected VIDEO ...Auto Movie Mode Move SEL Select ANT A/B Off Low Off THUMB STICK Video Color Management Set User Colors Magenta 50% Red 50% Yellow 50% Green 50% Cyan 50% Blue 50% Reset Move SEL Select Use THUMBSTICK to make them either deeper or more pure depending on THUMB STICK to select...
Owners Guide
Page 46
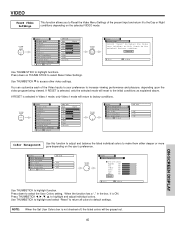
... Noise Reduction Auto Movie Mode Move SEL Select ANT A/B Off Low Off THUMB STICK Video Color Decoding RGB R G B Red 50% Green 50% Color 50% Tint Reset Move SEL Return Use THUMBSTICK to default. Use THUMBSTICK to highlight and select "Reset" to return all settings to ... it's input (ANT A/B, Inputs 1~5). This involves a process known as 3:2 pulldown. Press down to select from the VIDEO menu, your Hitachi Plasma Television will not be reconciled. ON-SCREEN DISPLAY 46 Use TINT to highlight and adjust Red, Green, Color and Tint. Auto Movie Mode...
... Noise Reduction Auto Movie Mode Move SEL Select ANT A/B Off Low Off THUMB STICK Video Color Decoding RGB R G B Red 50% Green 50% Color 50% Tint Reset Move SEL Return Use THUMBSTICK to default. Use THUMBSTICK to highlight and select "Reset" to return all settings to ... it's input (ANT A/B, Inputs 1~5). This involves a process known as 3:2 pulldown. Press down to select from the VIDEO menu, your Hitachi Plasma Television will not be reconciled. ON-SCREEN DISPLAY 46 Use TINT to highlight and adjust Red, Green, Color and Tint. Auto Movie Mode...

Owners Guide
Page 47
... features the spacious sound effects of the Plasma TV internal speakers. TruBass is always received). Manager Locks Setup Move SEL Sel Audio Treble 45% Bass 50% THUMB STICK SELECT Balance SRS TruBass Matrix Surround Audio Source L R High On Stereo Internal Speakers On Auto Noise Cancel On Perfect Volume On Move Change...
... features the spacious sound effects of the Plasma TV internal speakers. TruBass is always received). Manager Locks Setup Move SEL Sel Audio Treble 45% Bass 50% THUMB STICK SELECT Balance SRS TruBass Matrix Surround Audio Source L R High On Stereo Internal Speakers On Auto Noise Cancel On Perfect Volume On Move Change...
Owners Guide
Page 50
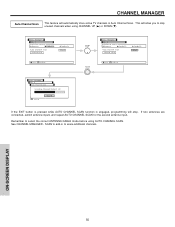
... allow you to erase additional channels. Manager Ant. See CHANNEL MANAGER - Manager Ant. CHANNEL MANAGER Auto Channel Scan This feature will stop. ON-SCREEN DISPLAY 50
... allow you to erase additional channels. Manager Ant. See CHANNEL MANAGER - Manager Ant. CHANNEL MANAGER Auto Channel Scan This feature will stop. ON-SCREEN DISPLAY 50

Owners Guide
Page 59
...; to quit the menu. Option 3 The whole picture will shift every 20 minutes by two pixels. Screen Saver Picture's Movement ON-SCREEN DISPLAY Image Power (50" Model Only) This function allows you to choose from a pattern mark. Select SOLID and background is visible (no picture can cause permanent damage to Plasma...
...; to quit the menu. Option 3 The whole picture will shift every 20 minutes by two pixels. Screen Saver Picture's Movement ON-SCREEN DISPLAY Image Power (50" Model Only) This function allows you to choose from a pattern mark. Select SOLID and background is visible (no picture can cause permanent damage to Plasma...

Owners Guide
Page 65
... 60.02 75.03 59.94 59.94 59.94 Horizontal Frequency (kHz) 31.47 31.47 37.86 37.50 35.16 37.88 48.08 46.88 48.36 56.48 60.02 63.98 79.98 33.72 44....DISPLAY MONITOR AND THE EXTERNAL COMPONENT BEFORE CONNECTING OR DISCONNECTING ANY CABLES. 1. In addition, XGA (1024 x 768) and SVGA (800 x 600) for 50". 2. Dots correspond to the true resolution in Real Mode of SRS Labs, Inc. RGB ANALOG OUTPUT 54321 10 9 8 7 6 15 14 13...PB L/(MONO) R AUDIO INPUT 3 IR BLASTER PR R AUDIO INPUT 2 PR R AUDIO INPUT 1 ANALOG INPUT L AUDIO DVI-HDTV L/(MONO) AUDIO Please use HITACHI specified cable.
... 60.02 75.03 59.94 59.94 59.94 Horizontal Frequency (kHz) 31.47 31.47 37.86 37.50 35.16 37.88 48.08 46.88 48.36 56.48 60.02 63.98 79.98 33.72 44....DISPLAY MONITOR AND THE EXTERNAL COMPONENT BEFORE CONNECTING OR DISCONNECTING ANY CABLES. 1. In addition, XGA (1024 x 768) and SVGA (800 x 600) for 50". 2. Dots correspond to the true resolution in Real Mode of SRS Labs, Inc. RGB ANALOG OUTPUT 54321 10 9 8 7 6 15 14 13...PB L/(MONO) R AUDIO INPUT 3 IR BLASTER PR R AUDIO INPUT 2 PR R AUDIO INPUT 1 ANALOG INPUT L AUDIO DVI-HDTV L/(MONO) AUDIO Please use HITACHI specified cable.


