
Owners Guide
Page 2
... personal injury. 16. Please fill out your HITACHI plasma television. Follow instructions for the mast and supporting structure, grounding of important operating and maintenance (servicing) instructions in accordance with arrowhead symbol, within an equilateral triangle, is intended to alert the user to notify you . Use only with the cart, stand, tripod, bracket, or table specified by the manufacturer, or sold with a dry...
... personal injury. 16. Please fill out your HITACHI plasma television. Follow instructions for the mast and supporting structure, grounding of important operating and maintenance (servicing) instructions in accordance with arrowhead symbol, within an equilateral triangle, is intended to alert the user to notify you . Use only with the cart, stand, tripod, bracket, or table specified by the manufacturer, or sold with a dry...
Owners Guide
Page 3
... indicated on -demand, a cable operator's enhanced program guide and data-enhanced television services may require prior authorization from the power outlet. Important Safety Instructions Power source This plasma television is designed to operate on -screen displays such as video games, stock market quotations, computer generated graphics, and other fixed (non-moving) patterns can be connected to a mains socket outlet with a protective earthing connection. Never connect the plasma television to 50 Hz, direct current...
... indicated on -demand, a cable operator's enhanced program guide and data-enhanced television services may require prior authorization from the power outlet. Important Safety Instructions Power source This plasma television is designed to operate on -screen displays such as video games, stock market quotations, computer generated graphics, and other fixed (non-moving) patterns can be connected to a mains socket outlet with a protective earthing connection. Never connect the plasma television to 50 Hz, direct current...
Owners Guide
Page 5
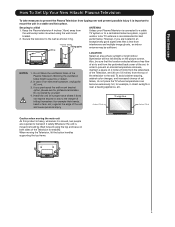
... is free from interference and multiple image ghosts, an indoor antenna may be sufficient. Do not block the ventilation holes of the Television for best performance. Keep the Plasma television 4 inches (10cm) away from the wall except when mounted using the top and base on the picture screen. ANTENNA Unless your Plasma Television is connected to a cable TV system or to a centralized antenna system, a good outdoor color TV antenna is recommended for stability. First time use...
... is free from interference and multiple image ghosts, an indoor antenna may be sufficient. Do not block the ventilation holes of the Television for best performance. Keep the Plasma television 4 inches (10cm) away from the wall except when mounted using the top and base on the picture screen. ANTENNA Unless your Plasma Television is connected to a cable TV system or to a centralized antenna system, a good outdoor color TV antenna is recommended for stability. First time use...
Owners Guide
Page 6
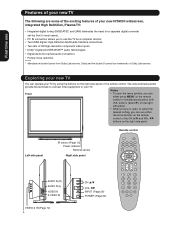
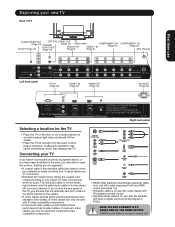
... ) on the right side panel. • When a menu is open, to select the desired setting, you to your TV by using the buttons on the right side panel or the remote control. First time use Features of your new TV The following are trademarks of HD high-resolution component video inputs. • Dolby* Digital and SRS WOW™ audio technologies. • Digital Audio Out optical audio connection. • Picture noise reduction. * Manufactured under...
... ) on the right side panel. • When a menu is open, to select the desired setting, you to your TV by using the buttons on the right side panel or the remote control. First time use Features of your new TV The following are trademarks of HD high-resolution component video inputs. • Dolby* Digital and SRS WOW™ audio technologies. • Digital Audio Out optical audio connection. • Picture noise reduction. * Manufactured under...
Owners Guide
Page 7
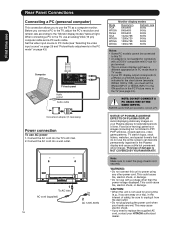
The red audio cable is for the stereo right channel, and the white audio cable is for use with AV amplifier with built-in digital surround (Dolby Digital or PCM.) NOTE: DO NOT CONNECT A PC USING ONE OF THE HDMI INPUTS. ALWAYS use the VGA port provided to use: yellow for video and red and white for use with video device with component video compatible components. If you look at the rear panel of TV IR AUDIO/VIDEO OUT (Page...
The red audio cable is for the stereo right channel, and the white audio cable is for use with AV amplifier with built-in digital surround (Dolby Digital or PCM.) NOTE: DO NOT CONNECT A PC USING ONE OF THE HDMI INPUTS. ALWAYS use the VGA port provided to use: yellow for video and red and white for use with video device with component video compatible components. If you look at the rear panel of TV IR AUDIO/VIDEO OUT (Page...
Owners Guide
Page 8
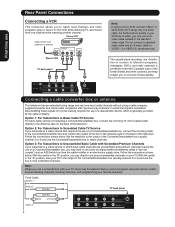
... channel while watching another channel. From Cable Option 1: Option 2: Cable Box TV back panel Cable Box Splitter A / B Switch A B Option 3: COMPONENT 2 COMPONENT 1 8 First time use Rear Panel Connections Connecting a VCR This connection allows you to watch local channels and video programs, play or record on the VCR while watching TV, and record from one audio cable. Descrambling these signals for normal viewing requires the use of a Converter/Descrambler box, connect the incoming cable to the Converter/Descrambler box and connect the output of the television...
... channel while watching another channel. From Cable Option 1: Option 2: Cable Box TV back panel Cable Box Splitter A / B Switch A B Option 3: COMPONENT 2 COMPONENT 1 8 First time use Rear Panel Connections Connecting a VCR This connection allows you to watch local channels and video programs, play or record on the VCR while watching TV, and record from one audio cable. Descrambling these signals for normal viewing requires the use of a Converter/Descrambler box, connect the incoming cable to the Converter/Descrambler box and connect the output of the television...
Owners Guide
Page 13
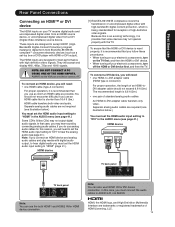
... connect an HDMI device and analog audio cables and play media with digital audio output, to -DVI adapter cable transfers only video. Because this is an evolving technology, it is being standardized for this case, you will need to connect a PC. If you do use the VGA port provided to set -top box or DVD player with high definition video signals. In this reason, you will accept and display 480i, 480p, 720p and 1080i signals...
... connect an HDMI device and analog audio cables and play media with digital audio output, to -DVI adapter cable transfers only video. Because this is an evolving technology, it is being standardized for this case, you will need to connect a PC. If you do use the VGA port provided to set -top box or DVD player with high definition video signals. In this reason, you will accept and display 480i, 480p, 720p and 1080i signals...
Owners Guide
Page 14
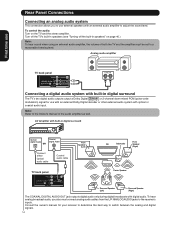
...receiver's inputs. Consult the owner's manual for use with an external Dolby Digital decoder or other external audio system with an external audio amplifier to adjust the sound level. Analog audio amplifier TV back panel LINE IN Connecting a digital audio system with digital audio. First time use Rear Panel Connections Connecting an analog audio system This connection allows you also must be set to a reasonable listening level. Turn off the TV's built-in speakers (see "Turning off the built-in digital surround The TV's two digital audio outputs output a Dolby Digital or 2-channel...
...receiver's inputs. Consult the owner's manual for use with an external Dolby Digital decoder or other external audio system with an external audio amplifier to adjust the sound level. Analog audio amplifier TV back panel LINE IN Connecting a digital audio system with digital audio. First time use Rear Panel Connections Connecting an analog audio system This connection allows you also must be set to a reasonable listening level. Turn off the TV's built-in speakers (see "Turning off the built-in digital surround The TV's two digital audio outputs output a Dolby Digital or 2-channel...
Owners Guide
Page 16
... plug/unplug the power cord when your Plasma display for extended periods of damage is not needed for a long time (e.g., if you need to the "Monitor display modes" table at right. Before you connect a PC to the TV, adjust the PC's resolution and refresh rate according to replace the supplied AC cord, contact your PC display output corresponds to a WVGA or a WXGA resolution as a computer monitor. NOTE: DO NOT CONNECT A PC USING ONE OF THE HDMI INPUTS...
... plug/unplug the power cord when your Plasma display for extended periods of damage is not needed for a long time (e.g., if you need to the "Monitor display modes" table at right. Before you connect a PC to the TV, adjust the PC's resolution and refresh rate according to replace the supplied AC cord, contact your PC display output corresponds to a WVGA or a WXGA resolution as a computer monitor. NOTE: DO NOT CONNECT A PC USING ONE OF THE HDMI INPUTS...

Owners Guide
Page 20
... does not turn off your VCR when the correct two digit preset code is entered. Release the SAT button. 3. Operating the pre-coded function for your DVD player. Release the VCR button. 3. You will now control your cable box 1. To switch to DVD pre-coded mode, press and release the DVD button. 2. Aim the remote at the DVD player and press the POWER button. The remote will need to set -top-box/satellite (STB) pre-coded mode, press...
... does not turn off your VCR when the correct two digit preset code is entered. Release the SAT button. 3. Operating the pre-coded function for your DVD player. Release the VCR button. 3. You will now control your cable box 1. To switch to DVD pre-coded mode, press and release the DVD button. 2. Aim the remote at the DVD player and press the POWER button. The remote will need to set -top-box/satellite (STB) pre-coded mode, press...
Owners Guide
Page 22
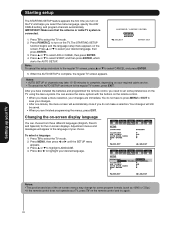
... changes will automatically close if you do not have installed the batteries and programmed the remote control, you need to save your choice. Changing the on-screen display language You can access the menu system with the buttons on the remote control. • When you make a selection. Starting setup The STARTING SETUP feature appears the first time you turn on the TV. IMPORTANT: Make sure that the antenna or cable TV system...
... changes will automatically close if you do not have installed the batteries and programmed the remote control, you need to save your choice. Changing the on-screen display language You can access the menu system with the buttons on the remote control. • When you make a selection. Starting setup The STARTING SETUP feature appears the first time you turn on the TV. IMPORTANT: Make sure that the antenna or cable TV system...
Owners Guide
Page 24
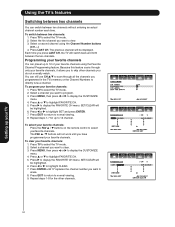
... a channel you have programmed your favorite channels. Press ▲ or ▼ to select the TV mode. 2. SET/CLEAR will not work until "0" replaces the channel number you want to directly tune a channel. Repeat steps 1-7 for the other channels you programmed in the TV's memory or the Channel Numbers to program. 3. Press to 12 channel. Video Audio Setup Customize Locks FAVORITE CH SET / CLEAR 0 0 0 0 RETURN SELECT : CH 2 AIR CABLE 0 0 0 0 0 0 0 0 ADJUST ENTER:SET Setting up to display the FAVORITE CH menu.
... a channel you have programmed your favorite channels. Press ▲ or ▼ to select the TV mode. 2. SET/CLEAR will not work until "0" replaces the channel number you want to directly tune a channel. Repeat steps 1-7 for the other channels you programmed in the TV's memory or the Channel Numbers to program. 3. Press to 12 channel. Video Audio Setup Customize Locks FAVORITE CH SET / CLEAR 0 0 0 0 RETURN SELECT : CH 2 AIR CABLE 0 0 0 0 0 0 0 0 ADJUST ENTER:SET Setting up to display the FAVORITE CH menu.

Owners Guide
Page 25
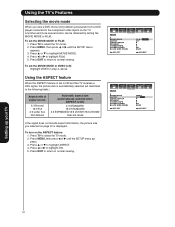
...Audio Setup Customize Locks LOCKS SET ACCESS CODE [0-9]:SELECT ENTER:SET E X I T: E N D Video Audio Setup Customize Locks LOCKS CONFIRM PASSWORD [0-9]:SELECT ENTER:SET E X I T: E N D Setting up the LOCKS menu. V-Chip system only. The password you set up your password. To select your password. Press TV to display the LOCKS menu. 3. You may now set . See "Using the V-Chip (parental control) feature" (page 26), or "Using the panel lock feature" (page 27.) To change your password. Use the Channel Number buttons (0-9) to enter a new code. The LOCKS menu...
...Audio Setup Customize Locks LOCKS SET ACCESS CODE [0-9]:SELECT ENTER:SET E X I T: E N D Video Audio Setup Customize Locks LOCKS CONFIRM PASSWORD [0-9]:SELECT ENTER:SET E X I T: E N D Setting up the LOCKS menu. V-Chip system only. The password you set up your password. To select your password. Press TV to display the LOCKS menu. 3. You may now set . See "Using the V-Chip (parental control) feature" (page 26), or "Using the panel lock feature" (page 27.) To change your password. Use the Channel Number buttons (0-9) to enter a new code. The LOCKS menu...

Owners Guide
Page 29
... video source you to label each input source for that input source. 7. Setting the clock You must set -top box SAT : Satellite box CBL : Cable box HD : HDMI device To label the video input sources: 1. Press TV to select the TV mode. 2. Press or to set the clock: 1. Set the DAY, YEAR and TIME as a VCR or DVD player. Video Audio Setup Customize Locks CUSTOMIZE ON TIMER FAVORITE CH CH LABEL SET THE INPUT OFF :SELECT :ADJUST Video Audio Setup Customize Locks CLOCK SET MONTH D AY YEAR TIME...
... video source you to label each input source for that input source. 7. Setting the clock You must set -top box SAT : Satellite box CBL : Cable box HD : HDMI device To label the video input sources: 1. Press TV to select the TV mode. 2. Press or to set the clock: 1. Set the DAY, YEAR and TIME as a VCR or DVD player. Video Audio Setup Customize Locks CUSTOMIZE ON TIMER FAVORITE CH CH LABEL SET THE INPUT OFF :SELECT :ADJUST Video Audio Setup Customize Locks CLOCK SET MONTH D AY YEAR TIME...

Owners Guide
Page 31
... center of time. Using these functions to change the picture size by selecting PICTURE SIZE in the SETUP menu. Using the TV's Features Viewing the wide-screen picture formats (480i and 480p signals only) You can view 480i and 480p format programs in a variety of the United States and other countries, and may be scrolled. Press TV to PIP/POP windows, closed captions, video game patterns, TV station logos, stock tickers, websites, and special formats that looks best to...
... center of time. Using these functions to change the picture size by selecting PICTURE SIZE in the SETUP menu. Using the TV's Features Viewing the wide-screen picture formats (480i and 480p signals only) You can view 480i and 480p format programs in a variety of the United States and other countries, and may be scrolled. Press TV to PIP/POP windows, closed captions, video game patterns, TV station logos, stock tickers, websites, and special formats that looks best to...
Owners Guide
Page 34
... MOVIE MODE to VIDEO (off): Highlight VIDEO in the following table.) Aspect ratio of signal source 4:3 Normal 16:9 Full 4:3 Letter box Not defined Automatic aspect size (automatically selected when ASPECT is ON) 4:3 STANDARD 16:9 STANDARD 4:3 EXPANDED/16:9 ZOOM1/16:9 ZOOM2 User-set mode If the signal does not include aspect information, the picture size you view a DVD movie (3:2 pulldown processed) from a DVD player connected to the component video inputs on the TV...
... MOVIE MODE to VIDEO (off): Highlight VIDEO in the following table.) Aspect ratio of signal source 4:3 Normal 16:9 Full 4:3 Letter box Not defined Automatic aspect size (automatically selected when ASPECT is ON) 4:3 STANDARD 16:9 STANDARD 4:3 EXPANDED/16:9 ZOOM1/16:9 ZOOM2 User-set mode If the signal does not include aspect information, the picture size you view a DVD movie (3:2 pulldown processed) from a DVD player connected to the component video inputs on the TV...
Owners Guide
Page 41
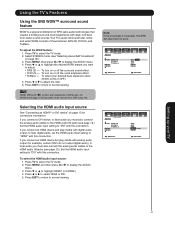
... digital audio, set the HDMI audio input setting to highlight the desired WOW feature you connect an HDMI device and play media with analog audio output (for connection information. Press or to adjust the item. 6. Press TV to display the AUDIO menu. 4. Press or to "HDMI" with this connection. WOW, SRS and symbol are trademarks of three features: SRS 3D, FOCUS, and TruBass. WOW technology is incorporated under license from stereo sound sources. Using...
... digital audio, set the HDMI audio input setting to highlight the desired WOW feature you connect an HDMI device and play media with analog audio output (for connection information. Press or to adjust the item. 6. Press TV to display the AUDIO menu. 4. Press or to "HDMI" with this connection. WOW, SRS and symbol are trademarks of three features: SRS 3D, FOCUS, and TruBass. WOW technology is incorporated under license from stereo sound sources. Using...
Owners Guide
Page 44
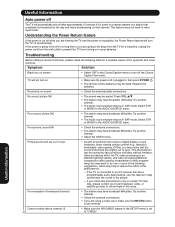
... in the Closed Caption menu to turn off the Closed Caption Text mode. Poor sound, picture OK • The station may help synchronize the sound to the picture. - Select STR or MONO in video input mode. Try another channel. • Check the antenna connections. • If you may have broadcast difficulties. Useful Information This phenomenon can be away from the TV for a long time, unplug the power cord from turning on that channel. Poor...
... in the Closed Caption menu to turn off the Closed Caption Text mode. Poor sound, picture OK • The station may help synchronize the sound to the picture. - Select STR or MONO in video input mode. Try another channel. • Check the antenna connections. • If you may have broadcast difficulties. Useful Information This phenomenon can be away from the TV for a long time, unplug the power cord from turning on that channel. Poor...

Owners Guide
Page 45
... Audio source feature (in the AUDIO menu) is MTS broadcastset properly. • Change or reset your password. • Make sure the TV • CBL • SAT • VCR • DVD mode is set to select a certain channel Multiple images Poor color or no text Solution • The channel may be dead. Replace the batteries. • Check the PANEL LOCK feature. • Check the digital signal strength. • Make sure the Closed Caption...
... Audio source feature (in the AUDIO menu) is MTS broadcastset properly. • Change or reset your password. • Make sure the TV • CBL • SAT • VCR • DVD mode is set to select a certain channel Multiple images Poor color or no text Solution • The channel may be dead. Replace the batteries. • Check the PANEL LOCK feature. • Check the digital signal strength. • Make sure the Closed Caption...

Owners Guide
Page 46
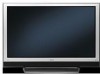
Model 50HDA39 PDP size 49.95 in . (869 mm) Weight 113.5 lbs. (51.5 kg) Supplied accessories Remote control with features and/or specifications that may be compatible with two size "AA" batteries, AC cord 46 Useful Information Video/Audio terminals S-VIDEO INPUT Y-INPUT: 1V (p-p), 75 ohm, negative sync., Mini DIN 4 pin x 3 / C-INPUT: 0.286V p-p) (burst signal), 75 ohm VIDEO/AUDIO INPUT VIDEO: 1V (p-p), 75 ohm, negative sync., pin jack x 3 / AUDIO: 300 mV (rms) (60% modulation equivalent, 35k ohm), pin...
Model 50HDA39 PDP size 49.95 in . (869 mm) Weight 113.5 lbs. (51.5 kg) Supplied accessories Remote control with features and/or specifications that may be compatible with two size "AA" batteries, AC cord 46 Useful Information Video/Audio terminals S-VIDEO INPUT Y-INPUT: 1V (p-p), 75 ohm, negative sync., Mini DIN 4 pin x 3 / C-INPUT: 0.286V p-p) (burst signal), 75 ohm VIDEO/AUDIO INPUT VIDEO: 1V (p-p), 75 ohm, negative sync., pin jack x 3 / AUDIO: 300 mV (rms) (60% modulation equivalent, 35k ohm), pin...


