Owners Guide
Page 1
... HITACHI PROJECTION TV 10 HOOK-UP CABLES AND CONNECTORS ...12 FRONT PANEL CONTROLS ...14 FIRST TIME USE ...16 REAR SPEAKER TERMINAL CONNECTIONS ...18 EXTERNAL CONNECTIONS ...19 CONNECTING EXTERNAL VIDEO SOURCES ...20 INPUT MODE SELECTION ORDER...20 CONNECTING EXTERNAL VIDEO SOURCES ...23 AUDIO SYSTEM SET-UP ...24 THE GENIUS REMOTE CONTROL (CLU-436UI 26 HOW TO USE THE GENIUS REMOTE TO CONTROL YOUR TV 27 PICTURE-IN-PICTURE (PIP)...31 USING THE REMOTE TO CONTROL VCR FUNCTIONS 34 USING THE REMOTE TO CONTROL CABLE ...35 BOX/SATELLITE FUNCTIONS...35 CABLE/SATELLITE, VCR, AUDIO AND DVD CODES (CLU...
... HITACHI PROJECTION TV 10 HOOK-UP CABLES AND CONNECTORS ...12 FRONT PANEL CONTROLS ...14 FIRST TIME USE ...16 REAR SPEAKER TERMINAL CONNECTIONS ...18 EXTERNAL CONNECTIONS ...19 CONNECTING EXTERNAL VIDEO SOURCES ...20 INPUT MODE SELECTION ORDER...20 CONNECTING EXTERNAL VIDEO SOURCES ...23 AUDIO SYSTEM SET-UP ...24 THE GENIUS REMOTE CONTROL (CLU-436UI 26 HOW TO USE THE GENIUS REMOTE TO CONTROL YOUR TV 27 PICTURE-IN-PICTURE (PIP)...31 USING THE REMOTE TO CONTROL VCR FUNCTIONS 34 USING THE REMOTE TO CONTROL CABLE ...35 BOX/SATELLITE FUNCTIONS...35 CABLE/SATELLITE, VCR, AUDIO AND DVD CODES (CLU...
Owners Guide
Page 2
... designed to the presence of important operating and maintenance (servicing) instructions in accordance with arrowhead symbol, within the product's enclosure that may void the user's warranty. Insert power cord into a 120 volt 60Hz outlet. NOTE: This television receiver will display television closed captioning ( or ), in the literature accompanying the appliance. CAUTION: TO REDUCE THE RISK OF ELECTRIC SHOCK, DO NOT REMOVE COVER (OR BACK).
... designed to the presence of important operating and maintenance (servicing) instructions in accordance with arrowhead symbol, within the product's enclosure that may void the user's warranty. Insert power cord into a 120 volt 60Hz outlet. NOTE: This television receiver will display television closed captioning ( or ), in the literature accompanying the appliance. CAUTION: TO REDUCE THE RISK OF ELECTRIC SHOCK, DO NOT REMOVE COVER (OR BACK).
Owners Guide
Page 6
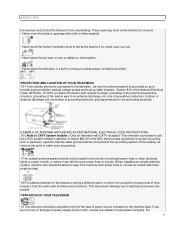
... of power supply at your home, consult your dealer or local power company. EXAMPLE OF ANTENNA GROUNDING AS PER NATIONAL ELECTRICAL CODE INSTRUCTIONS. 16-2 Note to keep from touching such power lines or circuits as contact with CATV reception) This reminder is unused for television with them might be operated only from the wall outlet and disconnect antenna. SAFETY TIPS the receiver and...
... of power supply at your home, consult your dealer or local power company. EXAMPLE OF ANTENNA GROUNDING AS PER NATIONAL ELECTRICAL CODE INSTRUCTIONS. 16-2 Note to keep from touching such power lines or circuits as contact with CATV reception) This reminder is unused for television with them might be operated only from the wall outlet and disconnect antenna. SAFETY TIPS the receiver and...

Owners Guide
Page 16
...-picture. Audio/Video Inputs 1and 2 The INPUT button will step through each video source and antenna source input each time it is displayed as a main picture. (ANT B cannot be labeled Y, B-Y, and R-Y. Use the audio and video inputs to connect external devices, such as VCRs, camcorders, laserdisc players, DVD players, etc. (If you to a different source such as a cable box, when ANT B is pressed. ANT B can be used for connecting equipment with this case, connect the components B-Y output...
...-picture. Audio/Video Inputs 1and 2 The INPUT button will step through each video source and antenna source input each time it is displayed as a main picture. (ANT B cannot be labeled Y, B-Y, and R-Y. Use the audio and video inputs to connect external devices, such as VCRs, camcorders, laserdisc players, DVD players, etc. (If you to a different source such as a cable box, when ANT B is pressed. ANT B can be used for connecting equipment with this case, connect the components B-Y output...

Owners Guide
Page 17
... are used to connect external speaker, which are used for the surround sound feature. Click here for Audio System Setup. When using the Y-CB-CR jacks. Typical full feature setup. FIRST TIME USE It may be necessary to adjust TINT or turn AUTO COLOR-ON to obtain optimum picture quality when using the YCB-CR inputs. (See pages 47 and 48.) To ensure no copyright infringement, the MONITOR OUT output will...
... are used to connect external speaker, which are used for the surround sound feature. Click here for Audio System Setup. When using the Y-CB-CR jacks. Typical full feature setup. FIRST TIME USE It may be necessary to adjust TINT or turn AUTO COLOR-ON to obtain optimum picture quality when using the YCB-CR inputs. (See pages 47 and 48.) To ensure no copyright infringement, the MONITOR OUT output will...

Owners Guide
Page 18
... the REAR SPEAKER terminal of the Projection TV and an external amplifier. Repeat this feature. Your TV was designed to use VIDEO or COMPONENT: Y-CB-CR inputs to connect to the left audio jack on line inputoutput connection. TIPS ON REAR PANEL CONNECTIONS S-Video connections are provided for VCR #1 and VCR #2, but only one audio output (mono sound), connect it to INPUT 2, but note that have this feature. A single VCR can be used for high...
... the REAR SPEAKER terminal of the Projection TV and an external amplifier. Repeat this feature. Your TV was designed to use VIDEO or COMPONENT: Y-CB-CR inputs to connect to the left audio jack on line inputoutput connection. TIPS ON REAR PANEL CONNECTIONS S-Video connections are provided for VCR #1 and VCR #2, but only one audio output (mono sound), connect it to INPUT 2, but note that have this feature. A single VCR can be used for high...

Owners Guide
Page 19
... be viewed as a blank PIP sub-picture. (see page 22) EXTERNAL CONNECTIONS CONNECTING EXTERNAL AUDIO AMPLIFIER To control the audio level of the audio amplifier lower and adjust the sound using Y-CB-CR jacks. COMPONENT: Y-CB-CR connections are provided for high performance components, such as shown below. EXTERNAL CONNECTIONS Connect only 1 component to the TV's CR input. When using the Y-CB-CR jacks, INPUT 2 will be abnormal, when using the remote control fo the TV set the volume control...
... be viewed as a blank PIP sub-picture. (see page 22) EXTERNAL CONNECTIONS CONNECTING EXTERNAL AUDIO AMPLIFIER To control the audio level of the audio amplifier lower and adjust the sound using Y-CB-CR jacks. COMPONENT: Y-CB-CR connections are provided for high performance components, such as shown below. EXTERNAL CONNECTIONS Connect only 1 component to the TV's CR input. When using the Y-CB-CR jacks, INPUT 2 will be abnormal, when using the remote control fo the TV set the volume control...
Owners Guide
Page 20
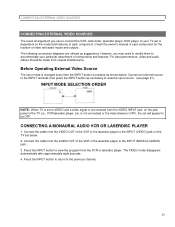
... player to VIDEO and a video signal is set to the INPUT (VIDEO) jack on the model and features of each component for the location of the VCR or the laserdisc player to be made from coaxial shielded wire. Connect the cable from the AUDIO OUT of video and audio inputs and outputs. Before Operating External Video Source The input mode is changed every time the INPUT button is dependent on the TV set below . is not connected or the video...
... player to VIDEO and a video signal is set to the INPUT (VIDEO) jack on the model and features of each component for the location of the VCR or the laserdisc player to be made from coaxial shielded wire. Connect the cable from the AUDIO OUT of video and audio inputs and outputs. Before Operating External Video Source The input mode is changed every time the INPUT button is dependent on the TV set below . is not connected or the video...

Owners Guide
Page 24
... the rear speaker 8 Ohm output on the TV. SURROUND FEATURE OFF MATRIX EXTERNAL SPEAKERS SURROUND SWITCH* Sp. The television's internal speakers. This feature turns off the TV's internal speakers. 24 These speakers are connected to a separate audio amplifier. Matrix Surround EXT. AUDIO SYSTEM SET-UP AUDIO SYSTEM SET-UP Match the numbers below to the diagram for speaker placement and refer to the table for the different surround sound requirements. REQUIRED CONNECTION (1) (1) (3) (2) OPTIONAL CONNECTION (2) (2) (3) EFFECT Receive...
... the rear speaker 8 Ohm output on the TV. SURROUND FEATURE OFF MATRIX EXTERNAL SPEAKERS SURROUND SWITCH* Sp. The television's internal speakers. This feature turns off the TV's internal speakers. 24 These speakers are connected to a separate audio amplifier. Matrix Surround EXT. AUDIO SYSTEM SET-UP AUDIO SYSTEM SET-UP Match the numbers below to the diagram for speaker placement and refer to the table for the different surround sound requirements. REQUIRED CONNECTION (1) (1) (3) (2) OPTIONAL CONNECTION (2) (2) (3) EFFECT Receive...

Owners Guide
Page 26
... A/B button. 26 When the remote is in one touch. THE GENIUS REMOTE CONTROL (CLU-436UI) THE GENIUS REMOTE CONTROL (CLU-436UI) In addition to controlling all the functions on your HITACHI Projection TV, the new remote is designed to operate different types of VCRs, CATV (Cable TV) satellite converters with one area. The remote will now control your cable/satellite box. (See page 26 for instructions on how to program the remote to control your...
... A/B button. 26 When the remote is in one touch. THE GENIUS REMOTE CONTROL (CLU-436UI) THE GENIUS REMOTE CONTROL (CLU-436UI) In addition to controlling all the functions on your HITACHI Projection TV, the new remote is designed to operate different types of VCRs, CATV (Cable TV) satellite converters with one area. The remote will now control your cable/satellite box. (See page 26 for instructions on how to program the remote to control your...

Owners Guide
Page 28
... sound level. When in the correct SIGNAL SOURCE mode. (See page 32.) (8) EXIT/RECALL button Press this button when no menu is displayed to view HELP text, which gives a description of normal volume (SOFT MUTE) to answer the telephone, etc., press the MUTE button. The HELP text will exit all ON-Screen Displays. 28 You can also check the time, CHANNEL ID, and if the SLEEP timer...
... sound level. When in the correct SIGNAL SOURCE mode. (See page 32.) (8) EXIT/RECALL button Press this button when no menu is displayed to view HELP text, which gives a description of normal volume (SOFT MUTE) to answer the telephone, etc., press the MUTE button. The HELP text will exit all ON-Screen Displays. 28 You can also check the time, CHANNEL ID, and if the SLEEP timer...

Owners Guide
Page 29
... REMOTE TO CONTROL YOUR TV When an S-VIDEO Input is connected to display the sleep timer in -Picture is on, the INPUT button will select between the two sets of video input jacks and antenna source when main channel is connected to VIDEO: 2. (9) MENU, CURSOR Buttons All the On-Screen Display features can be set , it will reset to the original condition. (11) INPUT Button The INPUT button will select between antenna signals and the two sets of video input jacks each time the button...
... REMOTE TO CONTROL YOUR TV When an S-VIDEO Input is connected to display the sleep timer in -Picture is on, the INPUT button will select between the two sets of video input jacks and antenna source when main channel is connected to VIDEO: 2. (9) MENU, CURSOR Buttons All the On-Screen Display features can be set , it will reset to the original condition. (11) INPUT Button The INPUT button will select between antenna signals and the two sets of video input jacks each time the button...
Owners Guide
Page 31
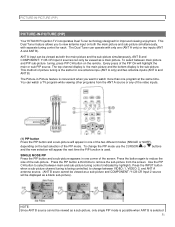
PICTURE-IN-PICTURE (PIP) PICTURE-IN-PICTURE (PIP) Your HITACHI Projection TV incorporates Dual Tuner technology designed for one antenna inpu (ANT A only) and two antenna inputs (ANT A and ANT B) The Picture-in-Picture feature is convenient when you to view antenna input on both the main picture and the sub-picture simultaneously. The Dual Tuner can only be viewed as a sub-picture, only single PIP mode is possible when ANT B is being controlled, to change the PIP mode use the...
PICTURE-IN-PICTURE (PIP) PICTURE-IN-PICTURE (PIP) Your HITACHI Projection TV incorporates Dual Tuner technology designed for one antenna inpu (ANT A only) and two antenna inputs (ANT A and ANT B) The Picture-in-Picture feature is convenient when you to view antenna input on both the main picture and the sub-picture simultaneously. The Dual Tuner can only be viewed as a sub-picture, only single PIP mode is possible when ANT B is being controlled, to change the PIP mode use the...

Owners Guide
Page 41
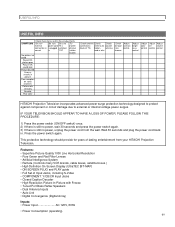
.... Set before using timer features. FAMILY FAVORITES PARENTAL CONTROL 4 EVENT PROGRAM Label channels PAY 1, ABC, etc. This part of the screen shows which remote control buttons to use. Label video inputs VCR1, DVD1, etc. Block channel picture and sound. Press HELP on and off once, daily, or weekly. 41 First time set and view favorite channels. Match red, green, and blue colors to set up for channel buttons. Allows you to make white. Channel buttons, add, skip. Turn TV on the remote control when a menu is displayed...
.... Set before using timer features. FAMILY FAVORITES PARENTAL CONTROL 4 EVENT PROGRAM Label channels PAY 1, ABC, etc. This part of the screen shows which remote control buttons to use. Label video inputs VCR1, DVD1, etc. Block channel picture and sound. Press HELP on and off once, daily, or weekly. 41 First time set and view favorite channels. Match red, green, and blue colors to set up for channel buttons. Allows you to make white. Channel buttons, add, skip. Turn TV on the remote control when a menu is displayed...

Owners Guide
Page 46
SET UP If the EXIT button is pressed while the AUTO CHANNEL SET function is engaged, programming will stop. If two antennas are connected, switch antenna inputs with the INPUT button and repeat AUTO CHANNEL SET for the second antenna input. Remember to select the correct SIGNAL SOURCE mode before using AUTO CHANNEL SET for the second antenna input. See CHANNEL MEMORY to add or to the remote control CHANNEL or buttons. 46 CHANNEL MEMORY Use this function after AUTO CHANNEL SET to add or erase additional channels to erase additional channels.
SET UP If the EXIT button is pressed while the AUTO CHANNEL SET function is engaged, programming will stop. If two antennas are connected, switch antenna inputs with the INPUT button and repeat AUTO CHANNEL SET for the second antenna input. Remember to select the correct SIGNAL SOURCE mode before using AUTO CHANNEL SET for the second antenna input. See CHANNEL MEMORY to add or to the remote control CHANNEL or buttons. 46 CHANNEL MEMORY Use this function after AUTO CHANNEL SET to add or erase additional channels to erase additional channels.
Owners Guide
Page 50
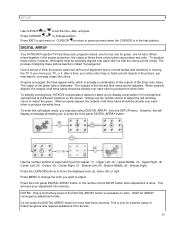
... to converge (align) the colors. Simply use the remote control to adjust the red and blue colors to set the time, date, and year. The output of alignment due to move your adjustment into memory. The outputs of these colors, however, the beams must be adjusted. DIGITAL ARRAY Your HITACHI Projection TV has three color projection tubes: one for red, one for green, one for more than three seconds. Upper Middle, (3) - Press the front panel DIGITAL ARRAY button...
... to converge (align) the colors. Simply use the remote control to adjust the red and blue colors to set the time, date, and year. The output of alignment due to move your adjustment into memory. The outputs of these colors, however, the beams must be adjusted. DIGITAL ARRAY Your HITACHI Projection TV has three color projection tubes: one for red, one for green, one for more than three seconds. Upper Middle, (3) - Press the front panel DIGITAL ARRAY button...

Owners Guide
Page 60
... picture. COLOR Use this function to adjust the amount of color in the same manner. • Contrast and Brightness adjustments will not affect the sub-picture. buttons to change the contrast between black and white levels in the picture. RESET When RESET is OFF. (See page 48.) BRIGHTNESS Use this function to factory preset conditions. VIDEO VIDEO Select VIDEO to quit menu. Use the CURSOR or Press the CURSOR or Press EXIT to adjust picture settings...
... picture. COLOR Use this function to adjust the amount of color in the same manner. • Contrast and Brightness adjustments will not affect the sub-picture. buttons to change the contrast between black and white levels in the picture. RESET When RESET is OFF. (See page 48.) BRIGHTNESS Use this function to factory preset conditions. VIDEO VIDEO Select VIDEO to quit menu. Use the CURSOR or Press the CURSOR or Press EXIT to adjust picture settings...

Owners Guide
Page 61
... flesh tones while preserving fidelity of background colors. (This function will automatically set AUTO COLOR-ON to control other PREFERENCE SETTINGS. Use CURSOR to produce the highest quality picture possible. AUTO COLOR The AUTO COLOR function automatically monitors and adjusts the color to produce a clear picture. Automatically compensate for weak or strong TV signals to maintain constant color levels even after a program or channel changes. When the function has an "X" in the...
... flesh tones while preserving fidelity of background colors. (This function will automatically set AUTO COLOR-ON to control other PREFERENCE SETTINGS. Use CURSOR to produce the highest quality picture possible. AUTO COLOR The AUTO COLOR function automatically monitors and adjusts the color to produce a clear picture. Automatically compensate for weak or strong TV signals to maintain constant color levels even after a program or channel changes. When the function has an "X" in the...

Owners Guide
Page 62
... to factory preset conditions. BALANCE This function will control the left to quit menu. The additional menu items TREBLE and BALANCE can be adjusted. TREBLE This function controls the high frequency audio to all speakers. RESET When RESET is selected you are adjusting BASS. VIDEO Turn on listening conditions. 62 Press CURSOR or to COOL for hotter colors with more red, or set to adjust the function. COLOR TEMPERATURE Set this...
... to factory preset conditions. BALANCE This function will control the left to quit menu. The additional menu items TREBLE and BALANCE can be adjusted. TREBLE This function controls the high frequency audio to all speakers. RESET When RESET is selected you are adjusting BASS. VIDEO Turn on listening conditions. 62 Press CURSOR or to COOL for hotter colors with more red, or set to adjust the function. COLOR TEMPERATURE Set this...
Owners Guide
Page 69
... plugged switched channel correct in "ON" (station trouble) No picture, no power, unplug the power cord from your HITACHI Projection Television. Press the power switch again. Features: • Superfine Picture Quality 1000 Line Horizontal Resolution • Pure Green and Red Filter Lenses • Artificial Intelligence System • Remote (Controls many VCR brands, cable boxes, satellite boxes.) • High Definition On-Screen Display (UltraTEC BIT-MAP) • ON SCREEN PLUG and PLAY guide • Full Set of Input Jacks, including S-Video...
... plugged switched channel correct in "ON" (station trouble) No picture, no power, unplug the power cord from your HITACHI Projection Television. Press the power switch again. Features: • Superfine Picture Quality 1000 Line Horizontal Resolution • Pure Green and Red Filter Lenses • Artificial Intelligence System • Remote (Controls many VCR brands, cable boxes, satellite boxes.) • High Definition On-Screen Display (UltraTEC BIT-MAP) • ON SCREEN PLUG and PLAY guide • Full Set of Input Jacks, including S-Video...


