
Owners Guide
Page 2
.... REFER SERVICING TO QUALIFIED SERVICE PERSONNEL. CAUTION: Adjust only those controls that a safety problem should be of a sufficient magnitude to constitute a risk of the television as improper changes or modifications not expressly approved by Hitachi America, Ltd. If the television does not operate properly, unplug the television and call your product model. NOTE: • There are no user serviceable parts inside the color television. • Model and serial numbers are...
.... REFER SERVICING TO QUALIFIED SERVICE PERSONNEL. CAUTION: Adjust only those controls that a safety problem should be of a sufficient magnitude to constitute a risk of the television as improper changes or modifications not expressly approved by Hitachi America, Ltd. If the television does not operate properly, unplug the television and call your product model. NOTE: • There are no user serviceable parts inside the color television. • Model and serial numbers are...
Owners Guide
Page 3
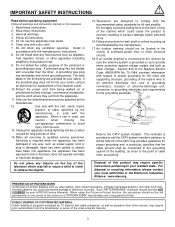
... National Electric Code, ANSI/NFPA No. 70-1984, provides information with the manufacturer's instructions. 8. Do not use this apparatus near any objects on this television. 1. IMPORTANT SAFETY INSTRUCTIONS Read before operating equipment Follow all instructions. 5. Read these instructions. 3. When using the Picture-in wire to the point of overhead power lines or other apparatus (including amplifiers) that the cable ground shall be located in...
... National Electric Code, ANSI/NFPA No. 70-1984, provides information with the manufacturer's instructions. 8. Do not use this apparatus near any objects on this television. 1. IMPORTANT SAFETY INSTRUCTIONS Read before operating equipment Follow all instructions. 5. Read these instructions. 3. When using the Picture-in wire to the point of overhead power lines or other apparatus (including amplifiers) that the cable ground shall be located in...
Owners Guide
Page 13
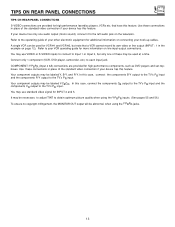
... connecting your hook-up cables. A single VCR can be necessary to adjust TINT to your device has this feature. If your device has this feature. COMPONENT: Y-PBPR (Input 4 &5) connections are provided for high performance components, such as DVD players and set-topboxes. TIPS ON REAR PANEL CONNECTIONS TIPS ON REAR PANEL CONNECTIONS S-VIDEO connections are provided for high performance laserdisc players, VCRs etc. that a VCR cannot record its own video or line output (INPUT...
... connecting your hook-up cables. A single VCR can be necessary to adjust TINT to your device has this feature. If your device has this feature. COMPONENT: Y-PBPR (Input 4 &5) connections are provided for high performance components, such as DVD players and set-topboxes. TIPS ON REAR PANEL CONNECTIONS TIPS ON REAR PANEL CONNECTIONS S-VIDEO connections are provided for high performance laserdisc players, VCRs etc. that a VCR cannot record its own video or line output (INPUT...
Owners Guide
Page 15
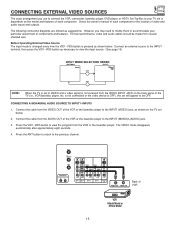
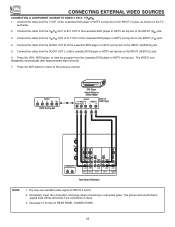
... particular assortment of video and audio inputs and outputs. The following connection diagrams are offered as shown below . 2. CONNECTING EXTERNAL VIDEO SOURCES The exact arrangement you may need to modify them to the INPUT (VIDEO) jack, as necessary to view the input source. (See page 16) INPUT MODE SELECTION ORDER (ANTENNA) (INPUT) Ant A VID1 Video:1 VID1 ANT NOTE: When the TV is set below . Check the owner's manual of VCR VCR Hitachi Model or Similar Model 15
... particular assortment of video and audio inputs and outputs. The following connection diagrams are offered as shown below . 2. CONNECTING EXTERNAL VIDEO SOURCES The exact arrangement you may need to modify them to the INPUT (VIDEO) jack, as necessary to view the input source. (See page 16) INPUT MODE SELECTION ORDER (ANTENNA) (INPUT) Ant A VID1 Video:1 VID1 ANT NOTE: When the TV is set below . Check the owner's manual of VCR VCR Hitachi Model or Similar Model 15
Owners Guide
Page 18
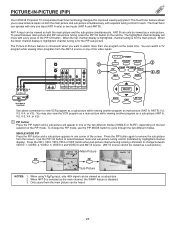
... rear panel jacks. Completely insert the connection cord plugs when connecting to the previous channel. Press the VID4~VID5 button, to view the program from the CB/PB OUT or B-Y OUT of the Laserdisc/DVD player or HDTV set top box to the INPUT (AUDIO/R) jack. 5. You may use standard video signal for tips on the TV set top box to the INPUT (Y) jack, as shown on REAR PANEL CONNECTIONS. 18 See page 13 for INPUT:4 and 5. 2. Connect...
... rear panel jacks. Completely insert the connection cord plugs when connecting to the previous channel. Press the VID4~VID5 button, to view the program from the CB/PB OUT or B-Y OUT of the Laserdisc/DVD player or HDTV set top box to the INPUT (AUDIO/R) jack. 5. You may use standard video signal for tips on the TV set top box to the INPUT (Y) jack, as shown on REAR PANEL CONNECTIONS. 18 See page 13 for INPUT:4 and 5. 2. Connect...
Owners Guide
Page 19
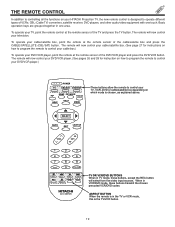
... how to program the remote to control your DVD/VCR player.) POWER TV CBL/SAT DVD/VCR SWAP PIP MODE PIP FREEZE HELP PIP CH MENU These buttons allow the remote to control your cable/satellite box. (See page 27 for instructions on which mode is the TV/VCR button. 19 The remote will now control your TV, point the remote control at the remote sensor of VCRs, CBL (Cable TV) converters, satellite receiver, DVD players, and other audio/video equipment with one area. To operate your television.
... how to program the remote to control your DVD/VCR player.) POWER TV CBL/SAT DVD/VCR SWAP PIP MODE PIP FREEZE HELP PIP CH MENU These buttons allow the remote to control your cable/satellite box. (See page 27 for instructions on which mode is the TV/VCR button. 19 The remote will now control your TV, point the remote control at the remote sensor of VCRs, CBL (Cable TV) converters, satellite receiver, DVD players, and other audio/video equipment with one area. To operate your television.
Owners Guide
Page 21
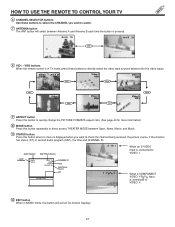
.... ቨ ANTENNA button The ANT button will exit all On-Screen Displays. 21 Ant A 10 Ant B 28 ANT ቩ VID1 ~ VID5 buttons When the remote control is displayed when you wish to check the channel being received, the picture source, if the channel has stereo (ST) or second audio program (SAP), the time and CHANNEL ID. PBPR: 4 When a COMPONENT VIDEO: Y-PBPR Input is connected to VIDEO: 4. ቮ EXIT button When in MENU mode, this button will...
.... ቨ ANTENNA button The ANT button will exit all On-Screen Displays. 21 Ant A 10 Ant B 28 ANT ቩ VID1 ~ VID5 buttons When the remote control is displayed when you wish to check the channel being received, the picture source, if the channel has stereo (ST) or second audio program (SAP), the time and CHANNEL ID. PBPR: 4 When a COMPONENT VIDEO: Y-PBPR Input is connected to VIDEO: 4. ቮ EXIT button When in MENU mode, this button will...
Owners Guide
Page 23
... CONVERTER S-VIDEO S-VIDEO S-VIDEO ANT B AUDIO TO HI-FI R L VIDEO VIDEO Y/VIDEO Y/VIDEO VIDEO (MONO) (MONO) L L R R AUDIO AUDIO INPUT 1 INPUT 2 PB (MONO) L PR R AUDIO INPUT 4 PB (MONO) L L PR R AUDIO R AUDIO INPUT 5 MONITOR OUT ባ ቢ POWER TV CBL/SAT DVD/VCR SWAP PIP MODE PIP FREEZE HELP PIP CH MENU ቤ ብ,ቦ SELECT VCR Hitachi Model or Similar Model MUTE EXIT LAST CH Use above connection to view antenna inputs on the remote. When the lower channel display is highlighted, channel tuning is for the PIP sub-picture. ANT...
... CONVERTER S-VIDEO S-VIDEO S-VIDEO ANT B AUDIO TO HI-FI R L VIDEO VIDEO Y/VIDEO Y/VIDEO VIDEO (MONO) (MONO) L L R R AUDIO AUDIO INPUT 1 INPUT 2 PB (MONO) L PR R AUDIO INPUT 4 PB (MONO) L L PR R AUDIO R AUDIO INPUT 5 MONITOR OUT ባ ቢ POWER TV CBL/SAT DVD/VCR SWAP PIP MODE PIP FREEZE HELP PIP CH MENU ቤ ብ,ቦ SELECT VCR Hitachi Model or Similar Model MUTE EXIT LAST CH Use above connection to view antenna inputs on the remote. When the lower channel display is highlighted, channel tuning is for the PIP sub-picture. ANT...
Owners Guide
Page 31
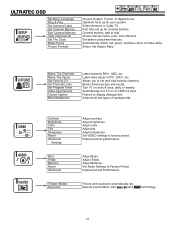
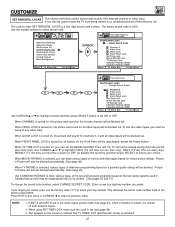
... Set Program Timer Video Input Sensor Closed Caption Menu Background Label channels PAY1, ABC, etc. Adjust color. Label video inputs VCR1, DVD1, etc. VIDEO AUDIO THEATER Contrast Brightness Color Tint Sharpness Reset Advanced Settings Bass Treble Balance Reset Advanced Theater Modes Surround Adjust contrast. Adjust sharpness. Optimum hook up for your system. Check channel name, scan, and child lock. Feature to Factory Preset. ULTRATEC OSD SETUP Set Menu Language Plug & Play Set Antenna/Cable Set Channel Memory Edit Channel Memory View Channel List Set The Clock Magic Focus Picture...
... Set Program Timer Video Input Sensor Closed Caption Menu Background Label channels PAY1, ABC, etc. Adjust color. Label video inputs VCR1, DVD1, etc. VIDEO AUDIO THEATER Contrast Brightness Color Tint Sharpness Reset Advanced Settings Bass Treble Balance Reset Advanced Theater Modes Surround Adjust contrast. Adjust sharpness. Optimum hook up for your system. Check channel name, scan, and child lock. Feature to Factory Preset. ULTRATEC OSD SETUP Set Menu Language Plug & Play Set Antenna/Cable Set Channel Memory Edit Channel Memory View Channel List Set The Clock Magic Focus Picture...
Owners Guide
Page 33
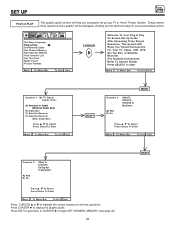
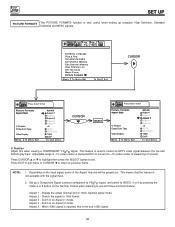
... AUDIO THEATER Set Menu Language Plug & Play Set Antenna/Cable Set Channel Memory Edit Channel Memory View Channel List Set The Clock Magic Focus Picture Formats M e n u To M e n u B a r To E x i t Q u i t CURSOR Welcome To Your Plug & Play On Screen Set Up Guide. Press EXIT to quit menu or CURSOR ̈ to display the graphic guide. Simply answer three questions and a graphic will help you the optimum setup for your TV or Home Theater System. I Want To Connect A Set...
... AUDIO THEATER Set Menu Language Plug & Play Set Antenna/Cable Set Channel Memory Edit Channel Memory View Channel List Set The Clock Magic Focus Picture Formats M e n u To M e n u B a r To E x i t Q u i t CURSOR Welcome To Your Plug & Play On Screen Set Up Guide. Press EXIT to quit menu or CURSOR ̈ to display the graphic guide. Simply answer three questions and a graphic will help you the optimum setup for your TV or Home Theater System. I Want To Connect A Set...
Owners Guide
Page 35
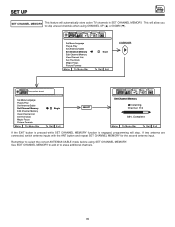
... SET CHANNEL MEMORY function is engaged, programming will stop. SETUP CUSTOMIZE VIDEO SEL AUDIO THEATER Set Menu Language Plug & Play Set Antenna/Cable Set Channel Memory Edit Channel Memory View Channel List Set The Clock Magic Focus Picture Formats M e n u To M e n u B a r Begin To Q u i t E x i t CURSOR SETUP SEL Press select to erase additional channels. 35 SETUP SET UP SET CHANNEL MEMORY This feature will allow you to select the correct ANTENNA/CABLE mode before using CHANNEL UP (̆) or DOWN (̄). If two antenna are connected, switch antenna inputs...
... SET CHANNEL MEMORY function is engaged, programming will stop. SETUP CUSTOMIZE VIDEO SEL AUDIO THEATER Set Menu Language Plug & Play Set Antenna/Cable Set Channel Memory Edit Channel Memory View Channel List Set The Clock Magic Focus Picture Formats M e n u To M e n u B a r Begin To Q u i t E x i t CURSOR SETUP SEL Press select to erase additional channels. 35 SETUP SET UP SET CHANNEL MEMORY This feature will allow you to select the correct ANTENNA/CABLE mode before using CHANNEL UP (̆) or DOWN (̄). If two antenna are connected, switch antenna inputs...
Owners Guide
Page 36
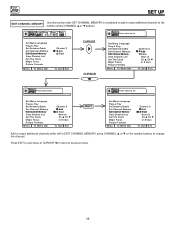
Press EXIT to quit menu or CURSOR ̇ to return to change the channel. SETUP CUSTOMIZE VIDEO SEL AUDIO THEATER SETUP SEL Press select to set Set Menu Language Plug & Play Set Antenna/Cable Set Channel Memory Edit Channel Memory View Channel List Set The Clock Magic Focus Picture Formats M e n u To M e n u B a r Channel 3 Add Erase To Q u i t E x i t CURSOR CURSOR Set Menu Language Plug & Play Set Antenna/Cable Set Channel Memory Edit Channel Memory View Channel List Set The Clock Magic Focus Picture Formats M e n u To M e n u B a r Channel 3 Add Erase Next ch Ch ̆...
Press EXIT to quit menu or CURSOR ̇ to return to change the channel. SETUP CUSTOMIZE VIDEO SEL AUDIO THEATER SETUP SEL Press select to set Set Menu Language Plug & Play Set Antenna/Cable Set Channel Memory Edit Channel Memory View Channel List Set The Clock Magic Focus Picture Formats M e n u To M e n u B a r Channel 3 Add Erase To Q u i t E x i t CURSOR CURSOR Set Menu Language Plug & Play Set Antenna/Cable Set Channel Memory Edit Channel Memory View Channel List Set The Clock Magic Focus Picture Formats M e n u To M e n u B a r Channel 3 Add Erase Next ch Ch ̆...
Owners Guide
Page 40
.... SETUP SET UP PICTURE FORMATS The PICTURE FORMATS function is used to center an HDTV video signal between the top and bottom gray bars. Aspect 5 - This feature is very useful when setting up a Component Signal (connect component to Y-PBPR inputs) and switch to set. SETUP CUSTOMIZE VIDEO SEL AUDIO THEATER Set Menu Language Plug & Play Set Antenna/Cable Set Channel Memory Edit Channel Memory View Channel List Set The Clock Magic Focus Picture Formats M e n u To M e n u B a r To Q u i t E x i t CURSOR SETUP Press Select To Set SEL Picture Formats Aspect Style...
.... SETUP SET UP PICTURE FORMATS The PICTURE FORMATS function is used to center an HDTV video signal between the top and bottom gray bars. Aspect 5 - This feature is very useful when setting up a Component Signal (connect component to Y-PBPR inputs) and switch to set. SETUP CUSTOMIZE VIDEO SEL AUDIO THEATER Set Menu Language Plug & Play Set Antenna/Cable Set Channel Memory Edit Channel Memory View Channel List Set The Clock Magic Focus Picture Formats M e n u To M e n u B a r To Q u i t E x i t CURSOR SETUP Press Select To Set SEL Picture Formats Aspect Style...
Owners Guide
Page 42
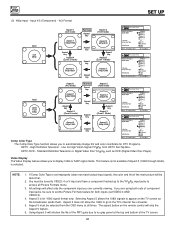
... mode) is set VIDEO:4 AND VIDEO:5). 4. Use for 1080i signal format only. Aspect 5 is for High Vision Signal Y-PBPR from the OSD menu at the top and bottom of the TV screen. 42 The aspect button on the TV screen as DVD (Digital Video Disc Player). Position Comp Color Type Video Display M e n u To M e n u B a r Y-PBPR: 4 Aspect 1 Aspect 2 Aspect 3 Aspect 4 Aspect 5 +5 HDTV SDTV/DVD 1080i 540P To Q u i t E x i t SETUP Press Select To Set SEL Picture Formats Aspect Style V. Aspect 5 must be sure to the TV's internal flex converter. 5. SETUP SET UP (3) 480p Input...
... mode) is set VIDEO:4 AND VIDEO:5). 4. Use for 1080i signal format only. Aspect 5 is for High Vision Signal Y-PBPR from the OSD menu at the top and bottom of the TV screen. 42 The aspect button on the TV screen as DVD (Digital Video Disc Player). Position Comp Color Type Video Display M e n u To M e n u B a r Y-PBPR: 4 Aspect 1 Aspect 2 Aspect 3 Aspect 4 Aspect 5 +5 HDTV SDTV/DVD 1080i 540P To Q u i t E x i t SETUP Press Select To Set SEL Picture Formats Aspect Style V. Aspect 5 must be sure to the TV's internal flex converter. 5. SETUP SET UP (3) 480p Input...
Owners Guide
Page 47
... and television programs based on , the picture and sound for channels 3, 4 and all video inputs will be blocked out. When FRONT PANEL LOCK is selected, various types of the selected channel or video input. SETUP CUSTOMIZE VIDEO SEL AUDIO THEATER CUSTOMIZE Use number buttons to its content. (See pages 50 and 51) To change the secret code number, select CHANGE SECRET CODE. Set Parental Locks Set Program Timer Video Input Sensor Closed Caption Menu Background Menu To Menu Bar To Quit Exit CURSOR Set Parental Locks - - - - If...
... and television programs based on , the picture and sound for channels 3, 4 and all video inputs will be blocked out. When FRONT PANEL LOCK is selected, various types of the selected channel or video input. SETUP CUSTOMIZE VIDEO SEL AUDIO THEATER CUSTOMIZE Use number buttons to its content. (See pages 50 and 51) To change the secret code number, select CHANGE SECRET CODE. Set Parental Locks Set Program Timer Video Input Sensor Closed Caption Menu Background Menu To Menu Bar To Quit Exit CURSOR Set Parental Locks - - - - If...
Owners Guide
Page 49
... dialogue. If the option of blocking "NR" programs (non-rated, not applicable and none) per FCC Rules Section 15.120(e)(2). SETUP CUSTOMIZE VIDEO SEL AUDIO THEATER CURSOR Set Parental Lock **** Change Secret Code Channel 3 Video Lock Quick Lock Front Panel Lock Set Time Lock Mo v ie R a tin g s Lock TV Ratings Lock Canadian Ratings (Eng) Canadian Ratings (Frn) CURSOR Menu To Menu Bar To Quit Exit Use CURSOR ̆ or ̄ to highlight the...
... dialogue. If the option of blocking "NR" programs (non-rated, not applicable and none) per FCC Rules Section 15.120(e)(2). SETUP CUSTOMIZE VIDEO SEL AUDIO THEATER CURSOR Set Parental Lock **** Change Secret Code Channel 3 Video Lock Quick Lock Front Panel Lock Set Time Lock Mo v ie R a tin g s Lock TV Ratings Lock Canadian Ratings (Eng) Canadian Ratings (Frn) CURSOR Menu To Menu Bar To Quit Exit Use CURSOR ̆ or ̄ to highlight the...
Owners Guide
Page 51
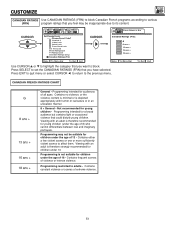
Change Secret Code? Channel 3 Video Lock Quick Lock Front Panel Lock Set Time Lock Mo v ie R a tin g s Lock TV Ratings Lock Canadian Ratings (Eng) Canadian Ratings (Frn) CURSOR Canadian Ratings (Frn): VIEW G VIEW 8 ans + VIEW 13 ans + VIEW 16 ans + VIEW 18 ans + Menu To Menu Bar To Quit Exit Menu To Menu Bar To Quit Exit Use CURSOR ̆ or ̄ to highlight the category that could disturb young children. Programming intended for a broad audience...
Change Secret Code? Channel 3 Video Lock Quick Lock Front Panel Lock Set Time Lock Mo v ie R a tin g s Lock TV Ratings Lock Canadian Ratings (Eng) Canadian Ratings (Frn) CURSOR Canadian Ratings (Frn): VIEW G VIEW 8 ans + VIEW 13 ans + VIEW 16 ans + VIEW 18 ans + Menu To Menu Bar To Quit Exit Menu To Menu Bar To Quit Exit Use CURSOR ̆ or ̄ to highlight the category that could disturb young children. Programming intended for a broad audience...
Owners Guide
Page 53
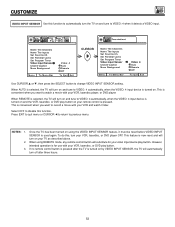
... Inputs Set Favorite Ch. Select OFF to previous menu. Set Parental Locks Set Program Timer Video Input Sensor Closed Caption Menu Background Menu To Menu Bar Video: 4 Auto Remote Off To Quit Exit Use CURSOR ̆ or ̄, then press the SELECT button to watch it later. This feature is now reset and will automatically turn off after the TV is for your remote control is turned on. This is convenient when you want to change VIDEO INPUT SENSOR setting...
... Inputs Set Favorite Ch. Select OFF to previous menu. Set Parental Locks Set Program Timer Video Input Sensor Closed Caption Menu Background Menu To Menu Bar Video: 4 Auto Remote Off To Quit Exit Use CURSOR ̆ or ̄, then press the SELECT button to watch it later. This feature is now reset and will automatically turn off after the TV is for your remote control is turned on. This is convenient when you want to change VIDEO INPUT SENSOR setting...
Owners Guide
Page 56
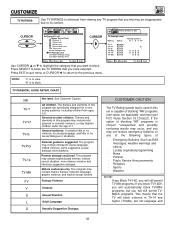
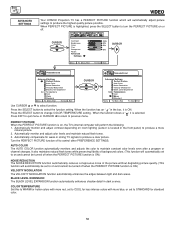
... set VIDEO SEL Press select to set to COOL for weak or strong TV signals to previous menu. When PERFECT PICTURE is ON.) NOISE REDUCTION The NOISE REDUCTION function automatically reduces conspicuous noise in the front panel) to change COLOR TEMPERATURE setting. PERFECT PICTURE When the PERFECT PICTURE function is ON. COLOR TEMPERATURE Set this to WARM for standard color. 56 VIDEO ADVANCED SETTINGS VIDEO Your HITACHI Projection TV has a PERFECT PICTURE function which will automatically adjust picture settings to control...
... set VIDEO SEL Press select to set to COOL for weak or strong TV signals to previous menu. When PERFECT PICTURE is ON.) NOISE REDUCTION The NOISE REDUCTION function automatically reduces conspicuous noise in the front panel) to change COLOR TEMPERATURE setting. PERFECT PICTURE When the PERFECT PICTURE function is ON. COLOR TEMPERATURE Set this to WARM for standard color. 56 VIDEO ADVANCED SETTINGS VIDEO Your HITACHI Projection TV has a PERFECT PICTURE function which will automatically adjust picture settings to control...
Owners Guide
Page 64
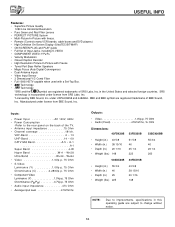
... PICTURE System • Mulit-Picture-In-Picture with freeze. • Remote (Controls many VCR brands, cable boxes and DVD players.) • High Definition On-Screen Display (UltraTEC BIT-MAP) • ON SCREEN PLUG and PLAY guide • Full Set of Input Jacks, including S-VIDEO • COMPONENT VIDEO: Y-PB/PR • Velocity Modulation • Closed Caption Decoder • High Resolution Picture-In-Picture with Freeze • Tuned Port Bass Reflex Speakers • Magic Focus (Auto Digital Convergence) • Dual Antenna Inputs • Video Input...
... PICTURE System • Mulit-Picture-In-Picture with freeze. • Remote (Controls many VCR brands, cable boxes and DVD players.) • High Definition On-Screen Display (UltraTEC BIT-MAP) • ON SCREEN PLUG and PLAY guide • Full Set of Input Jacks, including S-VIDEO • COMPONENT VIDEO: Y-PB/PR • Velocity Modulation • Closed Caption Decoder • High Resolution Picture-In-Picture with Freeze • Tuned Port Bass Reflex Speakers • Magic Focus (Auto Digital Convergence) • Dual Antenna Inputs • Video Input...


