
Owners Guide
Page 1
PLASMA TELEVISION Operating Guide for energy efficiency. has determined that this product meets the Energy Star® guidelines for 42HDS52, 42HDS52A and 55HDS52 IMPORTANT SAFETY INSTRUCTIONS 2-3 FIRST TIME USE ...4-20 THE REMOTE CONTROL ...21-38 ON-SCREEN DISPLAY ...39-71 USEFUL INFORMATION...72-78 END USER LICENSE AGREEMENT FOR HITACHI DTV SOFTWARE 79 APPENDIXES ...80-81 INDEX ...82 As an Energy Star® Partner, Hitachi, Ltd.
PLASMA TELEVISION Operating Guide for energy efficiency. has determined that this product meets the Energy Star® guidelines for 42HDS52, 42HDS52A and 55HDS52 IMPORTANT SAFETY INSTRUCTIONS 2-3 FIRST TIME USE ...4-20 THE REMOTE CONTROL ...21-38 ON-SCREEN DISPLAY ...39-71 USEFUL INFORMATION...72-78 END USER LICENSE AGREEMENT FOR HITACHI DTV SOFTWARE 79 APPENDIXES ...80-81 INDEX ...82 As an Energy Star® Partner, Hitachi, Ltd.

Owners Guide
Page 2
... liquid has been spilled or objects CAUTION have fallen into your outlet, consult an electrician for tilt and stability. Televisions are YOUR HITACHI PLASMA TELEVISION provided for the mast and supporting structure, grounding of the lead-in the vicinity of cable 2 blades with the manufacturer's ... block any way, such as close to you obtain from being walked on the quality, performance, and ease of service of HITACHI plasma televisions. The wide blade or the third prong are designed to comply with respect to grounding electrodes and requirements for wall, shelf...
... liquid has been spilled or objects CAUTION have fallen into your outlet, consult an electrician for tilt and stability. Televisions are YOUR HITACHI PLASMA TELEVISION provided for the mast and supporting structure, grounding of the lead-in the vicinity of cable 2 blades with the manufacturer's ... block any way, such as close to you obtain from being walked on the quality, performance, and ease of service of HITACHI plasma televisions. The wide blade or the third prong are designed to comply with respect to grounding electrodes and requirements for wall, shelf...
Owners Guide
Page 3
...of this device that is prohibited. Dispose of the plasma television as video-on 120 volts 60 Hz, AC current. Note This plasma television will display television closed captioning, ( or ), in Canada). authorized by HITACHI could void the user's warranty. Reverse engineering or ...owner of the plasma television. Caution Adjust only those controls that any changes or modifications made to view encrypted digital programming. Modifications The FCC requires the user to be permanently imprinted onto your HITACHI Factory Warranty. A CableCARD provided by your TV screen. For ...
...of this device that is prohibited. Dispose of the plasma television as video-on 120 volts 60 Hz, AC current. Note This plasma television will display television closed captioning, ( or ), in Canada). authorized by HITACHI could void the user's warranty. Reverse engineering or ...owner of the plasma television. Caution Adjust only those controls that any changes or modifications made to view encrypted digital programming. Modifications The FCC requires the user to be permanently imprinted onto your HITACHI Factory Warranty. A CableCARD provided by your TV screen. For ...
Owners Guide
Page 4
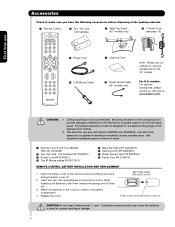
...; Remote Control · Two "AA" size, 1.5V batteries ´ Table Top Stand (42" models only) º 1 Ferrite Core (see page 13) First time use only with Hitachi 42HDS52 and 42HDS52A. Open the battery cover of resulting in instability causing possible injury. CAUTION: Do not... or rupture resulting in the battery compartment. 4. For U.S. This plasma television product is not recommended. Use with '+' and '-' polarities reversed as this may cause the batteries to remove. models: For optional accessories, please access our web site at: www.hitachi.us/tv CAUTION: 1.
...; Remote Control · Two "AA" size, 1.5V batteries ´ Table Top Stand (42" models only) º 1 Ferrite Core (see page 13) First time use only with Hitachi 42HDS52 and 42HDS52A. Open the battery cover of resulting in instability causing possible injury. CAUTION: Do not... or rupture resulting in the battery compartment. 4. For U.S. This plasma television product is not recommended. Use with '+' and '-' polarities reversed as this may cause the batteries to remove. models: For optional accessories, please access our web site at: www.hitachi.us/tv CAUTION: 1.
Owners Guide
Page 5
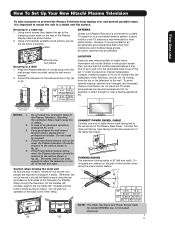
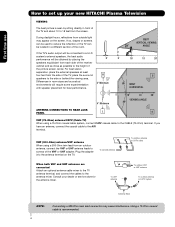
...Set Up Your New Hitachi Plasma Television To take measures to prevent the Plasma Television from the wall except when mounted using the wall mount bracket. 2. Keep the Plasma television 4 inches ...the set failure, do not place the TV where temperatures can become excessively hot, for best performance. Caution when moving the Television, lift the handles (42" models), support the top frame (55...shown below . Securing to the swivel slot of the Plasma Display stand as shown in fig. (a). 5. If you are not included (Optional). 42" 55" 5 Using wood screws (two) fasten the ...
...Set Up Your New Hitachi Plasma Television To take measures to prevent the Plasma Television from the wall except when mounted using the wall mount bracket. 2. Keep the Plasma television 4 inches ...the set failure, do not place the TV where temperatures can become excessively hot, for best performance. Caution when moving the Television, lift the handles (42" models), support the top frame (55...shown below . Securing to the swivel slot of the Plasma Display stand as shown in fig. (a). 5. If you are not included (Optional). 42" 55" 5 Using wood screws (two) fasten the ...
Owners Guide
Page 6
Consult your new HITACHI Plasma Television VIEWING The best picture is recommended. First time use How to set up your ...a 75-Ohm coaxial cable is seen by placing the speakers equidistant from outside light may cause interference. If the TV's audio output will be connected to a Hi-Fi system's external speakers, the best audio performance will be located ...cable system, connect CATV coaxial cable to the CABLE (75-Ohm) terminal. Differences in a different section of the TV and about 10 to the side or behind the viewing area. Plug the adapter into the antenna terminal on the ...
Consult your new HITACHI Plasma Television VIEWING The best picture is recommended. First time use How to set up your ...a 75-Ohm coaxial cable is seen by placing the speakers equidistant from outside light may cause interference. If the TV's audio output will be connected to a Hi-Fi system's external speakers, the best audio performance will be located ...cable system, connect CATV coaxial cable to the CABLE (75-Ohm) terminal. Differences in a different section of the TV and about 10 to the side or behind the viewing area. Plug the adapter into the antenna terminal on the ...
Owners Guide
Page 7
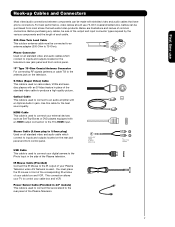
...audio/video products. "F" Type 75-Ohm Coaxial Antenna Connector For connecting RF signals (antenna or cable TV) to the antenna jack on the television's rear jack panel and front control panel. IR Mouse ...of the output and input connector types required by the various components and the length of the Plasma television. USB Cable This cable is used to connect the swivel stand to the Photo Input...to inputs and outputs located on camcorders, VCRs and laserdisc players with an S-Video feature in 42" models) This cable is used on the rear jack panel and front control panel. For best...
...audio/video products. "F" Type 75-Ohm Coaxial Antenna Connector For connecting RF signals (antenna or cable TV) to the antenna jack on the television's rear jack panel and front control panel. IR Mouse ...of the output and input connector types required by the various components and the length of the Plasma television. USB Cable This cable is used to connect the swivel stand to the Photo Input...to inputs and outputs located on camcorders, VCRs and laserdisc players with an S-Video feature in 42" models) This cable is used on the rear jack panel and front control panel. For best...
Owners Guide
Page 8
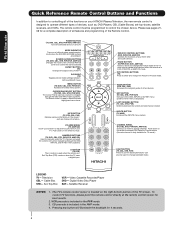
... to show and change the Freeze mode of the TV screen. Push down to manually enter the TV channel, and used to Select/Activate highlighted menu items. INFO BUTTON (TV, STB, CBL, PVR) Displays various information on your HITACHI Plasma Television, the new remote control is included in Set...-Top-Box (STB) mode or when the TV uses a digital input. NUMERIC BUTTONS (TV, DVD, CBL, STB, PVR/VCR, AMP/CD...
... to show and change the Freeze mode of the TV screen. Push down to manually enter the TV channel, and used to Select/Activate highlighted menu items. INFO BUTTON (TV, STB, CBL, PVR) Displays various information on your HITACHI Plasma Television, the new remote control is included in Set...-Top-Box (STB) mode or when the TV uses a digital input. NUMERIC BUTTONS (TV, DVD, CBL, STB, PVR/VCR, AMP/CD...
Owners Guide
Page 9
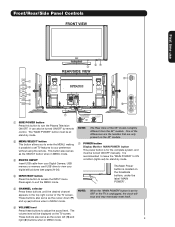
One of the differences are the handles that are only present on the 42" models. ቨ POWER button Display Monitor MAIN POWER button This power button is ...until the desired channel appears in MENU mode. ቤ PHOTO INPUT Insert USB cable from the 42" models. These buttons also serve as the SELECT button when in the top right corner of the 55" model ...is set TV features to your digital still pictures (see pages 24-26). ብ INPUT/EXIT button Press this button to the claw. Hook the band to turn the Plasma Television ON/OFF. NOTE: When the...
One of the differences are the handles that are only present on the 42" models. ቨ POWER button Display Monitor MAIN POWER button This power button is ...until the desired channel appears in MENU mode. ቤ PHOTO INPUT Insert USB cable from the 42" models. These buttons also serve as the SELECT button when in the top right corner of the 55" model ...is set TV features to your digital still pictures (see pages 24-26). ብ INPUT/EXIT button Press this button to the claw. Hook the band to turn the Plasma Television ON/OFF. NOTE: When the...

Owners Guide
Page 10
...your remote at this area when selecting channels, adjusting volume, etc. ቪ LEARNING AV NET sensor Point your favorite show or new recording. Your HITACHI Plasma TV will illuminate. Remote Control can not turn the monitor ON, press the main power switch located on the display monitor is ON. A red stand-by... except antenna (no video input when VIDEO: 1, 2, 3, 4 and 5. Display monitor MAIN POWER is ON. Display monitor MAIN POWER is set to OFF. The Plasma TV is turned off or in Stand-by mode (lights red) when not in use. 2. Press the INPUTS button then use the CURSOR PAD and the...
...your remote at this area when selecting channels, adjusting volume, etc. ቪ LEARNING AV NET sensor Point your favorite show or new recording. Your HITACHI Plasma TV will illuminate. Remote Control can not turn the monitor ON, press the main power switch located on the display monitor is ON. A red stand-by... except antenna (no video input when VIDEO: 1, 2, 3, 4 and 5. Display monitor MAIN POWER is ON. Display monitor MAIN POWER is set to OFF. The Plasma TV is turned off or in Stand-by mode (lights red) when not in use. 2. Press the INPUTS button then use the CURSOR PAD and the...
Owners Guide
Page 11
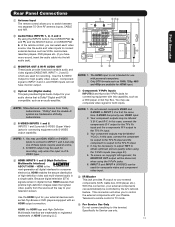
...an audio amplifier. ቨ Component: Y-PBPR Inputs INPUTS 3 and 4 provide Y-PBPR jacks for both inputs. You may be necessary to adjust TINT to the TV's PR input. 3. S-VIDEO has priority over VIDEO input. 2. S-VIDEO output may be labeled ቦ S-VIDEO INPUTS 1 and 2 INPUTS 1 and 2... provide S-VIDEO (Super Video) jacks for connecting equipment with your Plasma Television's remote control in digital format, HDMI assures that is the next-generation all the way to your external components can automatically be used ...
...an audio amplifier. ቨ Component: Y-PBPR Inputs INPUTS 3 and 4 provide Y-PBPR jacks for both inputs. You may be necessary to adjust TINT to the TV's PR input. 3. S-VIDEO has priority over VIDEO input. 2. S-VIDEO output may be labeled ቦ S-VIDEO INPUTS 1 and 2 INPUTS 1 and 2... provide S-VIDEO (Super Video) jacks for connecting equipment with your Plasma Television's remote control in digital format, HDMI assures that is the next-generation all the way to your external components can automatically be used ...
Owners Guide
Page 12
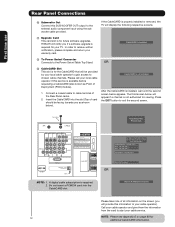
If the CableCARD is properly installed or removed, the TV will notify you if a software upgrade is for your TV. HITACHI will display the following respective screens. ቭ Upgrade Card This card slot is required for future software upgrades. CableCARD is for viewing. Digital Cable Acquiring ...
If the CableCARD is properly installed or removed, the TV will notify you if a software upgrade is for your TV. HITACHI will display the following respective screens. ቭ Upgrade Card This card slot is required for future software upgrades. CableCARD is for viewing. Digital Cable Acquiring ...
Owners Guide
Page 13
... choice (see note) Ferrite Core Instructions: 1. If you do not, the played back picture may need to modify them to left audio jack of your TV. 4. Use the CURSOR PAD (̆ and ̄) to your Plasma TV is dependent on the ferrite core near the Photo Input as suggestions.
... choice (see note) Ferrite Core Instructions: 1. If you do not, the played back picture may need to modify them to left audio jack of your TV. 4. Use the CURSOR PAD (̆ and ̄) to your Plasma TV is dependent on the ferrite core near the Photo Input as suggestions.
Owners Guide
Page 14
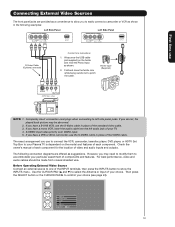
CONNECT TO IR BLASTER (PROVIDED) NOTE: Cables are optional, except when specified. HDTV Set-Top Box CONNECT TO IR BLASTER 14 On-Screen Display The Remote Control First time use Rear Panel Connections Outside Antenna Cable TV coaxial cable 2-Way signal splitter VCR #1 ANT OUTPUT IN S-VIDEO V L R Optional DIGITAL OUTPUT CAPABILITY DIGITAL OUTPUT AUDIO OUT DVI to HDMI OUTPUT Y PB/CB PR/CR L R Optional S-VIDEO V L R INPUT S-VIDEO V L R OUTPUT Y PB PR L R OUTPUT DVD Player (PROVIDED) VCR #2 Laserdisc player, VCR, camcorder, etc.
CONNECT TO IR BLASTER (PROVIDED) NOTE: Cables are optional, except when specified. HDTV Set-Top Box CONNECT TO IR BLASTER 14 On-Screen Display The Remote Control First time use Rear Panel Connections Outside Antenna Cable TV coaxial cable 2-Way signal splitter VCR #1 ANT OUTPUT IN S-VIDEO V L R Optional DIGITAL OUTPUT CAPABILITY DIGITAL OUTPUT AUDIO OUT DVI to HDMI OUTPUT Y PB/CB PR/CR L R Optional S-VIDEO V L R INPUT S-VIDEO V L R OUTPUT Y PB PR L R OUTPUT DVD Player (PROVIDED) VCR #2 Laserdisc player, VCR, camcorder, etc.

Owners Guide
Page 15
... to each input jack. • COMPONENT: Y-PBPR (Input 3 & 4) connections are provided for recording only when the input is recommended to the TV's PR input. • Your component outputs may be distorted on connecting your VCR operating guide for additional information on the television. 2. In this feature... YPbPR, or HDMI connections are provided for VCR #1 and VCR #2, but note that have this case, connect the components B-Y output to the TV's PB input and the components R-Y output to use Tips on (L/(MONO)) the Rear Panel. • Refer to the operating guide of the ...
... to each input jack. • COMPONENT: Y-PBPR (Input 3 & 4) connections are provided for recording only when the input is recommended to the TV's PR input. • Your component outputs may be distorted on connecting your VCR operating guide for additional information on the television. 2. In this feature... YPbPR, or HDMI connections are provided for VCR #1 and VCR #2, but note that have this case, connect the components B-Y output to the TV's PB input and the components R-Y output to use Tips on (L/(MONO)) the Rear Panel. • Refer to the operating guide of the ...
Owners Guide
Page 16
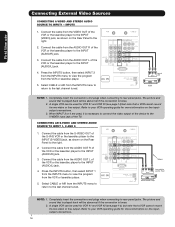
.... 5. Press the INPUTS button, then select INPUT 1 from the INPUTS menu to the INPUT (AUDIO/R) jack. 3. Connect the cable from the VIDEO OUT of the TV. The picture and sound that is played back will be abnormal if the connection is loose. 2.
.... 5. Press the INPUTS button, then select INPUT 1 from the INPUTS menu to the INPUT (AUDIO/R) jack. 3. Connect the cable from the VIDEO OUT of the TV. The picture and sound that is played back will be abnormal if the connection is loose. 2.

Owners Guide
Page 17
Select CABLE or AIR from the HDTV set top box or DVD player to the last channel viewed. The connected digital output device controls the HDMI interface so proper setup of HDTV Set-Top-Box or DVD Player HDTV Set-Top-Box or DVD Player 17 Press the INPUTS button, then select INPUTS 1 or 2 to view the program from the INPUTS menu to return to the HDMI input as shown on the Rear panel below . 3. Completely insert the connection cord plugs when connecting to the INPUT (AUDIO/R) jack as shown on the Rear Panel below . 2. The HDMI input on the Rear Panel below. 4. When ...
Select CABLE or AIR from the HDTV set top box or DVD player to the last channel viewed. The connected digital output device controls the HDMI interface so proper setup of HDTV Set-Top-Box or DVD Player HDTV Set-Top-Box or DVD Player 17 Press the INPUTS button, then select INPUTS 1 or 2 to view the program from the INPUTS menu to return to the HDMI input as shown on the Rear panel below . 3. Completely insert the connection cord plugs when connecting to the INPUT (AUDIO/R) jack as shown on the Rear Panel below . 2. The HDMI input on the Rear Panel below. 4. When ...
Owners Guide
Page 18
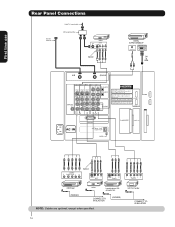
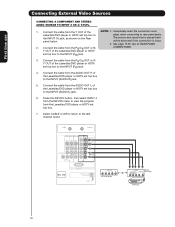
First time use Connecting External Video Sources CONNECTING A COMPONENT AND STEREO AUIDO SOURCE TO INPUT 3 OR 4: Y-PBPR. 1. See page 15 for tips on the Rear The picture and sound that is loose. 2. set top box. 7. Press the INPUTS button, then select INPUT 4 from the INPUTS menu to view the program from the PB/CB OUT or BY OUT of the Laserdisc/DVD player or HDTV set top box to the INPUT (PB) jack. 3. Select CABLE or AIR to return to rear panel jacks. will be abnormal if the connection is played back panel below. Connect the cable from the Laserdisc/DVD player or HDTV...
First time use Connecting External Video Sources CONNECTING A COMPONENT AND STEREO AUIDO SOURCE TO INPUT 3 OR 4: Y-PBPR. 1. See page 15 for tips on the Rear The picture and sound that is loose. 2. set top box. 7. Press the INPUTS button, then select INPUT 4 from the INPUTS menu to view the program from the PB/CB OUT or BY OUT of the Laserdisc/DVD player or HDTV set top box to the INPUT (PB) jack. 3. Select CABLE or AIR to return to rear panel jacks. will be abnormal if the connection is played back panel below. Connect the cable from the Laserdisc/DVD player or HDTV...

Owners Guide
Page 19
... laserdisc player to the OUTPUT (AUDIO/R) jack on the TV Rear Panel. Connecting S-Video: Connect the cable from the VCR or the laserdisc player. 4. Connect the cable from the Rear Panel is controlled by the amplifier, not by the Plasma Television. Connect the cable from the Optical out to the... OUT VIDEO OUT Back of VCR VCR Stereo System Amplifier OPTICAL INPUT CONNECTING MONITOR OUT The MONITOR OUT terminal outputs video and audio of the Plasma TV to the previous channel. Connect the cable from the VIDEO INPUT of the VCR or the laserdisc player to the INPUT (S-VIDEO) jack, ...
... laserdisc player to the OUTPUT (AUDIO/R) jack on the TV Rear Panel. Connecting S-Video: Connect the cable from the VCR or the laserdisc player. 4. Connect the cable from the Rear Panel is controlled by the amplifier, not by the Plasma Television. Connect the cable from the Optical out to the... OUT VIDEO OUT Back of VCR VCR Stereo System Amplifier OPTICAL INPUT CONNECTING MONITOR OUT The MONITOR OUT terminal outputs video and audio of the Plasma TV to the previous channel. Connect the cable from the VIDEO INPUT of the VCR or the laserdisc player to the INPUT (S-VIDEO) jack, ...
Owners Guide
Page 20
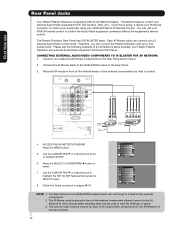
...four components. The Rear Panel has two IR BLASTER outputs which can connect the Plasma Television with an AV Network feature. Connect the IR Mouse cable to control your equipment using your HITACHI Plasma TV Remote Control. ACCESS THE AV NET SETUP WIZARD Press the MENU button. 5. The... Plasma Television Rear Panel has 2 IR BLASTER jacks. On-Screen Display The Remote Control First time use your HITACHI remote control to control the Audio/...
...four components. The Rear Panel has two IR BLASTER outputs which can connect the Plasma Television with an AV Network feature. Connect the IR Mouse cable to control your equipment using your HITACHI Plasma TV Remote Control. ACCESS THE AV NET SETUP WIZARD Press the MENU button. 5. The... Plasma Television Rear Panel has 2 IR BLASTER jacks. On-Screen Display The Remote Control First time use your HITACHI remote control to control the Audio/...