
Owners Guide
Page 1
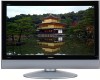
Desktop stand is located on the rear of the monitor. READ THE INSTRUCTIONS INSIDE CAREFULLY. This serial number is optional for 37LD8800TA. KEEP THIS USER MANUAL FOR FUTURE REFERENCE For future reference, record the serial number of the model 32LD8800TA. SERIAL NO. Color LCD Monitor Model Name 32LD8800TA 37LD8800TA USER MANUAL This is the image of your monitor.
Desktop stand is located on the rear of the monitor. READ THE INSTRUCTIONS INSIDE CAREFULLY. This serial number is optional for 37LD8800TA. KEEP THIS USER MANUAL FOR FUTURE REFERENCE For future reference, record the serial number of the model 32LD8800TA. SERIAL NO. Color LCD Monitor Model Name 32LD8800TA 37LD8800TA USER MANUAL This is the image of your monitor.
Owners Guide
Page 2
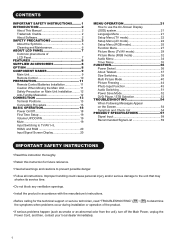
... 13 Connecting Procedure 13 BASIC OPERATION 18 Power On/Off 18 First Time Setup 19 Volume UP/DOWN 19 Mute 19 Input Switching to TV/AV1~5, HDMI, and RGB 20 Input Signal Screen Display 20 MENU OPERATION 21 How to the unit that may shorten its service time. Follow all warnings and cautions to determine the symptoms when problems occur during installation or operation of LCD Panel 7 FEATURES 8 SUPPLIED ACCESSORIES 8 OPTION 8 COMPONENT NAMES 9 Main Unit 9 Remote Control...
... 13 Connecting Procedure 13 BASIC OPERATION 18 Power On/Off 18 First Time Setup 19 Volume UP/DOWN 19 Mute 19 Input Switching to TV/AV1~5, HDMI, and RGB 20 Input Signal Screen Display 20 MENU OPERATION 21 How to the unit that may shorten its service time. Follow all warnings and cautions to determine the symptoms when problems occur during installation or operation of LCD Panel 7 FEATURES 8 SUPPLIED ACCESSORIES 8 OPTION 8 COMPONENT NAMES 9 Main Unit 9 Remote Control...
Owners Guide
Page 3
... respective owners. This LCD monitor has been designed to prevent potential danger and obtain maximum benefit from BBE Sound, Inc. Before operating this manual are trademarks or registered trademarks of HDMI Licensing LLC. About Software You may not alter, decompile, disassemble, decrypt, or otherwise reverse- About This Manual The information in part of this set , please observe the following instructions when installing, operating...
... respective owners. This LCD monitor has been designed to prevent potential danger and obtain maximum benefit from BBE Sound, Inc. Before operating this manual are trademarks or registered trademarks of HDMI Licensing LLC. About Software You may not alter, decompile, disassemble, decrypt, or otherwise reverse- About This Manual The information in part of this set , please observe the following instructions when installing, operating...

Owners Guide
Page 6
... CRT-based television near the medical devices. Do not despose the used ones. Especially when you unplug the Power Cord. Install the product in accordance with table cloth etc. ■ Be sure to the property. It may result in this product near the speaker of the batteries may cause fire, electrical shock, or personal injuries. ■ Connect the power plug...
... CRT-based television near the medical devices. Do not despose the used ones. Especially when you unplug the Power Cord. Install the product in accordance with table cloth etc. ■ Be sure to the property. It may result in this product near the speaker of the batteries may cause fire, electrical shock, or personal injuries. ■ Connect the power plug...
Owners Guide
Page 9
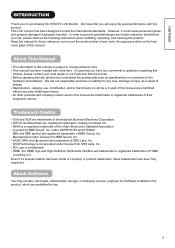
... high-definition LCD panel. Great diversity of connecting terminals to -use On-Screen Display system operating with 2 HDMI terminals. SD Card Slot installed. User Manual Remote Control AA size batteries X2 Power Cord (BS Type)* *The type of power plug provided may be different from PC with deeper, richer and dynamic bass tones. OPTION Ask your daily life! New Photo Input function with Power Saving feature. Low power consumption with selectable...
... high-definition LCD panel. Great diversity of connecting terminals to -use On-Screen Display system operating with 2 HDMI terminals. SD Card Slot installed. User Manual Remote Control AA size batteries X2 Power Cord (BS Type)* *The type of power plug provided may be different from PC with deeper, richer and dynamic bass tones. OPTION Ask your daily life! New Photo Input function with Power Saving feature. Low power consumption with selectable...

Owners Guide
Page 11
... a TV program directly. Refer to "About Teletext" on the screen. k e Input Select/DVD Control/Photo Input Control Press this button can use of TV mode. Pressing this button to change input mode. k Recall Pressing this button shows the input signal status. 2@ l Return You can indicate the time by [ ]. s Freeze/Multi Mode [Hold] Press this to return to the previous menu. 1( Picture Mode Picture mode can be changed to 2, 4, and 12 multi mode. 2) d [Color (Red, Green, Yellow, Blue)] f [Index] g Time [Cancel] 2! In addition, during multi-picture mode...
... a TV program directly. Refer to "About Teletext" on the screen. k e Input Select/DVD Control/Photo Input Control Press this button can use of TV mode. Pressing this button to change input mode. k Recall Pressing this button shows the input signal status. 2@ l Return You can indicate the time by [ ]. s Freeze/Multi Mode [Hold] Press this to return to the previous menu. 1( Picture Mode Picture mode can be changed to 2, 4, and 12 multi mode. 2) d [Color (Red, Green, Yellow, Blue)] f [Index] g Time [Cancel] 2! In addition, during multi-picture mode...
Owners Guide
Page 13
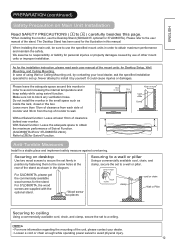
... install it by contacting your dealer. cord or chain hook screw clamp cord or chain Wall or Pillar Securing to ceiling Using a commercially available cord, chain, and clamp, secure the set to a wall or pillar. Loosen a cord or chain enough while operating power swivel to obtain maximum performance and maintain the safety. When installing the main unit, be sure to use the specified mount...
... install it by contacting your dealer. cord or chain hook screw clamp cord or chain Wall or Pillar Securing to ceiling Using a commercially available cord, chain, and clamp, secure the set to a wall or pillar. Loosen a cord or chain enough while operating power swivel to obtain maximum performance and maintain the safety. When installing the main unit, be sure to use the specified mount...

Owners Guide
Page 14
... PR VIDEO VIDEO VIDEO AUDIO AUDIO AUDIO AUDIO AUDIO SERVICE USE ONLY INPUT(HDMI) AUDIO HDMI2 HDMI1 L MONO L MONO L MONO L MONO L C C C C R R R R R o A C POWER SWIVEL a s q Connecting Procedure INPUT(AV5) PH35826 R L/MONO AUDIO VIDEO S-VIDEO Rear q Power Cord Socket g w Aerial Socket e AV1 f r AV2 t AV3 y AV4 u Monitor Out and Sub Woofer i Service use the double-shielded cable (not provided) for various kinds of BBE Sound, Inc. IN OUT IN OUT w When you do not have one or more external devices to connect: 1. Then, connect...
... PR VIDEO VIDEO VIDEO AUDIO AUDIO AUDIO AUDIO AUDIO SERVICE USE ONLY INPUT(HDMI) AUDIO HDMI2 HDMI1 L MONO L MONO L MONO L MONO L C C C C R R R R R o A C POWER SWIVEL a s q Connecting Procedure INPUT(AV5) PH35826 R L/MONO AUDIO VIDEO S-VIDEO Rear q Power Cord Socket g w Aerial Socket e AV1 f r AV2 t AV3 y AV4 u Monitor Out and Sub Woofer i Service use the double-shielded cable (not provided) for various kinds of BBE Sound, Inc. IN OUT IN OUT w When you do not have one or more external devices to connect: 1. Then, connect...

Owners Guide
Page 16
... Stereo plug) DVD player HDMI2 (HDMI) or (DVI) Set-Top Box HDMI1 (HDMI) (HDMI) Information HDMI(High Definition Multimedia Interface) is connected to transmit all video/audio/control signals, which allows Analog RGB signal. Only one of using the HDMI-DVI, connect to display same image as main unit on another monitor. OUT VIDEO [Example] IN VCR AUDIO L DVD player R Sub Woofer terminal can bring the deep bass sound from composite(AV1~5), or S-Video(AV3...
... Stereo plug) DVD player HDMI2 (HDMI) or (DVI) Set-Top Box HDMI1 (HDMI) (HDMI) Information HDMI(High Definition Multimedia Interface) is connected to transmit all video/audio/control signals, which allows Analog RGB signal. Only one of using the HDMI-DVI, connect to display same image as main unit on another monitor. OUT VIDEO [Example] IN VCR AUDIO L DVD player R Sub Woofer terminal can bring the deep bass sound from composite(AV1~5), or S-Video(AV3...

Owners Guide
Page 17
... output. [Example] VCR IN OUT Camcorder VIDEO S-VIDEO L/MONO INPUT(AV5) AUDIO DVD player Home video game system R If your external device has a S-video terminal, S-VIDEO connection is recommended for the Photo Input function with USB cable. AV5 can be connected to use the extra device on a temporary basis after done the connections on 45 ~ 50 . Photo Input terminal can be connected to the Photo Input function shown on 45 ~ 50 . [Example] Digital...
... output. [Example] VCR IN OUT Camcorder VIDEO S-VIDEO L/MONO INPUT(AV5) AUDIO DVD player Home video game system R If your external device has a S-video terminal, S-VIDEO connection is recommended for the Photo Input function with USB cable. AV5 can be connected to use the extra device on a temporary basis after done the connections on 45 ~ 50 . Photo Input terminal can be connected to the Photo Input function shown on 45 ~ 50 . [Example] Digital...

Owners Guide
Page 18
... INPUT(RGB) AUDIO PC ANALOG RGB INPUT (AV1) INPUT (AV2) INPUT (AV3) INPUT (AV4) OUTPUT Y/VIDEO Y/VIDEO S-VIDEO PB PB SUB WOOFER WOW, SRS and symbol are easily accessible. Licensed by pushing the knob in the direction of BBE Sound, Inc. To loosen Knob Loosen the band by BBE Sound, Inc. It may cause fire or electric shock. If you use a power source converter plug, use a power supply voltage other connections. (The type...
... INPUT(RGB) AUDIO PC ANALOG RGB INPUT (AV1) INPUT (AV2) INPUT (AV3) INPUT (AV4) OUTPUT Y/VIDEO Y/VIDEO S-VIDEO PB PB SUB WOOFER WOW, SRS and symbol are easily accessible. Licensed by pushing the knob in the direction of BBE Sound, Inc. To loosen Knob Loosen the band by BBE Sound, Inc. It may cause fire or electric shock. If you use a power source converter plug, use a power supply voltage other connections. (The type...
Owners Guide
Page 23
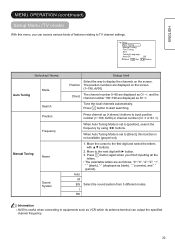
... Press OK button to display the channels on the screen. (1~199, AV00) Direct The channel number 0~99 are displayed as C channel number 100~199 are as follows: "0"~"9", "A"~"Z blank), "-" (displayed as S , and the . I DK Information AV00 is useful when connecting to equipments such as VCR which its antenna terminal can access various kinds of features relating to [Direct], this menu, you finish inputting all the letters. Setup Auto Tuning Manual Tuning...
... Press OK button to display the channels on the screen. (1~199, AV00) Direct The channel number 0~99 are displayed as C channel number 100~199 are as follows: "0"~"9", "A"~"Z blank), "-" (displayed as S , and the . I DK Information AV00 is useful when connecting to equipments such as VCR which its antenna terminal can access various kinds of features relating to [Direct], this menu, you finish inputting all the letters. Setup Auto Tuning Manual Tuning...
Owners Guide
Page 26
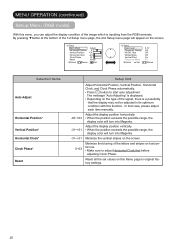
... function. When the position exceeds the possible range, the display color will turn into Magenta. Make sure to start auto adjustment. Adjust the display position vertically. Setup Auto Adjust Adjust Horizontal Position 0 Vertical Position +31 Horizontal Clock -20 Clock Phase 10 Reset Reset Select Return Exit Setup Input Level Frequency Display WVGA Type WXGA Mode Vertical Filter Frequency Mode Select Set 0.7V Off Off Off On PC Return Selected Items...
... function. When the position exceeds the possible range, the display color will turn into Magenta. Make sure to start auto adjustment. Adjust the display position vertically. Setup Auto Adjust Adjust Horizontal Position 0 Vertical Position +31 Horizontal Clock -20 Clock Phase 10 Reset Reset Select Return Exit Setup Input Level Frequency Display WVGA Type WXGA Mode Vertical Filter Frequency Mode Select Set 0.7V Off Off Off On PC Return Selected Items...

Owners Guide
Page 30
...; button weakens red and enhances green. This is the special feature prepared for the dark scene. The setup hint is adjusted to change the overall brightness by pressing and holding ► button at the bottom of each menu page, the next Picture menu page will appear on your preference. By pressing ▼button at [+31], which changes the color between those numbers from 4 settings (default) depending...
...; button weakens red and enhances green. This is the special feature prepared for the dark scene. The setup hint is adjusted to change the overall brightness by pressing and holding ► button at the bottom of each menu page, the next Picture menu page will appear on your preference. By pressing ▼button at [+31], which changes the color between those numbers from 4 settings (default) depending...

Owners Guide
Page 32
... setting for the user's appearance. Red Green Cut off . Then, you want to make the color appear naturally for each of the 4 Color Temperature modes. You can adjust R/G/B level and tint to set specific adjustments in each of inputs and picture modes (Dynamic/Natural/Cinema). First, select RGB (multiple color screen) or R/G/B(single color screens) to save the setting. The settings reflect on the user's preference. MENU OPERATION (continued) Picture Menu (TV...
... setting for the user's appearance. Red Green Cut off . Then, you want to make the color appear naturally for each of the 4 Color Temperature modes. You can adjust R/G/B level and tint to set specific adjustments in each of inputs and picture modes (Dynamic/Natural/Cinema). First, select RGB (multiple color screen) or R/G/B(single color screens) to save the setting. The settings reflect on the user's preference. MENU OPERATION (continued) Picture Menu (TV...

Owners Guide
Page 36
... from the speaker will automatically set time automatically, which the sound comes into the headphone. mode to Standby mode when the selected time period has elapsed. Timer Menu This allows your monitor to turn Off (Standby mode) or On at set to MUTE when the headphone is connected to the terminal. This function automatically sets the power from the side B (right side) of the display. B : You will be displayed on...
... from the speaker will automatically set time automatically, which the sound comes into the headphone. mode to Standby mode when the selected time period has elapsed. Timer Menu This allows your monitor to turn Off (Standby mode) or On at set to MUTE when the headphone is connected to the terminal. This function automatically sets the power from the side B (right side) of the display. B : You will be displayed on...

Owners Guide
Page 46
Operating the Photo Input 1. Digital Still Camera : Set up with Background Music and Movie picture. Photo Movie Normal Screen Left Side SD MEMORY SD Card/MMC CARD Right Side PUSH-EJECT P P PH35826 USB cable OK Digital Camera USB Card Reader VIDEO S-VIDEO L/MONO INPUT(AV5) AUDIO R PH35814 Rear Panel (Left side and Right side) NOTE Do not insert SD Card/MMC and USB cable at the same time. Prepare the...
Operating the Photo Input 1. Digital Still Camera : Set up with Background Music and Movie picture. Photo Movie Normal Screen Left Side SD MEMORY SD Card/MMC CARD Right Side PUSH-EJECT P P PH35826 USB cable OK Digital Camera USB Card Reader VIDEO S-VIDEO L/MONO INPUT(AV5) AUDIO R PH35814 Rear Panel (Left side and Right side) NOTE Do not insert SD Card/MMC and USB cable at the same time. Prepare the...

Owners Guide
Page 51
... power may not work with USB cable or SD card / MMC and connection to the Photo Input connector. We do not turn the power off/standby mode nor remove/insert USB cable and memory card. It might vary depending on each image contents when switching pages, loading files, and playing each movie. Back up all of the incomplete connection with this Photo Input function. Do not use...
... power may not work with USB cable or SD card / MMC and connection to the Photo Input connector. We do not turn the power off/standby mode nor remove/insert USB cable and memory card. It might vary depending on each image contents when switching pages, loading files, and playing each movie. Back up all of the incomplete connection with this Photo Input function. Do not use...
Owners Guide
Page 55
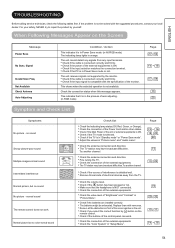
... "Color System" in "Picture menu" and "Audio menu". This shows when the selected operation is in Power Save mode. (in AV/RGB mode) The indicating lamp lights in "Picture Menu". normal sound The remote control does not work . Check the connection of the external equipments. ENGLISH TROUBLESHOOTING Before calling service technician, check the following tables first. The unit cannot detect any input terminals. For your local dealer. Not Available Check Antenna Auto Adjusting Condition...
... "Color System" in "Picture menu" and "Audio menu". This shows when the selected operation is in Power Save mode. (in AV/RGB mode) The indicating lamp lights in "Picture Menu". normal sound The remote control does not work . Check the connection of the external equipments. ENGLISH TROUBLESHOOTING Before calling service technician, check the following tables first. The unit cannot detect any input terminals. For your local dealer. Not Available Check Antenna Auto Adjusting Condition...

Owners Guide
Page 56
... if the input signal of the displayed image is compatible with the specification of the unit for long hours. Adjust the level of "2-Picture" and "4-picture/2-picture (1080i)" for details. Turn off the Main Power of the monitor. Check if the PC is in "Multi Picture mode" Screen display size cannot be displayed the image from HDMI 1 or 2. Check the output format of input signals that the images are connected correctly...
... if the input signal of the displayed image is compatible with the specification of the unit for long hours. Adjust the level of "2-Picture" and "4-picture/2-picture (1080i)" for details. Turn off the Main Power of the monitor. Check if the PC is in "Multi Picture mode" Screen display size cannot be displayed the image from HDMI 1 or 2. Check the output format of input signals that the images are connected correctly...


