User Manual
Page 4
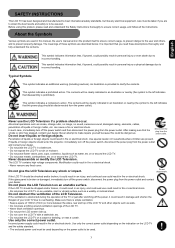
... to meet international safety standards, but like any electrical equipment, care must be used depending on the power outlet to be used in this manual, the user's manual and on the product itself to ensure correct usage, to prevent danger to the user and others, and to prevent property damage. Never use...
... to meet international safety standards, but like any electrical equipment, care must be used depending on the power outlet to be used in this manual, the user's manual and on the product itself to ensure correct usage, to prevent danger to the user and others, and to prevent property damage. Never use...
User Manual
Page 5
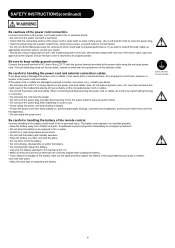
... battery. • Do not recharge, disassemble or solder the battery. • Do not physically impact the battery. • Use only the battery specified in the manual of this could result in handling the power cord and external connection cables. When connecting and disconnecting the power cord or cables, do not place...
... battery. • Do not recharge, disassemble or solder the battery. • Do not physically impact the battery. • Use only the battery specified in the manual of this could result in handling the power cord and external connection cables. When connecting and disconnecting the power cord or cables, do not place...

User Manual
Page 15
Note : It is designed to "ON" condition (lights red) for the complete system, and must be at least 5sec. between Main Power button off then on 120VOLTS 60Hz AC current. REAR PANEL MAIN POWER SWITCH & AC INPUT 32"/37" LCD TV ① AC IN input This TV is required that there should be turned ON/OFF manually. Insert the TV power cord into a 120VOLTS 60Hz outlet. ①-1 Main power button: This power button is recommended to leave the "MAIN POWER" to operate on . 14 It is for stand-by mode.
Note : It is designed to "ON" condition (lights red) for the complete system, and must be at least 5sec. between Main Power button off then on 120VOLTS 60Hz AC current. REAR PANEL MAIN POWER SWITCH & AC INPUT 32"/37" LCD TV ① AC IN input This TV is required that there should be turned ON/OFF manually. Insert the TV power cord into a 120VOLTS 60Hz outlet. ①-1 Main power button: This power button is recommended to leave the "MAIN POWER" to operate on . 14 It is for stand-by mode.
User Manual
Page 19
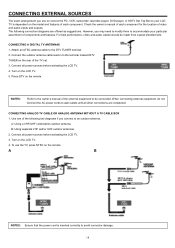
... to avoid connector damage. 18 For best performance, video and audio cables should be connected. Press DTV on the remote. NOTES: Refer to the owner's manual of the external equipment to your particular assortment of video and audio inputs and outputs. B: Using separate VHF and/or UHF outdoor antennas. 2. CONNECTING EXTERNAL... to connect the PC, VCR, camcorder, laserdisc player, DVD player, or HDTV Set Top Box to be made from coaxial shielded wire. Check the owner's manual of each component.
... to avoid connector damage. 18 For best performance, video and audio cables should be connected. Press DTV on the remote. NOTES: Refer to the owner's manual of the external equipment to your particular assortment of video and audio inputs and outputs. B: Using separate VHF and/or UHF outdoor antennas. 2. CONNECTING EXTERNAL... to connect the PC, VCR, camcorder, laserdisc player, DVD player, or HDTV Set Top Box to be made from coaxial shielded wire. Check the owner's manual of each component.

User Manual
Page 32
... swivel function. The OSD indicator will display on and hang from the TV. Adjust swivel by cable tie. ATTENTION • Do not push the panel manually while using the TV wall mounted, be used to meet user's requirement. It could cause a failure of the TV and then tie it with other...
... swivel function. The OSD indicator will display on and hang from the TV. Adjust swivel by cable tie. ATTENTION • Do not push the panel manually while using the TV wall mounted, be used to meet user's requirement. It could cause a failure of the TV and then tie it with other...
User Manual
Page 33
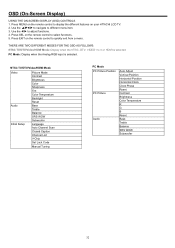
...Press MENU on the remote control to display the different features on the remote control to quickly exit from a menu. Press EXIT on your HITACHI LCD TV. 2. THERE ARE TWO DIFFERENT MODES FOR THE OSD AS FOLLOWS: NTSC TV/DTV/Video/HDMI Mode: Display when the NTSC, ...Tint Color Temperature Backlight Reset Bass Treble Balance SRS WOW Subwoofer Language Auto Channel Scan Closed Caption Channel List V-Chip Set Lock Code Manual Tuning PC Mode PC Picture Position PC Picture Audio Auto Adjust Vertical Position Horizontal Position Horizontal Clock Clock Phase Reset Contrast Brightness Color Temperature...
...Press MENU on the remote control to display the different features on the remote control to quickly exit from a menu. Press EXIT on your HITACHI LCD TV. 2. THERE ARE TWO DIFFERENT MODES FOR THE OSD AS FOLLOWS: NTSC TV/DTV/Video/HDMI Mode: Display when the NTSC, ...Tint Color Temperature Backlight Reset Bass Treble Balance SRS WOW Subwoofer Language Auto Channel Scan Closed Caption Channel List V-Chip Set Lock Code Manual Tuning PC Mode PC Picture Position PC Picture Audio Auto Adjust Vertical Position Horizontal Position Horizontal Clock Clock Phase Reset Contrast Brightness Color Temperature...
User Manual
Page 35
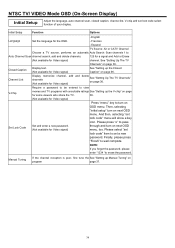
... "o" to set lock code" item to pass Set Lock Code Set and enter a new password. (Not available for Video signal) See "Setting up Manual Tuning" on page 36. NOTE: If you forget the password, please enter "1234 "to well complete. Finally, please press "Finish" to erase the password.... Manual Tuning If the channel reception is poor, fine tune the See "Setting up the Closed Caption" on next OSD menu, too. And then, selecting ...
... "o" to set lock code" item to pass Set Lock Code Set and enter a new password. (Not available for Video signal) See "Setting up Manual Tuning" on page 36. NOTE: If you forget the password, please enter "1234 "to well complete. Finally, please press "Finish" to erase the password.... Manual Tuning If the channel reception is poor, fine tune the See "Setting up the Closed Caption" on next OSD menu, too. And then, selecting ...

User Manual
Page 38
... a viewer attempts to watch a blocked channel, this message appears: The channel will remain blocked until the correct lock code is enter SETTING UP THE MANUAL TUNING Manual Tuning Due to select a channel. 5. Use the ▲▼ buttons to highlight the Initial Setup function, and then press the SEL button to .... 5. With the fine tune function , you can tune in each channel precisely which has poor picture. Press the ▼ button once to highlight Manual Tuning, and then press the SEL button to view the options. 4. English 4. Press the EXIT button on the remote control to...
... a viewer attempts to watch a blocked channel, this message appears: The channel will remain blocked until the correct lock code is enter SETTING UP THE MANUAL TUNING Manual Tuning Due to select a channel. 5. Use the ▲▼ buttons to highlight the Initial Setup function, and then press the SEL button to .... 5. With the fine tune function , you can tune in each channel precisely which has poor picture. Press the ▼ button once to highlight Manual Tuning, and then press the SEL button to view the options. 4. English 4. Press the EXIT button on the remote control to...

User Manual
Page 39
... the bass performance. Move image up or down. Adjust the blue color of treble. Increase and decreases the level of the display only in manual mode. NOTES: WOW, SRS and the symbol are trademarks of bass. Function Increase and decreases the level of SRS Labs, Inc. Move image... audio enhancement technology from SRS Labs, Inc. 38 Adjust the green color of the display only in manual mode. Options 0 to 100 0 to 100 OK PC Picture Adjust contrast, brightness, color temperature and reset. Manual 0 to 100 0 to 100 0 to On or Off. R G B Reset Adjust the red color of...
... the bass performance. Move image up or down. Adjust the blue color of treble. Increase and decreases the level of the display only in manual mode. NOTES: WOW, SRS and the symbol are trademarks of bass. Function Increase and decreases the level of SRS Labs, Inc. Move image... audio enhancement technology from SRS Labs, Inc. 38 Adjust the green color of the display only in manual mode. Options 0 to 100 0 to 100 OK PC Picture Adjust contrast, brightness, color temperature and reset. Manual 0 to 100 0 to 100 0 to On or Off. R G B Reset Adjust the red color of...
User Manual
Page 41
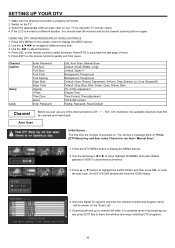
... Lock Enter Password Font Size Font Style Font Color Font Opacity Edge Style Edge Color Opacity I-Plate Time Zone About Enter Password Edit, Auto Scan, Manual Scan Default, Small, Middle, Large Default, Style0~7 Background, Foreground Background, Foreground Default, None, Raised, Depressed, Uniform, Drop Shadow (L), Drop Shadow... "Scan List". 5. If the LCD is scanned, the channel number and program name will end up on the remote control to run Auto / Manual Scan". 1. Use the W X to lunch the auto scan. USING THE DTV ON-SCREEN DISPLAY (OSD) CONTROLS 1. Press ▲ or &#...
... Lock Enter Password Font Size Font Style Font Color Font Opacity Edge Style Edge Color Opacity I-Plate Time Zone About Enter Password Edit, Auto Scan, Manual Scan Default, Small, Middle, Large Default, Style0~7 Background, Foreground Background, Foreground Default, None, Raised, Depressed, Uniform, Drop Shadow (L), Drop Shadow... "Scan List". 5. If the LCD is scanned, the channel number and program name will end up on the remote control to run Auto / Manual Scan". 1. Use the W X to lunch the auto scan. USING THE DTV ON-SCREEN DISPLAY (OSD) CONTROLS 1. Press ▲ or &#...
User Manual
Page 42
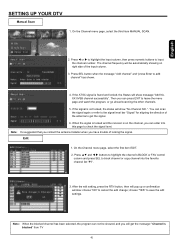
... scan the signal again or refer to the signal level bar "Signal" for aligning the direction of the input column. 3. ". English SETTING UP YOUR DTV Manual Scan 1. Press SEL button when the message "Add channel" and "press Enter to save the edit settings. Press W or X to highlight the input column, ... highlight the channel's BLOCK or FAV control column and press SEL to input the channel number. On the Channel menu page, select the third item MANUAL SCAN. 2. On the Channel menu page, select the first item EDIT. 2. When the signal is locked and the receiver is blocked" from TV 41...
... scan the signal again or refer to the signal level bar "Signal" for aligning the direction of the input column. 3. ". English SETTING UP YOUR DTV Manual Scan 1. Press SEL button when the message "Add channel" and "press Enter to save the edit settings. Press W or X to highlight the input column, ... highlight the channel's BLOCK or FAV control column and press SEL to input the channel number. On the Channel menu page, select the third item MANUAL SCAN. 2. On the Channel menu page, select the first item EDIT. 2. When the signal is locked and the receiver is blocked" from TV 41...

