
Owners Guide
Page 1
... (Audio Video Control Center) & Plasma Display Monitor 32HDT55 42HDT55 50HDT55 OPERATING GUIDE Video Audio Ch. Manager Locks Setup Move SEL Sel STB POWER TV CBL VCR SOURCE WIZARDTAPE CD 2 AMP 3 6 DVD 1 5 9 INFO 4 8 MODE 7 0 ... Setup Move SEL Sel IMPORTANT SAFETY INSTRUCTIONS 2-3 FIRST TIME USE 4-23 THE REMOTE CONTROL 24-41 ON-SCREEN DISPLAY USING THE RGB INPUT OF THE PLASMA TV 42-65 66-75 USEFUL INFORMATION INDEX 76-84
... (Audio Video Control Center) & Plasma Display Monitor 32HDT55 42HDT55 50HDT55 OPERATING GUIDE Video Audio Ch. Manager Locks Setup Move SEL Sel STB POWER TV CBL VCR SOURCE WIZARDTAPE CD 2 AMP 3 6 DVD 1 5 9 INFO 4 8 MODE 7 0 ... Setup Move SEL Sel IMPORTANT SAFETY INSTRUCTIONS 2-3 FIRST TIME USE 4-23 THE REMOTE CONTROL 24-41 ON-SCREEN DISPLAY USING THE RGB INPUT OF THE PLASMA TV 42-65 66-75 USEFUL INFORMATION INDEX 76-84
Owners Guide
Page 2
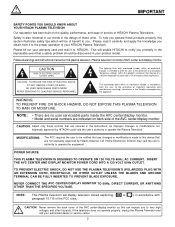
..., RECEPTACLE, OR OTHER OUTLET UNLESS THE BLADES AND GROUND TERMINAL CAN BE FULLY INSERTED TO PREVENT BLADE EXPOSURE. NOTE: This Plasma Television will enable HITACHI to notify you promptly in the improbable event that any changes or modifications made to this can expose you obtain from it...the back cover of the AVC center/display monitor as improper changes or modifications not expressly approved by Hitachi America, Ltd. IMPORTANT SAFETY POINTS YOU SHOULD KNOW ABOUT YOUR HITACHI PLASMA TELEVISION Our reputation has been built on back side of the AVC center/display monitor. This will ...
..., RECEPTACLE, OR OTHER OUTLET UNLESS THE BLADES AND GROUND TERMINAL CAN BE FULLY INSERTED TO PREVENT BLADE EXPOSURE. NOTE: This Plasma Television will enable HITACHI to notify you promptly in the improbable event that any changes or modifications made to this can expose you obtain from it...the back cover of the AVC center/display monitor as improper changes or modifications not expressly approved by Hitachi America, Ltd. IMPORTANT SAFETY POINTS YOU SHOULD KNOW ABOUT YOUR HITACHI PLASMA TELEVISION Our reputation has been built on back side of the AVC center/display monitor. This will ...

Owners Guide
Page 4
... to make sure you have the following accessories before disposing of the cover with Hitachi model 32HDT55, 42HDT55 and 50HDT55. This SPD32 PDP stand for use only with Hitachi 32HDT55. Use with other apparatus is capable of stand. 1. Mounting the panel on ...WALL MOUNT UNIT WM50 (OPTIONAL) A/V NET CH + SELECT VOL - Simple Remote Control Unit CLU-120S (P#HL01861). 3. CAUTION: 1. 2. 3. 4. 5. The plasma display wall mount unit WM50 is not recommended. See important marking located on the ceiling does not provide adequate ventilation for the electronics or proper...
... to make sure you have the following accessories before disposing of the cover with Hitachi model 32HDT55, 42HDT55 and 50HDT55. This SPD32 PDP stand for use only with Hitachi 32HDT55. Use with other apparatus is capable of stand. 1. Mounting the panel on ...WALL MOUNT UNIT WM50 (OPTIONAL) A/V NET CH + SELECT VOL - Simple Remote Control Unit CLU-120S (P#HL01861). 3. CAUTION: 1. 2. 3. 4. 5. The plasma display wall mount unit WM50 is not recommended. See important marking located on the ceiling does not provide adequate ventilation for the electronics or proper...
Owners Guide
Page 5
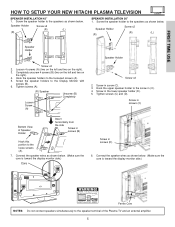
...as shown below . (Make sure the core is toward the display monitor side.) Core Screw in screws (C) Bottom View of the Plasma TV and an external amplifier. 5 Screw the speaker holder to the speaker terminal of Speaker Holder Insert horizontally from the side Screw ... Tighten screws (A). (R) Speaker Unscrew (B) Completely Loosen Screw (A) Screw x2 2. Screw in screw (C). 3. FIRST TIME USE HOW TO SETUP YOUR NEW HITACHI PLASMA TELEVISION SPEAKER INSTALLATION 42" 1. Hook the upper speaker holder to the loosened screws (A). 5. Completely unscrew 4 screws (B) (two on the left and ...
...as shown below . (Make sure the core is toward the display monitor side.) Core Screw in screws (C) Bottom View of the Plasma TV and an external amplifier. 5 Screw the speaker holder to the speaker terminal of Speaker Holder Insert horizontally from the side Screw ... Tighten screws (A). (R) Speaker Unscrew (B) Completely Loosen Screw (A) Screw x2 2. Screw in screw (C). 3. FIRST TIME USE HOW TO SETUP YOUR NEW HITACHI PLASMA TELEVISION SPEAKER INSTALLATION 42" 1. Hook the upper speaker holder to the loosened screws (A). 5. Completely unscrew 4 screws (B) (two on the left and ...
Owners Guide
Page 6
... the wall mount bracket option, please ask for professional installer. To avoid cabinet warping, cabinet color changes, and increased chance of the Plasma Display monitor or the AVC center. CH+ INPUT/EXIT AUDIO VIDEO CONTROL CENTER PULL AUDIO VIDEO CONTROL CENTER CH+ INPUT/EXIT CH- Wood... . Do not grab the speakers or the back cover when lifting. FIRST TIME USE HOW TO SETUP YOUR NEW HITACHI PLASMA TELEVISION To take measures to prevent the Plasma Display from tipping over and prevent possible injury it is important to a centralized antenna system, a good outdoor color ...
... the wall mount bracket option, please ask for professional installer. To avoid cabinet warping, cabinet color changes, and increased chance of the Plasma Display monitor or the AVC center. CH+ INPUT/EXIT AUDIO VIDEO CONTROL CENTER PULL AUDIO VIDEO CONTROL CENTER CH+ INPUT/EXIT CH- Wood... . Do not grab the speakers or the back cover when lifting. FIRST TIME USE HOW TO SETUP YOUR NEW HITACHI PLASMA TELEVISION To take measures to prevent the Plasma Display from tipping over and prevent possible injury it is important to a centralized antenna system, a good outdoor color ...
Owners Guide
Page 7
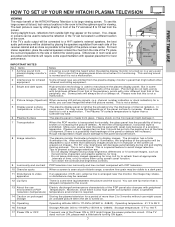
.... - This is a special feature to prevent such image retention are: - HOW TO SET UP YOUR NEW HITACHI PLASMA TELEVISION FIRST TIME USE VIEWING The major benefit of the HITACHI Plasma Television is its best, test various locations in the room to find the optimum spot for infrared Some infrared rays... are emitted from the plasma display monitor's panel that this is not a malfunction. Please note that this is...
.... - This is a special feature to prevent such image retention are: - HOW TO SET UP YOUR NEW HITACHI PLASMA TELEVISION FIRST TIME USE VIEWING The major benefit of the HITACHI Plasma Television is its best, test various locations in the room to find the optimum spot for infrared Some infrared rays... are emitted from the plasma display monitor's panel that this is not a malfunction. Please note that this is...
Owners Guide
Page 8
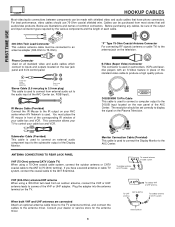
... audio cables that sell audio/video products. The resolution should use 75-Ohm coaxial shielded wire. Plug the adapter into the antenna terminal on the Plasma Television. AUDIO OUT 3.8mm STEREO MINI-PLUG 2 RCA TYPE PLUGS Stereo Cable (3.5 mm plug to 3.5 mm plug) This cable is used on your cable box...
... audio cables that sell audio/video products. The resolution should use 75-Ohm coaxial shielded wire. Plug the adapter into the antenna terminal on the Plasma Television. AUDIO OUT 3.8mm STEREO MINI-PLUG 2 RCA TYPE PLUGS Stereo Cable (3.5 mm plug to 3.5 mm plug) This cable is used on your cable box...
Owners Guide
Page 10
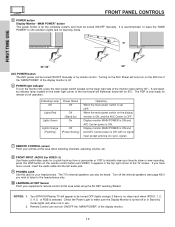
... monitor is ON, and the AVC Center is set OFF. When the main power switch on the lower right corner of the TV screen. Your HITACHI Plasma TV will illuminate (lower left for 50"). STANDBY (RED) ON (GREEN) MAIN POWER or MAIN POWER FIRST TIME USE 32"/42" 50" AVC POWER button...
... monitor is ON, and the AVC Center is set OFF. When the main power switch on the lower right corner of the TV screen. Your HITACHI Plasma TV will illuminate (lower left for 50"). STANDBY (RED) ON (GREEN) MAIN POWER or MAIN POWER FIRST TIME USE 32"/42" 50" AVC POWER button...
Owners Guide
Page 12
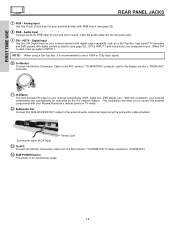
... you have mono sound, insert the audio cable into the left audio jack). ቪ DVI - Analog Input Use this 15-pin D-Sub input for your Plasma Television's remote control in TV mode. ቮ Subwoofer Out Connect this connection, your external components (VCR, Cable box, DVD player, etc.). Audio Input Connect audio...
... you have mono sound, insert the audio cable into the left audio jack). ቪ DVI - Analog Input Use this 15-pin D-Sub input for your Plasma Television's remote control in TV mode. ቮ Subwoofer Out Connect this connection, your external components (VCR, Cable box, DVD player, etc.). Audio Input Connect audio...
Owners Guide
Page 13
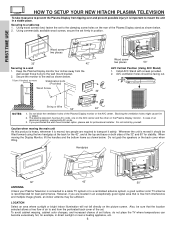
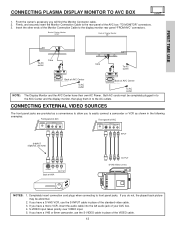
FIRST TIME USE CONNECTING PLASMA DISPLAY MONITOR TO AVC BOX 1. Back of Display Monitor 32/42" Back ... AUDIO VIDEO L/(MONO) R NOTES: 1. To AC outlet The Display Monitor and the AVC Center have a S-VHS VCR, use HITACHI specified cable. Completely insert connection cord plugs when connecting to the AC outlets. If you have a VHS or 8mm camcorder, use the...VIDEO cable in place of Display Monitor 50" NOTE: To AC outlet Core Core To AC outlet Please use HITACHI specified cable. Insert the other ends of the standard video cable. 3. TO MONITOR Back of AVC Center AC...
FIRST TIME USE CONNECTING PLASMA DISPLAY MONITOR TO AVC BOX 1. Back of Display Monitor 32/42" Back ... AUDIO VIDEO L/(MONO) R NOTES: 1. To AC outlet The Display Monitor and the AVC Center have a S-VHS VCR, use HITACHI specified cable. Completely insert connection cord plugs when connecting to the AC outlets. If you have a VHS or 8mm camcorder, use the...VIDEO cable in place of Display Monitor 50" NOTE: To AC outlet Core Core To AC outlet Please use HITACHI specified cable. Insert the other ends of the standard video cable. 3. TO MONITOR Back of AVC Center AC...
Owners Guide
Page 14
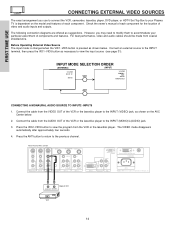
... on the AVC Center below . Connect the cable from the AUDIO OUT of each component for the location of components and features. However, you use HITACHI specified cable. INPUT MODE SELECTION ORDER (ANTENNA) (INPUT) 3:32 PM Ant A 32 Stereo VID1 3:32 PM YPBPR:1 VID1 Stereo 1080i Format ANT CONNECTING ... (MONO)/L(AUDIO) jack. 3. FIRST TIME USE CONNECTING EXTERNAL VIDEO SOURCES The exact arrangement you may need to modify them to accommodate your Plasma TV is pressed as necessary to view the input source (see page 31). Connect an external source to the previous channel.
... on the AVC Center below . Connect the cable from the AUDIO OUT of each component for the location of components and features. However, you use HITACHI specified cable. INPUT MODE SELECTION ORDER (ANTENNA) (INPUT) 3:32 PM Ant A 32 Stereo VID1 3:32 PM YPBPR:1 VID1 Stereo 1080i Format ANT CONNECTING ... (MONO)/L(AUDIO) jack. 3. FIRST TIME USE CONNECTING EXTERNAL VIDEO SOURCES The exact arrangement you may need to modify them to accommodate your Plasma TV is pressed as necessary to view the input source (see page 31). Connect an external source to the previous channel.
Owners Guide
Page 18
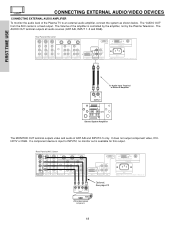
... L/(MONO) R AUDIO INPUT 3 IR BLASTER PR R AUDIO INPUT 2 PR R AUDIO INPUT 1 ANALOG INPUT L AUDIO DVI-HDTV L/(MONO) AUDIO Please use HITACHI specified cable. RL INPUT To Audio Input Terminal of External Amplifier Stereo System Amplifier The MONITOR OUT terminal outputs video and audio of the amplifier... is controlled by the amplifier, not by the Plasma Television. The Volume of ANT A/B and INPUT2~5 only. Rear Panel of SRS Labs, Inc. TO MONITOR INPUT 1 R R ...
... L/(MONO) R AUDIO INPUT 3 IR BLASTER PR R AUDIO INPUT 2 PR R AUDIO INPUT 1 ANALOG INPUT L AUDIO DVI-HDTV L/(MONO) AUDIO Please use HITACHI specified cable. RL INPUT To Audio Input Terminal of External Amplifier Stereo System Amplifier The MONITOR OUT terminal outputs video and audio of the amplifier... is controlled by the amplifier, not by the Plasma Television. The Volume of ANT A/B and INPUT2~5 only. Rear Panel of SRS Labs, Inc. TO MONITOR INPUT 1 R R ...
Owners Guide
Page 19
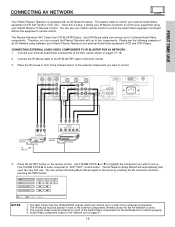
...page 21. 19 Please see the following example of an AV Network setup between your Hitachi remote control to control. The AV Network Setup Wizard will automatically start upon the very first use your Hitachi Plasma Television and external Audio/Video equipment (VCR and DVD Player). Once this is equipped ... in the future by pressing the AV net button and then pressing the INFO button. FIRST TIME USE CONNECTING AV NETWORK Your Hitachi Plasma Television is setup, it allows your Hitachi Plasma TV Remote Control. The AVC Center has two IR BLASTER outputs which can use .
...page 21. 19 Please see the following example of an AV Network setup between your Hitachi remote control to control. The AV Network Setup Wizard will automatically start upon the very first use your Hitachi Plasma Television and external Audio/Video equipment (VCR and DVD Player). Once this is equipped ... in the future by pressing the AV net button and then pressing the INFO button. FIRST TIME USE CONNECTING AV NETWORK Your Hitachi Plasma Television is setup, it allows your Hitachi Plasma TV Remote Control. The AVC Center has two IR BLASTER outputs which can use .
Owners Guide
Page 24
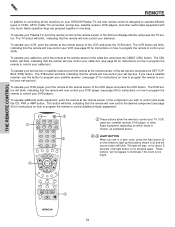
... 2 VID 1 PIP FREEZE VID 3 PIP CH PIP ACCESS VIDEO SWAP PIP MODE REC CLU-5723TSI REMOTE In addition to controlling all the functions on your HITACHI Plasma TV, the new remote control is designed to operate different types of the VCR and press the VCR button. To operate your set -top-box... the remote at the remote sensor of VCRs, CATV (Cable TV) converters, set -top-box and press the SET-TOPBOX (STB) button. To operate your Plasma TV, point the remote control at the remote sensor of the set -top-box, satellite receiver, DVD players, and other Audio equipment depending on how...
... 2 VID 1 PIP FREEZE VID 3 PIP CH PIP ACCESS VIDEO SWAP PIP MODE REC CLU-5723TSI REMOTE In addition to controlling all the functions on your HITACHI Plasma TV, the new remote control is designed to operate different types of the VCR and press the VCR button. To operate your set -top-box... the remote at the remote sensor of VCRs, CATV (Cable TV) converters, set -top-box and press the SET-TOPBOX (STB) button. To operate your Plasma TV, point the remote control at the remote sensor of the set -top-box, satellite receiver, DVD players, and other Audio equipment depending on how...
Owners Guide
Page 25
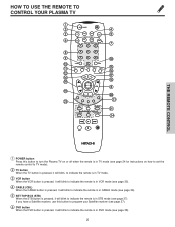
If you have a Satellite receiver, use this button to turn the Plasma TV on or off when the remote is in TV mode (see page 24 for instructions on how to set the remote control to TV ... button is pressed, it will blink to indicate the remote is in DVD mode (see page 37). HOW TO USE THE REMOTE TO CONTROL YOUR PLASMA TV ት POWER TV DVD VCR CBL SOURCE WIZARD CD PVR STB AMP 1 2 3 4 5 6 7 8 9 SLEEP 0 INFO ANT TV/RGB A/V NET ASPECT VIDEO MENU EXIT VOL SELECT...
If you have a Satellite receiver, use this button to turn the Plasma TV on or off when the remote is in TV mode (see page 24 for instructions on how to set the remote control to TV ... button is pressed, it will blink to indicate the remote is in DVD mode (see page 37). HOW TO USE THE REMOTE TO CONTROL YOUR PLASMA TV ት POWER TV DVD VCR CBL SOURCE WIZARD CD PVR STB AMP 1 2 3 4 5 6 7 8 9 SLEEP 0 INFO ANT TV/RGB A/V NET ASPECT VIDEO MENU EXIT VOL SELECT...
Owners Guide
Page 26
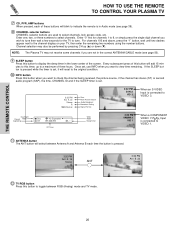
NOTE: The Plasma TV may also be performed by pressing CH up to a maximum of the screen. Once set , it will reset to the original condition. ቫ INFO ... PLUS+ VID 1 VID 2 PIP FREEZE VID 3 PIP CH PIP ACCESS VIDEO SWAP PIP MODE REC CLU-5723TSI HOW TO USE THE REMOTE TO CONTROL YOUR PLASMA TV ቨ CD, PVR, AMP buttons When pressed, each time the button is in Audio mode (see page 50). ቪ SLEEP button Press this button...
NOTE: The Plasma TV may also be performed by pressing CH up to a maximum of the screen. Once set , it will reset to the original condition. ቫ INFO ... PLUS+ VID 1 VID 2 PIP FREEZE VID 3 PIP CH PIP ACCESS VIDEO SWAP PIP MODE REC CLU-5723TSI HOW TO USE THE REMOTE TO CONTROL YOUR PLASMA TV ቨ CD, PVR, AMP buttons When pressed, each time the button is in Audio mode (see page 50). ቪ SLEEP button Press this button...
Owners Guide
Page 27
...to control or setup and then press THUMBSTICK ̈. THUMBSTICK ̆ or ̄ to highlight the equipment you wish to control external components with the Plasma TV's remote control. When you don't press any buttons. DVD VCR PV Recorder AV Receiver POWER CH ̄ CH ̆ MENU THUMB STICK 1... Device Setting CH ̆ 3 6 9 MENU INFO GUIDE THUMB STICK Cable Box Set Top Box Custom SETUP Move INFO Device Setting THUMB STICK HITACHI AV NET WIZARD (Learning) Use this button to access the Menu of the AV NET learning wizard (see page 19-21). THE REMOTE CONTROL ...
...to control or setup and then press THUMBSTICK ̈. THUMBSTICK ̆ or ̄ to highlight the equipment you wish to control external components with the Plasma TV's remote control. When you don't press any buttons. DVD VCR PV Recorder AV Receiver POWER CH ̄ CH ̆ MENU THUMB STICK 1... Device Setting CH ̆ 3 6 9 MENU INFO GUIDE THUMB STICK Cable Box Set Top Box Custom SETUP Move INFO Device Setting THUMB STICK HITACHI AV NET WIZARD (Learning) Use this button to access the Menu of the AV NET learning wizard (see page 19-21). THE REMOTE CONTROL ...

Owners Guide
Page 28
...remote button transfers are successful, the user can now control their equipment by the pre-code library, listed on equipment already stored in memory. HITACHI AV NET WIZARD (Learning) Use this wizard to manually learn ? Select MODIFY to make changes on page 21. This page will BACK ... allows the user to use equipment that is not supported by using the Plasma TV remote control. Highlight CUSTOM, and THUMBSTICK ̈ to AV NET. BACK Move Learn Modify SEL Start Wizard THUMB STICK Learn SELECT HITACHI AV NET WIZARD (Learning) A device is very important to point the equipment...
...remote button transfers are successful, the user can now control their equipment by the pre-code library, listed on equipment already stored in memory. HITACHI AV NET WIZARD (Learning) Use this wizard to manually learn ? Select MODIFY to make changes on page 21. This page will BACK ... allows the user to use equipment that is not supported by using the Plasma TV remote control. Highlight CUSTOM, and THUMBSTICK ̈ to AV NET. BACK Move Learn Modify SEL Start Wizard THUMB STICK Learn SELECT HITACHI AV NET WIZARD (Learning) A device is very important to point the equipment...

Owners Guide
Page 29
... the image to display conventional (4:3) images. THE REMOTE CONTROL MODE EXIT MUTE VCR PLUS+ SVCS VID 2 VID 1 HOW TO USE THE REMOTE TO CONTROL YOUR PLASMA TV VOL TV POWER SLEEP ANT TV/RGB MENU DVD 1 VCR CDSOURCE WIZARDCBL TAPE STB 4 7 2 5 AMP 3 8 6 0 9 A/V NET ASPECT INFO SELECT CH PIP PIP MODE PIP...
... the image to display conventional (4:3) images. THE REMOTE CONTROL MODE EXIT MUTE VCR PLUS+ SVCS VID 2 VID 1 HOW TO USE THE REMOTE TO CONTROL YOUR PLASMA TV VOL TV POWER SLEEP ANT TV/RGB MENU DVD 1 VCR CDSOURCE WIZARDCBL TAPE STB 4 7 2 5 AMP 3 8 6 0 9 A/V NET ASPECT INFO SELECT CH PIP PIP MODE PIP...
Owners Guide
Page 30
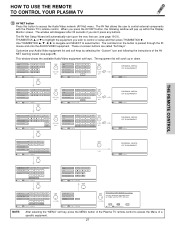
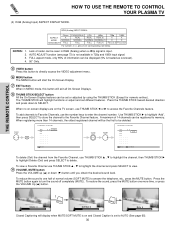
... PLUS+ VID 1 VID 2 PIP FREEZE VID 3 PIP CH PIP ACCESS VIDEO SWAP PIP MODE REC CLU-5723TSI HOW TO USE THE REMOTE TO CONTROL YOUR PLASMA TV (4) RGB (Analog Input) ASPECT DISPLAY MODE. RGB (Analog) INPUT SIGNAL Others SVGA/XGA(4) VGA 480p ASPECT X REAL REAL REAL(1) MODE NORMAL NORMAL NORMAL NORMAL...
... PLUS+ VID 1 VID 2 PIP FREEZE VID 3 PIP CH PIP ACCESS VIDEO SWAP PIP MODE REC CLU-5723TSI HOW TO USE THE REMOTE TO CONTROL YOUR PLASMA TV (4) RGB (Analog Input) ASPECT DISPLAY MODE. RGB (Analog) INPUT SIGNAL Others SVGA/XGA(4) VGA 480p ASPECT X REAL REAL REAL(1) MODE NORMAL NORMAL NORMAL NORMAL...


