
Reference Guide
Page 9
...drive 62 To replace the hard drive holder 63 To prepare a new hard drive 64 Troubleshooting and Maintenance 65 Troubleshooting Your Notebook 66 Audio problems 66 CD-ROM and DVD problems 67 Display problems 68 Hard drive problems 69 Heat problems 70 Infrared ...PC Card problems 76 Performance problems 76 Power and battery problems 77 Printing problems 79 Serial, parallel, and USB problems 80 Startup problems 81 Wireless problems 82 Configuring Your Notebook 84 To run the BIOS Setup utility 84 To change video memory settings using BIOS Setup utility 87 Reinstalling and Updating...
...drive 62 To replace the hard drive holder 63 To prepare a new hard drive 64 Troubleshooting and Maintenance 65 Troubleshooting Your Notebook 66 Audio problems 66 CD-ROM and DVD problems 67 Display problems 68 Hard drive problems 69 Heat problems 70 Infrared ...PC Card problems 76 Performance problems 76 Power and battery problems 77 Printing problems 79 Serial, parallel, and USB problems 80 Startup problems 81 Wireless problems 82 Configuring Your Notebook 84 To run the BIOS Setup utility 84 To change video memory settings using BIOS Setup utility 87 Reinstalling and Updating...
Maintenance and Service Guide
Page 86
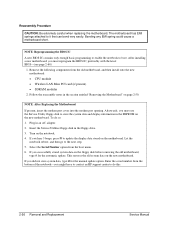
... Manual If you might have to contact an HP support center to update the display data stored on the floppy disk before removing the old motherboard, type A for the manual update option. NOTE: Reprogramming the BIOS IC A new BIOS IC contains only enough basic programming to enable the notebook to the next step. 5. Reassembly Procedure CAUTION...
... Manual If you might have to contact an HP support center to update the display data stored on the floppy disk before removing the old motherboard, type A for the manual update option. NOTE: Reprogramming the BIOS IC A new BIOS IC contains only enough basic programming to enable the notebook to the next step. 5. Reassembly Procedure CAUTION...
Maintenance and Service Guide
Page 89
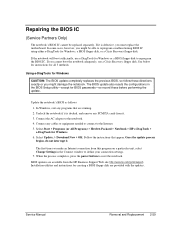
... the instructions that are running. 2. Select Start > Programs (or All Programs) > Hewlett-Packard > Notebook > HP e-DiagTools > e-DiagTools for all 3 methods. Select Update, > Download New > OK. If it . 3. In some cases, however, you must replace the motherboard. Update the notebook's BIOS as follows: 1. Once the update process begins, do not interrupt it is defective, you might damage the...
... the instructions that are running. 2. Select Start > Programs (or All Programs) > Hewlett-Packard > Notebook > HP e-DiagTools > e-DiagTools for all 3 methods. Select Update, > Download New > OK. If it . 3. In some cases, however, you must replace the motherboard. Update the notebook's BIOS as follows: 1. Once the update process begins, do not interrupt it is defective, you might damage the...
Maintenance and Service Guide
Page 112
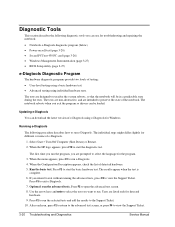
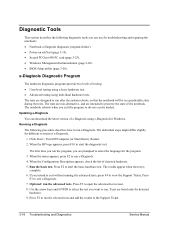
Updating e-Diagtools You can be in a predictable state during the tests. When ...to run after the system reboots, so that the notebook will be loaded. Press F2 to start the basic hardware test. After each run e-Diagtools. 4. When the HP logo appears, press F10 to run the advanced tests.... slightly for troubleshooting and repairing the notebook: • Notebook e-Diagtools diagnostic program (below) • Power-on self-test (page 3-20) • Sycard PCCtest 450 PC card (page 3-26) • Windows Management Instrumentation (page 3-27) • BIOS Setup utility (page 3-27) ...
Updating e-Diagtools You can be in a predictable state during the tests. When ...to run after the system reboots, so that the notebook will be loaded. Press F2 to start the basic hardware test. After each run e-Diagtools. 4. When the HP logo appears, press F10 to run the advanced tests.... slightly for troubleshooting and repairing the notebook: • Notebook e-Diagtools diagnostic program (below) • Power-on self-test (page 3-20) • Sycard PCCtest 450 PC card (page 3-26) • Windows Management Instrumentation (page 3-27) • BIOS Setup utility (page 3-27) ...
Maintenance and Service Guide
Page 120
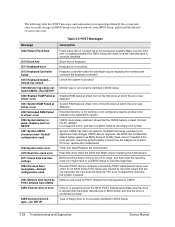
...which the error was detected System RAM failed at offset nnnn Update to the latest BIOS version CMOS clock battery indicator shows that the drive is installed properly Run BIOS Setup and make changes in BIOS Setup 3-28 Troubleshooting and Diagnostics Service Manual replace the motherboard Timer...detected Extended memory is not working or not configured properly at offset nnnn of floppy drive A: not correctly identified in BIOS Setup, reset the notebook, enter BIOS Setup, and install the defaults or correct the error. Table 3-5 POST Messages Message 0200 Failure Fixed Disk 0210 Stuck...
...which the error was detected System RAM failed at offset nnnn Update to the latest BIOS version CMOS clock battery indicator shows that the drive is installed properly Run BIOS Setup and make changes in BIOS Setup 3-28 Troubleshooting and Diagnostics Service Manual replace the motherboard Timer...detected Extended memory is not working or not configured properly at offset nnnn of floppy drive A: not correctly identified in BIOS Setup, reset the notebook, enter BIOS Setup, and install the defaults or correct the error. Table 3-5 POST Messages Message 0200 Failure Fixed Disk 0210 Stuck...
Maintenance and Service Guide
Page 127
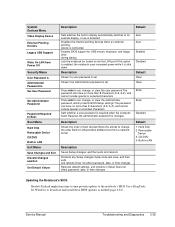
... password, date, or time changes Restores default settings, and remains in LAN provides diskless boot from time to time provide updates to the notebook's BIOS Use e-DiagTools for Windows to download and install these BIOS updates as needed (page 2-61). CD/DVD 4. Hard Disk 2. Service Manual Troubleshooting and Diagnostics 3-35 Removable Device 3. System Devices ... Shows the order of boot devices Move the entries to change the order Built-in Setup Does not affect password, date, or time changes Updating the Notebook's BIOS Hewlett-Packard might from a network server Default 1.
... password, date, or time changes Restores default settings, and remains in LAN provides diskless boot from time to time provide updates to the notebook's BIOS Use e-DiagTools for Windows to download and install these BIOS updates as needed (page 2-61). CD/DVD 4. Hard Disk 2. Service Manual Troubleshooting and Diagnostics 3-35 Removable Device 3. System Devices ... Shows the order of boot devices Move the entries to change the order Built-in Setup Does not affect password, date, or time changes Updating the Notebook's BIOS Hewlett-Packard might from a network server Default 1.
Service Manual
Page 128
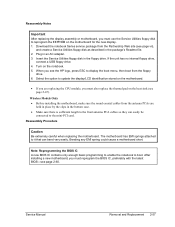
... antenna PCAs are replacing the CPU module, you must also replace the thermal pad on the heat sink (see the HP logo, press ESC to reprogram the EEPROM on the notebook. 5. Insert the Service Utilities floppy disk in an AC adapter. 3. Bending any EMI spring could cause a motherboard ...and Replacement 2-57 Select the option to the mini-PCI card. Note: Reprogramming the BIOS IC A new BIOS IC contains only enough basic programming to enable the notebook to it that can easily be connected to update the display/LCD identification stored on the motherboard. • If you are held in...
... antenna PCAs are replacing the CPU module, you must also replace the thermal pad on the heat sink (see the HP logo, press ESC to reprogram the EEPROM on the notebook. 5. Insert the Service Utilities floppy disk in an AC adapter. 3. Bending any EMI spring could cause a motherboard ...and Replacement 2-57 Select the option to the mini-PCI card. Note: Reprogramming the BIOS IC A new BIOS IC contains only enough basic programming to enable the notebook to it that can easily be connected to update the display/LCD identification stored on the motherboard. • If you are held in...
Service Manual
Page 132
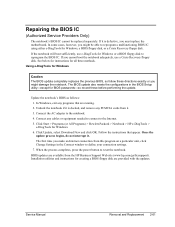
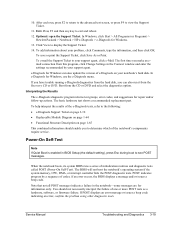
.... 3. If you must replace the motherboard. Undock the notebook if it . Click Start > Programs (or All Programs) > Hewlett-Packard > Notebook > HP e-DiagTools > e-DiagTools for Windows or a BIOS floppy disk to define your connection settings. 7. When the process completes, press the power button to the notebook. 4. The BIOS update also resets the configurations in the Connect window to...
.... 3. If you must replace the motherboard. Undock the notebook if it . Click Start > Programs (or All Programs) > Hewlett-Packard > Notebook > HP e-DiagTools > e-DiagTools for Windows or a BIOS floppy disk to define your connection settings. 7. When the process completes, press the power button to the notebook. 4. The BIOS update also resets the configurations in the Connect window to...
Service Manual
Page 153
... When the HP logo appears, press F10 to open the advanced test screen. 8. When the menu appears, press F2 to exit e-Diagtools. 7. Optional: run . Updating e-Diagtools You can use for troubleshooting and repairing the notebook: • Notebook e-Diagtools diagnostic ...program (below). • Power-on self-test (page 3-19). • Sycard PCCtest 450 PC card (page 3-25). • Windows Management Instrumentation (page 3-26). • BIOS Setup utility...
... When the HP logo appears, press F10 to open the advanced test screen. 8. When the menu appears, press F2 to exit e-Diagtools. 7. Optional: run . Updating e-Diagtools You can use for troubleshooting and repairing the notebook: • Notebook e-Diagtools diagnostic ...program (below). • Power-on self-test (page 3-19). • Sycard PCCtest 450 PC card (page 3-25). • Windows Management Instrumentation (page 3-26). • BIOS Setup utility...
Service Manual
Page 154
..., click Start > All Programs (or Programs) > Hewlett-Packard > Notebook > HP e-Diagtools > e-Diagtools for repair and/or follow-up actions. To add... your support agent, click e-Mail. The basic hardware test shows a recommended replacement part. The BIOS will not boot the notebook's operating system if the system memory, CPU, DMA, or interrupt controller fails the POST diagnostic ...You should enable you to view the Support Ticket. 11. The first time you can also update the version of e-Diagtools on page 1-65 This combined information should not necessarily interpret the failure ...
..., click Start > All Programs (or Programs) > Hewlett-Packard > Notebook > HP e-Diagtools > e-Diagtools for repair and/or follow-up actions. To add... your support agent, click e-Mail. The basic hardware test shows a recommended replacement part. The BIOS will not boot the notebook's operating system if the system memory, CPU, DMA, or interrupt controller fails the POST diagnostic ...You should enable you to view the Support Ticket. 11. The first time you can also update the version of e-Diagtools on page 1-65 This combined information should not necessarily interpret the failure ...
Service Manual
Page 158
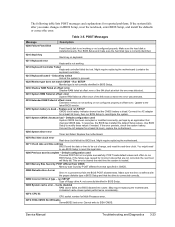
... slows system performance considerably. 02F0: CPU ID: CPU socket number for at least 24 hours; Update to reset the legal date. 0280 Previous boot incomplete - In response, the BIOS has installed the default Setup values. Make sure the drive is not working. 0212 Keyboard Controller ... Failed at offset: nnnn System RAM failed at offset nnnn of floppy drive A: not correctly identified in BIOS Setup and that specified in BIOS Setup, reset the notebook, enter BIOS Setup, and install the defaults or correct the error. Run SETUP Monitor type is connected correctly. 02B2 Incorrect...
... slows system performance considerably. 02F0: CPU ID: CPU socket number for at least 24 hours; Update to reset the legal date. 0280 Previous boot incomplete - In response, the BIOS has installed the default Setup values. Make sure the drive is not working. 0212 Keyboard Controller ... Failed at offset: nnnn System RAM failed at offset nnnn of floppy drive A: not correctly identified in BIOS Setup and that specified in BIOS Setup, reset the notebook, enter BIOS Setup, and install the defaults or correct the error. Run SETUP Monitor type is connected correctly. 02B2 Incorrect...
Service Manual
Page 163
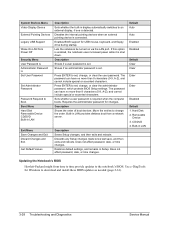
...Discards any Setup changes made since last save, and then exits and reboots. Restores default settings, and remains in LAN Updating the Notebook's BIOS Hewlett-Packard might from a network server. Removable Device 3. Press ENTER to an external display, if one is detected. Press ENTER ... password is set . Lets the notebook be turned on via the LAN port. Built-in Setup. CD/DVD 4. The password can have no more than 8 characters (0-9, A-Z), and cannot include special or accented characters. Move the entries to download and install these BIOS updates as needed (page 2-61). ...
...Discards any Setup changes made since last save, and then exits and reboots. Restores default settings, and remains in LAN Updating the Notebook's BIOS Hewlett-Packard might from a network server. Removable Device 3. Press ENTER to an external display, if one is detected. Press ENTER ... password is set . Lets the notebook be turned on via the LAN port. Built-in Setup. CD/DVD 4. The password can have no more than 8 characters (0-9, A-Z), and cannot include special or accented characters. Move the entries to download and install these BIOS updates as needed (page 2-61). ...
Hard Drive White Paper
Page 3
.../country/us /en/support.html After installing the application, access the HP Notebook LidSwitch Policy by selecting Start > Programs > HP Notebook LidSwitch Policy. The following URL: http://welcome.hp.com/country/us /en/support.html to download the latest BIOS update. The short test runs. The F10 Setup Hard Drive Self-Test enhancement is available as one...
.../country/us /en/support.html After installing the application, access the HP Notebook LidSwitch Policy by selecting Start > Programs > HP Notebook LidSwitch Policy. The following URL: http://welcome.hp.com/country/us /en/support.html to download the latest BIOS update. The short test runs. The F10 Setup Hard Drive Self-Test enhancement is available as one...
Installing Microsoft Windows XP Service Pack 2 on HP Compaq Business Notebooks
Page 3
...unstable installation. Preparing for installation 1. Connect AC power. 4. Compare the current ROM version date to the latest ROMPaq release date on the HP website to SP2. Start the system using Computer Setup or by annual subscription or as a download from the Microsoft website, or on ...determining the current ROM version and how to complete the ROM upgrade. 3 To check and upgrade ROM BIOS for each PC • Microsoft Windows XP Service Pack 2 o SP2 is updated monthly and available by pressing Fn+Esc after the OS boots. - See Appendix A for information on CD from...
...unstable installation. Preparing for installation 1. Connect AC power. 4. Compare the current ROM version date to the latest ROMPaq release date on the HP website to SP2. Start the system using Computer Setup or by annual subscription or as a download from the Microsoft website, or on ...determining the current ROM version and how to complete the ROM upgrade. 3 To check and upgrade ROM BIOS for each PC • Microsoft Windows XP Service Pack 2 o SP2 is updated monthly and available by pressing Fn+Esc after the OS boots. - See Appendix A for information on CD from...


