Software Update, Backup and Recovery - Windows Vista
Page 7
A newer BIOS update may not be downloaded. or - ● Visit the HP Web site at http://www.hp.com. 2. Follow the instructions on battery power, docked in Help and Support. - Do not shut down the computer or initiate Sleep or Hibernation. b. ENWW Downloading software updates from ...download or install a BIOS update while the computer is running on the screen to download your computer. It is recommended that you check the HP Web site periodically for your selection to an optional power source. Follow the instructions on your computer: ● Click a software update link in...
A newer BIOS update may not be downloaded. or - ● Visit the HP Web site at http://www.hp.com. 2. Follow the instructions on battery power, docked in Help and Support. - Do not shut down the computer or initiate Sleep or Hibernation. b. ENWW Downloading software updates from ...download or install a BIOS update while the computer is running on the screen to download your computer. It is recommended that you check the HP Web site periodically for your selection to an optional power source. Follow the instructions on your computer: ● Click a software update link in...
Drives
Page 4
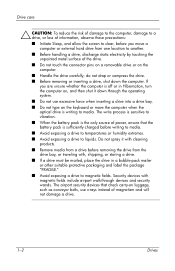
...Avoid exposing a drive to temperatures or humidity extremes. ■ Avoid exposing a drive to a medium. The airport security devices that the battery pack is writing to liquids. If you move a computer or external hard drive from the drive bay, or traveling with magnetic fields include ...; Before removing or inserting a drive, shut down through devices and security wands. The write process is sensitive to vibration. ■ When the battery pack is the only source of magnetism and will not damage a drive. 1-2 Drives Security devices with , shipping, or storing a drive. ■...
...Avoid exposing a drive to temperatures or humidity extremes. ■ Avoid exposing a drive to a medium. The airport security devices that the battery pack is writing to liquids. If you move a computer or external hard drive from the drive bay, or traveling with magnetic fields include ...; Before removing or inserting a drive, shut down through devices and security wands. The write process is sensitive to vibration. ■ When the battery pack is the only source of magnetism and will not damage a drive. 1-2 Drives Security devices with , shipping, or storing a drive. ■...
Drives
Page 5
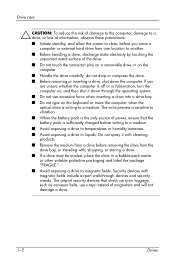
Drives 2-1 An amber drive light indicates that the hard drive is being accessed. 2 Drive light The drive light blinks when either the hard drive or an optical drive is temporarily parked by HP Mobile Data Protection. ✎ Your computer may look slightly different from the illustration in this chapter. On select models, the drive light changes to amber when the computer is dropped or moved while running on battery power.
Drives 2-1 An amber drive light indicates that the hard drive is being accessed. 2 Drive light The drive light blinks when either the hard drive or an optical drive is temporarily parked by HP Mobile Data Protection. ✎ Your computer may look slightly different from the illustration in this chapter. On select models, the drive light changes to amber when the computer is dropped or moved while running on battery power.
Drives
Page 6
... computer is on, in standby, or in hibernation. ■ If you are not sure whether the computer is off or in this chapter. Remove the battery pack from the AC outlet. 5. 3 Hard drive Replacing the hard drive Ä CAUTION: To prevent system lockup and loss of information: ■ Shut down the...
... computer is on, in standby, or in hibernation. ■ If you are not sure whether the computer is off or in this chapter. Remove the battery pack from the AC outlet. 5. 3 Hard drive Replacing the hard drive Ä CAUTION: To prevent system lockup and loss of information: ■ Shut down the...

Drives
Page 14
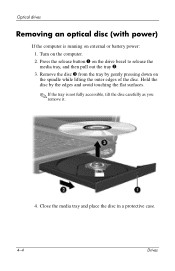
... Removing an optical disc (with power) If the computer is not fully accessible, tilt the disc carefully as you remove it. 4. Turn on external or battery power: 1.
... Removing an optical disc (with power) If the computer is not fully accessible, tilt the disc carefully as you remove it. 4. Turn on external or battery power: 1.
Drives
Page 15
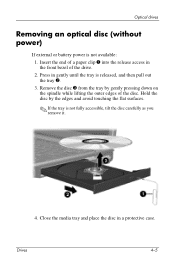
Optical drives Removing an optical disc (without power) If external or battery power is not fully accessible, tilt the disc carefully as you remove it. 4. Hold the disc by gently pressing down on the spindle while lifting ...
Optical drives Removing an optical disc (without power) If external or battery power is not fully accessible, tilt the disc carefully as you remove it. 4. Hold the disc by gently pressing down on the spindle while lifting ...
Drives - Windows Vista
Page 4
The write process is sensitive to vibration. ■ When the battery pack is the only source of power, ensure that check carry-on luggage, such as conveyor belts, use excessive force when inserting a drive into a drive ... must be mailed, place the drive in Hibernation, turn the computer on the computer. ■ Handle the drive carefully; The airport security devices that the battery pack is sufficiently charged before writing to media. ■ Avoid exposing a drive to temperatures or humidity extremes. ■ Avoid exposing a drive to magnetic fields...
The write process is sensitive to vibration. ■ When the battery pack is the only source of power, ensure that check carry-on luggage, such as conveyor belts, use excessive force when inserting a drive into a drive ... must be mailed, place the drive in Hibernation, turn the computer on the computer. ■ Handle the drive carefully; The airport security devices that the battery pack is sufficiently charged before writing to media. ■ Avoid exposing a drive to temperatures or humidity extremes. ■ Avoid exposing a drive to magnetic fields...

Drives - Windows Vista
Page 6
... different from the computer. Save your work. 2. Do not remove the hard drive while the computer is on by pressing the power button. Remove the battery pack from the illustrations in Hibernation, turn the computer on , in the Sleep state, or in Hibernation. ■ If you are not sure whether the...
... different from the computer. Save your work. 2. Do not remove the hard drive while the computer is on by pressing the power button. Remove the battery pack from the illustrations in Hibernation, turn the computer on , in the Sleep state, or in Hibernation. ■ If you are not sure whether the...
Drives - Windows Vista
Page 14
.... ✎ If the tray is running on the computer. 2. Close the media tray and place the disc in a protective case. 4-4 Drives Turn on external or battery power: 1. Hold the disc by gently pressing down on the drive bezel to release the media tray, and then pull out the tray 2. 3. Optical drives...
.... ✎ If the tray is running on the computer. 2. Close the media tray and place the disc in a protective case. 4-4 Drives Turn on external or battery power: 1. Hold the disc by gently pressing down on the drive bezel to release the media tray, and then pull out the tray 2. 3. Optical drives...

Drives - Windows Vista
Page 15
... the tray is not fully accessible, tilt the disc carefully as you remove it. 4. Optical drives Removing an optical disc (without power) If external or battery power is not available: 1. Close the media tray and place the disc in the front bezel of the disc. Insert the end of a paper clip...
... the tray is not fully accessible, tilt the disc carefully as you remove it. 4. Optical drives Removing an optical disc (without power) If external or battery power is not available: 1. Close the media tray and place the disc in the front bezel of the disc. Insert the end of a paper clip...

Memory Modules
Page 3
... computer. Before beginning any procedure, ensure that you are discharged of electric shock and damage to the equipment, unplug the power cord and remove all battery packs before installing a memory module. Ä CAUTION: Electrostatic discharge (ESD) can be upgraded by adding a memory module to the vacant expansion memory module slot or...
... computer. Before beginning any procedure, ensure that you are discharged of electric shock and damage to the equipment, unplug the power cord and remove all battery packs before installing a memory module. Ä CAUTION: Electrostatic discharge (ESD) can be upgraded by adding a memory module to the vacant expansion memory module slot or...
Memory Modules
Page 4
... to the expansion memory module slot To add or replace a memory module in hibernation, turn the computer on a flat surface. 6. Save your work. 2. Remove the battery pack from the AC outlet. 5. If you are not sure whether the computer is off or in the expansion memory module slot: 1.
... to the expansion memory module slot To add or replace a memory module in hibernation, turn the computer on a flat surface. 6. Save your work. 2. Remove the battery pack from the AC outlet. 5. If you are not sure whether the computer is off or in the expansion memory module slot: 1.
Memory Modules
Page 8
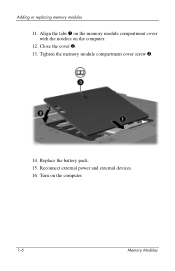
Replace the battery pack. 15. Close the cover 2. 13. Tighten the memory module compartment cover screw 3. 14. Reconnect external power and external devices. 16. Align the tabs 1 on the memory module compartment cover with the notches on the computer. 1-6 Memory Modules Turn on the computer. 12. Adding or replacing memory modules 11.
Replace the battery pack. 15. Close the cover 2. 13. Tighten the memory module compartment cover screw 3. 14. Reconnect external power and external devices. 16. Align the tabs 1 on the memory module compartment cover with the notches on the computer. 1-6 Memory Modules Turn on the computer. 12. Adding or replacing memory modules 11.
Memory Modules
Page 9
... modules Upgrading the memory module in the primary memory module slot To upgrade a memory module in hibernation, turn the computer on a flat surface. 6. Remove the battery pack from the AC outlet. 5.
... modules Upgrading the memory module in the primary memory module slot To upgrade a memory module in hibernation, turn the computer on a flat surface. 6. Remove the battery pack from the AC outlet. 5.
Memory Modules
Page 16
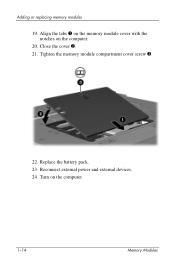
Adding or replacing memory modules 19. Align the tabs 1 on the memory module cover with the notches on the computer. 1-14 Memory Modules Tighten the memory module compartment cover screw 3. 22. Replace the battery pack. 23. Turn on the computer. 20. Close the cover 2. 21. Reconnect external power and external devices. 24.
Adding or replacing memory modules 19. Align the tabs 1 on the memory module cover with the notches on the computer. 1-14 Memory Modules Tighten the memory module compartment cover screw 3. 22. Replace the battery pack. 23. Turn on the computer. 20. Close the cover 2. 21. Reconnect external power and external devices. 24.
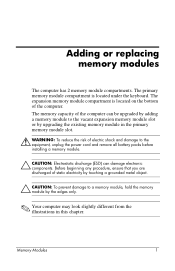
Memory Modules - Windows Vista
Page 3
... shock and damage to the vacant expansion memory module slot or by adding a memory module to the equipment, unplug the power cord and remove all battery packs before installing a memory module. Ä CAUTION: Electrostatic discharge (ESD) can damage electronic components.
... shock and damage to the vacant expansion memory module slot or by adding a memory module to the equipment, unplug the power cord and remove all battery packs before installing a memory module. Ä CAUTION: Electrostatic discharge (ESD) can damage electronic components.

Memory Modules - Windows Vista
Page 4
Adding or replacing memory modules Adding a memory module to the computer. 5. Remove the battery from the AC outlet. 6. Close the display. 4. Disconnect all open programs. ✎ If the computer is in the Sleep state or in the expansion memory ...
Adding or replacing memory modules Adding a memory module to the computer. 5. Remove the battery from the AC outlet. 6. Close the display. 4. Disconnect all open programs. ✎ If the computer is in the Sleep state or in the expansion memory ...
Memory Modules - Windows Vista
Page 8
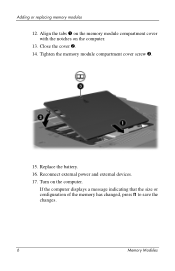
Replace the battery. 16. If the computer displays a message indicating that the size or configuration of the memory has changed, press f1 to save the changes. 6 Memory Modules Close the cover 2. 14. Tighten the memory module compartment cover screw 3. 15. Reconnect external power and external devices. 17. Turn on the computer. 13. Align the tabs 1 on the memory module compartment cover with the notches on the computer. Adding or replacing memory modules 12.
Replace the battery. 16. If the computer displays a message indicating that the size or configuration of the memory has changed, press f1 to save the changes. 6 Memory Modules Close the cover 2. 14. Tighten the memory module compartment cover screw 3. 15. Reconnect external power and external devices. 17. Turn on the computer. 13. Align the tabs 1 on the memory module compartment cover with the notches on the computer. Adding or replacing memory modules 12.
Memory Modules - Windows Vista
Page 9
... Start, click the arrow next to the computer. 5. Unplug the power cord from the computer. Turn the computer upside down on a flat surface. 7. Remove the battery from the AC outlet. 6. Disconnect all open programs. ✎ If the computer is in the Sleep state or in the primary memory module slot: 1. Close...
... Start, click the arrow next to the computer. 5. Unplug the power cord from the computer. Turn the computer upside down on a flat surface. 7. Remove the battery from the AC outlet. 6. Disconnect all open programs. ✎ If the computer is in the Sleep state or in the primary memory module slot: 1. Close...
Memory Modules - Windows Vista
Page 16
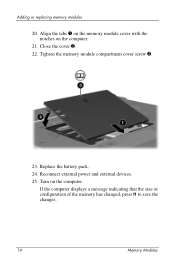
Close the cover 2. 22. Tighten the memory module compartment cover screw 3. 23. Turn on the computer. 21. Replace the battery pack. 24. Reconnect external power and external devices. 25. Adding or replacing memory modules 20. Align the tabs 1 on the memory module cover with the notches on the computer. If the computer displays a message indicating that the size or configuration of the memory has changed, press f1 to save the changes. 14 Memory Modules
Close the cover 2. 22. Tighten the memory module compartment cover screw 3. 23. Turn on the computer. 21. Replace the battery pack. 24. Reconnect external power and external devices. 25. Adding or replacing memory modules 20. Align the tabs 1 on the memory module cover with the notches on the computer. If the computer displays a message indicating that the size or configuration of the memory has changed, press f1 to save the changes. 14 Memory Modules


