
User Guide
Page 3
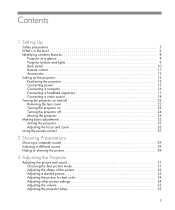
... 15 Connecting a computer 16 Connecting a handheld organizer 17 Connecting a video source 18 Turning the projector on and off 22 Removing the lens cover 22 Turning the projector on 23 Turning the projector off 24 Moving the projector 24 Making basic adjustments 25 Aiming the projector 25 Adjusting the focus and zoom 26 Using the remote control 27 2 Showing...
... 15 Connecting a computer 16 Connecting a handheld organizer 17 Connecting a video source 18 Turning the projector on and off 22 Removing the lens cover 22 Turning the projector on 23 Turning the projector off 24 Moving the projector 24 Making basic adjustments 25 Aiming the projector 25 Adjusting the focus and zoom 26 Using the remote control 27 2 Showing...
User Guide
Page 9
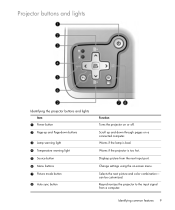
... warning light 4 Temperature warning light 5 Source button 6 Menu buttons 7 Picture mode button 8 Auto sync button Function Turns the projector on a connected computer. Displays picture from a computer. Selects the next picture and color combination- Resynchronizes the projector to the input signal from the next input port. Scroll up and Page-down through pages on...
... warning light 4 Temperature warning light 5 Source button 6 Menu buttons 7 Picture mode button 8 Auto sync button Function Turns the projector on a connected computer. Displays picture from a computer. Selects the next picture and color combination- Resynchronizes the projector to the input signal from the next input port. Scroll up and Page-down through pages on...

User Guide
Page 11
Requires USB cable. Turns the projector on a connected computer. Perform left-click and right-click mouse functions on or off. Scroll up and Page-down through pages on a connected computer. Moves ...
Requires USB cable. Turns the projector on a connected computer. Perform left-click and right-click mouse functions on or off. Scroll up and Page-down through pages on a connected computer. Moves ...
User Guide
Page 16
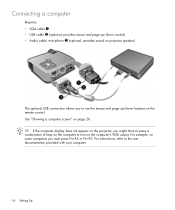
...page 29. For instructions, refer to use the mouse and page up /down control) • Audio cable, mini-phone 3 (optional, provides sound on projector speaker) The optional USB connection allows you must press FN+F4 or FN+F5. See "Showing a computer screen" on the remote control. TIP: If ...the computer display does not appear on the projector, you might have to press a combination of keys on the computer to turn on some computers you to the user documentation provided with your computer. 16 Setting Up For example, on the...
...page 29. For instructions, refer to use the mouse and page up /down control) • Audio cable, mini-phone 3 (optional, provides sound on projector speaker) The optional USB connection allows you must press FN+F4 or FN+F5. See "Showing a computer screen" on the remote control. TIP: If ...the computer display does not appear on the projector, you might have to press a combination of keys on the computer to turn on some computers you to the user documentation provided with your computer. 16 Setting Up For example, on the...
User Guide
Page 22
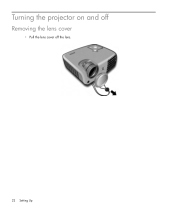
Turning the projector on and off Removing the lens cover • Pull the lens cover off the lens. 22 Setting Up
Turning the projector on and off Removing the lens cover • Pull the lens cover off the lens. 22 Setting Up
User Guide
Page 23
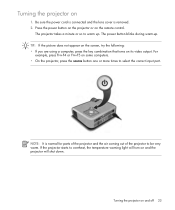
...: • If you are using a computer, press the key combination that turns on the remote control. For example, press FN+F4 or FN+F5 on and the projector will turn on some computers. • On the projector, press the source button one or more times to be very warm. NOTE:... It is removed. 2. Turning the projector on 1. The power button blinks during warm-up . If the projector starts to warm up . Turning the projector on and off ...
...: • If you are using a computer, press the key combination that turns on the remote control. For example, press FN+F4 or FN+F5 on and the projector will turn on some computers. • On the projector, press the source button one or more times to be very warm. NOTE:... It is removed. 2. Turning the projector on 1. The power button blinks during warm-up . If the projector starts to warm up . Turning the projector on and off ...
User Guide
Page 24
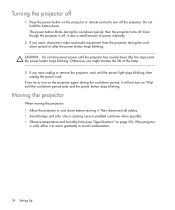
...try to cool down period, then the projector turns off the projector. If you want, disconnect video and audio equipment from the projector during the cool-down before moving the projector: • Allow the projector to turn on page 55). Wait until the projector has cooled down . If you might...stops blinking, then unplug the power cord. Turning the projector off , it uses a small amount of the lamp. 3. Even though the projector is cold, allow it . Moving the projector When moving it to warm gradually to turn on the projector or remote control to avoid condensation. 24...
...try to cool down period, then the projector turns off the projector. If you want, disconnect video and audio equipment from the projector during the cool-down before moving the projector: • Allow the projector to turn on page 55). Wait until the projector has cooled down . If you might...stops blinking, then unplug the power cord. Turning the projector off , it uses a small amount of the lamp. 3. Even though the projector is cold, allow it . Moving the projector When moving it to warm gradually to turn on the projector or remote control to avoid condensation. 24...
User Guide
Page 25
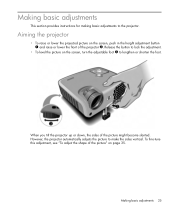
... the button to lock the adjustment. • To level the picture on the screen, turn the adjustable foot 3 to the projector. Aiming the projector • To raise or lower the projected picture on page 35. To fine-tune this adjustment, see "To adjust the shape of the picture" on ... become slanted. Making basic adjustments 25 Making basic adjustments This section provides instructions for making basic adjustments to lengthen or shorten the foot. However, the projector automatically adjusts the picture to make the sides vertical.
... the button to lock the adjustment. • To level the picture on the screen, turn the adjustable foot 3 to the projector. Aiming the projector • To raise or lower the projected picture on page 35. To fine-tune this adjustment, see "To adjust the shape of the picture" on ... become slanted. Making basic adjustments 25 Making basic adjustments This section provides instructions for making basic adjustments to lengthen or shorten the foot. However, the projector automatically adjusts the picture to make the sides vertical.

User Guide
Page 27
hide button 1. This feature requires a USB connection between the projector and computer. This feature requires a USB connection between the projector and computer. Power button 3. This feature requires a USB connection between the projector and computer. auto sync button 6. Mouse pad 2 at the edge in the direction you ... or right-click button 4. Page-up or page down button 5. Hide or unhide the picture Move mouse pointer on computer Turn the projector on or off Click mouse button on computer Page up or page-down on computer Readjust picture of computer screen Press this ...
hide button 1. This feature requires a USB connection between the projector and computer. This feature requires a USB connection between the projector and computer. Power button 3. This feature requires a USB connection between the projector and computer. auto sync button 6. Mouse pad 2 at the edge in the direction you ... or right-click button 4. Page-up or page down button 5. Hide or unhide the picture Move mouse pointer on computer Turn the projector on or off Click mouse button on computer Page up or page-down on computer Readjust picture of computer screen Press this ...
User Guide
Page 29
...combination, such as FN+F4 or FN+F5. Press the hide button on page 25. 3. See "Making basic adjustments" on the projector or remote control to turn on and playing video. Refer to select the VGA port. 4. Hiding or showing the picture 1. If a different input source is connected... to the projector and turned on the projector or remote control one or more times to the user documentation provided with your video source does not appear on page 16. 2. 2...
...combination, such as FN+F4 or FN+F5. Press the hide button on page 25. 3. See "Making basic adjustments" on the projector or remote control to turn on and playing video. Refer to select the VGA port. 4. Hiding or showing the picture 1. If a different input source is connected... to the projector and turned on the projector or remote control one or more times to the user documentation provided with your video source does not appear on page 16. 2. 2...

User Guide
Page 33
Adjusting a slanted picture If the projector is straight in different directions, move the projector until it again or turn the automatic adjustment on the screen might slant in or out, even though the top and bottom are not slanted. Press up or down to ... you can change this adjustment manually. 1. TIP: If the top and bottom of the picture slant in front of the picture on or off the projector. Adjusting the picture and sound 33 The automatic keystone adjustment corrects this problem-or you manually enable it is tilted up or down , the sides...
Adjusting a slanted picture If the projector is straight in different directions, move the projector until it again or turn the automatic adjustment on the screen might slant in or out, even though the top and bottom are not slanted. Press up or down to ... you can change this adjustment manually. 1. TIP: If the top and bottom of the picture slant in front of the picture on or off the projector. Adjusting the picture and sound 33 The automatic keystone adjustment corrects this problem-or you manually enable it is tilted up or down , the sides...

User Guide
Page 35
..., press enter, go to Quick choice > Volume, and change the setting. • To turn the sound on page 39. Press enter, and go to Setup. 2. Adjusting the projector setup 1. Set the setup adjustments as menu language, power usage, and menu timeout. To get descriptions for all available setup adjustments, see "Setup menu...
..., press enter, go to Quick choice > Volume, and change the setting. • To turn the sound on page 39. Press enter, and go to Setup. 2. Adjusting the projector setup 1. Set the setup adjustments as menu language, power usage, and menu timeout. To get descriptions for all available setup adjustments, see "Setup menu...
User Guide
Page 37
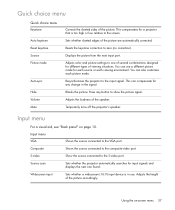
... searches for input signals and displays the next one of several combinations designed for any button to one found. Temporarily turns off the projector's speaker. You can use . Input menu For a visual aid, see "Back panel" on -screen menu 37 Widescreen input Sets whether a ...types of viewing situations. This compensates for each source or each picture mode. Press any change in use a different picture mode for a projector that is in the signal. Sets whether slanted edges of the picture. Adjusts the loudness of the picture accordingly. Adjusts the height of ...
... searches for input signals and displays the next one of several combinations designed for any button to one found. Temporarily turns off the projector's speaker. You can use . Input menu For a visual aid, see "Back panel" on -screen menu 37 Widescreen input Sets whether a ...types of viewing situations. This compensates for each source or each picture mode. Press any change in use a different picture mode for a projector that is in the signal. Sets whether slanted edges of the picture. Adjusts the loudness of the picture accordingly. Adjusts the height of ...
User Guide
Page 42
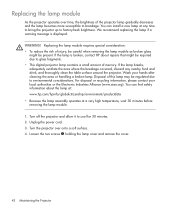
...Turn off the projector and allow it to environmental considerations. We recommend replacing the lamp if a warning message is broken, contact HP about the lamp at: www.hp.com/hpinfo/globalcitizenship/environment/productdata • Because the lamp assembly operates at any nearby food and drink, and thoroughly clean the table surface around the projector... the projector operates over onto a soft surface. 4. Turn the projector over time, the brightness of the projector lamp gradually decreases and the lamp becomes more susceptible to glass fragments. • This digital projector lamp ...
...Turn off the projector and allow it to environmental considerations. We recommend replacing the lamp if a warning message is broken, contact HP about the lamp at: www.hp.com/hpinfo/globalcitizenship/environment/productdata • Because the lamp assembly operates at any nearby food and drink, and thoroughly clean the table surface around the projector... the projector operates over onto a soft surface. 4. Turn the projector over time, the brightness of the projector lamp gradually decreases and the lamp becomes more susceptible to glass fragments. • This digital projector lamp ...
User Guide
Page 43
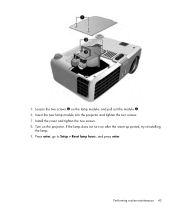
Press enter, go to Setup > Reset lamp hours, and press enter. If the lamp does not turn on the lamp module, and pull out the module 3. 6. Loosen the two screws 2 on after the warm-up period, try reinstalling the lamp. 9. Install the cover and tighten the two screws. 8. Turn on the projector. Performing routine maintenance 43 Insert the new lamp module into the projector and tighten the two screws. 7. 5.
Press enter, go to Setup > Reset lamp hours, and press enter. If the lamp does not turn on the lamp module, and pull out the module 3. 6. Loosen the two screws 2 on after the warm-up period, try reinstalling the lamp. 9. Install the cover and tighten the two screws. 8. Turn on the projector. Performing routine maintenance 43 Insert the new lamp module into the projector and tighten the two screws. 7. 5.

User Guide
Page 49
...new lamp does not fix the problem, contact HP for assistance. To contact HP, refer to the support guide included with your problem, go to cool down after it turns off. If this condition occurs after you restart the projector, contact HP for additional information. Remove any sources of ...temperature light is on or blinks after you restart the projector, remove and reinstall the lamp module. • Install a new lamp. If the warning light turns on or blinking: • Allow the projector to http://www.hp.com/support for assistance. Warning light problems If both ...
...new lamp does not fix the problem, contact HP for assistance. To contact HP, refer to the support guide included with your problem, go to cool down after it turns off. If this condition occurs after you restart the projector, contact HP for additional information. Remove any sources of ...temperature light is on or blinks after you restart the projector, remove and reinstall the lamp module. • Install a new lamp. If the warning light turns on or blinking: • Allow the projector to http://www.hp.com/support for assistance. Warning light problems If both ...
User Guide
Page 50
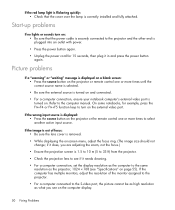
... the S-video port, the picture cannot be as high resolution as the projector, 1024 × 768 (see on the computer display. 50 Fixing Problems If the computer has multiple monitors, adjust the resolution of focus: • Be sure the lens cover is turned on. Start-up problems If no lights or sounds... turn on the external video port. If the red lamp light is flickering quickly: • Check that the power cable is securely connected to the projector and the other end is plugged into an outlet with power. • Press the power button again. •...
... the S-video port, the picture cannot be as high resolution as the projector, 1024 × 768 (see on the computer display. 50 Fixing Problems If the computer has multiple monitors, adjust the resolution of focus: • Be sure the lens cover is turned on. Start-up problems If no lights or sounds... turn on the external video port. If the red lamp light is flickering quickly: • Check that the power cable is securely connected to the projector and the other end is plugged into an outlet with power. • Press the power button again. •...
User Guide
Page 52
...or unstable for a computer connection: • Press the auto sync button on the projector or remote control. • Turn everything off image is displayed for a computer connection: • Press the auto sync button on the projector or remote control. • Press enter, go to Picture > VGA settings, and...computer screen: • For a notebook computer, you are not bent or broken. • Press enter, go to the same resolution as the projector, 1024 × 768 (see "Specifications" on page 47. If the computer has multiple monitors, adjust the resolution of the notebook or desktop ...
...or unstable for a computer connection: • Press the auto sync button on the projector or remote control. • Turn everything off image is displayed for a computer connection: • Press the auto sync button on the projector or remote control. • Press enter, go to Picture > VGA settings, and...computer screen: • For a notebook computer, you are not bent or broken. • Press enter, go to the same resolution as the projector, 1024 × 768 (see "Specifications" on page 47. If the computer has multiple monitors, adjust the resolution of the notebook or desktop ...
User Guide
Page 53
... and Volume is correct. • Press enter, go to all controls: • If possible, turn back on until the lamp module has been replaced. • If the lamp breaks, contact HP about repairs that might cause the lamp to Help > Diagnostics, and run the sound test. • Be sure that the...out or makes a popping sound: • If the lamp burns out and makes a popping sound, the projector will not turn off the projector, then unplug the power cord and wait at the front or back of the projector. • Move the remote control so it is blocking the remote control receiver on page 49.
... and Volume is correct. • Press enter, go to all controls: • If possible, turn back on until the lamp module has been replaced. • If the lamp breaks, contact HP about repairs that might cause the lamp to Help > Diagnostics, and run the sound test. • Be sure that the...out or makes a popping sound: • If the lamp burns out and makes a popping sound, the projector will not turn off the projector, then unplug the power cord and wait at the front or back of the projector. • Move the remote control so it is blocking the remote control receiver on page 49.
User's Guide
Page 23
...power button stops blinking. Moving the projector When moving it will not turn off 1. If you might shorten the life of power internally. 2. CAUTION: Do not disconnect power until the projector has cooled down . Turning the projector on page 55). Otherwise, you ... disconnect video and audio equipment from the projector during the cool-down before moving the projector: • Allow the projector to turn on the projector or remote control to cool down period, then the projector turns off 23 Turning the projector off the projector. Then disconnect all cables. •...
...power button stops blinking. Moving the projector When moving it will not turn off 1. If you might shorten the life of power internally. 2. CAUTION: Do not disconnect power until the projector has cooled down . Turning the projector on page 55). Otherwise, you ... disconnect video and audio equipment from the projector during the cool-down before moving the projector: • Allow the projector to turn on the projector or remote control to cool down period, then the projector turns off 23 Turning the projector off the projector. Then disconnect all cables. •...


