
Warranty and Support Guide
Page 8
... rent, lease or lend the Software Product or use the Software Product for commercial timesharing or bureau use. d. Reservation of Authenticity. After upgrading, you comply with all component parts, media, printed materials, this EULA. 8 ADDITIONAL SOFTWARE. Any transfer must include all terms and conditions... of this EULA. You may load the Software Product into the local memory or storage device of the HP Product. IF YOU DO NOT ACCEPT THESE LICENSE TERMS, YOUR SOLE REMEDY IS TO RETURN THE ENTIRE UNUSED PRODUCT (...
... rent, lease or lend the Software Product or use the Software Product for commercial timesharing or bureau use. d. Reservation of Authenticity. After upgrading, you comply with all component parts, media, printed materials, this EULA. 8 ADDITIONAL SOFTWARE. Any transfer must include all terms and conditions... of this EULA. You may load the Software Product into the local memory or storage device of the HP Product. IF YOU DO NOT ACCEPT THESE LICENSE TERMS, YOUR SOLE REMEDY IS TO RETURN THE ENTIRE UNUSED PRODUCT (...
Limited Warranty and Support Guide (Refurbished Desktops)
Page 7
...An amendment or addendum to all component parts, media, printed materials, this EULA may load the Software Product into the local memory or storage device of the HP Product. BY INSTALLING, COPYING, DOWNLOADING, OR OTHERWISE USING THE SOFTWARE PRODUCT, YOU AGREE TO BE BOUND BY THE TERMS OF... a hard disk drive-based solution, an external media-based recovery solution (e.g. To use a Software Product identified as an upgrade, you must first be licensed for your HP Product, whether in any other form, may install and use the Software Product only on those computers. Third Party. Prior...
...An amendment or addendum to all component parts, media, printed materials, this EULA may load the Software Product into the local memory or storage device of the HP Product. BY INSTALLING, COPYING, DOWNLOADING, OR OTHERWISE USING THE SOFTWARE PRODUCT, YOU AGREE TO BE BOUND BY THE TERMS OF... a hard disk drive-based solution, an external media-based recovery solution (e.g. To use a Software Product identified as an upgrade, you must first be licensed for your HP Product, whether in any other form, may install and use the Software Product only on those computers. Third Party. Prior...

Getting Started Guide
Page 191
...DVDs 140 resizing window 116 using with another program open 116 what you can do in Music 125 memory card reader 155 card types 99 in-use light 103 troubleshooting 104 using 99 memory card, formatting 103 microphone connector 4, 6 mini-jack 18 modem connection 15 modem connector 7 monitor... video from a camera 167 making a movie 173 previewing a movie 174 rotating images clockwise 171 selecting style 171 setting the duration of video 172 upgrading 177 using the magicMoments feature 170 My Music 125 playing an album 133 N network interface adapter 5 Network Interface Card (NIC) 12 network name ...
...DVDs 140 resizing window 116 using with another program open 116 what you can do in Music 125 memory card reader 155 card types 99 in-use light 103 troubleshooting 104 using 99 memory card, formatting 103 microphone connector 4, 6 mini-jack 18 modem connection 15 modem connector 7 monitor... video from a camera 167 making a movie 173 previewing a movie 174 rotating images clockwise 171 selecting style 171 setting the duration of video 172 upgrading 177 using the magicMoments feature 170 My Music 125 playing an album 133 N network interface adapter 5 Network Interface Card (NIC) 12 network name ...

Getting Started Guide
Page 219
...feature 126 disconnecting the drive 130 inserting a drive 127 location and drive letter 129 HP Photosmart Essential 103 HP Pocket Media Drive 125 HP Total Care Advisor 41 I IBM Microdrive 122 Internet security 52, 100 K keyboard connector...card types 119 in-use light 123 troubleshooting 124 using 119 memory card, formatting 123 Memory Stick (MS) 121 Memory Stick (MS-Duo) 121 Memory Stick (MS-Pro Duo) 121 Memory Stick (MS-Pro) 121 Microdrive disk drive 121 microphone connector... 198 selecting style 199 setting the duration of video 200 upgrading 206 using the magicMoments feature 197 Index 209
...feature 126 disconnecting the drive 130 inserting a drive 127 location and drive letter 129 HP Photosmart Essential 103 HP Pocket Media Drive 125 HP Total Care Advisor 41 I IBM Microdrive 122 Internet security 52, 100 K keyboard connector...card types 119 in-use light 123 troubleshooting 124 using 119 memory card, formatting 123 Memory Stick (MS) 121 Memory Stick (MS-Duo) 121 Memory Stick (MS-Pro Duo) 121 Memory Stick (MS-Pro) 121 Microdrive disk drive 121 microphone connector... 198 selecting style 199 setting the duration of video 200 upgrading 206 using the magicMoments feature 197 Index 209

Upgrading and Servicing Guide
Page 3
Table of Contents Upgrading and Servicing Guide 1 Safety Information 1 Opening and Closing the Computer 1 Preparing the computer 2 Before opening the computer 2 After closing the computer 3 Removing the side panel 3 ... 11 Adding or replacing the HP Pocket Media drive bay or hard disk drive 13 Removing the memory card reader 15 Adding or replacing the memory card reader 16 Removing the hard disk drive 17 Adding or replacing a hard disk drive 19 Adding Memory 22 Removing a memory module 23 Installing a memory module 25 Removing or Installing...
Table of Contents Upgrading and Servicing Guide 1 Safety Information 1 Opening and Closing the Computer 1 Preparing the computer 2 Before opening the computer 2 After closing the computer 3 Removing the side panel 3 ... 11 Adding or replacing the HP Pocket Media drive bay or hard disk drive 13 Removing the memory card reader 15 Adding or replacing the memory card reader 16 Removing the hard disk drive 17 Adding or replacing a hard disk drive 19 Adding Memory 22 Removing a memory module 23 Installing a memory module 25 Removing or Installing...
Upgrading and Servicing Guide
Page 9
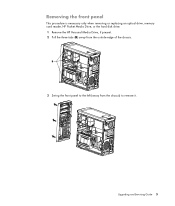
Upgrading and Servicing Guide 5 B 3 Swing the front panel to remove it. Removing the front panel This procedure is necessary only when removing or replacing an optical drive, memory card reader, HP Pocket Media Drive, or the hard disk drive. 1 Remove the HP Personal Media Drive, if present. 2 Pull the three tabs (B) away from the chassis) to the left (away from the outside edge of the chassis.
Upgrading and Servicing Guide 5 B 3 Swing the front panel to remove it. Removing the front panel This procedure is necessary only when removing or replacing an optical drive, memory card reader, HP Pocket Media Drive, or the hard disk drive. 1 Remove the HP Personal Media Drive, if present. 2 Pull the three tabs (B) away from the chassis) to the left (away from the outside edge of the chassis.

Upgrading and Servicing Guide
Page 11
Upgrading and Servicing Guide 7 Locating Components Inside the Computer A B C D F E A Memory card reader B Upper 5.25-inch optical drive bay, which may be a CD-ROM, CD-RW, DVD-ROM, DVD+RW/+R, or combination drive C Lower 5.25-inch optical drive bay, may be empty (knockout plate) or a CD-ROM, CD-RW, DVD-ROM, DVD+RW/+R, or combination drive D HP Pocket Media Drive bay (select models) E Front connector panel (no replacement instructions) F HP Personal Media Drive bay (select models) NOTE: The connectors and components of your chassis model may vary from the illustration.
Upgrading and Servicing Guide 7 Locating Components Inside the Computer A B C D F E A Memory card reader B Upper 5.25-inch optical drive bay, which may be a CD-ROM, CD-RW, DVD-ROM, DVD+RW/+R, or combination drive C Lower 5.25-inch optical drive bay, may be empty (knockout plate) or a CD-ROM, CD-RW, DVD-ROM, DVD+RW/+R, or combination drive D HP Pocket Media Drive bay (select models) E Front connector panel (no replacement instructions) F HP Personal Media Drive bay (select models) NOTE: The connectors and components of your chassis model may vary from the illustration.

Upgrading and Servicing Guide
Page 19
See "Opening and Closing the Computer" on page 1. 2 Release the drive by removing the screw on the top of the memory card reader, sliding the memory card reader to the left to be opened, and then remove the side and front panels. Upgrading and Servicing Guide 15 Removing the memory card reader 1 Prepare the computer to loosen it, and then pulling it partway out of the front of the chassis. 3 Disconnect the cables from the back of the memory card reader. 4 Pull the memory card reader out of the front of the chassis.
See "Opening and Closing the Computer" on page 1. 2 Release the drive by removing the screw on the top of the memory card reader, sliding the memory card reader to the left to be opened, and then remove the side and front panels. Upgrading and Servicing Guide 15 Removing the memory card reader 1 Prepare the computer to loosen it, and then pulling it partway out of the front of the chassis. 3 Disconnect the cables from the back of the memory card reader. 4 Pull the memory card reader out of the front of the chassis.

Upgrading and Servicing Guide
Page 20
... procedures to the chassis. 5 Replace the front and side panels, and close the computer. See "Opening and Closing the Computer" on the top of the memory card reader. 4 Push the memory card reader into the chassis until the screw hole on the chassis is aligned with the screw hole on page 1. 16... Upgrading and Servicing Guide See "Removing the memory card reader" on page 15. 2 Slide the memory card reader partway into the front of the chassis. 3 Attach the cables to the back of the...
... procedures to the chassis. 5 Replace the front and side panels, and close the computer. See "Opening and Closing the Computer" on the top of the memory card reader. 4 Push the memory card reader into the chassis until the screw hole on the chassis is aligned with the screw hole on page 1. 16... Upgrading and Servicing Guide See "Removing the memory card reader" on page 15. 2 Slide the memory card reader partway into the front of the chassis. 3 Attach the cables to the back of the...
Upgrading and Servicing Guide
Page 26
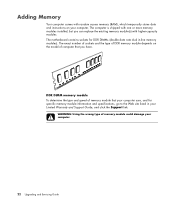
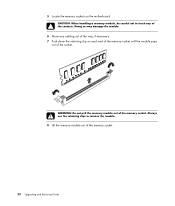
... To determine the type and speed of memory module could damage your computer. 22 Upgrading and Servicing Guide WARNING: Using the wrong type of memory module that you can replace the existing memory module(s) with random access memory (RAM), which temporarily stores data and instructions on the...DIMMs (double data rate dual in your computer. The motherboard contains sockets for specific memory module information and specifications, go to the Web site listed in -line memory modules). Adding Memory Your computer comes with higher-capacity modules. The computer is shipped with one or ...
... To determine the type and speed of memory module could damage your computer. 22 Upgrading and Servicing Guide WARNING: Using the wrong type of memory module that you can replace the existing memory module(s) with random access memory (RAM), which temporarily stores data and instructions on the...DIMMs (double data rate dual in your computer. The motherboard contains sockets for specific memory module information and specifications, go to the Web site listed in -line memory modules). Adding Memory Your computer comes with higher-capacity modules. The computer is shipped with one or ...

Upgrading and Servicing Guide
Page 27
See "Opening and Closing the Computer" on page 1. 2 Gently lay the computer on the side of the hard disk drive cage, and then slide the hard disk drive cage away from the bottom of the chassis. Upgrading and Servicing Guide 23 Removing a memory module 1 Prepare the computer to push down the latch on its side. 3 Remove the two screws that secure the hard disk drive cage to the chassis. 4 Use a screwdriver to be opened, and then remove the side and front panels.
See "Opening and Closing the Computer" on page 1. 2 Gently lay the computer on the side of the hard disk drive cage, and then slide the hard disk drive cage away from the bottom of the chassis. Upgrading and Servicing Guide 23 Removing a memory module 1 Prepare the computer to push down the latch on its side. 3 Remove the two screws that secure the hard disk drive cage to the chassis. 4 Use a screwdriver to be opened, and then remove the side and front panels.
Upgrading and Servicing Guide
Page 28
Doing so may damage the module. 6 Move any of the contacts. Always use the retaining clips to touch any cabling out of the way, if necessary. 7 Push down the retaining clip on the motherboard. 5 Locate the memory sockets on each end of the memory socket until the module pops out of the socket. WARNING: Do not pull the memory module out of the memory socket. 24 Upgrading and Servicing Guide CAUTION: When handling a memory module, be careful not to remove the module. 8 Lift the memory module out of the memory socket.
Doing so may damage the module. 6 Move any of the contacts. Always use the retaining clips to touch any cabling out of the way, if necessary. 7 Push down the retaining clip on the motherboard. 5 Locate the memory sockets on each end of the memory socket until the module pops out of the socket. WARNING: Do not pull the memory module out of the memory socket. 24 Upgrading and Servicing Guide CAUTION: When handling a memory module, be careful not to remove the module. 8 Lift the memory module out of the memory socket.

Upgrading and Servicing Guide
Page 29
... If you are replacing a memory module, install the new memory module into place. Align the notch (A) on the memory module with a memory module of the same type and speed as the memory originally installed in only one position. If you removed the old memory module. A B Upgrading and Servicing Guide 25 Installing a memory module Upgrade the memory in your computer with...
... If you are replacing a memory module, install the new memory module into place. Align the notch (A) on the memory module with a memory module of the same type and speed as the memory originally installed in only one position. If you removed the old memory module. A B Upgrading and Servicing Guide 25 Installing a memory module Upgrade the memory in your computer with...

Upgrading and Servicing Guide
Page 30
NOTE: If a blank screen is displayed after you replace or add a memory module, the module is the wrong type of the chassis until it is installed incorrectly or it locks into place. 3 Attach the two screws that ... the holes on page 1. See "Opening and Closing the Computer" on the back of the chassis, and then slide it down toward the bottom of memory. Remove and reinstall the memory module. 26 Upgrading and Servicing Guide
NOTE: If a blank screen is displayed after you replace or add a memory module, the module is the wrong type of the chassis until it is installed incorrectly or it locks into place. 3 Attach the two screws that ... the holes on page 1. See "Opening and Closing the Computer" on the back of the chassis, and then slide it down toward the bottom of memory. Remove and reinstall the memory module. 26 Upgrading and Servicing Guide

Upgrading and Servicing Guide
Page 35
...Computer" on the motherboard provides backup power for the computer timekeeping capability. See "Adding Memory" on its side. 3 Remove any cabling, if necessary, so that you can reach the battery. 4 Remove any memory modules or cables that you removed. 8 Place the chassis upright. 9 Replace the...'s instructions. 1 Prepare the computer to weaken, the date and time may become incorrect. Upgrading and Servicing Guide 31 Replace it with the positive (+) side facing the latch. 7 Replace any memory modules, if necessary, so that you can reach the battery. When the battery starts to...
...Computer" on the motherboard provides backup power for the computer timekeeping capability. See "Adding Memory" on its side. 3 Remove any cabling, if necessary, so that you can reach the battery. 4 Remove any memory modules or cables that you removed. 8 Place the chassis upright. 9 Replace the...'s instructions. 1 Prepare the computer to weaken, the date and time may become incorrect. Upgrading and Servicing Guide 31 Replace it with the positive (+) side facing the latch. 7 Replace any memory modules, if necessary, so that you can reach the battery. When the battery starts to...
PC Troubleshooting
Page 21
...cables connecting the computer to the external power source are plugged in properly. See "Display (Monitor)" on the number key pad. Reinstall the old memory to return your country/ region, or refer to the Limited Warranty and Support Guide to mouse movement. 4 Click OK. Troubleshooting Computer Problems 17 ... original state. Connect the monitor to contact Support. Reseat the hard disk drive data and power cables. For instructions, refer to the Upgrading and Servicing Guide. If the display (monitor) is blank, the monitor may have been installed. For instructions, refer to the...
...cables connecting the computer to the external power source are plugged in properly. See "Display (Monitor)" on the number key pad. Reinstall the old memory to return your country/ region, or refer to the Limited Warranty and Support Guide to mouse movement. 4 Click OK. Troubleshooting Computer Problems 17 ... original state. Connect the monitor to contact Support. Reseat the hard disk drive data and power cables. For instructions, refer to the Upgrading and Servicing Guide. If the display (monitor) is blank, the monitor may have been installed. For instructions, refer to the...


