Upgrading and Servicing Guide
Page 18
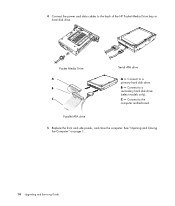
B - C - Connect to a secondary hard disk drive (select models only). Connect to the computer motherboard. 5 Replace the front and side panels, and close the computer. Connect to the back of the HP Pocket Media Drive bay or hard disk drive. 4 Connect the power and data cables to a primary hard disk drive. Pocket Media Drive A B MASTER C SLAVE To CPU Parallel ATA drive Serial ATA drive A - See "Opening and Closing the Computer" on page 1. 14 Upgrading and Servicing Guide
B - C - Connect to a secondary hard disk drive (select models only). Connect to the computer motherboard. 5 Replace the front and side panels, and close the computer. Connect to the back of the HP Pocket Media Drive bay or hard disk drive. 4 Connect the power and data cables to a primary hard disk drive. Pocket Media Drive A B MASTER C SLAVE To CPU Parallel ATA drive Serial ATA drive A - See "Opening and Closing the Computer" on page 1. 14 Upgrading and Servicing Guide
Upgrading and Servicing Guide
Page 24
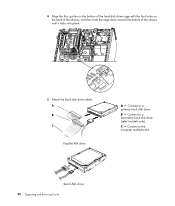
4 Align the four guides on the bottom of the hard disk drive cage with the four holes on the back of the chassis, and then slide the cage down toward the bottom of the chassis until it locks into place. 5 Attach the hard disk drive cables. Connect to the computer motherboard. Serial ATA drive 20 Upgrading and Servicing Guide Connect to a secondary hard disk drive (select models only). Connect to a primary hard disk drive. A B MASTER C SLAVE To CPU Parallel ATA drive A - B - C -
4 Align the four guides on the bottom of the hard disk drive cage with the four holes on the back of the chassis, and then slide the cage down toward the bottom of the chassis until it locks into place. 5 Attach the hard disk drive cables. Connect to the computer motherboard. Serial ATA drive 20 Upgrading and Servicing Guide Connect to a secondary hard disk drive (select models only). Connect to a primary hard disk drive. A B MASTER C SLAVE To CPU Parallel ATA drive A - B - C -
Upgrading and Servicing Guide
Page 26
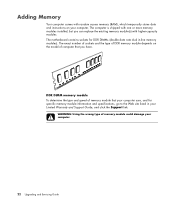
WARNING: Using the wrong type of memory module could damage your computer. Adding Memory Your computer comes with higher-capacity modules. The motherboard contains sockets for specific memory module information and specifications, go to the Web site listed in your computer uses, and for DDR DIMMs ...data rate dual in-line memory modules). The exact number of sockets and the type of DDR memory module depends on your computer. 22 Upgrading and Servicing Guide The computer is shipped with one or more memory modules installed, but you can replace the existing memory module(s) with random ...
WARNING: Using the wrong type of memory module could damage your computer. Adding Memory Your computer comes with higher-capacity modules. The motherboard contains sockets for specific memory module information and specifications, go to the Web site listed in your computer uses, and for DDR DIMMs ...data rate dual in-line memory modules). The exact number of sockets and the type of DDR memory module depends on your computer. 22 Upgrading and Servicing Guide The computer is shipped with one or more memory modules installed, but you can replace the existing memory module(s) with random ...
Upgrading and Servicing Guide
Page 28
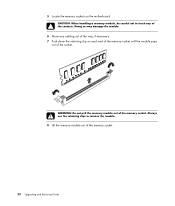
WARNING: Do not pull the memory module out of the way, if necessary. 7 Push down the retaining clip on the motherboard. Doing so may damage the module. 6 Move any of the contacts. 5 Locate the memory sockets on each end of the memory socket until the module pops out of the socket. CAUTION: When handling a memory module, be careful not to remove the module. 8 Lift the memory module out of the memory socket. 24 Upgrading and Servicing Guide Always use the retaining clips to touch any cabling out of the memory socket.
WARNING: Do not pull the memory module out of the way, if necessary. 7 Push down the retaining clip on the motherboard. Doing so may damage the module. 6 Move any of the contacts. 5 Locate the memory sockets on each end of the memory socket until the module pops out of the socket. CAUTION: When handling a memory module, be careful not to remove the module. 8 Lift the memory module out of the memory socket. 24 Upgrading and Servicing Guide Always use the retaining clips to touch any cabling out of the memory socket.

Upgrading and Servicing Guide
Page 32
... plate. See "Opening and Closing the Computer" on page 1. 2 Gently lay the computer on its side. 3 On the back of the sharp edges on the motherboard. Or Insert a flat-head screwdriver into the knockout plate slot (A), and then gently rotate the screwdriver to be opened, and then remove the side and...
... plate. See "Opening and Closing the Computer" on page 1. 2 Gently lay the computer on its side. 3 On the back of the sharp edges on the motherboard. Or Insert a flat-head screwdriver into the knockout plate slot (A), and then gently rotate the screwdriver to be opened, and then remove the side and...

Upgrading and Servicing Guide
Page 35
The battery has an estimated life expectancy of explosion if the battery is incorrectly replaced. WARNING: There is danger of seven years. Upgrading and Servicing Guide 31 Replacing the Battery A lithium battery on page 1. If the battery runs out of power, replace it only with a CR2032...the latch away from the battery, and then lift the battery out of an equivalent type. See "Opening and Closing the Computer" on the motherboard provides backup power for the computer timekeeping capability. Replace it with a battery of the same or of the socket. 6 Install the new CR2032 ...
The battery has an estimated life expectancy of explosion if the battery is incorrectly replaced. WARNING: There is danger of seven years. Upgrading and Servicing Guide 31 Replacing the Battery A lithium battery on page 1. If the battery runs out of power, replace it only with a CR2032...the latch away from the battery, and then lift the battery out of an equivalent type. See "Opening and Closing the Computer" on the motherboard provides backup power for the computer timekeeping capability. Replace it with a battery of the same or of the socket. 6 Install the new CR2032 ...


