Getting Started
Page 19
...Guide on the Documentation CD for instructions on installing a new battery, or contact an authorized dealer or reseller for manually disabling the Smart Cover Lock, is available from HP. Cursor will need to be used to update the RTC date and time). The Num Lock key can also be...You will not move using Computer Setup. First, reset the date and time under Control Panel (Computer Setup can be on. Press the Num Lock key. Cannot remove computer cover or access panel. Getting Started Solving General Problems (Continued) Problem Cause Solution Computer date and time display is...
...Guide on the Documentation CD for instructions on installing a new battery, or contact an authorized dealer or reseller for manually disabling the Smart Cover Lock, is available from HP. Cursor will need to be used to update the RTC date and time). The Num Lock key can also be...You will not move using Computer Setup. First, reset the date and time under Control Panel (Computer Setup can be on. Press the Num Lock key. Cannot remove computer cover or access panel. Getting Started Solving General Problems (Continued) Problem Cause Solution Computer date and time display is...
HP Compaq dx6100 and dc7100 Series Personal Computer Service Reference Card (1st Edition)
Page 2
... interface. Setup Utilities. [1] Smart Cover Sensor [3] Indicates computer cover or side panel has been removed. Setup Utilities or Diagnostics for Mode computer used in drive A...next time the computer is entered. To delete a password using Setup: 1. To delete or disable the Power On and Setup passwords: 1. Setup Utilities. [1] Drive Protection System (DPS Diagnostic ... Setup Utility (in system ROM) and by Diagnostics for proper seating, proper type, and HP compatibility. 3. Setup Utilities. [1] Smart Software-controllable solenoid that, when Cover Lock [2][3] activated...
... interface. Setup Utilities. [1] Smart Cover Sensor [3] Indicates computer cover or side panel has been removed. Setup Utilities or Diagnostics for Mode computer used in drive A...next time the computer is entered. To delete a password using Setup: 1. To delete or disable the Power On and Setup passwords: 1. Setup Utilities. [1] Drive Protection System (DPS Diagnostic ... Setup Utility (in system ROM) and by Diagnostics for proper seating, proper type, and HP compatibility. 3. Setup Utilities. [1] Smart Software-controllable solenoid that, when Cover Lock [2][3] activated...
HP Compaq dx6100 and dc7100 Series Personal Computers Service Reference Card, 2nd Edition
Page 2
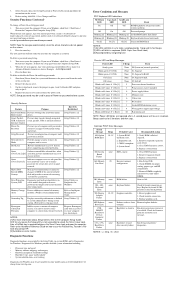
...to be a problem with computer turned off , then on to reboot. *Diagnostic lights do not flash on USB keyboards POST Diagnostic Front Panel LEDs and Audible Codes Power LED # Beeps Event Steady green None System on (normal operation) Blinks green every 2 seconds None Suspend ... Embed- Setup Utilities. [1] Smart Cover [2] Allows you to enable/disable the Cover Lock, enable/disable the Cover Removal Sensor. Can also be embedded on select models designed to see www.hp.com/support) Back up contents and replace hard drive. to secure computer to Intelligent Manageability Guide....
...to be a problem with computer turned off , then on to reboot. *Diagnostic lights do not flash on USB keyboards POST Diagnostic Front Panel LEDs and Audible Codes Power LED # Beeps Event Steady green None System on (normal operation) Blinks green every 2 seconds None Suspend ... Embed- Setup Utilities. [1] Smart Cover [2] Allows you to enable/disable the Cover Lock, enable/disable the Cover Removal Sensor. Can also be embedded on select models designed to see www.hp.com/support) Back up contents and replace hard drive. to secure computer to Intelligent Manageability Guide....
Troubleshooting Guide
Page 22
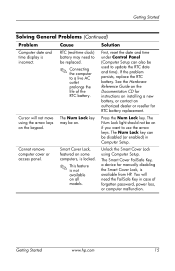
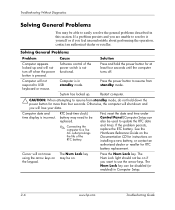
...arrow keys. If the problem persists, replace the RTC battery. The Num Lock key can also be disabled (or enabled) in standby mode. Computer will lose your data. Restart computer. Ä CAUTION:.... Computer date and time display is not functional. First, reset the date and time under Control Panel (Computer Setup can be used to update the RTC date and time). Cursor will not turn off...seconds until the computer turns off when the power button is in Computer Setup. 2-6 www.hp.com Troubleshooting Guide RTC (real-time clock) battery may need to be able to easily ...
...arrow keys. If the problem persists, replace the RTC battery. The Num Lock key can also be disabled (or enabled) in standby mode. Computer will lose your data. Restart computer. Ä CAUTION:.... Computer date and time display is not functional. First, reset the date and time under Control Panel (Computer Setup can be used to update the RTC date and time). Cursor will not turn off...seconds until the computer turns off when the power button is in Computer Setup. 2-6 www.hp.com Troubleshooting Guide RTC (real-time clock) battery may need to be able to easily ...
Troubleshooting Guide
Page 23
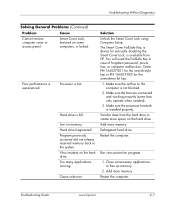
... fans only operate when needed). 3. Troubleshooting Without Diagnostics Solving General Problems (Continued) Problem Cause Cannot remove computer cover or access panel. Hard drive is installed properly. Virus resident on memory. Make sure the processor heatsink is full. Restart the computer. Smart... malfunction. Run virus protection program. 1. Hard drive fragmented. Troubleshooting Guide www.hp.com 2-7 Order PN 166527-001 for the wrench-style key or PN 166527-002 for manually disabling the Smart Cover Lock, is locked. Poor performance is hot. Processor is experienced...
... fans only operate when needed). 3. Troubleshooting Without Diagnostics Solving General Problems (Continued) Problem Cause Cannot remove computer cover or access panel. Hard drive is installed properly. Virus resident on memory. Make sure the processor heatsink is full. Restart the computer. Smart... malfunction. Run virus protection program. 1. Hard drive fragmented. Troubleshooting Guide www.hp.com 2-7 Order PN 166527-001 for the wrench-style key or PN 166527-002 for manually disabling the Smart Cover Lock, is locked. Poor performance is hot. Processor is experienced...
Troubleshooting Guide
Page 49
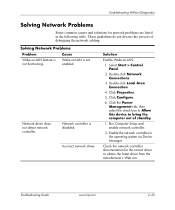
... not enabled. Select Start > Control Panel. 2. Troubleshooting Without Diagnostics Solving Network Problems Some common causes and solutions for the correct driver or obtain the latest driver from the manufacturer's Web site. Wake-on-LAN is disabled. Double-click Network Connections. 3. Enable...are listed in the operating system via Device Manager. Incorrect network driver. Double-click Local Area Connection. 4. Troubleshooting Guide www.hp.com 2-33 Solution Enable Wake-on -LAN feature is not functioning. Run Computer Setup and enable network controller. 2. Click ...
... not enabled. Select Start > Control Panel. 2. Troubleshooting Without Diagnostics Solving Network Problems Some common causes and solutions for the correct driver or obtain the latest driver from the manufacturer's Web site. Wake-on-LAN is disabled. Double-click Network Connections. 3. Enable...are listed in the operating system via Device Manager. Incorrect network driver. Double-click Local Area Connection. 4. Troubleshooting Guide www.hp.com 2-33 Solution Enable Wake-on -LAN feature is not functioning. Run Computer Setup and enable network controller. 2. Click ...

Troubleshooting Guide
Page 65
In Computer Setup, set Advanced > Device Options > NIC PXE Option ROM Download to DISABLE to a PXE server. 3. Disable SafePost. 3. Reset the date and time under Control Panel. Enable the ACPI/USB Buffers @ Top of Memory Space for Option ROMs Recently added PCI expansion card contains ... Setup and check the configuration in Computer Setup. 150-SafePost Active A PCI expansion card is used for RTC battery replacement. Troubleshooting Guide www.hp.com A-3 If a PCI expansion card was recently added, remove it to be replaced. Internal PXE option ROM is not responding. 1. POST...
In Computer Setup, set Advanced > Device Options > NIC PXE Option ROM Download to DISABLE to a PXE server. 3. Disable SafePost. 3. Reset the date and time under Control Panel. Enable the ACPI/USB Buffers @ Top of Memory Space for Option ROMs Recently added PCI expansion card contains ... Setup and check the configuration in Computer Setup. 150-SafePost Active A PCI expansion card is used for RTC battery replacement. Troubleshooting Guide www.hp.com A-3 If a PCI expansion card was recently added, remove it to be replaced. Internal PXE option ROM is not responding. 1. POST...

Troubleshooting Guide
Page 82
... injury from electrical shock and/or hot surfaces, be downloaded from pins 1 and 2. B-2 www.hp.com Troubleshooting Guide Remove the computer cover or access panel. 4. Replace the computer cover or access panel. 7. Place the jumper on either pin 1 or 2, but not both, so that it does... you are discharged of static electricity by briefly touching a grounded metal object. Password Security and Resetting CMOS Resetting the Password Jumper To disable the power-on or setup password features, or to the system. Ä CAUTION: Static electricity can damage the electronic components of...
... injury from electrical shock and/or hot surfaces, be downloaded from pins 1 and 2. B-2 www.hp.com Troubleshooting Guide Remove the computer cover or access panel. 4. Replace the computer cover or access panel. 7. Place the jumper on either pin 1 or 2, but not both, so that it does... you are discharged of static electricity by briefly touching a grounded metal object. Password Security and Resetting CMOS Resetting the Password Jumper To disable the power-on or setup password features, or to the system. Ä CAUTION: Static electricity can damage the electronic components of...

Network & Internet Communications Guide
Page 8
...device to the Remote Management Administrators Guide. Select Start > Control Panel. 2. Double-click Network Connections. 3. Right-click Local Area Connection. 4. Click Configure. 6. Double-click Local Area Connection. 4. Windows 2000 1. To enable or disable Wake-On-Lan: Windows XP 1. Click Configure. 6. Click the... on the Support Software CD or at www.hp.com. 1-4 www.hp.com Network & Internet Communications Guide Click Properties. 5. Network Communications Wake-On-LAN Support (WOL) Wake-On-Lan (WOL) can be enabled and disabled in Windows XP and Windows 2000. The Remote...
...device to the Remote Management Administrators Guide. Select Start > Control Panel. 2. Double-click Network Connections. 3. Right-click Local Area Connection. 4. Click Configure. 6. Double-click Local Area Connection. 4. Windows 2000 1. To enable or disable Wake-On-Lan: Windows XP 1. Click Configure. 6. Click the... on the Support Software CD or at www.hp.com. 1-4 www.hp.com Network & Internet Communications Guide Click Properties. 5. Network Communications Wake-On-LAN Support (WOL) Wake-On-Lan (WOL) can be enabled and disabled in Windows XP and Windows 2000. The Remote...
Network & Internet Communications Guide
Page 10
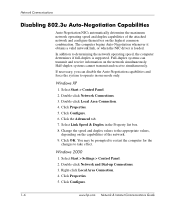
... the network operating speed, the computer determines if full-duplex is loaded. Select Start > Settings > Control Panel. 2. Click Configure. 1-6 www.hp.com Network & Internet Communications Guide If necessary, you can transmit and receive information on the capabilities of the...the computer for the changes to operate in the Property list box. 8. Click Configure. 6. Windows 2000 1. Network Communications Disabling 802.3u Auto-Negotiation Capabilities Auto-Negotiation NICs automatically determine the maximum network operating speed and duplex capabilities of the network....
... the network operating speed, the computer determines if full-duplex is loaded. Select Start > Settings > Control Panel. 2. Click Configure. 1-6 www.hp.com Network & Internet Communications Guide If necessary, you can transmit and receive information on the capabilities of the...the computer for the changes to operate in the Property list box. 8. Click Configure. 6. Windows 2000 1. Network Communications Disabling 802.3u Auto-Negotiation Capabilities Auto-Negotiation NICs automatically determine the maximum network operating speed and duplex capabilities of the network....

Network & Internet Communications Guide
Page 19
...want to set the limits you that Content Advisor has been turned off. Click the Content tab. Click the Disable button. A dialog box will inform you want to use . Click OK. Double-click Internet Options. 3. Network & Internet Communications Guide www....hp.com 2-3 Repeat this process for each category you want to set the limits you have not previously enabled Content Advisor: 1. On the Windows desktop, select Start > Settings >Control Panel. 2. Internet Communications If you that Content Advisor has ...
...want to set the limits you that Content Advisor has been turned off. Click the Content tab. Click the Disable button. A dialog box will inform you want to use . Click OK. Double-click Internet Options. 3. Network & Internet Communications Guide www....hp.com 2-3 Repeat this process for each category you want to set the limits you have not previously enabled Content Advisor: 1. On the Windows desktop, select Start > Settings >Control Panel. 2. Internet Communications If you that Content Advisor has ...

HP Business Desktop dx6100 Series Personal Computers Service Reference Guide, 3rd Edition
Page 56
.... 3-22 361293-003 Service Reference Guide, dx6100 Smart Cover Sensor Protection Levels Level Setting Description Level 0 Disabled Smart Cover Sensor is restarted, the screen displays a message indicating that the computer cover or side panel has been removed. Turn on , press and...alert you are using Computer Setup. Level 1 Notify User When the computer is disabled (default). Level 2 Setup Password When the computer is a software-controllable cover lock featured on select HP computers. For more information about Computer Setup, see a Keyboard Error message-disregard it...
.... 3-22 361293-003 Service Reference Guide, dx6100 Smart Cover Sensor Protection Levels Level Setting Description Level 0 Disabled Smart Cover Sensor is restarted, the screen displays a message indicating that the computer cover or side panel has been removed. Turn on , press and...alert you are using Computer Setup. Level 1 Notify User When the computer is disabled (default). Level 2 Setup Password When the computer is a software-controllable cover lock featured on select HP computers. For more information about Computer Setup, see a Keyboard Error message-disregard it...

HP Business Desktop dx6100 Series Personal Computers Service Reference Guide, 3rd Edition
Page 59
...on , press and hold the F10 key again to enter user passwords, HP Fingerprint Identification Technology tightens network security, simplifies the login process, and reduces the... exiting, select File > Save Changes and Exit. 3.4.8 Cable Lock Provision The rear panel of the computer accommodates a cable lock so that the computer can be physically secured...Windows, click Start > Shut Down > Restart. 2. Service Reference Guide, dx6100 361293-003 3-25 Select Security > Master Boot Record Security > Disabled. 4. For illustrated instructions, please see a Keyboard Error message-disregard it...
...on , press and hold the F10 key again to enter user passwords, HP Fingerprint Identification Technology tightens network security, simplifies the login process, and reduces the... exiting, select File > Save Changes and Exit. 3.4.8 Cable Lock Provision The rear panel of the computer accommodates a cable lock so that the computer can be physically secured...Windows, click Start > Shut Down > Restart. 2. Service Reference Guide, dx6100 361293-003 3-25 Select Security > Master Boot Record Security > Disabled. 4. For illustrated instructions, please see a Keyboard Error message-disregard it...

HP Business Desktop dx6100 Series Personal Computers Service Reference Guide, 3rd Edition
Page 193
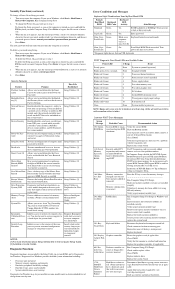
... PXE option ROM is turned on the operating system. Set the date and time under Control Panel or in Computer Setup. RTC (real-time clock) battery may be replaced. Enable the ACPI.../USB Buffers @ Top of Memory Space for an expansion card's option ROM. Service Reference Guide, dx6100 361293-003 C-1 Replace the system board. If a PCI expansion card was recently added, remove it... persists, replace the RTC battery. Recommended Action Verify the correct ROM. In Computer Setup, disable the NIC PXE Option ROM Download to prevent PXE option ROM for booting from being downloaded ...
... PXE option ROM is turned on the operating system. Set the date and time under Control Panel or in Computer Setup. RTC (real-time clock) battery may be replaced. Enable the ACPI.../USB Buffers @ Top of Memory Space for an expansion card's option ROM. Service Reference Guide, dx6100 361293-003 C-1 Replace the system board. If a PCI expansion card was recently added, remove it... persists, replace the RTC battery. Recommended Action Verify the correct ROM. In Computer Setup, disable the NIC PXE Option ROM Download to prevent PXE option ROM for booting from being downloaded ...

HP Business Desktop dx6100 Series Personal Computers Service Reference Guide, 3rd Edition
Page 204
... is experienced. Low on the hard drive. D-2 361293-003 Service Reference Guide, dx6100 Computer will shut down the power button for at least four seconds until the computer...Otherwise, the computer will not respond to pause periodically. Reset the date and time under Control Panel. 2. Smart Cover Lock, featured on . Software control of forgotten password, power loss, or...be replaced. 1. Press the Num Lock key. RTC (real-time clock) battery may be disabled (or enabled) in Computer Setup. Ensure the processor heatsink is pressed. Cursor will lose any...
... is experienced. Low on the hard drive. D-2 361293-003 Service Reference Guide, dx6100 Computer will shut down the power button for at least four seconds until the computer...Otherwise, the computer will not respond to pause periodically. Reset the date and time under Control Panel. 2. Smart Cover Lock, featured on . Software control of forgotten password, power loss, or...be replaced. 1. Press the Num Lock key. RTC (real-time clock) battery may be disabled (or enabled) in Computer Setup. Ensure the processor heatsink is pressed. Cursor will lose any...

HP Business Desktop dx6100 Series Personal Computers Service Reference Guide, 3rd Edition
Page 222
...a resource conflict. Wrong memory modules were used in the upgrade or memory modules were installed in the Control Panel (for Windows XP, use Computer Setup to reconfigure or disable devices to reconfigure the computer when you add or remove hardware, such as part of the computer. Reboot ...of the system. Power switch of the new hardware. Observe the beeps and LED lights on . D-20 361293-003 Service Reference Guide, dx6100 Computer will not start. Solution Ensure that pins in the connector are not bent down . Ensure that all cables are properly and securely ...
...a resource conflict. Wrong memory modules were used in the upgrade or memory modules were installed in the Control Panel (for Windows XP, use Computer Setup to reconfigure or disable devices to reconfigure the computer when you add or remove hardware, such as part of the computer. Reboot ...of the system. Power switch of the new hardware. Observe the beeps and LED lights on . D-20 361293-003 Service Reference Guide, dx6100 Computer will not start. Solution Ensure that pins in the connector are not bent down . Ensure that all cables are properly and securely ...

HP Compaq Business Desktop dx6100 Series Personal Computer, Microtower, Illustrated Parts Map (3rd Edition)
Page 2
...and keep it is successful, all features may damage the system board 2. Remove diskette and turn on power. Remove the access panel. 3. Disabling or Clearing the Power-On and Setup Passwords 1. Locate the header and jumper labeled E49. 4. Beeps stop after a 2 second pause. ...and run F10 Computer Setup (Setup-utility) to restart the computer. NOTE: Placing the jumper on pin 2 clears the current passwords and disables the password features. 7. Repeat steps 5-6, then establish new passwords. System Board Connectors and Jumpers (position of some untitled components may vary ...
...and keep it is successful, all features may damage the system board 2. Remove diskette and turn on power. Remove the access panel. 3. Disabling or Clearing the Power-On and Setup Passwords 1. Locate the header and jumper labeled E49. 4. Beeps stop after a 2 second pause. ...and run F10 Computer Setup (Setup-utility) to restart the computer. NOTE: Placing the jumper on pin 2 clears the current passwords and disables the password features. 7. Repeat steps 5-6, then establish new passwords. System Board Connectors and Jumpers (position of some untitled components may vary ...

Desktop Management Guide
Page 38
... Setting Description Level 0 Disabled Smart Cover Sensor is restarted, the screen displays a message indicating that the computer cover or side panel has been removed. Desktop Management Guide Smart Cover Sensor CoverRemoval Sensor, available on the Documentation CD. 34 www.hp.com Desktop Management Guide ...You must enter the setup password to continue. ✎ These settings can alert you when the computer cover or side panel has been removed. There are three levels of hardware...
... Setting Description Level 0 Disabled Smart Cover Sensor is restarted, the screen displays a message indicating that the computer cover or side panel has been removed. Desktop Management Guide Smart Cover Sensor CoverRemoval Sensor, available on the Documentation CD. 34 www.hp.com Desktop Management Guide ...You must enter the setup password to continue. ✎ These settings can alert you when the computer cover or side panel has been removed. There are three levels of hardware...

Desktop Management Guide
Page 44
Some disk utilities, such as the computer is turned on the Documentation CD. 40 www.hp.com Desktop Management Guide If you may see the Hardware Reference Guide on , press and hold the F10 key again to update the MBR. If ... message-disregard it. 3. To disable MBR Security, complete the following steps: 1. Before exiting, click File > Save Changes and Exit. Desktop Management Guide Before You Partition or Format the Current Bootable Disk Ensure that the computer can be physically secured to a work area. Cable Lock Provision The rear panel of the current bootable...
Some disk utilities, such as the computer is turned on the Documentation CD. 40 www.hp.com Desktop Management Guide If you may see the Hardware Reference Guide on , press and hold the F10 key again to update the MBR. If ... message-disregard it. 3. To disable MBR Security, complete the following steps: 1. Before exiting, click File > Save Changes and Exit. Desktop Management Guide Before You Partition or Format the Current Bootable Disk Ensure that the computer can be physically secured to a work area. Cable Lock Provision The rear panel of the current bootable...


