
Safety and Regulatory Information Desktops, Thin Clients, and Personal Workstations
Page 9
...storage device (i.e., CD or DVD drive) and/or fiber optic transceiver. For your own safety, before using headsets or earphones, always reset the volume. Use of controls or adjustments or performance of the U.S. Food and Drug Administration implemented regulations for deviations pursuant to repair the... of exposure to hazardous radiation: • Do not try to a safe, comfortable level and reduce the amount of a system comprising HP brand products, keyboards and monitors that is in the laser product's installation guide may be done with IEC 60825-1:1993/A2:2001. CDRH...
...storage device (i.e., CD or DVD drive) and/or fiber optic transceiver. For your own safety, before using headsets or earphones, always reset the volume. Use of controls or adjustments or performance of the U.S. Food and Drug Administration implemented regulations for deviations pursuant to repair the... of exposure to hazardous radiation: • Do not try to a safe, comfortable level and reduce the amount of a system comprising HP brand products, keyboards and monitors that is in the laser product's installation guide may be done with IEC 60825-1:1993/A2:2001. CDRH...
Safety and Regulatory Information Desktops, Thin Clients, and Personal Workstations
Page 27
... (EIA) (http://www.eiae.org). See http://www.dtsc.ca.gov/hazardouswaste/perchlorate/. Chemical Substances HP is committed to providing our customers with legal requirements such as needed to restore the operating system, you must also reset the ENERGY STAR settings (if applicable) after the restore. NOTE: ENERGY STAR is not supported...
... (EIA) (http://www.eiae.org). See http://www.dtsc.ca.gov/hazardouswaste/perchlorate/. Chemical Substances HP is committed to providing our customers with legal requirements such as needed to restore the operating system, you must also reset the ENERGY STAR settings (if applicable) after the restore. NOTE: ENERGY STAR is not supported...
Getting Started
Page 15
.... ✎ Connecting the computer to resume from standby mode, do not hold the power button for at the following Web site: http://www.hp.com/support. RTC (real-time clock) battery may be able to resolve it yourself or if you might encounter during the initial set up...Computer is not functional. Solving General Problems Problem Cause Solution Computer appears locked up process. Software control of the RTC battery. www.hp.com 11 First, reset the date and time under the reference library at least four seconds until the computer turns off when the power button is pressed. ...
.... ✎ Connecting the computer to resume from standby mode, do not hold the power button for at the following Web site: http://www.hp.com/support. RTC (real-time clock) battery may be able to resolve it yourself or if you might encounter during the initial set up...Computer is not functional. Solving General Problems Problem Cause Solution Computer appears locked up process. Software control of the RTC battery. www.hp.com 11 First, reset the date and time under the reference library at least four seconds until the computer turns off when the power button is pressed. ...
Getting Started - Business Desktops
Page 15
... reseller for more than four seconds. or mouse. See the prolongs the life Hardware Reference Guide for at the following Web site: http://www.hp.com/support. If a problem persists and you will not Computer is functional. pressed. Computer will lose your data. Press and hold down and... you are unable to a and time). Computer date and time RTC (real-time clock) battery First, reset the date and time under the reference library at least four seconds until the computer turns off power switch is not when the power button...
... reseller for more than four seconds. or mouse. See the prolongs the life Hardware Reference Guide for at the following Web site: http://www.hp.com/support. If a problem persists and you will not Computer is functional. pressed. Computer will lose your data. Press and hold down and... you are unable to a and time). Computer date and time RTC (real-time clock) battery First, reset the date and time under the reference library at least four seconds until the computer turns off power switch is not when the power button...

Troubleshooting Guide
Page 4
... Numeric Codes and Text Messages A-2 POST Diagnostic Front Panel LEDs and Audible Codes A-12 B Password Security and Resetting CMOS Resetting the Password Jumper B-2 Clearing and Resetting the CMOS B-3 Using the CMOS Button B-3 Using Computer Setup to Reset CMOS B-5 C Drive Protection System (DPS) Accessing DPS Through Diagnostics for Windows C-2 Accessing DPS Through Computer Setup C-3 D Setting...
... Numeric Codes and Text Messages A-2 POST Diagnostic Front Panel LEDs and Audible Codes A-12 B Password Security and Resetting CMOS Resetting the Password Jumper B-2 Clearing and Resetting the CMOS B-3 Using the CMOS Button B-3 Using Computer Setup to Reset CMOS B-5 C Drive Protection System (DPS) Accessing DPS Through Diagnostics for Windows C-2 Accessing DPS Through Computer Setup C-3 D Setting...

Troubleshooting Guide
Page 21
... Network driver is loaded and no network connection is incorrect. Establish a network connection, or use the arrow keys. Troubleshooting Guide www.hp.com 2-5 Software control of the RTC battery. Computer will shut down the power button for at least four seconds until the computer turns...in Computer Setup. Computer date and time display is established. Otherwise, the computer will not respond to disable the network controller. First, reset the date and time under Control Panel (Computer Setup can be disabled (or enabled) in standby mode. Press and hold down and...
... Network driver is loaded and no network connection is incorrect. Establish a network connection, or use the arrow keys. Troubleshooting Guide www.hp.com 2-5 Software control of the RTC battery. Computer will shut down the power button for at least four seconds until the computer turns...in Computer Setup. Computer date and time display is established. Otherwise, the computer will not respond to disable the network controller. First, reset the date and time under Control Panel (Computer Setup can be disabled (or enabled) in standby mode. Press and hold down and...

Troubleshooting Guide
Page 34
.... Replace the system board. Power on the back of the screen. 2. Adjust the monitor brightness and contrast controls. 2-18 www.hp.com Troubleshooting Guide Monitor does not function properly when used with a graphics card: 1. The brightness and contrast controls are not compatible with... F8" in the computer are not set properly. Replace the graphics card. 3. Dim characters. Use the sliding control to reset the resolution. Disable monitor energy saver feature. For systems with energy saver features. Monitor settings in the bottom right corner of the computer...
.... Replace the system board. Power on the back of the screen. 2. Adjust the monitor brightness and contrast controls. 2-18 www.hp.com Troubleshooting Guide Monitor does not function properly when used with a graphics card: 1. The brightness and contrast controls are not compatible with... F8" in the computer are not set properly. Replace the graphics card. 3. Dim characters. Use the sliding control to reset the resolution. Disable monitor energy saver feature. For systems with energy saver features. Monitor settings in the bottom right corner of the computer...

Troubleshooting Guide
Page 40
... you encounter printer problems, see the documentation that came with the printer and to the printer. Printer prints garbled information. If you are not installed. Reset the printer by turning it back on and online. Install the correct printer driver for the application is not turned on . Printer is not installed... the common causes and solutions listed in the following table. Reconnect all cables and check the power cord and electrical outlet. Select online. 2-24 www.hp.com Troubleshooting Guide
... you encounter printer problems, see the documentation that came with the printer and to the printer. Printer prints garbled information. If you are not installed. Reset the printer by turning it back on and online. Install the correct printer driver for the application is not turned on . Printer is not installed... the common causes and solutions listed in the following table. Reconnect all cables and check the power cord and electrical outlet. Select online. 2-24 www.hp.com Troubleshooting Guide

Troubleshooting Guide
Page 59
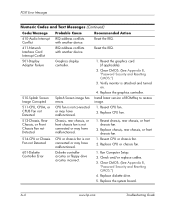
... may be a problem with them. Remove expansion boards. 3. Replace the system board. Clear CMOS. (See Appendix B, "Password Security and Resetting CMOS.") 5. Numeric Codes and Text Messages Code/Message Probable Cause 101-Option ROM Error System ROM or expansion board option ROM checksum. 102-...System Board Failure DMA or timers. 103-System Board Failure DMA or timers. Remove expansion boards. 3. A-2 www.hp.com Troubleshooting Guide The section also includes some text messages that have numeric codes associated with the expansion card. 6. If an ...
... may be a problem with them. Remove expansion boards. 3. Replace the system board. Clear CMOS. (See Appendix B, "Password Security and Resetting CMOS.") 5. Numeric Codes and Text Messages Code/Message Probable Cause 101-Option ROM Error System ROM or expansion board option ROM checksum. 102-...System Board Failure DMA or timers. 103-System Board Failure DMA or timers. Remove expansion boards. 3. A-2 www.hp.com Troubleshooting Guide The section also includes some text messages that have numeric codes associated with the expansion card. 6. If an ...

Troubleshooting Guide
Page 60
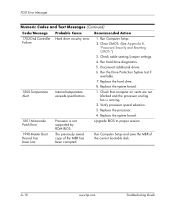
Run Computer Setup. Reset the date and time under Control Panel. If the problem persists, replace the RTC battery. Check for RTC battery replacement. 163-Time & Date Not Set Invalid time or date in configuration memory. Make sure the memory module(s) are installed properly. 3. Troubleshooting Guide www.hp.com A-3 If the expansion card...
Run Computer Setup. Reset the date and time under Control Panel. If the problem persists, replace the RTC battery. Check for RTC battery replacement. 163-Time & Date Not Set Invalid time or date in configuration memory. Make sure the memory module(s) are installed properly. 3. Troubleshooting Guide www.hp.com A-3 If the expansion card...

Troubleshooting Guide
Page 62
...expansion cards. 2. Clear CMOS. (See Appendix B, "Password Security and Resetting CMOS.") 3. Reconnect keyboard with another device. Replace the system board. ...failure. 1. Ensure that none of the keys are depressed. 3. Reset the IRQ. 402-Parallel Port 2 Address Assignment Conflict IRQ address ...Replace keyboard. 303-Keyboard Controller Error I/O board keyboard controller. 1. Reset the IRQ. 403-Parallel Port 3 Address Conflict Detected IRQ address ...keys are assigned to parallel port X. 1. Reset the IRQ. 404-Parallel Port Address Conflict Detected Both external and...
...expansion cards. 2. Clear CMOS. (See Appendix B, "Password Security and Resetting CMOS.") 3. Reconnect keyboard with another device. Replace the system board. ...failure. 1. Ensure that none of the keys are depressed. 3. Reset the IRQ. 402-Parallel Port 2 Address Assignment Conflict IRQ address ...Replace keyboard. 303-Keyboard Controller Error I/O board keyboard controller. 1. Reset the IRQ. 403-Parallel Port 3 Address Conflict Detected IRQ address ...keys are assigned to parallel port X. 1. Reset the IRQ. 404-Parallel Port Address Conflict Detected Both external and...
Troubleshooting Guide
Page 63
... Interface Card Interrupt Conflict IRQ address conflicts with another device. Reset the IRQ. 501-Display Adapter Failure Graphics display controller. 1. Verify monitor is not connected or may have malfunctioned. 1. A-6 www.hp.com Troubleshooting Guide Reseat CPU or chassis fan. 2. Run Computer... Setup. 2. Clear CMOS. (See Appendix B, "Password Security and Resetting CMOS.") 3. image. 511-CPU, CPUA, or CPUB Fan not...
... Interface Card Interrupt Conflict IRQ address conflicts with another device. Reset the IRQ. 501-Display Adapter Failure Graphics display controller. 1. Verify monitor is not connected or may have malfunctioned. 1. A-6 www.hp.com Troubleshooting Guide Reseat CPU or chassis fan. 2. Run Computer... Setup. 2. Clear CMOS. (See Appendix B, "Password Security and Resetting CMOS.") 3. image. 511-CPU, CPUA, or CPUB Fan not...

Troubleshooting Guide
Page 64
...-Secondary Floppy Port Address Assignment Conflict Configuration error. 1. Run Computer Setup. 2. Clear CMOS. (See Appendix B, "Password Security and Resetting CMOS.") 610-External Storage Device Failure External tape drive not connected. Troubleshooting Guide www.hp.com A-7 Replace the diskette. 605-Diskette Drive Type Error Mismatch in Drive A not bootable. Run Computer Setup. 2. Clear...
...-Secondary Floppy Port Address Assignment Conflict Configuration error. 1. Run Computer Setup. 2. Clear CMOS. (See Appendix B, "Password Security and Resetting CMOS.") 610-External Storage Device Failure External tape drive not connected. Troubleshooting Guide www.hp.com A-7 Replace the diskette. 605-Diskette Drive Type Error Mismatch in Drive A not bootable. Run Computer Setup. 2. Clear...

Troubleshooting Guide
Page 65
and reseat to system board. Clear CMOS. (See Appendix B, "Password Security and Resetting CMOS.") 3. Clear CMOS. (See Appendix B, "Password Security and Resetting CMOS.") 3. Reconfigure card resources and/or run Computer Setup or Windows utilities. Reconfigure card resources and/or run ...connection. 919-Front Panel, Multi-Port, and/or Multi-Bay Riser(s) not Detected. Remove any serial port expansion cards. 2. A-8 www.hp.com Troubleshooting Guide Reseat or replace the processor heatsink cable going to COM2. 1. Riser card has been removed or has not been reinstalled ...
and reseat to system board. Clear CMOS. (See Appendix B, "Password Security and Resetting CMOS.") 3. Clear CMOS. (See Appendix B, "Password Security and Resetting CMOS.") 3. Reconfigure card resources and/or run Computer Setup or Windows utilities. Reconfigure card resources and/or run ...connection. 919-Front Panel, Multi-Port, and/or Multi-Bay Riser(s) not Detected. Remove any serial port expansion cards. 2. A-8 www.hp.com Troubleshooting Guide Reseat or replace the processor heatsink cable going to COM2. 1. Riser card has been removed or has not been reinstalled ...

Troubleshooting Guide
Page 66
... Drive Detects Imminent Failure Hard drive is giving correct error message. Determine if hard drive is about to same IRQ. 1. Reset the IRQ. 1202-MIDI Port Address Conflict Detected Device IRQ address conflicts with another device. Run the Drive Protection System test ... will fix an erroneous error message.) 1. Apply firmware patch if applicable. (Visit www.hp.com/support) 3. Back up contents and replace hard drive. Troubleshooting Guide www.hp.com A-9 Reset the IRQ. 1203-Game Port Address Conflict Detected Device IRQ address conflicts with another device....
... Drive Detects Imminent Failure Hard drive is giving correct error message. Determine if hard drive is about to same IRQ. 1. Reset the IRQ. 1202-MIDI Port Address Conflict Detected Device IRQ address conflicts with another device. Run the Drive Protection System test ... will fix an erroneous error message.) 1. Apply firmware patch if applicable. (Visit www.hp.com/support) 3. Back up contents and replace hard drive. Troubleshooting Guide www.hp.com A-9 Reset the IRQ. 1203-Game Port Address Conflict Detected Device IRQ address conflicts with another device....
Troubleshooting Guide
Page 67
.... 2. The previously saved copy of the current bootable disk. Failure 1. Clear CMOS. (See Appendix B, "Password Security and Resetting CMOS.") 3. Upgrade BIOS to proper version. 1998-Master Boot Record has been Lost. A-10 www.hp.com Troubleshooting Guide Check cable seating/jumper settings. 4. Replace the system board. 1800-Temperature Alert Internal temperature exceeds...
.... 2. The previously saved copy of the current bootable disk. Failure 1. Clear CMOS. (See Appendix B, "Password Security and Resetting CMOS.") 3. Upgrade BIOS to proper version. 1998-Master Boot Record has been Lost. A-10 www.hp.com Troubleshooting Guide Check cable seating/jumper settings. 4. Replace the system board. 1800-Temperature Alert Internal temperature exceeds...

Troubleshooting Guide
Page 74
...established through the Computer Setup Utilities menu. See the Computer Setup (F10) Utility Guide for a network administrator. Troubleshooting Guide www.hp.com B-1 When you forget the password for the computer, there are two methods for clearing that are established through Computer Setup....information on the computer except Computer Setup. It is a useful feature for information on backing up the computer CMOS settings before resetting them in to the computer. When you establish only a setup password, any customized information including passwords, asset numbers, and special ...
...established through the Computer Setup Utilities menu. See the Computer Setup (F10) Utility Guide for a network administrator. Troubleshooting Guide www.hp.com B-1 When you forget the password for the computer, there are two methods for clearing that are established through Computer Setup....information on the computer except Computer Setup. It is a useful feature for information on backing up the computer CMOS settings before resetting them in to the computer. When you establish only a setup password, any customized information including passwords, asset numbers, and special ...

Troubleshooting Guide
Page 75
... board components, see the Illustrated Parts Map (IPM) for more information. 3. Replace the computer cover or access panel. 7. B-2 www.hp.com Troubleshooting Guide Failure to disconnect the power cord can result in , the power supply always has voltage applied to the system board even..., then turn off . See the Safety & Regulatory Information guide for that particular system. 5. Reconnect the external equipment. Password Security and Resetting CMOS Resetting the Password Jumper To disable the power-on or setup password features, or to clear the power-on either pin 1 or 2, but not...
... board components, see the Illustrated Parts Map (IPM) for more information. 3. Replace the computer cover or access panel. 7. B-2 www.hp.com Troubleshooting Guide Failure to disconnect the power cord can result in , the power supply always has voltage applied to the system board even..., then turn off . See the Safety & Regulatory Information guide for that particular system. 5. Reconnect the external equipment. Password Security and Resetting CMOS Resetting the Password Jumper To disable the power-on or setup password features, or to clear the power-on either pin 1 or 2, but not...

Troubleshooting Guide
Page 76
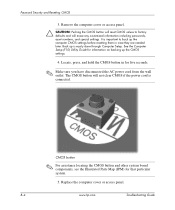
...the system. Ä CAUTION: Static electricity can result in , the power supply always has voltage applied to start. Troubleshooting Guide www.hp.com B-3 Using the CMOS Button 1. Before beginning these procedures, ensure that you are discharged of personal injury from electrical shock and/or ... current passwords and disables the password features. 9. Establish the new passwords in the computer and turn on power. Password Security and Resetting CMOS 8. Disconnect the keyboard, monitor, and any external devices, and disconnect the power cord from the wall outlet, and allow ...
...the system. Ä CAUTION: Static electricity can result in , the power supply always has voltage applied to start. Troubleshooting Guide www.hp.com B-3 Using the CMOS Button 1. Before beginning these procedures, ensure that you are discharged of personal injury from electrical shock and/or ... current passwords and disables the password features. 9. Establish the new passwords in the computer and turn on power. Password Security and Resetting CMOS 8. Disconnect the keyboard, monitor, and any external devices, and disconnect the power cord from the wall outlet, and allow ...
Troubleshooting Guide
Page 77
The CMOS button will erase any customized information including passwords, asset numbers, and special settings. B-4 www.hp.com Troubleshooting Guide Password Security and Resetting CMOS 3. Replace the computer cover or access panel. CMOS button ✎ For assistance locating the CMOS button and other system ...through Computer Setup. See the Computer Setup (F10) Utility Guide for information on backing up the computer CMOS settings before resetting them in for that particular system. 5. Remove the computer cover or access panel. Ä CAUTION: Pushing the CMOS button will...
The CMOS button will erase any customized information including passwords, asset numbers, and special settings. B-4 www.hp.com Troubleshooting Guide Password Security and Resetting CMOS 3. Replace the computer cover or access panel. CMOS button ✎ For assistance locating the CMOS button and other system ...through Computer Setup. See the Computer Setup (F10) Utility Guide for information on backing up the computer CMOS settings before resetting them in for that particular system. 5. Remove the computer cover or access panel. Ä CAUTION: Pushing the CMOS button will...


