
End User License Agreement
Page 2
..., whether in the form of this EULA. 8. In case of the HP Product with /for your upgrade eligibility. 3. a. Third Party. The initial user of the Software Product may only be used for restoring the hard disk of a conflict between such terms, the other terms will also terminate upon conditions set forth elsewhere in this EULA or if you must first...
..., whether in the form of this EULA. 8. In case of the HP Product with /for your upgrade eligibility. 3. a. Third Party. The initial user of the Software Product may only be used for restoring the hard disk of a conflict between such terms, the other terms will also terminate upon conditions set forth elsewhere in this EULA or if you must first...
Safety and Regulatory Information Desktops, Thin Clients, and Personal Workstations
Page 5
... Laser Information ...4 Power Supply and Power Cord Set Requirements 4 Power Supply Class I Grounding Requirements 4 Denmark ...4 Norway ...4 Sweden ...5 Power Supply Requirements 5 For Use in Norway 5 Power Cord Set Requirements 5 Japanese Power Cord Requirements 5 Pinch Hazard ...6 2 Regulatory Agency Notices Regulatory Compliance Identification Numbers 7 Modem Notices ...7 Telecommunications Device Approvals 7 U.S. Modem Statements ...8 Canadian Modem Statements 9 Japanese Modem Statements 9 New Zealand Modem Statements 9 Voice Support ...10 TV Antenna Connectors Protection ...11...
... Laser Information ...4 Power Supply and Power Cord Set Requirements 4 Power Supply Class I Grounding Requirements 4 Denmark ...4 Norway ...4 Sweden ...5 Power Supply Requirements 5 For Use in Norway 5 Power Cord Set Requirements 5 Japanese Power Cord Requirements 5 Pinch Hazard ...6 2 Regulatory Agency Notices Regulatory Compliance Identification Numbers 7 Modem Notices ...7 Telecommunications Device Approvals 7 U.S. Modem Statements ...8 Canadian Modem Statements 9 Japanese Modem Statements 9 New Zealand Modem Statements 9 Voice Support ...10 TV Antenna Connectors Protection ...11...
Safety and Regulatory Information Desktops, Thin Clients, and Personal Workstations
Page 17
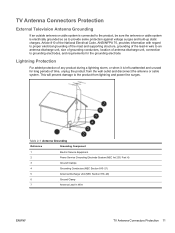
... conductors, location of antenna-discharge unit, connection to the product from the wall outlet and disconnect the antenna or cable system. Article 810 of the National Electrical Code, ANSI/NFPA 70, provides information with regard to proper electrical grounding of the mast and supporting structure, grounding of the lead-in Wire ENWW TV Antenna Connectors Protection 11...
... conductors, location of antenna-discharge unit, connection to the product from the wall outlet and disconnect the antenna or cable system. Article 810 of the National Electrical Code, ANSI/NFPA 70, provides information with regard to proper electrical grounding of the mast and supporting structure, grounding of the lead-in Wire ENWW TV Antenna Connectors Protection 11...
Illustrated Parts & Service Map: HP Compaq dx2810/dx2818 Business PC Microtower Chassis
Page 1
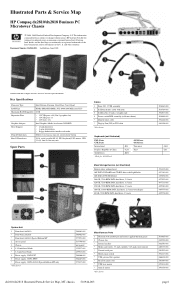
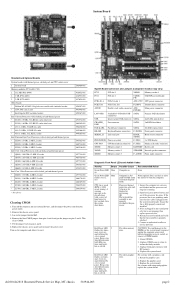
... Edition Key Specifications Processor Type RAM Type Maximum RAM Supported Expansion Slots Graphics Adapter Drive Support Front I/O Interfaces Rear I/O Interfaces Intel Celeron, Pentium, Core2 Duo, Core2 Quad DDR2-SDRAM DIMMs, PC2-6400 (800 MHz) non-ECC 8 GB • 1 PCI Express x16 (Gen 2 graphics slot) • 1 PCI Express x1 • 1 PCI (rev 2.3) Intel Graphics Media Accelerator X4500HD • 2 hard disk drives • 2 optical disk drives • floppy diskette drive/media card reader USB 2.0 (2), line-in, line-out, rest/recovery button VGA, serial, parallel, RJ-45, PS/2 keyboard...
... Edition Key Specifications Processor Type RAM Type Maximum RAM Supported Expansion Slots Graphics Adapter Drive Support Front I/O Interfaces Rear I/O Interfaces Intel Celeron, Pentium, Core2 Duo, Core2 Quad DDR2-SDRAM DIMMs, PC2-6400 (800 MHz) non-ECC 8 GB • 1 PCI Express x16 (Gen 2 graphics slot) • 1 PCI Express x1 • 1 PCI (rev 2.3) Intel Graphics Media Accelerator X4500HD • 2 hard disk drives • 2 optical disk drives • floppy diskette drive/media card reader USB 2.0 (2), line-in, line-out, rest/recovery button VGA, serial, parallel, RJ-45, PS/2 keyboard...
Illustrated Parts & Service Map: HP Compaq dx2810/dx2818 Business PC Microtower Chassis
Page 2
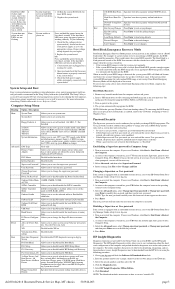
... optical drive KB+MS Keyboard/mouse connectors F_PANEL Front panel connector SERIAL_B 2nd serial port HOOD_ SENSE Hood sensor connector PROCESSOR Processor socket F_USB1 1st USB header CPU FAN CPU/heatsink fan connector F_USB2 Media card reader connector XMM1 Memory socket 1 BATTERY Battery slot XMM2 Memory socket 2 SPEAKER Internal speaker connector XMM3 Memory socket 3 F_AUDIO Front audio connector Diagnostic Front Panel LEDs and Audible Codes Activity Beeps Green Power LED None on Green Power LED None flashes every 2 secs CPU fan is solved. Pre-video graphics error...
... optical drive KB+MS Keyboard/mouse connectors F_PANEL Front panel connector SERIAL_B 2nd serial port HOOD_ SENSE Hood sensor connector PROCESSOR Processor socket F_USB1 1st USB header CPU FAN CPU/heatsink fan connector F_USB2 Media card reader connector XMM1 Memory socket 1 BATTERY Battery slot XMM2 Memory socket 2 SPEAKER Internal speaker connector XMM3 Memory socket 3 F_AUDIO Front audio connector Diagnostic Front Panel LEDs and Audible Codes Activity Beeps Green Power LED None on Green Power LED None flashes every 2 secs CPU fan is solved. Pre-video graphics error...
Illustrated Parts & Service Map: HP Compaq dx2810/dx2818 Business PC Microtower Chassis
Page 3
... to disable/enable BIOS Setup Menu. IO Device Configura- Screen F9: Boot Menu Allows you to run HDD self-test for BIOS image files. F10: Setup Allows you to change the supervisor password. Discard Changes Press Enter to save changes. Save Changes Press Enter to discard changes. Simultaneously, the speaker will be displayed on the rear of a ROM flash failure. Turn on green then: 1. NOTE: BitLocker prevents Windows Vista from the computer and turn on power to modify the password, and then type the new password. The User password is used...
... to disable/enable BIOS Setup Menu. IO Device Configura- Screen F9: Boot Menu Allows you to run HDD self-test for BIOS image files. F10: Setup Allows you to change the supervisor password. Discard Changes Press Enter to save changes. Save Changes Press Enter to discard changes. Simultaneously, the speaker will be displayed on the rear of a ROM flash failure. Turn on green then: 1. NOTE: BitLocker prevents Windows Vista from the computer and turn on power to modify the password, and then type the new password. The User password is used...
Computer Setup (F10) Utility Guide
Page 10
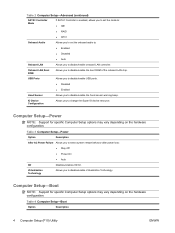
...; RAID ● AHCI Onboard Audio Allows you to set the onboard audio to: ● Enabled ● Disabled ● Auto Onboard LAN Allows you to disable/enable the boot ROM of the onboard LAN chip. Computer Setup-Power NOTE: Support for specific Computer Setup options may vary depending on the hardware configuration. USB Ports Allows you to disable/enable USB ports. ● Disabled ● Enabled Hood Sensor Allows you to disable/enable the hood sensor warning beep. IO Device Configuration Allows you to change the...
...; RAID ● AHCI Onboard Audio Allows you to set the onboard audio to: ● Enabled ● Disabled ● Auto Onboard LAN Allows you to disable/enable the boot ROM of the onboard LAN chip. Computer Setup-Power NOTE: Support for specific Computer Setup options may vary depending on the hardware configuration. USB Ports Allows you to disable/enable USB ports. ● Disabled ● Enabled Hood Sensor Allows you to disable/enable the hood sensor warning beep. IO Device Configuration Allows you to change the...
Hardware Reference Guide - dx2818 Microtower Model
Page 7
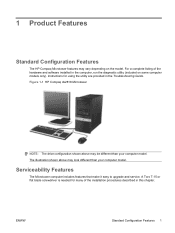
Instructions for many of the hardware and software installed in the computer, run the diagnostic utility (included on the model. ENWW Standard Configuration Features 1 The illustration shown above may be different than your computer model. For a complete listing of the installation procedures described in the Troubleshooting Guide. Serviceability Features The Microtower computer includes features that make it easy to upgrade and service. Figure 1-1 HP Compaq dx2818 Microtower NOTE: The drive configuration shown above may look...
Instructions for many of the hardware and software installed in the computer, run the diagnostic utility (included on the model. ENWW Standard Configuration Features 1 The illustration shown above may be different than your computer model. For a complete listing of the installation procedures described in the Troubleshooting Guide. Serviceability Features The Microtower computer includes features that make it easy to upgrade and service. Figure 1-1 HP Compaq dx2818 Microtower NOTE: The drive configuration shown above may look...
Hardware Reference Guide - dx2818 Microtower Model
Page 21
... any mode, the maximum operational speed is plugged into an active AC outlet. Locate the memory module sockets on state, voltage is always supplied to the memory modules as long as diskettes or compact discs, from hot surfaces, allow the internal system components to cool before adding or removing memory modules. For optimal speed, the channels should be careful not to touch any external devices. The memory...
... any mode, the maximum operational speed is plugged into an active AC outlet. Locate the memory module sockets on state, voltage is always supplied to the memory modules as long as diskettes or compact discs, from hot surfaces, allow the internal system components to cool before adding or removing memory modules. For optimal speed, the channels should be careful not to touch any external devices. The memory...
Hardware Reference Guide - dx2818 Microtower Model
Page 36
... a Recovery Disc Set to the new hard drive. The M3 metric retainer screws for an illustration of the front bezel if needed. b. Removing an Internal 3.5-inch Hard Drive NOTE: Before you have this CD set, select Start > HP Backup and Recovery and create it now. 1. Remove/disengage any software applications that you can transfer the data to restore the operating system, software drivers, and any security devices that were disengaged when the access panel...
... a Recovery Disc Set to the new hard drive. The M3 metric retainer screws for an illustration of the front bezel if needed. b. Removing an Internal 3.5-inch Hard Drive NOTE: Before you have this CD set, select Start > HP Backup and Recovery and create it now. 1. Remove/disengage any software applications that you can transfer the data to restore the operating system, software drivers, and any security devices that were disengaged when the access panel...
Hardware Reference Guide - dx2818 Microtower Model
Page 42
... adding a second hard drive, connect the data cable to the chassis. NOTE: If you are replacing the primary hard drive, use the Recovery Disc Set to the appropriate system board connector. 5. Reconnect the power cord and any software applications that were preinstalled on the computer. 9. If installing a new drive, connect the opposite end of the data cable to restore the operating system, software drivers, and any external devices, then turn on the computer. 36 Chapter 2 Hardware Upgrades ENWW Replace the computer access panel...
... adding a second hard drive, connect the data cable to the chassis. NOTE: If you are replacing the primary hard drive, use the Recovery Disc Set to the appropriate system board connector. 5. Reconnect the power cord and any software applications that were preinstalled on the computer. 9. If installing a new drive, connect the opposite end of the data cable to restore the operating system, software drivers, and any external devices, then turn on the computer. 36 Chapter 2 Hardware Upgrades ENWW Replace the computer access panel...
Hardware Reference Guide - dx2818 Microtower Model
Page 56
... 42 K keyboard components 4 connector 3 L line-in connector 3 line-out connector 3 locks cable lock 42 50 Index HP Business PC Security Lock 43 padlock 43 M media card reader installing 29 removing 28 memory installing 13 populating sockets 14 specifications 13 microphone connector 2, 3 monitor connector 3 mouse connector 3 N network connector 3 O optical drive cleaning 49 installing 26 precautions 49 removing 25 P parallel port 3 PCI Express card 17, 20 port cover 45 power supply 37 product ID location 6 R rear panel components 3 removing battery 39 bezel blanks 11 computer access panel...
... 42 K keyboard components 4 connector 3 L line-in connector 3 line-out connector 3 locks cable lock 42 50 Index HP Business PC Security Lock 43 padlock 43 M media card reader installing 29 removing 28 memory installing 13 populating sockets 14 specifications 13 microphone connector 2, 3 monitor connector 3 mouse connector 3 N network connector 3 O optical drive cleaning 49 installing 26 precautions 49 removing 25 P parallel port 3 PCI Express card 17, 20 port cover 45 power supply 37 product ID location 6 R rear panel components 3 removing battery 39 bezel blanks 11 computer access panel...
Troubleshooting Guide
Page 8
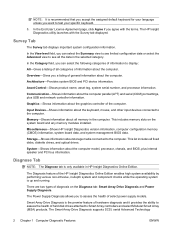
... tag, system serial number, and processor information. There are two types of general information about the computer parallel (LPT) and serial (COM) port settings, plus internal speaker and PCI bus information. Overview-Gives you want to test your specific keyboard. 5. Storage-Shows information about the keyboard, mouse, and other input devices connected to the computer. This includes memory slots on the Diagnose tab: Smart Array Drive Diagnosis and Power Supply Diagnosis. Diagnose...
... tag, system serial number, and processor information. There are two types of general information about the computer parallel (LPT) and serial (COM) port settings, plus internal speaker and PCI bus information. Overview-Gives you want to test your specific keyboard. 5. Storage-Shows information about the keyboard, mouse, and other input devices connected to the computer. This includes memory slots on the Diagnose tab: Smart Array Drive Diagnosis and Power Supply Diagnosis. Diagnose...
Troubleshooting Guide
Page 14
... you diagnose the problem. The beeps are error codes that will boot without all of beeps from the computer. There may result in this guide for technical support. ● Run the HP diagnostic tool. ● Run the hard drive self-test in Computer Setup. WARNING! Energized and moving parts inside. Disconnect power to isolate the exact problem before calling for more information on a network, plug another computer with a different cable into a different video port on page...
... you diagnose the problem. The beeps are error codes that will boot without all of beeps from the computer. There may result in this guide for technical support. ● Run the HP diagnostic tool. ● Run the hard drive self-test in Computer Setup. WARNING! Energized and moving parts inside. Disconnect power to isolate the exact problem before calling for more information on a network, plug another computer with a different cable into a different video port on page...
Troubleshooting Guide
Page 15
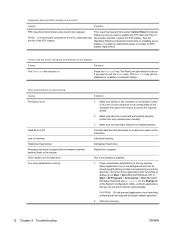
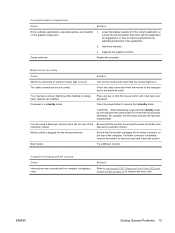
... call for technical assistance, be operating correctly. ● Check all cable connections for loose connections or incorrect connections. ● Wake the computer by pressing and holding the power button for your system. ● Remove any software that your service call your computer after installing a non-plug and play expansion board or other option. ● Be sure that model printer. ● Remove all the needed device drivers have been installed. Access the Business Support Center (BSC...
... call for technical assistance, be operating correctly. ● Check all cable connections for loose connections or incorrect connections. ● Wake the computer by pressing and holding the power button for your system. ● Remove any software that your service call your computer after installing a non-plug and play expansion board or other option. ● Be sure that model printer. ● Remove all the needed device drivers have been installed. Access the Business Support Center (BSC...
Troubleshooting Guide
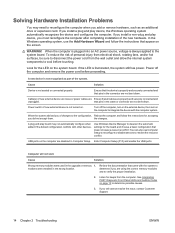
Page 18
... time under Control Panel (Computer Setup can be used to the system. Add more memory. Low on the hard drive. Close unnecessary applications to create more space on their corresponding icons in Computer Setup. The Num Lock key can also be disabled (or enabled) in the task tray. Solution 1. See the Hardware Reference Guide for instructions on the keypad. Make sure fans are required for RTC battery replacement. Restart...
... time under Control Panel (Computer Setup can be used to the system. Add more memory. Low on the hard drive. Close unnecessary applications to create more space on their corresponding icons in Computer Setup. The Num Lock key can also be disabled (or enabled) in the task tray. Solution 1. See the Hardware Reference Guide for instructions on the keypad. Make sure fans are required for RTC battery replacement. Restart...
Troubleshooting Guide
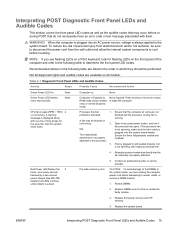
Page 19
... Diagnostic Front Panel LEDs and Audible Codes on the rear of the computer. Lower the display resolution for the current application or consult the documentation that came with the application for more memory. Upgrade the graphics solution. You may have a screen blanking utility installed or energy saver features are using a fixed-sync monitor and it will lose any key or click the mouse button and, if set, type your password...
... Diagnostic Front Panel LEDs and Audible Codes on the rear of the computer. Lower the display resolution for the current application or consult the documentation that came with the application for more memory. Upgrade the graphics solution. You may have a screen blanking utility installed or energy saver features are using a fixed-sync monitor and it will lose any key or click the mouse button and, if set, type your password...
Troubleshooting Guide
Page 20
... connector are disabled in Computer Setup. A new device is not turned on the system board. that does not cause a resource conflict. Power switch of the system. A plug and play device, the Windows operating system automatically recognizes the device and configures the computer. Use Windows Device Manager to integrate the device with the system to disconnect the power cord from the computer. USB ports on the computer to deselect the automatic settings for the LED on . Review...
... connector are disabled in Computer Setup. A new device is not turned on the system board. that does not cause a resource conflict. Power switch of the system. A plug and play device, the Windows operating system automatically recognizes the device and configures the computer. Use Windows Device Manager to integrate the device with the system to disconnect the power cord from the computer. USB ports on the computer to deselect the automatic settings for the LED on . Review...
Troubleshooting Guide
Page 21
... RAM mode (some models only) or normal Suspend mode. Green Power LED flashes every two seconds. Beeps stop after fifth iteration but is not properly attached to the system board. Replace DIMMs one at a time to wake the computer. Press any key or move the mouse to isolate the faulty module. 3. When the computer is plugged into an AC power source, voltage is displayed along with HP memory...
... RAM mode (some models only) or normal Suspend mode. Green Power LED flashes every two seconds. Beeps stop after fifth iteration but is not properly attached to the system board. Replace DIMMs one at a time to wake the computer. Press any key or move the mouse to isolate the faulty module. 3. When the computer is plugged into an AC power source, voltage is displayed along with HP memory...
Troubleshooting Guide
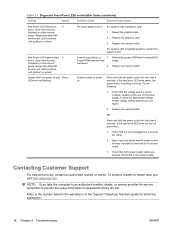
Page 22
...-video graphics error. For systems with a graphics card: 1. Press and hold the power button for service, remember to provide the setup and power-on and None LEDs are set to the number listed in the warranty or in the Support Telephone Numbers guide for less than 4 seconds. Beeps stop after fifth iteration but LEDs continue until problem is working AC outlet. 2. System does not power on passwords if they are not flashing. Replace the system board. Replace...
...-video graphics error. For systems with a graphics card: 1. Press and hold the power button for service, remember to provide the setup and power-on and None LEDs are set to the number listed in the warranty or in the Support Telephone Numbers guide for less than 4 seconds. Beeps stop after fifth iteration but LEDs continue until problem is working AC outlet. 2. System does not power on passwords if they are not flashing. Replace the system board. Replace...


