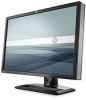

HP ZR22w and ZR24w LCD Monitors User Guide
Page 6
... Conversion 25 Using the HP Display Assistant Utility 25 Identifying Monitor Conditions ...26 Sleep Timer Mode ...27 HP Display LiteSaver ...28 Installing the HP Display LiteSaver Software 28 ...Support 32 Appendix B Technical Specifications ZR22w Model ...34 ZR24w Model ...35 Recognizing Preset Display Resolutions 36 ZR22w Model ...36 ZR24w Model ...37 Entering User Modes ...37 Energy Saver ...German Ergonomics Notice ...41 Japanese Notice ...41 Korean Notice ...41 Power Cord Set Requirements ...41 Japanese Power Cord Requirements 42 Product Environmental Notices ...42 ENERGY STAR® Qualification...
... Conversion 25 Using the HP Display Assistant Utility 25 Identifying Monitor Conditions ...26 Sleep Timer Mode ...27 HP Display LiteSaver ...28 Installing the HP Display LiteSaver Software 28 ...Support 32 Appendix B Technical Specifications ZR22w Model ...34 ZR24w Model ...35 Recognizing Preset Display Resolutions 36 ZR22w Model ...36 ZR24w Model ...37 Entering User Modes ...37 Energy Saver ...German Ergonomics Notice ...41 Japanese Notice ...41 Korean Notice ...41 Power Cord Set Requirements ...41 Japanese Power Cord Requirements 42 Product Environmental Notices ...42 ENERGY STAR® Qualification...

HP ZR22w and ZR24w LCD Monitors User Guide
Page 10
... (High-Bandwidth Digital Content Protection) copy protection on DVI and DisplayPort inputs ● Software and documentation CD that includes monitor drivers and product documentation ● Energy saver feature to meet requirements for reduced power consumption ● Energy Star qualified (ZR22w model only) ● Intelligent Management AssetControl ● Compliant with the following regulated...
... (High-Bandwidth Digital Content Protection) copy protection on DVI and DisplayPort inputs ● Software and documentation CD that includes monitor drivers and product documentation ● Energy saver feature to meet requirements for reduced power consumption ● Energy Star qualified (ZR22w model only) ● Intelligent Management AssetControl ● Compliant with the following regulated...

HP ZR22w and ZR24w LCD Monitors User Guide
Page 11
..., shelves, desks, speakers, chests, or carts may accidentally step on a cord or cable. For your HP LCD monitor. When unplugging from the electrical outlet, grasp the cord by unplugging the power cord from the product by the plug. CAUTION: For the protection of electric shock or damage to the... (UPS). Use the appropriate and correctly sized furniture designed to the LCD monitor so that no one is easily accessible at http://www.hp.com/ergo and/or on the correct power cord set to use only a power source and connection appropriate for this ability. The grounding plug is an ...
..., shelves, desks, speakers, chests, or carts may accidentally step on a cord or cable. For your HP LCD monitor. When unplugging from the electrical outlet, grasp the cord by unplugging the power cord from the product by the plug. CAUTION: For the protection of electric shock or damage to the... (UPS). Use the appropriate and correctly sized furniture designed to the LCD monitor so that no one is easily accessible at http://www.hp.com/ergo and/or on the correct power cord set to use only a power source and connection appropriate for this ability. The grounding plug is an ...

HP ZR22w and ZR24w LCD Monitors User Guide
Page 12
..., defaced, or broken. If the monitor is not operating properly or has been dropped or damaged, contact an authorized HP dealer, reseller, or service provider. ● Use only a power source and connection appropriate for ventilation. NOTE: Monitors with a soft, clean antistatic cloth.... 3. These openings must lay the monitor face down on the screen surface. Cleaning the Monitor 1. Never spray ...
..., defaced, or broken. If the monitor is not operating properly or has been dropped or damaged, contact an authorized HP dealer, reseller, or service provider. ● Use only a power source and connection appropriate for ventilation. NOTE: Monitors with a soft, clean antistatic cloth.... 3. These openings must lay the monitor face down on the screen surface. Cleaning the Monitor 1. Never spray ...

HP ZR22w and ZR24w LCD Monitors User Guide
Page 13
...: Be sure the master power switch, located on the rear panel of the monitor, is in this occurs the screen will not recover to the monitor. Using both hands, position the monitor over the pedestal base. instead see Mounting the Monitor on the monitor to the monitor, computer system, and other... locks, it will be used on the panel may cause nonuniformity of color or disorientation of the LCD panel. ENWW Installing the Monitor Pedestal Base 5 The master power switch turns off all power to its normal condition. 2. CAUTION: Do not touch the surface of the liquid crystals. If ...
...: Be sure the master power switch, located on the rear panel of the monitor, is in this occurs the screen will not recover to the monitor. Using both hands, position the monitor over the pedestal base. instead see Mounting the Monitor on the monitor to the monitor, computer system, and other... locks, it will be used on the panel may cause nonuniformity of color or disorientation of the LCD panel. ENWW Installing the Monitor Pedestal Base 5 The master power switch turns off all power to its normal condition. 2. CAUTION: Do not touch the surface of the liquid crystals. If ...

HP ZR22w and ZR24w LCD Monitors User Guide
Page 14
Connects the VGA cable to the monitor. Connects optional USB devices to the monitor. Connects the DisplayPort cable to the monitor. Connects the DVI-D cable to the monitor. Turns off all power to a host USB port/hub. Connects the monitor USB hub cable to the monitor. Rear Components HP ZR22w and ZR24w Models Figure 3-2 Rear Components Table 3-1 Rear Components Component...
Connects the VGA cable to the monitor. Connects optional USB devices to the monitor. Connects the DisplayPort cable to the monitor. Connects the DVI-D cable to the monitor. Turns off all power to a host USB port/hub. Connects the monitor USB hub cable to the monitor. Rear Components HP ZR22w and ZR24w Models Figure 3-2 Rear Components Table 3-1 Rear Components Component...

HP ZR22w and ZR24w LCD Monitors User Guide
Page 16
...Screen Display (OSD) feature by the plug. 8 Chapter 3 Setting Up the Monitor ENWW Figure 3-5 Connecting the Cables WARNING! Plug the power cord into a grounded (earthed) electrical outlet that no one end of the power cable to the DisplayPort connector on the computer. ● For DisplayPort digital operation,...; For DVI digital operation, use the DisplayPort signal cable provided. To reduce the risk of the monitor and the other end to the equipment: Do not disable the power cord grounding plug. Connect one may accidentally step on the rear of electric shock or damage to ...
...Screen Display (OSD) feature by the plug. 8 Chapter 3 Setting Up the Monitor ENWW Figure 3-5 Connecting the Cables WARNING! Plug the power cord into a grounded (earthed) electrical outlet that no one end of the power cable to the DisplayPort connector on the computer. ● For DisplayPort digital operation,...; For DVI digital operation, use the DisplayPort signal cable provided. To reduce the risk of the monitor and the other end to the equipment: Do not disable the power cord grounding plug. Connect one may accidentally step on the rear of electric shock or damage to ...

HP ZR22w and ZR24w LCD Monitors User Guide
Page 19
...portrait mode, you should always activate a screen saver application or turn off the monitor when it on the rear of time is not in image" are not covered under the HP warranty. * A prolonged period of the monitor is displayed for 10 seconds. NOTE: You can also be enabled. Press the... portrait orientation viewing to adapt to portrait mode. NOTE: If pressing the power button has no effect, the Power Button Lockout feature may occur on all LCD screens. Press the power button on the front of the monitor to install the Pivot Pro software included on the front of the OSD ...
...portrait mode, you should always activate a screen saver application or turn off the monitor when it on the rear of time is not in image" are not covered under the HP warranty. * A prolonged period of the monitor is displayed for 10 seconds. NOTE: You can also be enabled. Press the... portrait orientation viewing to adapt to portrait mode. NOTE: If pressing the power button has no effect, the Power Button Lockout feature may occur on all LCD screens. Press the power button on the front of the monitor to install the Pivot Pro software included on the front of the OSD ...

HP ZR22w and ZR24w LCD Monitors User Guide
Page 20
...right or left). 3. Disconnect and remove the signal and power cables from the Pedestal Base 12 Chapter 3 Setting Up the Monitor ENWW If the default source is turned off and the power and signal cables are active, the monitor will display the highest ranking priority input in the OSD ...by pressing the front panel menu button and selecting Source Control > Default Source. The monitor automatically scans the signal inputs for the display...
...right or left). 3. Disconnect and remove the signal and power cables from the Pedestal Base 12 Chapter 3 Setting Up the Monitor ENWW If the default source is turned off and the power and signal cables are active, the monitor will display the highest ranking priority input in the OSD ...by pressing the front panel menu button and selecting Source Control > Default Source. The monitor automatically scans the signal inputs for the display...

HP ZR22w and ZR24w LCD Monitors User Guide
Page 21
...screws are required (not provided with the monitor. 2. Mounting the Monitor NOTE: This apparatus is rated to support the weight of the monitor display panel. For best performance, it is important to use the power and video cables provided with the monitor). It is important to verify that the... manufacturer's mounting solution is compliant with the VESA standard and is intended to a mounting fixture. Figure 3-12 Removing the HP Quick Release from the pedestal base....
...screws are required (not provided with the monitor. 2. Mounting the Monitor NOTE: This apparatus is rated to support the weight of the monitor display panel. For best performance, it is important to use the power and video cables provided with the monitor). It is important to verify that the... manufacturer's mounting solution is compliant with the VESA standard and is intended to a mounting fixture. Figure 3-12 Removing the HP Quick Release from the pedestal base....

HP ZR22w and ZR24w LCD Monitors User Guide
Page 27
...on , press to optimize the screen image. Blue = Fully powered. Flashing Amber = Sleep Timer mode. Amber = Sleep mode. Front Panel Controls Table 4-1 Monitor Front Panel Controls Control 1 Menu 2 Minus 3 Plus/source 4 OK/auto 5 Power 6 Power LED Function Opens, selects or exits the OSD menu. If ...the OSD menu is on , press to navigate forward through the OSD menu and decrease adjustment levels. Turns the monitor on or off as long as the master power switch on the rear panel ...
...on , press to optimize the screen image. Blue = Fully powered. Flashing Amber = Sleep Timer mode. Amber = Sleep mode. Front Panel Controls Table 4-1 Monitor Front Panel Controls Control 1 Menu 2 Minus 3 Plus/source 4 OK/auto 5 Power 6 Power LED Function Opens, selects or exits the OSD menu. If ...the OSD menu is on , press to navigate forward through the OSD menu and decrease adjustment levels. Turns the monitor on or off as long as the master power switch on the rear panel ...
HP ZR22w and ZR24w LCD Monitors User Guide
Page 28
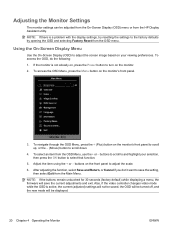
... Menu Use the On-Screen Display (OSD) to adjust the screen image based on , press the Power button to adjust the scale. 6. To access the OSD Menu, press the Menu button on the monitor. 2. buttons to scroll to select that function. 5. NOTE: If the buttons remain untouched for 30...your selection, then press the OK button to and highlight your viewing preferences. If the monitor is a problem with the display settings, try resetting the settings to scroll down. 4. To select an item from the HP Display Assistant utility. Adjust the item using the + or - buttons on the front...
... Menu Use the On-Screen Display (OSD) to adjust the screen image based on , press the Power button to adjust the scale. 6. To access the OSD Menu, press the Menu button on the monitor. 2. buttons to scroll to select that function. 5. NOTE: If the buttons remain untouched for 30...your selection, then press the OK button to and highlight your viewing preferences. If the monitor is a problem with the display settings, try resetting the settings to scroll down. 4. To select an item from the HP Display Assistant utility. Adjust the item using the + or - buttons on the front...

HP ZR22w and ZR24w LCD Monitors User Guide
Page 30
...The factory default is pressed. OSD Timeout Rotate OSD Power Saver Sets the time duration in seconds that the OSD is visible after the last button is Off. The factory default is On. 22 Chapter 4 Operating the Monitor ENWW Rotates the OSD menus and messages to Screen ...is 50. Video Overdrive Turns Video Overdrive On or Off. Enables the power saving feature. Adjust to fit the screen and maintains proportional image ● Overscan - Selects the OSD and power management features of the monitor. Table 4-2 OSD Menu (continued) Icon Main Menu OSD Control Management ...
...The factory default is pressed. OSD Timeout Rotate OSD Power Saver Sets the time duration in seconds that the OSD is visible after the last button is Off. The factory default is On. 22 Chapter 4 Operating the Monitor ENWW Rotates the OSD menus and messages to Screen ...is 50. Video Overdrive Turns Video Overdrive On or Off. Enables the power saving feature. Adjust to fit the screen and maintains proportional image ● Overscan - Selects the OSD and power management features of the monitor. Table 4-2 OSD Menu (continued) Icon Main Menu OSD Control Management ...

HP ZR22w and ZR24w LCD Monitors User Guide
Page 31
...On. Table 4-2 OSD Menu (continued) Icon Main Menu Submenu Power On Recall Mode Display Monitor Status DDC/CI Support Bezel Power LED Sleep Timer Language Description Restores power to the monitor following an unexpected removal of the monitor each time the OSD Main Menu is On. Displays the operating ...status of power. Select the location to display the status to place the monitor in which the OSD menu is English. Turns off the power LED on the screen each time the monitor is powered on. The default setting is Off. ●...
...On. Table 4-2 OSD Menu (continued) Icon Main Menu Submenu Power On Recall Mode Display Monitor Status DDC/CI Support Bezel Power LED Sleep Timer Language Description Restores power to the monitor following an unexpected removal of the monitor each time the OSD Main Menu is On. Displays the operating ...status of power. Select the location to display the status to place the monitor in which the OSD menu is English. Turns off the power LED on the screen each time the monitor is powered on. The default setting is Off. ●...

HP ZR22w and ZR24w LCD Monitors User Guide
Page 32
...input is the factory default. http://www.hp.com/support Returns all OSD menu settings and DDC/CI controls to : ● Always Active ● Low Power The factory default is Low Power. Exits the OSD menu screen. 24 Chapter 4 Operating the Monitor ENWW Selects the default or primary video ...input signal when the monitor is On. Table 4-2 OSD Menu (continued) Icon Main Menu Information...
...input is the factory default. http://www.hp.com/support Returns all OSD menu settings and DDC/CI controls to : ● Always Active ● Low Power The factory default is Low Power. Exits the OSD menu screen. 24 Chapter 4 Operating the Monitor ENWW Selects the default or primary video ...input signal when the monitor is On. Table 4-2 OSD Menu (continued) Icon Main Menu Information...
HP ZR22w and ZR24w LCD Monitors User Guide
Page 33
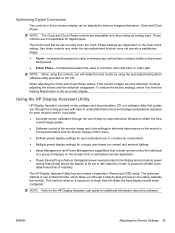
...; Multiple preset display settings for a single user based on content and ambient lighting. ● Asset Management and Power Management capabilities that will obtain the best results by -step process to accurately calibrate the monitor. The HP Display Assistant Utility has two modes of operation: Wizard and OSD mode. It provides: ● Accurate screen...
...; Multiple preset display settings for a single user based on content and ambient lighting. ● Asset Management and Power Management capabilities that will obtain the best results by -step process to accurately calibrate the monitor. The HP Display Assistant Utility has two modes of operation: Wizard and OSD mode. It provides: ● Accurate screen...

HP ZR22w and ZR24w LCD Monitors User Guide
Page 34
...power button is in HP Display Assistant. Theft deterrence mode is triggered if both the power and display cables have been disconnected from the PC on the monitor video input connector. Identifying Monitor Conditions Special messages will appear on the monitor screen when identifying the following monitor conditions: ● Monitor Status-When the monitor is powered... 60Hz-Indicates the monitor does not support the input signal because the resolution and/or refresh rate are set higher than the monitor supports (model ZR24w). ● No Source Signal-Indicates the monitor is not entered ...
...power button is in HP Display Assistant. Theft deterrence mode is triggered if both the power and display cables have been disconnected from the PC on the monitor video input connector. Identifying Monitor Conditions Special messages will appear on the monitor screen when identifying the following monitor conditions: ● Monitor Status-When the monitor is powered... 60Hz-Indicates the monitor does not support the input signal because the resolution and/or refresh rate are set higher than the monitor supports (model ZR24w). ● No Source Signal-Indicates the monitor is not entered ...

HP ZR22w and ZR24w LCD Monitors User Guide
Page 35
...If this occurs, you do not want to set a time for hours. 6. Press the OK button to enter the adjustment mode for the monitor to power on the monitor front panel to exit the menu. 12. ENWW Sleep Timer Mode 27 Note that enables you to set Sleep Time, press the OK button ...minutes. 9. Press the - (Minus) or + (Plus) button to select Management. 4. When you reset the time for minutes. 8. This also extends the life of power to the monitor will need to set Sleep Time. 11. A power failure or loss of the backlight bulbs in sleep mode until the next On Time activates or...
...If this occurs, you do not want to set a time for hours. 6. Press the OK button to enter the adjustment mode for the monitor to power on the monitor front panel to exit the menu. 12. ENWW Sleep Timer Mode 27 Note that enables you to set Sleep Time, press the OK button ...minutes. 9. Press the - (Minus) or + (Plus) button to select Management. 4. When you reset the time for minutes. 8. This also extends the life of power to the monitor will need to set Sleep Time. 11. A power failure or loss of the backlight bulbs in sleep mode until the next On Time activates or...

HP ZR22w and ZR24w LCD Monitors User Guide
Page 36
...protect the LCD panel against image retention. Installing the HP Display LiteSaver Software 1. After installing the software, click the HP Display LiteSaver icon in the computer CD-ROM Drive. Set to 0 to the System Tray. Cancel Restores the previous settings and minimizes HP Display ...Option To Do This Enable Display LiteSaver Enables the HP Display LiteSaver functions; This does not affect screen saver operation, which has priority over the HP Display LiteSaver. If disabled, the monitor will no longer control the monitor power until it is next run . Show 1 minute...
...protect the LCD panel against image retention. Installing the HP Display LiteSaver Software 1. After installing the software, click the HP Display LiteSaver icon in the computer CD-ROM Drive. Set to 0 to the System Tray. Cancel Restores the previous settings and minimizes HP Display ...Option To Do This Enable Display LiteSaver Enables the HP Display LiteSaver functions; This does not affect screen saver operation, which has priority over the HP Display LiteSaver. If disabled, the monitor will no longer control the monitor power until it is next run . Show 1 minute...

HP ZR22w and ZR24w LCD Monitors User Guide
Page 39
...Image Control/Horizontal Position or Vertical Position to the same mode as needed. Be sure that the master power switch on screen. Image is off . Monitor video cable is fuzzy or blurred; Connect the video cable properly. text is disconnected. Brightness and ...contrast are too low. Video cable is blank. Press the front panel power button. ENWW Solving Common Problems 31 Connect the power cord. the monitor is disconnected. Press the Menu button to inactivate the screen blanking utility. Set the master...
...Image Control/Horizontal Position or Vertical Position to the same mode as needed. Be sure that the master power switch on screen. Image is off . Monitor video cable is fuzzy or blurred; Connect the video cable properly. text is disconnected. Brightness and ...contrast are too low. Video cable is blank. Press the front panel power button. ENWW Solving Common Problems 31 Connect the power cord. the monitor is disconnected. Press the Menu button to inactivate the screen blanking utility. Set the master...


