
Brochure
Page 1
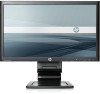
... a quick turn of the head VGA, DVI-D, and DisplayPort inputs provide a wide range of advanced connectivity options A built-in two port USB hub puts flash stick data close at hand A Cable management clip keeps unruly lines in more than previous CCFL monitors. With a soft black, sculpted form that almost vanishes into the background, you can help make a positive impact on the widescreen WLED (White LED) backlit panel. HP Advantage Series HP...
... a quick turn of the head VGA, DVI-D, and DisplayPort inputs provide a wide range of advanced connectivity options A built-in two port USB hub puts flash stick data close at hand A Cable management clip keeps unruly lines in more than previous CCFL monitors. With a soft black, sculpted form that almost vanishes into the background, you can help make a positive impact on the widescreen WLED (White LED) backlit panel. HP Advantage Series HP...
Brochure
Page 2
...-inch diagonal HP LCD monitor and an HP Compaq dc7800 or dc7900 Ultra-slim Desktop PC or HP t5000 series Thin Client on -screen Brightness, contrast, positioning, color temperature (warm, standard, cool, custom), image control (clock, clock phase, scaling, display) sharpness, DCR), monitor management, source control, information and factory reset Input power 100 - 240 VAC, 50/60 Hz Power consumption Maximum: 36 watts; HP Compaq LA2206x 21.5-inch WLED Backlit LCD Monitor Part number XN376A Panel type TN w/ WLED backlight Viewable image...
...-inch diagonal HP LCD monitor and an HP Compaq dc7800 or dc7900 Ultra-slim Desktop PC or HP t5000 series Thin Client on -screen Brightness, contrast, positioning, color temperature (warm, standard, cool, custom), image control (clock, clock phase, scaling, display) sharpness, DCR), monitor management, source control, information and factory reset Input power 100 - 240 VAC, 50/60 Hz Power consumption Maximum: 36 watts; HP Compaq LA2206x 21.5-inch WLED Backlit LCD Monitor Part number XN376A Panel type TN w/ WLED backlight Viewable image...

User Manual
Page 5
... Connecting USB Devices ...12 Removing the Monitor Pedestal Base 13 Mounting the Monitor ...14 Locating the Rating Labels ...15 Installing a Cable Lock ...15 4 Operating the Monitor ...16 Software and Utilities ...16 The Information File ...16 The Image Color Matching File 16 Installing the .INF and .ICM Files ...17 Installing from the CD ...17 Downloading from the Worldwide Web 17 Using the Auto-Adjustment Function 18 Front Panel Controls ...19 Adjusting the Monitor Settings ...20 Using the On-Screen Display Menu...
... Connecting USB Devices ...12 Removing the Monitor Pedestal Base 13 Mounting the Monitor ...14 Locating the Rating Labels ...15 Installing a Cable Lock ...15 4 Operating the Monitor ...16 Software and Utilities ...16 The Information File ...16 The Image Color Matching File 16 Installing the .INF and .ICM Files ...17 Installing from the CD ...17 Downloading from the Worldwide Web 17 Using the Auto-Adjustment Function 18 Front Panel Controls ...19 Adjusting the Monitor Settings ...20 Using the On-Screen Display Menu...
User Manual
Page 6
... Mode ...27 Appendix A Troubleshooting ...29 Solving Common Problems ...29 Online Technical Support ...30 Preparing to Call Technical Support 30 Appendix B Technical Specifications ...31 LA2006x Model ...31 LA2206x Model ...32 LA2306x Model ...33 Recognizing Preset Display Resolutions 35 LA2006x Model ...35 LA2206x Model ...35 LA2306x Model ...36 Entering User Modes ...37 Energy Saver Feature ...37 Appendix C Agency Regulatory Notices ...38 Federal Communications Commission Notice 38 Modifications ...38 Cables...
... Mode ...27 Appendix A Troubleshooting ...29 Solving Common Problems ...29 Online Technical Support ...30 Preparing to Call Technical Support 30 Appendix B Technical Specifications ...31 LA2006x Model ...31 LA2206x Model ...32 LA2306x Model ...33 Recognizing Preset Display Resolutions 35 LA2006x Model ...35 LA2206x Model ...35 LA2306x Model ...36 Entering User Modes ...37 Energy Saver Feature ...37 Appendix C Agency Regulatory Notices ...38 Federal Communications Commission Notice 38 Modifications ...38 Cables...
User Manual
Page 9
... signal input to support VGA analog with VGA signal cable provided ● Video signal input to support DVI digital with DVI-D signal cable provided ● Video signal input to support DisplayPort digital (DisplayPort cable not provided) ● USB 2.0 hub with 1920 x 1080 resolution, plus full-screen support for adjusting monitor settings ● Theft deterrence software ENWW HP LCD Monitors 1 includes custom scaling for maximum image size while preserving original aspect ratio ● LA2206x model, 54.6 cm (21.5-inch) diagonal viewable area display with one upstream port (connects...
... signal input to support VGA analog with VGA signal cable provided ● Video signal input to support DVI digital with DVI-D signal cable provided ● Video signal input to support DisplayPort digital (DisplayPort cable not provided) ● USB 2.0 hub with 1920 x 1080 resolution, plus full-screen support for adjusting monitor settings ● Theft deterrence software ENWW HP LCD Monitors 1 includes custom scaling for maximum image size while preserving original aspect ratio ● LA2206x model, 54.6 cm (21.5-inch) diagonal viewable area display with one upstream port (connects...
User Manual
Page 11
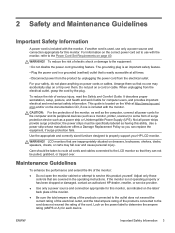
... be specifically labeled as the computer, connect all power strips provide surge protection; LCD monitors that they can replace the equipment, if surge protection fails. It describes proper workstation, setup, posture, and health and work habits for each device. Do not pull on power cords or cables. Not all power cords for the computer and its peripheral devices (such as a power strip or Uninterruptible Power Supply...
... be specifically labeled as the computer, connect all power strips provide surge protection; LCD monitors that they can replace the equipment, if surge protection fails. It describes proper workstation, setup, posture, and health and work habits for each device. Do not pull on power cords or cables. Not all power cords for the computer and its peripheral devices (such as a power strip or Uninterruptible Power Supply...

User Manual
Page 19
... the monitor screen, you can change the default source in the OSD by pressing the Menu button on the front panel, select OSD Control from the menu, then select Rotate OSD. The monitor automatically scans the signal inputs for an active input and uses that display the same static image on screen for five seconds. To disable this feature, press and hold the monitor power button for a prolonged period of the monitor, then select Management > Bezel Power LED...
... the monitor screen, you can change the default source in the OSD by pressing the Menu button on the front panel, select OSD Control from the menu, then select Rotate OSD. The monitor automatically scans the signal inputs for an active input and uses that display the same static image on screen for five seconds. To disable this feature, press and hold the monitor power button for a prolonged period of the monitor, then select Management > Bezel Power LED...
User Manual
Page 25
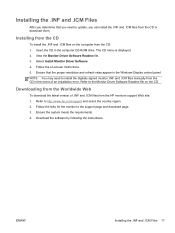
... the Monitor Driver Software Readme file on -screen instructions. 5. Refer to the support page and download page. 3. Insert the CD in the Windows Display control panel. Ensure the system meets the requirements. 4. Downloading from the Worldwide Web To download the latest version of an installation error. ENWW Installing the .INF and .ICM Files 17 The CD menu is displayed. 2. View the Monitor Driver Software Readme file. 3. Ensure that you need to update, you can install...
... the Monitor Driver Software Readme file on -screen instructions. 5. Refer to the support page and download page. 3. Insert the CD in the Windows Display control panel. Ensure the system meets the requirements. 4. Downloading from the Worldwide Web To download the latest version of an installation error. ENWW Installing the .INF and .ICM Files 17 The CD menu is displayed. 2. View the Monitor Driver Software Readme file. 3. Ensure that you need to update, you can install...
User Manual
Page 28
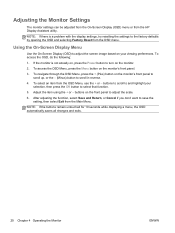
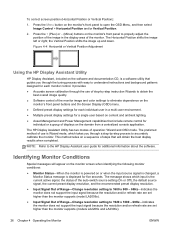
... front panel to save the setting, then select Exit from the HP Display Assistant utility. To select an item from the OSD menu. buttons to scroll to the factory defaults by opening the OSD and selecting Factory Reset from the OSD Menu, use the + or - If the monitor is a problem with the display settings, try resetting the settings to and highlight your viewing preferences. Adjust the item using the + or - Using the On-Screen Display Menu Use the On-Screen Display (OSD) to adjust the screen image based...
... front panel to save the setting, then select Exit from the HP Display Assistant utility. To select an item from the OSD menu. buttons to scroll to the factory defaults by opening the OSD and selecting Factory Reset from the OSD Menu, use the + or - If the monitor is a problem with the display settings, try resetting the settings to and highlight your viewing preferences. Adjust the item using the + or - Using the On-Screen Display Menu Use the On-Screen Display (OSD) to adjust the screen image based...

User Manual
Page 29
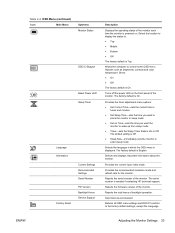
... remove any vertical bars or strips visible on the monitor will also change a menu item. Table 4-2 OSD Menu Icon Main Menu Submenu Description Brightness Adjustable scale Adjusts the brightness level of the screen. Contrast Adjustable scale Adjusts the contrast level of the screen. The factory default range is 90. Adjusting the Clock will be formatted. The factory default range is 80. Standard (6500K) Uses standard colors (default). Cool (9300K) Changes color to slightly reddish white. sets your own blue color levels Image Control Adjusts the screen image...
... remove any vertical bars or strips visible on the monitor will also change a menu item. Table 4-2 OSD Menu Icon Main Menu Submenu Description Brightness Adjustable scale Adjusts the brightness level of the screen. Contrast Adjustable scale Adjusts the contrast level of the screen. The factory default range is 90. Adjusting the Clock will be formatted. The factory default range is 80. Standard (6500K) Uses standard colors (default). Cool (9300K) Changes color to slightly reddish white. sets your own blue color levels Image Control Adjusts the screen image...
User Manual
Page 31
...sets the current time in sleep mode ● Set on the front panel of the monitor. The factory default is On. Provides the recommended resolution mode and refresh rate for the monitor. http://www.hp.com/support Returns all OSD menu settings and DDC/CI controls to control some OSD menu features such as brightness, contrast and color temperature. Table 4-2 OSD Menu (continued) Icon Main Menu Submenu Monitor Status DDC/CI Support Bezel Power LED Sleep Timer Language Information Factory Reset Current Settings Recommended Settings Serial Number FW Version Backlight Hours Service Support...
...sets the current time in sleep mode ● Set on the front panel of the monitor. The factory default is On. Provides the recommended resolution mode and refresh rate for the monitor. http://www.hp.com/support Returns all OSD menu settings and DDC/CI controls to control some OSD menu features such as brightness, contrast and color temperature. Table 4-2 OSD Menu (continued) Icon Main Menu Submenu Monitor Status DDC/CI Support Bezel Power LED Sleep Timer Language Information Factory Reset Current Settings Recommended Settings Serial Number FW Version Backlight Hours Service Support...

User Manual
Page 33
... the monitor's front panel to minimize video flickering or blurring. To eliminate vertical bars (Clock): 1. Press the Menu button on the screen background. ● Clock Phase-Increases/decreases the value to open the OSD Menu, and then select Image Control > Clock Phase. 2. Press the buttons slowly so that you will obtain the best results by using the auto-adjustment pattern software utility provided on the monitor's front panel to eliminate vertical bars...
... the monitor's front panel to minimize video flickering or blurring. To eliminate vertical bars (Clock): 1. Press the Menu button on the screen background. ● Clock Phase-Increases/decreases the value to open the OSD Menu, and then select Image Control > Clock Phase. 2. Press the buttons slowly so that you will obtain the best results by using the auto-adjustment pattern software utility provided on the monitor's front panel to eliminate vertical bars...
User Manual
Page 34
... the software. Press the Menu button on a sequence of operation: Wizard and OSD mode. This method relies on the monitor's front panel to the HP Display Assistant user guide for five seconds. the Vertical Position shifts the image up and down. The preferred method of Range-Change resolution setting to 1920 x 1080 - 60Hz-Indicates the monitor does not support the input signal because the resolution and/or refresh rate are set higher than the monitor supports (model LA2006x). ● Input Signal...
... the software. Press the Menu button on a sequence of operation: Wizard and OSD mode. This method relies on the monitor's front panel to the HP Display Assistant user guide for five seconds. the Vertical Position shifts the image up and down. The preferred method of Range-Change resolution setting to 1920 x 1080 - 60Hz-Indicates the monitor does not support the input signal because the resolution and/or refresh rate are set higher than the monitor supports (model LA2006x). ● Input Signal...

User Manual
Page 35
... Image Control OSD menu. ● Theft Mode Enabled-Indicates that Dynamic Contrast Ratio has been turned on the front panel for 10 seconds to the computer. ● OSD Lockout-The OSD can be enabled or disabled by pressing and holding the Menu button on . Scroll down and highlight Management. 3. Check to determine if the PC or input signal source is off or in the power saving mode. ● Auto Adjustment in the Image Control OSD menu...
... Image Control OSD menu. ● Theft Mode Enabled-Indicates that Dynamic Contrast Ratio has been turned on the front panel for 10 seconds to the computer. ● OSD Lockout-The OSD can be enabled or disabled by pressing and holding the Menu button on . Scroll down and highlight Management. 3. Check to determine if the PC or input signal source is off or in the power saving mode. ● Auto Adjustment in the Image Control OSD menu...
User Manual
Page 37
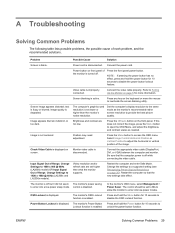
.../auto button on page 35). Image is active. Select Image Control/Horizontal Position or Vertical Position to inactivate the screen blanking utility. Connect the appropriate video cable (DisplayPort, DVI, or VGA) between the computer and monitor. In the monitor's OSD menu, select Management > Power Saver. The control should be set lower or higher than what the monitor supports. Press and hold the Menu button for 10 seconds to access the OSD menu. ENWW Solving Common Problems 29 Power cord is turned off. Power button...
.../auto button on page 35). Image is active. Select Image Control/Horizontal Position or Vertical Position to inactivate the screen blanking utility. Connect the appropriate video cable (DisplayPort, DVI, or VGA) between the computer and monitor. In the monitor's OSD menu, select Management > Power Saver. The control should be set lower or higher than what the monitor supports. Press and hold the Menu button for 10 seconds to access the OSD menu. ENWW Solving Common Problems 29 Power cord is turned off. Power button...
User Manual
Page 39
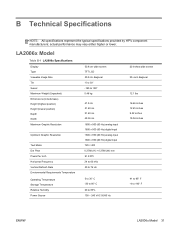
...typical specifications provided by HP's component manufacturers; actual performance may vary either higher or lower. LA2006x Model Table B-1 LA2006x Specifications Display Type Viewable Image Size Tilt Swivel Maximum Weight (Unpacked) Dimensions (include base) Height (highest position) Height (lowest position) Depth Width Maximum Graphic Resolution Optimum Graphic Resolution Text Mode Dot Pitch Pixels Per Inch Horizontal Frequency Vertical Refresh Rate Environmental Requirements Temperature Operating Temperature Storage Temperature Relative Humidity Power Source 50.8 cm wide screen TFT LCD...
...typical specifications provided by HP's component manufacturers; actual performance may vary either higher or lower. LA2006x Model Table B-1 LA2006x Specifications Display Type Viewable Image Size Tilt Swivel Maximum Weight (Unpacked) Dimensions (include base) Height (highest position) Height (lowest position) Depth Width Maximum Graphic Resolution Optimum Graphic Resolution Text Mode Dot Pitch Pixels Per Inch Horizontal Frequency Vertical Refresh Rate Environmental Requirements Temperature Operating Temperature Storage Temperature Relative Humidity Power Source 50.8 cm wide screen TFT LCD...
User Manual
Page 40
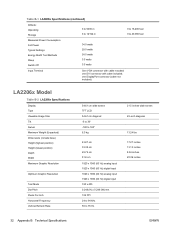
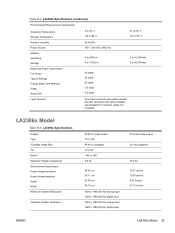
one DVI connector with cable included; one DisplayPort connector (cable not included) LA2206x Model Table B-2 LA2206x Specifications Display Type Viewable Image Size Tilt Swivel Maximum Weight (Unpacked) Dimensions (include base) Height (highest position) Height (lowest position) Depth Width Maximum Graphic Resolution Optimum Graphic Resolution Text Mode Dot Pitch Pixels Per Inch Horizontal Frequency Vertical Refresh Rate 54.61 cm wide screen TFT LCD 54.61 cm diagonal -5 to 30° -180 to 180° 6.0 kg 43.87 cm 33.35 cm...
one DVI connector with cable included; one DisplayPort connector (cable not included) LA2206x Model Table B-2 LA2206x Specifications Display Type Viewable Image Size Tilt Swivel Maximum Weight (Unpacked) Dimensions (include base) Height (highest position) Height (lowest position) Depth Width Maximum Graphic Resolution Optimum Graphic Resolution Text Mode Dot Pitch Pixels Per Inch Horizontal Frequency Vertical Refresh Rate 54.61 cm wide screen TFT LCD 54.61 cm diagonal -5 to 30° -180 to 180° 6.0 kg 43.87 cm 33.35 cm...
User Manual
Page 41
... DVI connector with cable included; one DisplayPort connector (cable not included) LA2306x Model Table B-3 LA2306x Specifications Display Type Viewable Image Size Tilt Swivel Maximum Weight (Unpacked) Dimensions (include base) Height (highest position) Height (lowest position) Depth Width Maximum Graphic Resolution Optimum Graphic Resolution 58.42 cm wide screen TFT LCD 58.42 cm diagonal -5 to 30° -180 to 40,000 feet 38 watts 33 watts 25 watts 0.5 watts 0.5 watts One VGA connector with cable...
... DVI connector with cable included; one DisplayPort connector (cable not included) LA2306x Model Table B-3 LA2306x Specifications Display Type Viewable Image Size Tilt Swivel Maximum Weight (Unpacked) Dimensions (include base) Height (highest position) Height (lowest position) Depth Width Maximum Graphic Resolution Optimum Graphic Resolution 58.42 cm wide screen TFT LCD 58.42 cm diagonal -5 to 30° -180 to 40,000 feet 38 watts 33 watts 25 watts 0.5 watts 0.5 watts One VGA connector with cable...

User Manual
Page 43
This monitor automatically recognizes these preset modes and they will appear properly sized and centered on the screen. LA2006x Model Table B-4 Factory Preset Modes Preset Pixel Format 1 640 × 480 2 720 × 400 3 800 × 600 4 1024 × 768 5 1280 × 720 6 1280 × 1024 7 1440 × 900 8 ...55.935 Vert Freq (Hz) 59.940 70.087 60.317 60.004 59.94 60.02 59.887 ENWW Recognizing Preset Display Resolutions 35 Recognizing Preset Display Resolutions The display resolutions listed below are the most commonly used modes and are set as factory defaults.
This monitor automatically recognizes these preset modes and they will appear properly sized and centered on the screen. LA2006x Model Table B-4 Factory Preset Modes Preset Pixel Format 1 640 × 480 2 720 × 400 3 800 × 600 4 1024 × 768 5 1280 × 720 6 1280 × 1024 7 1440 × 900 8 ...55.935 Vert Freq (Hz) 59.940 70.087 60.317 60.004 59.94 60.02 59.887 ENWW Recognizing Preset Display Resolutions 35 Recognizing Preset Display Resolutions The display resolutions listed below are the most commonly used modes and are set as factory defaults.

User Manual
Page 45
... User Modes 37 Entering User Modes The video controller signal may need to readjust the parameters of the monitor screen by using a preset mode. NOTE: The above power saver feature only works when connected to computers that is turned amber. Energy Saver Feature The monitors support a reduced power state. The monitor automatically stores the new setting, then recognizes the new mode just as it does a preset mode. By selecting the settings in the reduced power...
... User Modes 37 Entering User Modes The video controller signal may need to readjust the parameters of the monitor screen by using a preset mode. NOTE: The above power saver feature only works when connected to computers that is turned amber. Energy Saver Feature The monitors support a reduced power state. The monitor automatically stores the new setting, then recognizes the new mode just as it does a preset mode. By selecting the settings in the reduced power...


