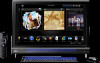
Upgrading and Servicing Guide
Page 3
Table of Contents Start Here...1 Safety Information ...2 Locating Components...2 Opening the Computer ...3 Removing and Replacing a Memory Module 7 Removing a Memory Module ...8 Replacing a Memory Module 10 Removing and Replacing the Hard Disk Drive 14 Removing the Hard Disk Drive 14 Replacing a Hard Disk Drive...17 Table of Contents iii
Table of Contents Start Here...1 Safety Information ...2 Locating Components...2 Opening the Computer ...3 Removing and Replacing a Memory Module 7 Removing a Memory Module ...8 Replacing a Memory Module 10 Removing and Replacing the Hard Disk Drive 14 Removing the Hard Disk Drive 14 Replacing a Hard Disk Drive...17 Table of Contents iii

Upgrading and Servicing Guide
Page 5
... provides instructions for replacing or upgrading the memory and the hard disk drive in personal injury or equipment damage. Read the following items before attempting to the product specifications for system upgradability information. It is recommended that you decide to upgrade or service the computer, refer to upgrade or service the HP TouchSmart PC. Start Here...
... provides instructions for replacing or upgrading the memory and the hard disk drive in personal injury or equipment damage. Read the following items before attempting to the product specifications for system upgradability information. It is recommended that you decide to upgrade or service the computer, refer to upgrade or service the HP TouchSmart PC. Start Here...
Upgrading and Servicing Guide
Page 10
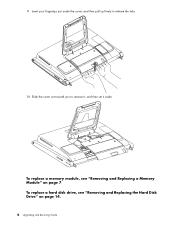
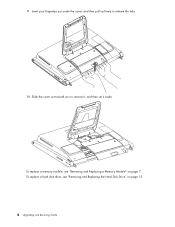
To replace a memory module, see "Removing and Replacing the Hard Disk Drive" on page 7. 9 Insert your fingertips just under the cover, and then pull up firmly to release the tabs. 10 Slide the cover out toward you to remove it, and then set it aside. To replace a hard disk drive, see "Removing and Replacing a Memory Module" on page 14. 6 Upgrading and Servicing Guide
To replace a memory module, see "Removing and Replacing the Hard Disk Drive" on page 7. 9 Insert your fingertips just under the cover, and then pull up firmly to release the tabs. 10 Slide the cover out toward you to remove it, and then set it aside. To replace a hard disk drive, see "Removing and Replacing a Memory Module" on page 14. 6 Upgrading and Servicing Guide
Upgrading and Servicing Guide
Page 16
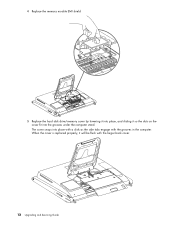
The cover snaps into place with a click as the side tabs engage with the larger back cover. 12 Upgrading and Servicing Guide When the cover is replaced properly, it so the slots on the cover fit into the grooves under the computer stand. 4 Replace the memory module EMI shield. 5 Replace the hard disk drive/memory cover by lowering it into place, and sliding it will be flush with the grooves in the computer.
The cover snaps into place with a click as the side tabs engage with the larger back cover. 12 Upgrading and Servicing Guide When the cover is replaced properly, it so the slots on the cover fit into the grooves under the computer stand. 4 Replace the memory module EMI shield. 5 Replace the hard disk drive/memory cover by lowering it into place, and sliding it will be flush with the grooves in the computer.
Upgrading and Servicing Guide
Page 17
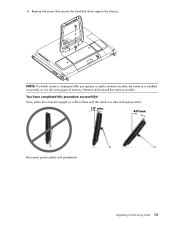
You have completed this procedure successfully! Now, place the computer upright on a flat surface with the stand in a safe and open position. 10° min. 40°max Reconnect power cables and peripherals. 6 Replace the screw that secures the hard disk drive cage to the chassis. NOTE: If a blank screen is displayed after you replace or add a memory module, the memory is installed incorrectly, or it is the wrong type of memory. Upgrading and Servicing Guide 13 Remove and reinstall the memory module.
You have completed this procedure successfully! Now, place the computer upright on a flat surface with the stand in a safe and open position. 10° min. 40°max Reconnect power cables and peripherals. 6 Replace the screw that secures the hard disk drive cage to the chassis. NOTE: If a blank screen is displayed after you replace or add a memory module, the memory is installed incorrectly, or it is the wrong type of memory. Upgrading and Servicing Guide 13 Remove and reinstall the memory module.

Upgrading and Servicing Guide
Page 18
... the procedures to the Limited Warranty, Support, and System Recovery Guide included with your HP TouchSmart PC. For details about the recovery procedure, refer to prepare the HP TouchSmart PC. Removing and Replacing the Hard Disk Drive You can replace or upgrade the hard disk drive. B A 14 Upgrading and Servicing Guide Failure to load the factory-installed files. CAUTION: Before removing the...
... the procedures to the Limited Warranty, Support, and System Recovery Guide included with your HP TouchSmart PC. For details about the recovery procedure, refer to prepare the HP TouchSmart PC. Removing and Replacing the Hard Disk Drive You can replace or upgrade the hard disk drive. B A 14 Upgrading and Servicing Guide Failure to load the factory-installed files. CAUTION: Before removing the...
Upgrading and Servicing Guide
Page 21
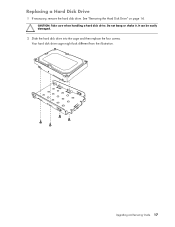
Do not bang or shake it. Your hard disk drive cage might look different from the illustration. It can be easily damaged. 2 Slide the hard disk drive into the cage and then replace the four screws. Upgrading and Servicing Guide 17 See "Removing the Hard Disk Drive" on page 14. Replacing a Hard Disk Drive 1 If necessary, remove the hard disk drive. CAUTION: Take care when handling a hard disk drive.
Do not bang or shake it. Your hard disk drive cage might look different from the illustration. It can be easily damaged. 2 Slide the hard disk drive into the cage and then replace the four screws. Upgrading and Servicing Guide 17 See "Removing the Hard Disk Drive" on page 14. Replacing a Hard Disk Drive 1 If necessary, remove the hard disk drive. CAUTION: Take care when handling a hard disk drive.
Upgrading and Servicing Guide
Page 23
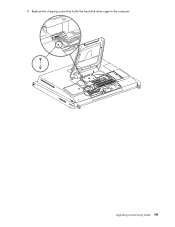
Upgrading and Servicing Guide 19 5 Replace the shipping screw that holds the hard disk drive cage to the computer.
Upgrading and Servicing Guide 19 5 Replace the shipping screw that holds the hard disk drive cage to the computer.

Upgrading and Servicing Guide
Page 24
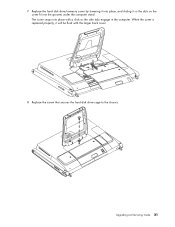
6 Replace the hard drive EMI shield, pressing it firmly into place so the tabs engage. 20 Upgrading and Servicing Guide
6 Replace the hard drive EMI shield, pressing it firmly into place so the tabs engage. 20 Upgrading and Servicing Guide
Upgrading and Servicing Guide
Page 25
When the cover is replaced properly, it so the slots on the cover fit into the grooves under the computer stand. 7 Replace the hard disk drive/memory cover by lowering it into place, and sliding it will be flush with a click as the side tabs engage in the computer. The cover snaps into place with the larger back cover. 8 Replace the screw that secures the hard disk drive cage to the chassis. Upgrading and Servicing Guide 21
When the cover is replaced properly, it so the slots on the cover fit into the grooves under the computer stand. 7 Replace the hard disk drive/memory cover by lowering it into place, and sliding it will be flush with a click as the side tabs engage in the computer. The cover snaps into place with the larger back cover. 8 Replace the screw that secures the hard disk drive cage to the chassis. Upgrading and Servicing Guide 21

Limited Warranty, Support, and System Recovery Guide
Page 5
... an authorized representative of end-user-replaceable HP or HP-approved parts if available for damage that the operation of this Limited Warranty is valid unless it is the date of purchase. YOU SHOULD MAKE PERIODIC BACKUP COPIES OF THE DATA STORED ON YOUR HARD DRIVE OR OTHER STORAGE DEVICES AS A... PRECAUTION AGAINST POSSIBLE FAILURES, ALTERATION, OR LOSS OF THE DATA. HP IS NOT RESPONSIBLE FOR DAMAGE TO OR LOSS OF ANY PROGRAMS, DATA, OR REMOVABLE STORAGE ...
... an authorized representative of end-user-replaceable HP or HP-approved parts if available for damage that the operation of this Limited Warranty is valid unless it is the date of purchase. YOU SHOULD MAKE PERIODIC BACKUP COPIES OF THE DATA STORED ON YOUR HARD DRIVE OR OTHER STORAGE DEVICES AS A... PRECAUTION AGAINST POSSIBLE FAILURES, ALTERATION, OR LOSS OF THE DATA. HP IS NOT RESPONSIBLE FOR DAMAGE TO OR LOSS OF ANY PROGRAMS, DATA, OR REMOVABLE STORAGE ...

Limited Warranty, Support, and System Recovery Guide
Page 11
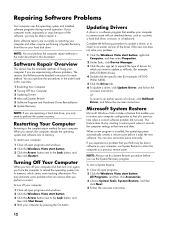
... manually. Complete the following procedure to update a driver, or to revert to an earlier version of fixing your computer if you are replacing a hard disk drive, you may be able to communicate with an attached device, such as restarting your computer and others require performing a System Recovery from ...system into its memory, which you experience a problem that of a driver, click Rollback Driver, and follow provide detailed instructions for example, HP DVD Writer 640b). 5 Click the Driver tab. 6 To update a driver, click Update Driver, and follow the onscreen instructions.
... manually. Complete the following procedure to update a driver, or to revert to an earlier version of fixing your computer if you are replacing a hard disk drive, you may be able to communicate with an attached device, such as restarting your computer and others require performing a System Recovery from ...system into its memory, which you experience a problem that of a driver, click Rollback Driver, and follow provide detailed instructions for example, HP DVD Writer 640b). 5 Click the Driver tab. 6 To update a driver, click Update Driver, and follow the onscreen instructions.

Warranty and Support Guide
Page 5
...OR ERROR-FREE. YOU SHOULD MAKE PERIODIC BACKUP COPIES OF THE DATA STORED ON YOUR HARD DRIVE OR OTHER STORAGE DEVICES AS A PRECAUTION AGAINST POSSIBLE FAILURES, ALTERATION, OR LOSS OF THE DATA. HP IS NOT RESPONSIBLE FOR THE RESTORATION OR REINSTALLATION OF ANY PROGRAMS OR DATA OTHER THAN ... THE PRODUCT IS MANUFACTURED. UNITS SENT IN FOR SERVICE MAY HAVE THE DATA ERASED FROM THE HARD DRIVE AND THE PROGRAMS RESTORED TO THEIR ORIGINAL STATE. HP will, at its discretion, repair or replace any product from defects in material or workmanship for ninety (90) days or for defective products...
...OR ERROR-FREE. YOU SHOULD MAKE PERIODIC BACKUP COPIES OF THE DATA STORED ON YOUR HARD DRIVE OR OTHER STORAGE DEVICES AS A PRECAUTION AGAINST POSSIBLE FAILURES, ALTERATION, OR LOSS OF THE DATA. HP IS NOT RESPONSIBLE FOR THE RESTORATION OR REINSTALLATION OF ANY PROGRAMS OR DATA OTHER THAN ... THE PRODUCT IS MANUFACTURED. UNITS SENT IN FOR SERVICE MAY HAVE THE DATA ERASED FROM THE HARD DRIVE AND THE PROGRAMS RESTORED TO THEIR ORIGINAL STATE. HP will, at its discretion, repair or replace any product from defects in material or workmanship for ninety (90) days or for defective products...
Warranty and Support Guide
Page 12
... a restore point where it . Some software repairs are experiencing software problems. The sections that follow provide detailed instructions for example, HP DVD Writer 640b). 5 Click the Driver tab. 6 To update a driver, click Update Driver, and follow the onscreen instructions.... Off Your Computer 3 Updating Drivers 4 Microsoft System Restore 5 Software Program and Hardware Driver Reinstallation 6 System Recovery NOTE: If you are replacing a hard disk drive, you may be able to perform the system recovery. To start a System Restore: 1 Close all open programs and windows. 2 Click...
... a restore point where it . Some software repairs are experiencing software problems. The sections that follow provide detailed instructions for example, HP DVD Writer 640b). 5 Click the Driver tab. 6 To update a driver, click Update Driver, and follow the onscreen instructions.... Off Your Computer 3 Updating Drivers 4 Microsoft System Restore 5 Software Program and Hardware Driver Reinstallation 6 System Recovery NOTE: If you are replacing a hard disk drive, you may be able to perform the system recovery. To start a System Restore: 1 Close all open programs and windows. 2 Click...
Getting Started Guide
Page 11
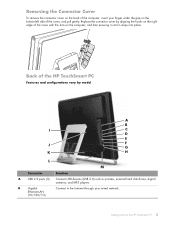
Replace the connector cover by model A B I C D E J F G K H L M Connector Function A USB 2.0 ports (3) Connect USB devices (USB 2.0) such as printers, external hard disk drives, digital cameras, and MP3 players. Removing the Connector Cover To remove the connector cover on the back of the cover..., and then pressing it until it snaps into place. B Gigabit Ethernet LAN (10/100/1G) Connect to Know the HP TouchSmart PC 5 Back of the HP TouchSmart PC Features and configurations vary by aligning the hooks on the right edge of the cover with the slots on the bottom-left...
Replace the connector cover by model A B I C D E J F G K H L M Connector Function A USB 2.0 ports (3) Connect USB devices (USB 2.0) such as printers, external hard disk drives, digital cameras, and MP3 players. Removing the Connector Cover To remove the connector cover on the back of the cover..., and then pressing it until it snaps into place. B Gigabit Ethernet LAN (10/100/1G) Connect to Know the HP TouchSmart PC 5 Back of the HP TouchSmart PC Features and configurations vary by aligning the hooks on the right edge of the cover with the slots on the bottom-left...
Getting Started Guide
Page 23
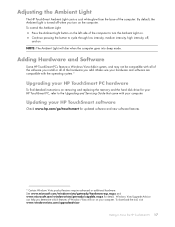
... software are compatible with the operating system.* Upgrading your HP TouchSmart PC hardware To find detailed instructions on removing and replacing the memory and the hard disk drive for your HP TouchSmart PC, refer to turn on . Continue pressing the button to Know the HP TouchSmart PC 17 Adjusting the Ambient Light The HP TouchSmart Ambient Light casts a cool white glow from the base...
... software are compatible with the operating system.* Upgrading your HP TouchSmart PC hardware To find detailed instructions on removing and replacing the memory and the hard disk drive for your HP TouchSmart PC, refer to turn on . Continue pressing the button to Know the HP TouchSmart PC 17 Adjusting the Ambient Light The HP TouchSmart Ambient Light casts a cool white glow from the base...

Upgrade and Service Guide
Page 3
Table of Contents Start Here...1 Safety Information ...2 Locating Components...2 Opening the Computer ...3 Removing and Replacing a Memory Module 7 Removing a Memory Module ...8 Replacing a Memory Module 10 Removing and Replacing the Hard Disk Drive 15 Removing the Hard Disk Drive 15 Replacing a Hard Disk Drive...18 Table of Contents iii
Table of Contents Start Here...1 Safety Information ...2 Locating Components...2 Opening the Computer ...3 Removing and Replacing a Memory Module 7 Removing a Memory Module ...8 Replacing a Memory Module 10 Removing and Replacing the Hard Disk Drive 15 Removing the Hard Disk Drive 15 Replacing a Hard Disk Drive...18 Table of Contents iii
Upgrade and Service Guide
Page 5
... practices and regulatory compliance required for replacing or upgrading the memory and the hard disk drive in personal injury or equipment damage. It is easier to consult this information than to do so before removing the memory cover or the back cover. Go to upgrade or service the HP TouchSmart PC. It is recommended that you...
... practices and regulatory compliance required for replacing or upgrading the memory and the hard disk drive in personal injury or equipment damage. It is easier to consult this information than to do so before removing the memory cover or the back cover. Go to upgrade or service the HP TouchSmart PC. It is recommended that you...
Upgrade and Service Guide
Page 10
9 Insert your fingertips just under the cover, and then pull up firmly to release the tabs. 10 Slide the cover out toward you to remove it, and then set it aside. To replace a hard disk drive, see "Removing and Replacing a Memory Module" on page 15. 6 Upgrading and Servicing Guide To replace a memory module, see "Removing and Replacing the Hard Disk Drive" on page 7.
9 Insert your fingertips just under the cover, and then pull up firmly to release the tabs. 10 Slide the cover out toward you to remove it, and then set it aside. To replace a hard disk drive, see "Removing and Replacing a Memory Module" on page 15. 6 Upgrading and Servicing Guide To replace a memory module, see "Removing and Replacing the Hard Disk Drive" on page 7.

Upgrade and Service Guide
Page 24
4 Connect the power and data cables to the hard disk drive. 5 Replace the hard drive EMI shield, pressing it firmly into place so the tabs engage. 20 Upgrading and Servicing Guide
4 Connect the power and data cables to the hard disk drive. 5 Replace the hard drive EMI shield, pressing it firmly into place so the tabs engage. 20 Upgrading and Servicing Guide


