Limited Warranty and Support Guide
Page 10
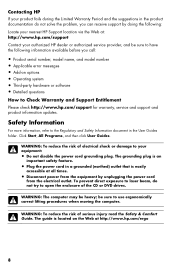
...available before you can receive support by unplugging the power cord from the electrical outlet. Click Start, All Programs, and then click User Guides. WARNING: To reduce the risk of electrical shock or damage to your authorized HP dealer or authorized service provider, and be sure ... Applicable error messages • Add-on the Web at : http://www.hp.com/support Contact your equipment: • Do not disable the power cord grounding plug. The grounding plug is an important safety feature. • Plug the power cord in a grounded (earthed) outlet that is located on options • ...
...available before you can receive support by unplugging the power cord from the electrical outlet. Click Start, All Programs, and then click User Guides. WARNING: To reduce the risk of electrical shock or damage to your authorized HP dealer or authorized service provider, and be sure ... Applicable error messages • Add-on the Web at : http://www.hp.com/support Contact your equipment: • Do not disable the power cord grounding plug. The grounding plug is an important safety feature. • Plug the power cord in a grounded (earthed) outlet that is located on options • ...

Limited Warranty and Support Guide - Refurbished
Page 13
...lifting procedures when moving the computer. WARNING: To reduce the risk of electrical shock or damage to your equipment: • Do not disable the power cord grounding plug. WARNING: To reduce the risk of serious injury read the Safety & Comfort Guide. be heavy; The grounding plug is an important ...safety feature. • Plug the power cord in the User Guides folder. The guide is easily accessible at http://www.hp.com/ergo 11 To prevent direct exposure to laser beam, do not try to open the enclosure of the...
...lifting procedures when moving the computer. WARNING: To reduce the risk of electrical shock or damage to your equipment: • Do not disable the power cord grounding plug. WARNING: To reduce the risk of serious injury read the Safety & Comfort Guide. be heavy; The grounding plug is an important ...safety feature. • Plug the power cord in the User Guides folder. The guide is easily accessible at http://www.hp.com/ergo 11 To prevent direct exposure to laser beam, do not try to open the enclosure of the...
Wall-Mounting your HP TouchSmart User Guide
Page 6
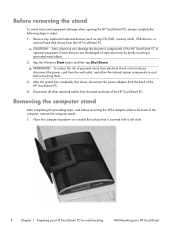
... of personal injury from electrical shock or hot surfaces, disconnect the power cord from the HP TouchSmart PC. WARNING! Disconnect all other attached cables from the back of the HP TouchSmart PC or optional equipment. CAUTION: Static electricity can damage the electronic components of the HP TouchSmart PC. 4. Before removing the stand To avoid injury and equipment damage...
... of personal injury from electrical shock or hot surfaces, disconnect the power cord from the HP TouchSmart PC. WARNING! Disconnect all other attached cables from the back of the HP TouchSmart PC or optional equipment. CAUTION: Static electricity can damage the electronic components of the HP TouchSmart PC. 4. Before removing the stand To avoid injury and equipment damage...

Wall-Mounting your HP TouchSmart User Guide
Page 15
...shock or hot surfaces, disconnect the power cord from the HP TouchSmart PC. Wall-Mounting your HP TouchSmart PC for removal from the wall and place facedown on the HP TouchSmart PC. Disconnect all other attached cables from the back of the HP TouchSmart PC. 5. CAUTION: Static electricity ...After the system has completely shut down, disconnect the power adapter from the back and side of the HP TouchSmart PC. 4. Ensure that you are discharged of the HP TouchSmart PC or optional equipment. Carefully remove the HP TouchSmart PC from the wall-mounting device. 1. Removing the ...
...shock or hot surfaces, disconnect the power cord from the HP TouchSmart PC. Wall-Mounting your HP TouchSmart PC for removal from the wall and place facedown on the HP TouchSmart PC. Disconnect all other attached cables from the back of the HP TouchSmart PC. 5. CAUTION: Static electricity ...After the system has completely shut down, disconnect the power adapter from the back and side of the HP TouchSmart PC. 4. Ensure that you are discharged of the HP TouchSmart PC or optional equipment. Carefully remove the HP TouchSmart PC from the wall-mounting device. 1. Removing the ...

Wall-Mounting your HP TouchSmart User Guide
Page 20
Place the HP TouchSmart PC in an upright position. 11. Connect any cables that there are no gaps between the computer stand and the stand cover. 10. 9. Adjust the vertical position and tilt of the display. 12. Connect the power cord. 13. Align the stand cover to the computer stand and snap it back into place. Make sure that were previously disconnected. 16 Chapter 2 Reinstalling the stand on your HP TouchSmart PC Wall-Mounting your HP TouchSmart
Place the HP TouchSmart PC in an upright position. 11. Connect any cables that there are no gaps between the computer stand and the stand cover. 10. 9. Adjust the vertical position and tilt of the display. 12. Connect the power cord. 13. Align the stand cover to the computer stand and snap it back into place. Make sure that were previously disconnected. 16 Chapter 2 Reinstalling the stand on your HP TouchSmart PC Wall-Mounting your HP TouchSmart
Setup Poster
Page 5
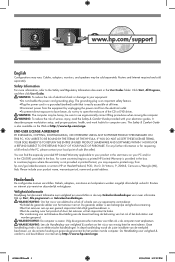
...name and postal address. Cables, adaptors, monitors, and speakers may request a printed copy from hp.com/go/orderdocuments or write to HP at all times. •Disconnect power from the equipment by unplugging the power cord from the electrical outlet. •To prevent direct exposure to laser beam, do not try...or damage to open the enclosure of serious injury, read the Safety & Comfort Guide provided with your equipment: •Do not disable the power cord grounding plug. WARNING: The computer may vary. WARNING: To reduce the risk of the CD or DVD drives. The Safety & Comfort ...
...name and postal address. Cables, adaptors, monitors, and speakers may request a printed copy from hp.com/go/orderdocuments or write to HP at all times. •Disconnect power from the equipment by unplugging the power cord from the electrical outlet. •To prevent direct exposure to laser beam, do not try...or damage to open the enclosure of serious injury, read the Safety & Comfort Guide provided with your equipment: •Do not disable the power cord grounding plug. WARNING: The computer may vary. WARNING: To reduce the risk of the CD or DVD drives. The Safety & Comfort ...
Troubleshooting & Maintenance Guide
Page 10
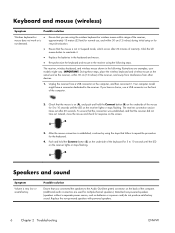
... the Connect button (C) on the underside of the keyboard for 5 to 10 seconds until the LED on the same level as batteries or a power cord) do not produce satisfactory sound. A Off Connect On B 3. Replace the batteries in the following steps. your models might have a choice,... front of the receiver, approximately 10 meters (32 feet) for normal use a USB connector on the screen. Replace the non-powered speakers with powered speakers. 6 Chapter 2 Troubleshooting ENWW The receiver connection session times out after 20 minutes of the receiver, and away from interference ...
... the Connect button (C) on the underside of the keyboard for 5 to 10 seconds until the LED on the same level as batteries or a power cord) do not produce satisfactory sound. A Off Connect On B 3. Replace the batteries in the following steps. your models might have a choice,... front of the receiver, approximately 10 meters (32 feet) for normal use a USB connector on the screen. Replace the non-powered speakers with powered speakers. 6 Chapter 2 Troubleshooting ENWW The receiver connection session times out after 20 minutes of the receiver, and away from interference ...

Troubleshooting & Maintenance Guide
Page 21
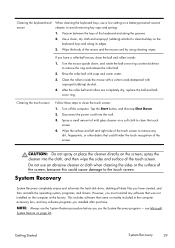
Tap the Start button, and then tap Shut Down. 2. Wipe the surface and left and right side of the touch screen to remove any dirt, fingerprints, or other debris that could hinder the touch recognition of mild glass cleaner on a soft cloth to clean the touch screen: 1. ENWW Cleaning the touch screen (select models only) 17 Turn off the computer. Follow these steps to clean the touch screen. 4. Disconnect the power cord from the wall. 3. Spray a small amount of the screen.
Tap the Start button, and then tap Shut Down. 2. Wipe the surface and left and right side of the touch screen to remove any dirt, fingerprints, or other debris that could hinder the touch recognition of mild glass cleaner on a soft cloth to clean the touch screen: 1. ENWW Cleaning the touch screen (select models only) 17 Turn off the computer. Follow these steps to clean the touch screen. 4. Disconnect the power cord from the wall. 3. Spray a small amount of the screen.
Getting Started Guide
Page 6
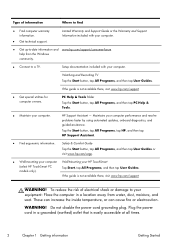
... inside temperature, or can cause fire or electrocution. WARNING! Do not disable the power cord grounding plug. PC Help & Tools folder Tap the Start button, tap All Programs, and then tap PC Help & Tools. ● Maintain your HP TouchSmart (select HP TouchSmart PC models only). Watching and Recording TV Tap the Start button, tap All Programs...
... inside temperature, or can cause fire or electrocution. WARNING! Do not disable the power cord grounding plug. PC Help & Tools folder Tap the Start button, tap All Programs, and then tap PC Help & Tools. ● Maintain your HP TouchSmart (select HP TouchSmart PC models only). Watching and Recording TV Tap the Start button, tap All Programs...

Getting Started Guide
Page 7
NOTE: Some features might not be available on systems that are shipped without a version of the CD or DVD drives. If you move, check the voltage requirements for the country/region in which you purchased your new location before plugging the computer into an AC power outlet. Getting Started 3 WARNING! WARNING! Disconnect power from the equipment by unplugging the power cord from the electrical outlet. WARNING! To prevent direct exposure to a laser beam, do not try to open the enclosure of Microsoft Windows. The power supply is preset for your computer.
NOTE: Some features might not be available on systems that are shipped without a version of the CD or DVD drives. If you move, check the voltage requirements for the country/region in which you purchased your new location before plugging the computer into an AC power outlet. Getting Started 3 WARNING! WARNING! Disconnect power from the equipment by unplugging the power cord from the electrical outlet. WARNING! To prevent direct exposure to a laser beam, do not try to open the enclosure of Microsoft Windows. The power supply is preset for your computer.
Getting Started Guide
Page 9
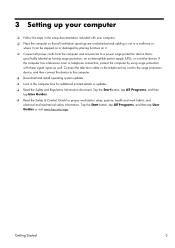
... protection with these signal inputs as having surge protection, an uninterruptible power supply (UPS), or a similar device. Connect the television cable or the telephone line cord to the surge protection device, and then connect the device to a power surge protection device that all power cords from the computer and accessories to the computer. ❑ Download... or updates. ❑ Read the Safety and Regulatory Information document. Tap the Start button, tap All Programs, and then tap User Guides or visit www.hp.com/ergo. Getting Started 5
... protection with these signal inputs as having surge protection, an uninterruptible power supply (UPS), or a similar device. Connect the television cable or the telephone line cord to the surge protection device, and then connect the device to a power surge protection device that all power cords from the computer and accessories to the computer. ❑ Download... or updates. ❑ Read the Safety and Regulatory Information document. Tap the Start button, tap All Programs, and then tap User Guides or visit www.hp.com/ergo. Getting Started 5
Getting Started Guide
Page 10
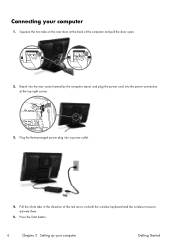
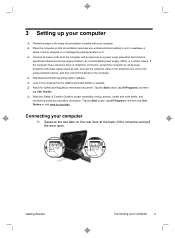
Press the Start button. 6 Chapter 3 Setting up your computer 1. Connecting your computer Getting Started Plug the three-pronged power plug into the power connection at the back of the red arrow on the rear door at the top right corner. Squeeze the two tabs on both the wireless keyboard and the wireless mouse to activate them. 5. Pull the white tabs in LAN 3. Reach into the rear cavity framed by the computer stand, and plug the power cord into a power outlet. 4. Sub IR out in the direction of the computer and pull the door open. 2.
Press the Start button. 6 Chapter 3 Setting up your computer 1. Connecting your computer Getting Started Plug the three-pronged power plug into the power connection at the back of the red arrow on the rear door at the top right corner. Squeeze the two tabs on both the wireless keyboard and the wireless mouse to activate them. 5. Pull the white tabs in LAN 3. Reach into the rear cavity framed by the computer stand, and plug the power cord into a power outlet. 4. Sub IR out in the direction of the computer and pull the door open. 2.

Getting Started Guide
Page 25
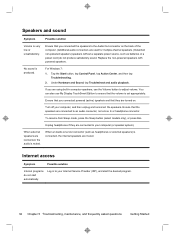
... and sound 21 For Windows 7: 1. Turn off your computer (or speaker system). Log in computer speakers, use My Display TouchSmart Edition to adjust volume. Speakers and sound Symptom Possible solution Volume is muted. Unplug headphones if they are turned on the back...models only), or press Esc. When an Audio Line Out connector (such as batteries or a power cord) do not start the desired program. Replace the non-powered speakers with powered speakers. Ensure that the speakers are muted. Ensure that you connected the speakers to an audio connector...
... and sound 21 For Windows 7: 1. Turn off your computer (or speaker system). Log in computer speakers, use My Display TouchSmart Edition to adjust volume. Speakers and sound Symptom Possible solution Volume is muted. Unplug headphones if they are turned on the back...models only), or press Esc. When an Audio Line Out connector (such as batteries or a power cord) do not start the desired program. Replace the non-powered speakers with powered speakers. Ensure that the speakers are muted. Ensure that you connected the speakers to an audio connector...
Getting Started Guide
Page 33
... remove any software that was not installed on the screen; Clean the rollers inside : 1. Tap the Start button, and then tap Shut Down. 2. Disconnect the power cord from the wall. 3. CAUTION: Do not spray or place the cleaner directly on the computer at the factory. NOTE: Always use the System Restore procedure... cloth to avoid removing key caps and springs. 1. Turn off the computer. Use a clean, dry cloth and isopropyl (rubbing) alcohol to clean buildup on a battery-powered vacuum cleaner, to clean the touch screen. 4. Spray a small amount of the mouse and the mouse...
... remove any software that was not installed on the screen; Clean the rollers inside : 1. Tap the Start button, and then tap Shut Down. 2. Disconnect the power cord from the wall. 3. CAUTION: Do not spray or place the cleaner directly on the computer at the factory. NOTE: Always use the System Restore procedure... cloth to avoid removing key caps and springs. 1. Turn off the computer. Use a clean, dry cloth and isopropyl (rubbing) alcohol to clean buildup on a battery-powered vacuum cleaner, to clean the touch screen. 4. Spray a small amount of the mouse and the mouse...

Getting Started (For 3D Models Only)
Page 6
...guide is not available there, visit www.hp.com/support WARNING! Watching and Recording TV Tap the Start button, tap All Programs, and then tap User Guides. Plug the power cord in a location away from the Windows community. HP Support Assistant - WARNING! Tap Start, ...tap All Programs, and then tap User Guides. www.hp.com/support/consumer-forum ● Connect to a TV. Maintains your HP TouchSmart (select HP TouchSmart PC models only). Do not disable the power cord grounding plug. Setup documentation included with your equipment: Place the computer in ...
...guide is not available there, visit www.hp.com/support WARNING! Watching and Recording TV Tap the Start button, tap All Programs, and then tap User Guides. Plug the power cord in a location away from the Windows community. HP Support Assistant - WARNING! Tap Start, ...tap All Programs, and then tap User Guides. www.hp.com/support/consumer-forum ● Connect to a TV. Maintains your HP TouchSmart (select HP TouchSmart PC models only). Do not disable the power cord grounding plug. Setup documentation included with your equipment: Place the computer in ...

Getting Started (For 3D Models Only)
Page 7
To prevent direct exposure to a laser beam, do not try to open the enclosure of Microsoft Windows. Disconnect power from the equipment by unplugging the power cord from the electrical outlet. Getting Started 3 NOTE: Some features might not be available on systems that are shipped without a version of the CD or DVD drives. WARNING! The power supply is preset for your computer. WARNING! If you move, check the voltage requirements for the country/region in which you purchased your new location before plugging the computer into an AC power outlet. WARNING!
To prevent direct exposure to a laser beam, do not try to open the enclosure of Microsoft Windows. Disconnect power from the equipment by unplugging the power cord from the electrical outlet. Getting Started 3 NOTE: Some features might not be available on systems that are shipped without a version of the CD or DVD drives. WARNING! The power supply is preset for your computer. WARNING! If you move, check the voltage requirements for the country/region in which you purchased your new location before plugging the computer into an AC power outlet. WARNING!
Getting Started (For 3D Models Only)
Page 9
...hp.com/ergo. Connecting your computer 5 Squeeze the two tabs on the rear door at the back of the computer and pull the door open. 3 Setting up your computer ❑ Follow the steps in the setup documentation included with your computer. ❑ Place the computer so that all power cords... unobstructed and cabling is specifically labeled as well. Connect the television cable or the telephone line cord to the surge protection device, and then connect the device to a power surge protection device that is not in the computer box for proper workstation setup, posture, health...
...hp.com/ergo. Connecting your computer 5 Squeeze the two tabs on the rear door at the back of the computer and pull the door open. 3 Setting up your computer ❑ Follow the steps in the setup documentation included with your computer. ❑ Place the computer so that all power cords... unobstructed and cabling is specifically labeled as well. Connect the television cable or the telephone line cord to the surge protection device, and then connect the device to a power surge protection device that is not in the computer box for proper workstation setup, posture, health...

Getting Started (For 3D Models Only)
Page 10
Plug the three-pronged power plug into the power connection at the top right corner. Reach into the rear cavity framed by the computer stand, and plug the power cord into a power outlet. 4. On both the wireless keyboard and the wireless mouse pull the white tabs in LAN 3. 2. Sub IR out in the direction of the red arrows. 6 Chapter 3 Setting up your computer Getting Started
Plug the three-pronged power plug into the power connection at the top right corner. Reach into the rear cavity framed by the computer stand, and plug the power cord into a power outlet. 4. On both the wireless keyboard and the wireless mouse pull the white tabs in LAN 3. 2. Sub IR out in the direction of the red arrows. 6 Chapter 3 Setting up your computer Getting Started
Getting Started (For 3D Models Only)
Page 36
Replace the non-powered speakers with powered speakers. Ensure that the speakers are connected to ensure that the volume is produced. Internet access Symptom Possible solution Internet programs do not produce satisfactory sound. Log in computer speakers, use My Display TouchSmart Edition to your ...you are connected, the audio is very low or unsatisfactory. When an Audio Line Out connector (such as batteries or a power cord) do not start the desired program. 32 Chapter 5 Troubleshooting, maintenance, and frequently asked questions Getting Started Tap the Start ...
Replace the non-powered speakers with powered speakers. Ensure that the speakers are connected to ensure that the volume is produced. Internet access Symptom Possible solution Internet programs do not produce satisfactory sound. Log in computer speakers, use My Display TouchSmart Edition to your ...you are connected, the audio is very low or unsatisfactory. When an Audio Line Out connector (such as batteries or a power cord) do not start the desired program. 32 Chapter 5 Troubleshooting, maintenance, and frequently asked questions Getting Started Tap the Start ...

Getting Started (For 3D Models Only)
Page 45
...the keyboard and along its edges. 3. Cleaning the computer vents Air vents keep the computer cool. Vacuum the vents on the screen; Disconnect the power cord from the wall. 3. Tap the Start button, and then tap Shut Down. 2. Turn the mouse upside down, and rotate the ball-cover ring... counterclockwise to clean buildup on a battery-powered vacuum mouse cleaner, to clean the touch screen. 4. Keep these steps to the touch screen. Cleaning the touch screen Follow these vents clean ...
...the keyboard and along its edges. 3. Cleaning the computer vents Air vents keep the computer cool. Vacuum the vents on the screen; Disconnect the power cord from the wall. 3. Tap the Start button, and then tap Shut Down. 2. Turn the mouse upside down, and rotate the ball-cover ring... counterclockwise to clean buildup on a battery-powered vacuum mouse cleaner, to clean the touch screen. 4. Keep these steps to the touch screen. Cleaning the touch screen Follow these vents clean ...


