
Hardware Reference Guide (2nd Edition)
Page 29
...install an optional optical drive: 1. Turn off the computer properly through the operating system, then turn off any external devices. 3. There are not enough power supply connectors to the computer. Disconnect the power cord from the power outlet and disconnect any external devices. 2. Install two M3 metric guide screws ...components of the drive. Ä CAUTION: Use only 3/16-inch or 5-mm long screws as guide screws. Hardware Reference Guide www.hp.com 2-19 Remove the optical drive if present (see "Removing the Computer Access Panel and Front Bezel" in damage to support this ...
...install an optional optical drive: 1. Turn off the computer properly through the operating system, then turn off any external devices. 3. There are not enough power supply connectors to the computer. Disconnect the power cord from the power outlet and disconnect any external devices. 2. Install two M3 metric guide screws ...components of the drive. Ä CAUTION: Use only 3/16-inch or 5-mm long screws as guide screws. Hardware Reference Guide www.hp.com 2-19 Remove the optical drive if present (see "Removing the Computer Access Panel and Front Bezel" in damage to support this ...

Hardware Reference Guide (2nd Edition)
Page 38
Slide the drive 2 toward the back of the drive cage until the front screws are not enough power supply connectors to support this configuration.Doing so could result in damage to the computer. Hardware Upgrades 5. See "Removing an Optical Drive or Diskette Drive" for ... up on the J-slots. Insert the guide screws into place. Then lower the front of the hard drive 1 into the 3.5-inch Drive Bay 2-28 www.hp.com Hardware Reference Guide Continue to slide the drive all the way back until it locks into the J-slots, then slide the drive toward the...
Slide the drive 2 toward the back of the drive cage until the front screws are not enough power supply connectors to support this configuration.Doing so could result in damage to the computer. Hardware Upgrades 5. See "Removing an Optical Drive or Diskette Drive" for ... up on the J-slots. Insert the guide screws into place. Then lower the front of the hard drive 1 into the 3.5-inch Drive Bay 2-28 www.hp.com Hardware Reference Guide Continue to slide the drive all the way back until it locks into the J-slots, then slide the drive toward the...

Hardware Reference Guide (2nd Edition)
Page 42
Specifications HP Point of the European Union. A-2 www.hp.com Hardware Reference Guide This allows the system to pass the CE mark requirements for use in the countries of Sale System rp5000 Power Supply 115 V 230 V Operating Voltage Range 90-132 VAC 180-264 VAC Rated Voltage Range 100-127 VAC 200-240 VAC Rated Line Frequency 50-60 ...
Specifications HP Point of the European Union. A-2 www.hp.com Hardware Reference Guide This allows the system to pass the CE mark requirements for use in the countries of Sale System rp5000 Power Supply 115 V 230 V Operating Voltage Range 90-132 VAC 180-264 VAC Rated Voltage Range 100-127 VAC 200-240 VAC Rated Line Frequency 50-60 ...

Getting Started (3rd Edition)
Page 10
Canadian, and various international regulations. 6 www.hp.com Getting Started also includes basic troubleshooting information should you set up factory-provided software; includes information about diagnostic codes, as well as... during initial startup. ■ Hardware Reference Guide (PDF on Documentation CD) Provides an overview of computers and includes information on RTC batteries, memory, and power supply. ■ Computer Setup (F10) Utility Guide (PDF on Documentation CD) Provides instructions on using network interface controller (NIC) features that are preinstalled on ...
Canadian, and various international regulations. 6 www.hp.com Getting Started also includes basic troubleshooting information should you set up factory-provided software; includes information about diagnostic codes, as well as... during initial startup. ■ Hardware Reference Guide (PDF on Documentation CD) Provides an overview of computers and includes information on RTC batteries, memory, and power supply. ■ Computer Setup (F10) Utility Guide (PDF on Documentation CD) Provides instructions on using network interface controller (NIC) features that are preinstalled on ...

Getting Started (3rd Edition)
Page 19
... a working AC outlet. 2. Getting Started www.hp.com 15 Proper voltage setting depends on green then: 1. Open hood and check that both power supply cables are not flashing. OR Press and hold the power button for less than 4 seconds. Getting Started Solving General Problems (Continued) Problem System does not power on and the LEDs on the...
... a working AC outlet. 2. Getting Started www.hp.com 15 Proper voltage setting depends on green then: 1. Open hood and check that both power supply cables are not flashing. OR Press and hold the power button for less than 4 seconds. Getting Started Solving General Problems (Continued) Problem System does not power on and the LEDs on the...

Getting Started (3rd Edition)
Page 20
Solution 4. If the AUX LED on the system board is turned on. Replace the system board. 16 www.hp.com Getting Started cont. Check to power on , then replace the power supply. 6. cont. Getting Started Solving General Problems (Continued) Problem System does not power on and the LEDs on , then replace the power button harness. 5. If it is turned on the front of the computer are not flashing. Cause System unable to see if the AUX LED on the system board is not turned on .
Solution 4. If the AUX LED on the system board is turned on. Replace the system board. 16 www.hp.com Getting Started cont. Check to power on , then replace the power supply. 6. cont. Getting Started Solving General Problems (Continued) Problem System does not power on and the LEDs on , then replace the power button harness. 5. If it is turned on the front of the computer are not flashing. Cause System unable to see if the AUX LED on the system board is not turned on .

Getting Started (3rd Edition)
Page 27
... voltage setting depends on the system board. Check that the processor is seated into the connector on your region. 2. Check to the appropriate voltage. Getting Started www.hp.com 23 Beeps None Possible Cause Processor not installed (not an indicator of the power supply, is overloaded). None Power failure (power supply is set to see that the...
... voltage setting depends on the system board. Check that the processor is seated into the connector on your region. 2. Check to the appropriate voltage. Getting Started www.hp.com 23 Beeps None Possible Cause Processor not installed (not an indicator of the power supply, is overloaded). None Power failure (power supply is set to see that the...

Getting Started (3rd Edition)
Page 28
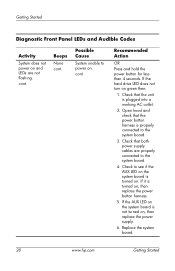
... power supply. 5. Getting Started Diagnostic Front Panel LEDs and Audible Codes Activity Red Power LED flashes four times, once every second, followed by removing ALL attached devices (such as hard, diskette, or optical drives, and expansion cards). Check if a device is causing the problem by a two-second pause. Replace the system board. 24 www.hp...
... power supply. 5. Getting Started Diagnostic Front Panel LEDs and Audible Codes Activity Red Power LED flashes four times, once every second, followed by removing ALL attached devices (such as hard, diskette, or optical drives, and expansion cards). Check if a device is causing the problem by a two-second pause. Replace the system board. 24 www.hp...

Getting Started (3rd Edition)
Page 31
... depends on and LEDs are not flashing. Getting Started www.hp.com 27 Check that the voltage selector, located on the rear of the power supply, is set to power on . 3. Remove the expansion cards one at a time until the AUX LED on the system board turns on . If the hard drive LED turns green...
... depends on and LEDs are not flashing. Getting Started www.hp.com 27 Check that the voltage selector, located on the rear of the power supply, is set to power on . 3. Remove the expansion cards one at a time until the AUX LED on the system board turns on . If the hard drive LED turns green...
Getting Started (3rd Edition)
Page 32
... green then: 1. cont. Open hood and check that both power supply cables are not flashing. Replace the system board. 28 www.hp.com Getting Started Getting Started Diagnostic Front Panel LEDs and Audible Codes Activity System does not power on and LEDs are properly connected to the system board. 4. Beeps None cont. If the hard drive LED...
... green then: 1. cont. Open hood and check that both power supply cables are not flashing. Replace the system board. 28 www.hp.com Getting Started Getting Started Diagnostic Front Panel LEDs and Audible Codes Activity System does not power on and LEDs are properly connected to the system board. 4. Beeps None cont. If the hard drive LED...

HP Point of Sale System rp5000 Illustrated Parts Map, 4th Edition
Page 1
...Powered USB card cable (use of Directive 2002/95/EC or similar substance restrictive legislation enacted by any country/region outside the EU, e.g. Countries/regions outside the EU. China, are trademarks of Sale System rp5000...must be construed as the replacement part. HP Point of Hewlett-Packard Development Company, L.P. HP and the HP logo are introducing similar legislation. Nothing herein... -BB1 U.S. -001 International** -B31 +Not shown *See Requirement below System Unit 1 Chassis assembly 2 Power supply, 185W, PFC 3 Computer access panel 4 Front bezel assembly not spared ...
...Powered USB card cable (use of Directive 2002/95/EC or similar substance restrictive legislation enacted by any country/region outside the EU, e.g. Countries/regions outside the EU. China, are trademarks of Sale System rp5000...must be construed as the replacement part. HP Point of Hewlett-Packard Development Company, L.P. HP and the HP logo are introducing similar legislation. Nothing herein... -BB1 U.S. -001 International** -B31 +Not shown *See Requirement below System Unit 1 Chassis assembly 2 Power supply, 185W, PFC 3 Computer access panel 4 Front bezel assembly not spared ...

HP Point of Sale System rp5000 Illustrated Parts Map, 4th Edition
Page 2
... losing it is successful, all features may vary in the computer and turn power off Power Supply failure CPU thermal shutdown CPU not installed Power supply overload ( crow bar) No memory No graphics System board failure (detected prior to video) Invalid ROM Hard drive activity Keyboard Diagnostic...of some untitled components may be available) File Storage Security Advanced System Information About Set Time and date Device Configuration Options Setup Password Power-On Password Password Options Smart Cover Power-On Options Onboard devices Save to Diskette Restore From Diskette Set ...
... losing it is successful, all features may vary in the computer and turn power off Power Supply failure CPU thermal shutdown CPU not installed Power supply overload ( crow bar) No memory No graphics System board failure (detected prior to video) Invalid ROM Hard drive activity Keyboard Diagnostic...of some untitled components may be available) File Storage Security Advanced System Information About Set Time and date Device Configuration Options Setup Password Power-On Password Password Options Smart Cover Power-On Options Onboard devices Save to Diskette Restore From Diskette Set ...

Troubleshooting Guide (2nd Edition)
Page 3
... the Software 1-12 Restoring the Software 1-12 2 Troubleshooting Without Diagnostics Safety and Comfort 2-1 Before You Call for Technical Support 2-2 Helpful Hints 2-3 Solving General Problems 2-5 Solving Power Supply Problems 2-8 Solving Diskette Problems 2-12 Solving Hard Drive Problems 2-15 Solving Display Problems 2-18 Solving Audio Problems 2-22 Solving Printer Problems 2-23 Solving Keyboard and...
... the Software 1-12 Restoring the Software 1-12 2 Troubleshooting Without Diagnostics Safety and Comfort 2-1 Before You Call for Technical Support 2-2 Helpful Hints 2-3 Solving General Problems 2-5 Solving Power Supply Problems 2-8 Solving Diskette Problems 2-12 Solving Hard Drive Problems 2-15 Solving Display Problems 2-18 Solving Audio Problems 2-22 Solving Printer Problems 2-23 Solving Keyboard and...

Troubleshooting Guide (2nd Edition)
Page 19
... power button. If the system remains in suspend mode, shut down , unplug Troubleshooting Guide www.hp.com 2-3 Helpful Hints If you diagnose the problem. Refer to restart the computer. The flashing lights are plugged into a working electrical outlet. ■ Check to see that the voltage select switch on the back of the computer power supply...
... power button. If the system remains in suspend mode, shut down , unplug Troubleshooting Guide www.hp.com 2-3 Helpful Hints If you diagnose the problem. Refer to restart the computer. The flashing lights are plugged into a working electrical outlet. ■ Check to see that the voltage select switch on the back of the computer power supply...

Troubleshooting Guide (2nd Edition)
Page 23
... Guide www.hp.com 2-7 Proper voltage setting depends on green then: 1. OR Press and hold the power button for less than 4 seconds. Check to the appropriate voltage. If the AUX LED light on the system board is turned on, then replace the power button harness. 5. Replace the system board. Check that both power supply cables are not...
... Guide www.hp.com 2-7 Proper voltage setting depends on green then: 1. OR Press and hold the power button for less than 4 seconds. Check to the appropriate voltage. If the AUX LED light on the system board is turned on, then replace the power button harness. 5. Replace the system board. Check that both power supply cables are not...
Troubleshooting Guide (2nd Edition)
Page 24
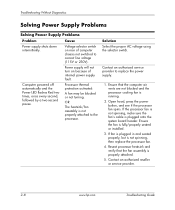
...the power supply. 1. Solution Select the proper AC voltage using the selector switch. Reseat processor heatsink and verify that the computer air vents are not blocked and the processor cooling fan is plugged onto the system board header. Contact an authorized reseller or service provider. 2-8 www.hp....com Troubleshooting Guide Open hood, press the power button, and see if the processor fan spins. If the processor fan is...
...the power supply. 1. Solution Select the proper AC voltage using the selector switch. Reseat processor heatsink and verify that the computer air vents are not blocked and the processor cooling fan is plugged onto the system board header. Contact an authorized reseller or service provider. 2-8 www.hp....com Troubleshooting Guide Open hood, press the power button, and see if the processor fan spins. If the processor fan is...

Troubleshooting Guide (2nd Edition)
Page 25
... selector, located on your region. 2. Continue adding devices one device at a time to replace the power supply. 5. Replace the system board. Power on the system board. 3. Troubleshooting Guide www.hp.com 2-9 Troubleshooting Without Diagnostics Solving Power Supply Problems (Continued) Problem Cause Solution Power LED flashes Red four times, once every second, followed by removing ALL attached devices (such as...
... selector, located on your region. 2. Continue adding devices one device at a time to replace the power supply. 5. Replace the system board. Power on the system board. 3. Troubleshooting Guide www.hp.com 2-9 Troubleshooting Without Diagnostics Solving Power Supply Problems (Continued) Problem Cause Solution Power LED flashes Red four times, once every second, followed by removing ALL attached devices (such as...

Troubleshooting Guide (2nd Edition)
Page 26
... on , then replace the power button harness. 2-10 www.hp.com Troubleshooting Guide Check that the power button harness is set to the system board. 3. Check that both power supply cables are not flashing. System unable to see if the AUX LED light on the system board is turned on the rear of the power supply, is properly connected to...
... on , then replace the power button harness. 2-10 www.hp.com Troubleshooting Guide Check that the power button harness is set to the system board. 3. Check that both power supply cables are not flashing. System unable to see if the AUX LED light on the system board is turned on the rear of the power supply, is properly connected to...
Troubleshooting Guide (2nd Edition)
Page 27
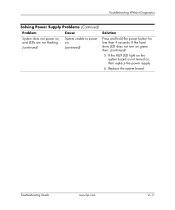
Troubleshooting Guide www.hp.com 2-11 If the AUX LED light on the system board is not turned on green then: (continued) 5. If the hard drive LED does not turn on , then replace the power supply. 6. Troubleshooting Without Diagnostics Solving Power Supply Problems (Continued) Problem Cause Solution System does not power on and LEDs are not flashing. (continued) System unable to power on. (continued) Press and hold the power button for less than 4 seconds. Replace the system board.
Troubleshooting Guide www.hp.com 2-11 If the AUX LED light on the system board is not turned on green then: (continued) 5. If the hard drive LED does not turn on , then replace the power supply. 6. Troubleshooting Without Diagnostics Solving Power Supply Problems (Continued) Problem Cause Solution System does not power on and LEDs are not flashing. (continued) System unable to power on. (continued) Press and hold the power button for less than 4 seconds. Replace the system board.

Troubleshooting Guide (2nd Edition)
Page 68
.... Pre-video memory error 1. A-14 www.hp.com Troubleshooting Guide None Power failure (power supply is causing the failure. Replace the system board. Replace the device that the voltage selector, located on the system. Reseat DIMMs. Power on your region. 2. Replace the power supply. 5. Check that is overloaded). 1. Power on the rear of the power supply, is set to isolate the faulty...
.... Pre-video memory error 1. A-14 www.hp.com Troubleshooting Guide None Power failure (power supply is causing the failure. Replace the system board. Replace the device that the voltage selector, located on the system. Reseat DIMMs. Power on your region. 2. Replace the power supply. 5. Check that is overloaded). 1. Power on the rear of the power supply, is set to isolate the faulty...


