
HP w20 / w22 LCD Monitor - User's Guide
Page 3
...; Cleaning the Monitor Important Safety Information The power cord is designed for use with your safety, be specifically labeled as having this ability. To use a different cord, use with your equipment if surge protection fails. CAUTION: To protect your monitor, as well as your equipment, do not disable the power cord grounding feature. Look on the correct power cord set to use only a power source and connection compatible with this monitor. WARNING...
...; Cleaning the Monitor Important Safety Information The power cord is designed for use with your safety, be specifically labeled as having this ability. To use a different cord, use with your equipment if surge protection fails. CAUTION: To protect your monitor, as well as your equipment, do not disable the power cord grounding feature. Look on the correct power cord set to use only a power source and connection compatible with this monitor. WARNING...
HP w20 / w22 LCD Monitor - User's Guide
Page 9
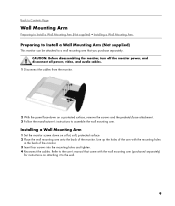
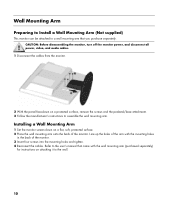
... the user's manual that came with the mounting holes in the back of the monitor. Back to Contents Page Wall Mounting Arm Preparing to Install a Wall Mounting Arm (Not supplied) • Installing a Wall Mounting Arm Preparing to Install a Wall Mounting Arm (Not supplied) This monitor can be attached to the wall. 9 Installing a Wall Mounting Arm 1 Set the monitor screen down on a protected surface, remove the screws and the pedestal/base attachment. 3 Follow the manufacturer's instructions to assemble the wall mounting arm. Line...
... the user's manual that came with the mounting holes in the back of the monitor. Back to Contents Page Wall Mounting Arm Preparing to Install a Wall Mounting Arm (Not supplied) • Installing a Wall Mounting Arm Preparing to Install a Wall Mounting Arm (Not supplied) This monitor can be attached to the wall. 9 Installing a Wall Mounting Arm 1 Set the monitor screen down on a protected surface, remove the screws and the pedestal/base attachment. 3 Follow the manufacturer's instructions to assemble the wall mounting arm. Line...
HP w20 / w22 LCD Monitor - User's Guide
Page 10
... the cables, and adjust the tilt as shown below. Back to Contents Page Using the Monitor Operating Instructions • External Controls • Settings •Setting the Optimal Resolution • Adjusting the Volume • Locking and Unlocking the OSD • Adjusting OSD Settings Operating Instructions Control buttons are located on for the other control buttons to work. • Set the resolution (Setting the Optimal Resolution) and adjust the volume (Adjusting the Volume). • Adjust the onscreen display (OSD) settings (Adjusting OSD Settings). 10 Use the menu button...
... the cables, and adjust the tilt as shown below. Back to Contents Page Using the Monitor Operating Instructions • External Controls • Settings •Setting the Optimal Resolution • Adjusting the Volume • Locking and Unlocking the OSD • Adjusting OSD Settings Operating Instructions Control buttons are located on for the other control buttons to work. • Set the resolution (Setting the Optimal Resolution) and adjust the volume (Adjusting the Volume). • Adjust the onscreen display (OSD) settings (Adjusting OSD Settings). 10 Use the menu button...
HP w20 / w22 LCD Monitor - User's Guide
Page 12
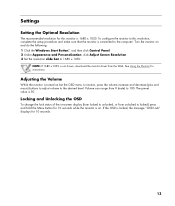
... Locking and Unlocking the OSD To change the lock status of the on-screen display (from locked to unlocked, or from unlocked to Contents Page Settings Setting the Optimal Resolution • Adjusting the Volume • Locking and Unlocking the OSD • Adjusting OSD Settings Setting the Optimal Resolution The recommended resolution for this resolution, complete the setup procedure and make sure that the monitor is not shown, download the monitor driver from 0 (mute) to the desired level. Back to locked) press and hold the menu button...
... Locking and Unlocking the OSD To change the lock status of the on-screen display (from locked to unlocked, or from unlocked to Contents Page Settings Setting the Optimal Resolution • Adjusting the Volume • Locking and Unlocking the OSD • Adjusting OSD Settings Setting the Optimal Resolution The recommended resolution for this resolution, complete the setup procedure and make sure that the monitor is not shown, download the monitor driver from 0 (mute) to the desired level. Back to locked) press and hold the menu button...
HP w20 / w22 LCD Monitor - User's Guide
Page 17
... computer video card should either turn on . Monitor is present in "Active Off-Mode". The LED should be snugly seated in its slot. • Make sure the monitor's video cable is properly connected to the computer. • Inspect the monitor's video cable and make sure none of the pins are bent. • Make sure the HP monitor drivers are installed (HP monitor drivers are available at the resolution you need a Plug & Play compatible computer and video card. Picture bounces, flickers or...
... computer video card should either turn on . Monitor is present in "Active Off-Mode". The LED should be snugly seated in its slot. • Make sure the monitor's video cable is properly connected to the computer. • Inspect the monitor's video cable and make sure none of the pins are bent. • Make sure the HP monitor drivers are installed (HP monitor drivers are available at the resolution you need a Plug & Play compatible computer and video card. Picture bounces, flickers or...
HP w20 / w22 LCD Monitor - User's Guide
Page 19
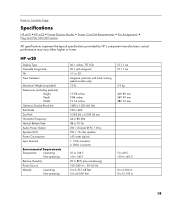
... higher or lower. HP w20 Display Type Viewable Image Size Tilt Face Treatment Maximum Weight (unpacked) Dimensions (including pedestal) Height Depth Width Optimum Display Resolution Text Mode Dot Pitch Horizontal Frequency Vertical Refresh Rate Audio Power Output Speaker (R/L) Power Consumption Input Terminal Environmental Requirements Temperature: Operating Non-operating Relative Humidity Power Source Altitude: Operating Non-operating 20.1 inches, TFT LCD 20.1-inch diagonal -5° to 20° Antiglare polarizer with hard coating (select models only) 13...
... higher or lower. HP w20 Display Type Viewable Image Size Tilt Face Treatment Maximum Weight (unpacked) Dimensions (including pedestal) Height Depth Width Optimum Display Resolution Text Mode Dot Pitch Horizontal Frequency Vertical Refresh Rate Audio Power Output Speaker (R/L) Power Consumption Input Terminal Environmental Requirements Temperature: Operating Non-operating Relative Humidity Power Source Altitude: Operating Non-operating 20.1 inches, TFT LCD 20.1-inch diagonal -5° to 20° Antiglare polarizer with hard coating (select models only) 13...
HP v220 LCD Monitor User's Guide
Page 10
... 1 Set the monitor screen down on a protected surface, remove the screws and the pedestal/base attachment. 3 Follow the manufacturer's instructions to assemble the wall mounting arm. Line up the holes of the arm with the wall mounting arm (purchased separately) for instructions on a flat, soft, protected surface. 2 Place the wall mounting arm onto the back of the monitor. 3 Insert four screws into the mounting holes and tighten. 4 Reconnect the cables...
... 1 Set the monitor screen down on a protected surface, remove the screws and the pedestal/base attachment. 3 Follow the manufacturer's instructions to assemble the wall mounting arm. Line up the holes of the arm with the wall mounting arm (purchased separately) for instructions on a flat, soft, protected surface. 2 Place the wall mounting arm onto the back of the monitor. 3 Insert four screws into the mounting holes and tighten. 4 Reconnect the cables...
HP v220 LCD Monitor User's Guide
Page 13
... locked, the message "OSD Lock" displays for 10 seconds while the monitor is turned on and do the following: 1 Click the Windows Start Button®, and then click Control Panel. 2 Under Appearance and Personalization, click Adjust Screen Resolution. 3 Set the resolution slide bar to locked) press and hold the Menu button for 10 seconds. 13 The preset value is not shown, download the monitor driver from the Web. Locking and Unlocking the OSD To change the lock...
... locked, the message "OSD Lock" displays for 10 seconds while the monitor is turned on and do the following: 1 Click the Windows Start Button®, and then click Control Panel. 2 Under Appearance and Personalization, click Adjust Screen Resolution. 3 Set the resolution slide bar to locked) press and hold the Menu button for 10 seconds. 13 The preset value is not shown, download the monitor driver from the Web. Locking and Unlocking the OSD To change the lock...
HP v220 LCD Monitor User's Guide
Page 18
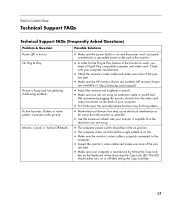
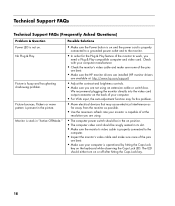
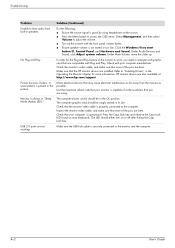
...) Problem & Question Power LED is stuck in "Active Off-Mode." The LED should be snugly seated in its slot. • Make sure the monitor's video cable is properly connected to work, you need a Plug & Play compatible computer and video card. No Plug & Play. Check with your computer manufacturer. • Check the monitor's video cable and make sure none of the pins are bent. • Make sure your monitor is capable of at : http://www.hp.com/support...
...) Problem & Question Power LED is stuck in "Active Off-Mode." The LED should be snugly seated in its slot. • Make sure the monitor's video cable is properly connected to work, you need a Plug & Play compatible computer and video card. No Plug & Play. Check with your computer manufacturer. • Check the monitor's video cable and make sure none of the pins are bent. • Make sure your monitor is capable of at : http://www.hp.com/support...
User's Guide w2228h, 2229h w2448h, w2448hc, w2558hc LCD Display
Page 5
... HP LCD Monitors ...1-1 Features ...1-1 2 Safety and Maintenance Guidelines Important Safety Information ...2-1 Safety Precautions ...2-1 Maintenance Guidelines...2-2 Cleaning the Monitor ...2-2 3 Setting Up the Monitor Unpacking the Monitor...3-1 Installing the Monitor ...3-1 Unfolding the monitor ...3-1 Wall-mounting the monitor ...3-2 Preparation ...3-2 Connecting the VGA (Analog) or DVI-D (Digital) Cable 3-3 To connect the VGA cable...3-4 To connect the DVI-D cable...3-4 Connecting the VGA / DVI-I Cable (Select Models Only 3-4 Connecting the HDMI Cable...3-4 Audio and Video Cables...
... HP LCD Monitors ...1-1 Features ...1-1 2 Safety and Maintenance Guidelines Important Safety Information ...2-1 Safety Precautions ...2-1 Maintenance Guidelines...2-2 Cleaning the Monitor ...2-2 3 Setting Up the Monitor Unpacking the Monitor...3-1 Installing the Monitor ...3-1 Unfolding the monitor ...3-1 Wall-mounting the monitor ...3-2 Preparation ...3-2 Connecting the VGA (Analog) or DVI-D (Digital) Cable 3-3 To connect the VGA cable...3-4 To connect the DVI-D cable...3-4 Connecting the VGA / DVI-I Cable (Select Models Only 3-4 Connecting the HDMI Cable...3-4 Audio and Video Cables...
User's Guide w2228h, 2229h w2448h, w2448hc, w2558hc LCD Display
Page 6
... Changing the slideshow transition 5-7 Changing the slideshow speed ...5-7 Changing the slideshow shuffle ...5-7 Adjusting the LCD settings for DPF 5-8 Restoring factory default...5-8 6 Preparing the Monitor for Shipping Folding the Monitor ...6-1 A Troubleshooting Solving Common Problems ...A-1 Getting Support from hp.com ...A-3 Preparing to Call Technical Support ...A-3 Locating the Rating Label...A-3 B Technical Specifications HP LCD Monitors ...B-1 Preset Video and High-Definition Modes B-3 LCD Monitor Quality and Pixel Policy...B-6 Power Cord Set Requirements ...B-6 vi User's Guide
... Changing the slideshow transition 5-7 Changing the slideshow speed ...5-7 Changing the slideshow shuffle ...5-7 Adjusting the LCD settings for DPF 5-8 Restoring factory default...5-8 6 Preparing the Monitor for Shipping Folding the Monitor ...6-1 A Troubleshooting Solving Common Problems ...A-1 Getting Support from hp.com ...A-3 Preparing to Call Technical Support ...A-3 Locating the Rating Label...A-3 B Technical Specifications HP LCD Monitors ...B-1 Preset Video and High-Definition Modes B-3 LCD Monitor Quality and Pixel Policy...B-6 Power Cord Set Requirements ...B-6 vi User's Guide
User's Guide w2228h, 2229h w2448h, w2448hc, w2558hc LCD Display
Page 9
... microphone (select models only) ■ Two-slot memory card reader with remote control (select models only) ■ Removable pedestal and Video Electronics Standards Association (VESA) standard mounting holes for flexible mounting solutions, including wall-mounting ■ Security lock slot for a Kensington lock security cable (security cable sold separately) ■ Plug and Play capability, if supported by your computer system ■ On-screen display (OSD) adjustments for ease of setup and screen optimization (choose English, Simplified Chinese...
... microphone (select models only) ■ Two-slot memory card reader with remote control (select models only) ■ Removable pedestal and Video Electronics Standards Association (VESA) standard mounting holes for flexible mounting solutions, including wall-mounting ■ Security lock slot for a Kensington lock security cable (security cable sold separately) ■ Plug and Play capability, if supported by your computer system ■ On-screen display (OSD) adjustments for ease of setup and screen optimization (choose English, Simplified Chinese...
User's Guide w2228h, 2229h w2448h, w2448hc, w2558hc LCD Display
Page 25
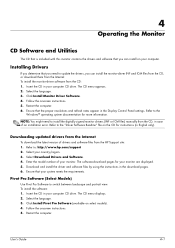
.... Download and install the driver and software files by using the instructions in the Display Control Panel settings. Click Install Monitor Driver Software. 4. Refer to the "Driver Software Readme" file on select models). 4. Refer to the Windows® operating system documentation for your monitor are displayed. 5. Pivot Pro Software (Select Models) Use Pivot Pro Software to : http://www.hp.com/support 2. Insert the CD in English only). Click Install Pivot Pro Software (available on the CD for instructions (in your monitor. User's Guide...
.... Download and install the driver and software files by using the instructions in the Display Control Panel settings. Click Install Monitor Driver Software. 4. Refer to the "Driver Software Readme" file on select models). 4. Refer to the Windows® operating system documentation for your monitor are displayed. 5. Pivot Pro Software (Select Models) Use Pivot Pro Software to : http://www.hp.com/support 2. Insert the CD in English only). Click Install Pivot Pro Software (available on the CD for instructions (in your monitor. User's Guide...
User's Guide w2228h, 2229h w2448h, w2448hc, w2558hc LCD Display
Page 26
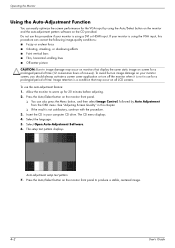
... that may occur on monitors that display the same static image on screen for the VGA input by Auto Adjustment from the OSD menu. Select Open Auto-Adjustment Software. 6. Image retention is using the Auto/Select button on the monitor and the auto-adjustment pattern software on all LCD screens. Insert the CD in image damage may occur on the CD provided. Auto-adjustment setup test pattern 7. Select the language. 5. Press the Auto/Select button on the monitor front panel to warm up...
... that may occur on monitors that display the same static image on screen for the VGA input by Auto Adjustment from the OSD menu. Select Open Auto-Adjustment Software. 6. Image retention is using the Auto/Select button on the monitor and the auto-adjustment pattern software on all LCD screens. Insert the CD in image damage may occur on the CD provided. Auto-adjustment setup test pattern 7. Select the language. 5. Press the Auto/Select button on the monitor front panel to warm up...
User's Guide w2228h, 2229h w2448h, w2448hc, w2558hc LCD Display
Page 31
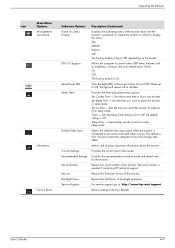
... sets the monitor to factory defaults. Selects and displays important information about the monitor. Provides the recommended resolution mode and refresh rate for the monitor. The serial number is On. For service support, go to: http://www.hp.com/support Returns settings to enter sleep mode. User's Guide 4-7 Sets the time you want to place the monitor in hours and minutes. Timer - Turns the light (LED) in the power button On and Off. Provides the current input video mode. Reports the serial number of backlight...
... sets the monitor to factory defaults. Selects and displays important information about the monitor. Provides the recommended resolution mode and refresh rate for the monitor. The serial number is On. For service support, go to: http://www.hp.com/support Returns settings to enter sleep mode. User's Guide 4-7 Sets the time you want to place the monitor in hours and minutes. Timer - Turns the light (LED) in the power button On and Off. Provides the current input video mode. Reports the serial number of backlight...
User's Guide w2228h, 2229h w2448h, w2448hc, w2558hc LCD Display
Page 32
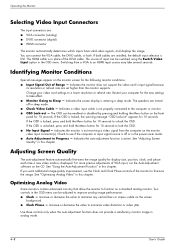
...Optimizing Analog Video Some monitors contain advanced circuitry that allow the monitor to fine-tune the image. Indicates the monitor does not support the video card's input signal because its resolution or refresh rate are : ■ VGA connector (analog) ■ DVI-D connector (digital) ■ HDMI connector The monitor automatically determines which inputs have valid video signals, and displays the image. Indicates the monitor is in analog mode. 4-8 User's Guide Identifying Monitor Conditions Special messages appear on the monitor video input connector(s). Indicates the screen...
...Optimizing Analog Video Some monitors contain advanced circuitry that allow the monitor to fine-tune the image. Indicates the monitor does not support the video card's input signal because its resolution or refresh rate are : ■ VGA connector (analog) ■ DVI-D connector (digital) ■ HDMI connector The monitor automatically determines which inputs have valid video signals, and displays the image. Indicates the monitor is in analog mode. 4-8 User's Guide Identifying Monitor Conditions Special messages appear on the monitor video input connector(s). Indicates the screen...
User's Guide w2228h, 2229h w2448h, w2448hc, w2558hc LCD Display
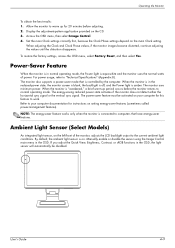
Page 33
... Specifications" (Appendix B). Manually enable or disable the sensor using the Image Control main menu in the reduced-power state, the monitor screen is blank, the backlight is off, and the Power light is in the OSD, the light sensor will automatically be activated on the left front of power. Power-Saver Feature When the monitor is amber. If you adjust the Quick View, Brightness, Contrast, or sRGB functions in normal operating mode, the Power light is...
... Specifications" (Appendix B). Manually enable or disable the sensor using the Image Control main menu in the reduced-power state, the monitor screen is blank, the backlight is off, and the Power light is in the OSD, the light sensor will automatically be activated on the left front of power. Power-Saver Feature When the monitor is amber. If you adjust the Quick View, Brightness, Contrast, or sRGB functions in normal operating mode, the Power light is...
User's Guide w2228h, 2229h w2448h, w2448hc, w2558hc LCD Display
Page 47
...: www.hp.com/support. Adjust the contrast and brightness controls. For VGA input, the auto-adjustment feature might fix this does not correct the image, press the Menu button to turn off while connecting the video cable. Turn on the keyboard or move the mouse to open the OSD menu, and adjust the brightness and contrast scales. Connect the video cable properly. Screen is not centered. Connect the monitor VGA signal cable to the VGA connector on the computer, or connect the DVI-D signal cable to the optimal resolution. Picture is set to Off...
...: www.hp.com/support. Adjust the contrast and brightness controls. For VGA input, the auto-adjustment feature might fix this does not correct the image, press the Menu button to turn off while connecting the video cable. Turn on the keyboard or move the mouse to open the OSD menu, and adjust the brightness and contrast scales. Connect the video cable properly. Screen is not centered. Connect the monitor VGA signal cable to the VGA connector on the computer, or connect the DVI-D signal cable to the optimal resolution. Picture is set to Off...
User's Guide w2228h, 2229h w2448h, w2448hc, w2558hc LCD Display
Page 48
... Windows Vista start button , Control Panel, and Hardware and Sound. Make sure the USB hub cable is present in the Operating the Monitor chapter for the Plug and Play feature of at the source. ■ Press the Menu button to access the OSD menu. Monitor is capable of the monitor to work, you are installed. USB 2.0 ports are also available at: http://www.hp.com/support Picture bounces, flickers, or wave pattern is securely connected to the monitor...
... Windows Vista start button , Control Panel, and Hardware and Sound. Make sure the USB hub cable is present in the Operating the Monitor chapter for the Plug and Play feature of at the source. ■ Press the Menu button to access the OSD menu. Monitor is capable of the monitor to work, you are installed. USB 2.0 ports are also available at: http://www.hp.com/support Picture bounces, flickers, or wave pattern is securely connected to the monitor...
User's Guide w2228h, 2229h w2448h, w2448hc, w2558hc LCD Display
Page 56
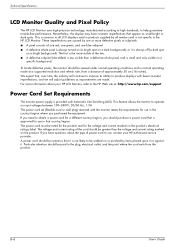
... Specifications LCD Monitor Quality and Pixel Policy The HP LCD Monitor uses high-precision technology, manufactured according to high standards, to the HP Web site at a supported resolution and refresh rate, from the product. The power cord must be walked on or pinched by all LCD displays used in normal operating mode at : http://www.hp.com/support Power Cord Set Requirements The monitor power supply is less visible than the voltage and current rating marked on input voltages...
... Specifications LCD Monitor Quality and Pixel Policy The HP LCD Monitor uses high-precision technology, manufactured according to high standards, to the HP Web site at a supported resolution and refresh rate, from the product. The power cord must be walked on or pinched by all LCD displays used in normal operating mode at : http://www.hp.com/support Power Cord Set Requirements The monitor power supply is less visible than the voltage and current rating marked on input voltages...


