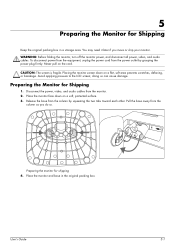
User's Guide q1859, q2009, q2159 LCD Display
Page 5
... Contents Notational Conventions...iii Notes, Cautions, and Warnings...iii Product Features 1-1 Compaq LCD Monitors...1-1 Features ...1-1 Safety and Maintenance Guidelines 2-1 Important Safety Information ...2-1 Safety Precautions ...2-1 Maintenance Guidelines...2-2 Cleaning the Monitor ...2-2 Setting Up the Monitor 3-1 Unpacking the Monitor...3-1 Installing the Monitor ...3-1 Preparing the monitor for desktop use 3-1 Preparing the monitor for wall-mounting 3-2 Connecting the VGA (Analog) Cable 3-5 To connect the...
User's Guide q1859, q2009, q2159 LCD Display
Page 7
This guide discusses the following models: ■ Q1859 LCD monitor ■ Q2009 LCD monitor ■ Q2159 LCD monitor Features ■ Large diagonal display ■ Maximum graphics resolution: ❏ Q1859: 1366 x 768 @ 60Hz ❏ Q2009: 1600 x 900 @ 60Hz ❏ Q2159: 1920 x 1080 @ 60Hz Plus full-screen support for lower resolutions ■ VGA analog video input ■ Fast response time, providing better...
User's Guide q1859, q2009, q2159 LCD Display
Page 10
.... You can substantially increase the life expectancy of the monitor by using a screen saver program and turning off the computer and the monitor. 2. Do not use an antistatic screen cleaner. 4. These chemicals may damage the monitor. Use a damp cloth to clean an LCD screen. 3. Cleaning the Monitor The monitor is not operating properly or has been dropped or damaged...
User's Guide q1859, q2009, q2159 LCD Display
Page 11
... onto the bottom of the support column until it . Store the packing box. 2. Determine whether the monitor will be desktop mounted or wall-mounted. Prepare a flat area to the LCD screen; You may need a straight-slot screwdriver to secure some cables. doing so can install the... monitor on a flat, soft, protected table or desk surface with the support column overhanging the edge. 2. Set the monitor screen face down while preparing it for installation...
User's Guide q1859, q2009, q2159 LCD Display
Page 22
...To avoid burn-in image damage on the CD provided. Allow the monitor to produce a stable, centered image. 4-2 User's Guide Auto adjustment setup test pattern 7. Press the Auto/OK button on all LCD screens. See "Adjusting Screen Quality" in use the auto adjustment feature: 1. The CD menu ...displays. 4. The setup test pattern displays. Select the language. 5. Operating the Monitor Using the Auto Adjustment Function You can also press the...
User's Guide q1859, q2009, q2159 LCD Display
Page 29
...from the column as you move or ship your monitor. Pull the base away from the monitor. 2. Place the monitor face down on a soft, protected surface. 3. Preparing the monitor for Shipping 1. User's Guide 5-1 Avoid applying pressure to the LCD screen; To disconnect power from the equipment, unplug ...the power cord from the column by grasping the power plug firmly. You may need it later if you do so. doing so can cause damage. Preparing the Monitor for shipping 4. Never ...