Getting Started Guide
Page 7
... cause errors and prevent the operating system from installing properly. NOTE: If the computer shipped with a Microsoft operating system, some portions of this documentation do not apply. CAUTION: Do not add optional hardware or third-party devices to 10 minutes, depending on the screen. 2. Installing the Windows Operating System The first time you turn on the hard drive, the installation process could take up your Internet connection, click Start > Internet...
... cause errors and prevent the operating system from installing properly. NOTE: If the computer shipped with a Microsoft operating system, some portions of this documentation do not apply. CAUTION: Do not add optional hardware or third-party devices to 10 minutes, depending on the screen. 2. Installing the Windows Operating System The first time you turn on the hard drive, the installation process could take up your Internet connection, click Start > Internet...
Getting Started Guide
Page 8
..., or use the Browse button in the folder C:\SWSetup\ISOs. 4. Each .iso file can select or change display settings. In Windows Vista and Windows 7, the Windows Update screen appears. Obtain the latest support software, including support software for the i386 directory, replace the path specification with your country and language, select Download drivers and software (and firmware), enter the model number of the critical updates and service packs. 5. For more pop-up from a pre-installed Windows 7 desktop, click Start > Windows Virtual...
..., or use the Browse button in the folder C:\SWSetup\ISOs. 4. Each .iso file can select or change display settings. In Windows Vista and Windows 7, the Windows Update screen appears. Obtain the latest support software, including support software for the i386 directory, replace the path specification with your country and language, select Download drivers and software (and firmware), enter the model number of the critical updates and service packs. 5. For more pop-up from a pre-installed Windows 7 desktop, click Start > Windows Virtual...
Getting Started Guide
Page 11
... turning the power off. Finding More Information The following publications are having to the system board. To access the publications, select Start > All Programs > HP User Manuals. Refer to enter a low-power or "standby" state instead of any unsaved data. includes information on RTC batteries, memory, and power supply. ● Maintenance and Service Guide (English only)-Provides information on parts removal and replacement, troubleshooting, Desktop Management, setup utilities, safety, routine care, connector pin assignments, POST error messages, diagnostic indicator lights...
... turning the power off. Finding More Information The following publications are having to the system board. To access the publications, select Start > All Programs > HP User Manuals. Refer to enter a low-power or "standby" state instead of any unsaved data. includes information on RTC batteries, memory, and power supply. ● Maintenance and Service Guide (English only)-Provides information on parts removal and replacement, troubleshooting, Desktop Management, setup utilities, safety, routine care, connector pin assignments, POST error messages, diagnostic indicator lights...
Getting Started Guide
Page 12
... problem. Access the Business Support Center (BSC) at : http://www.hp.com/ go /bizsupport for the latest online support information, software and drivers, proactive notification, and worldwide community of beeps emanating from the computer. ● Double-click the HP Support Assistant icon on the Windows 7 desktop and run the automated diagnostics. ● Check the power LED on a network, plug another computer with a different cable into a different video port on page 7 in this guide...
... problem. Access the Business Support Center (BSC) at : http://www.hp.com/ go /bizsupport for the latest online support information, software and drivers, proactive notification, and worldwide community of beeps emanating from the computer. ● Double-click the HP Support Assistant icon on the Windows 7 desktop and run the automated diagnostics. ● Check the power LED on a network, plug another computer with a different cable into a different video port on page 7 in this guide...

Getting Started Guide
Page 13
... computer will not function. You must be plugged into the monitor connector on some models) is connected into these ports, the monitor will restart if automatic start the computer. ● Reconfigure your computer after installing a non-plug and play expansion board or other monitor connectors are using a printer, you need a driver for your country and language, select See support and troubleshooting information, enter the model number of the computer, and press...
... computer will not function. You must be plugged into the monitor connector on some models) is connected into these ports, the monitor will restart if automatic start the computer. ● Reconfigure your computer after installing a non-plug and play expansion board or other monitor connectors are using a printer, you need a driver for your country and language, select See support and troubleshooting information, enter the model number of the computer, and press...
Getting Started Guide
Page 14
... at the factory. To start a System Restore: 1. System Recovery System Recovery completely erases and reformats the hard disk drive, deleting all HP or Compaq computers with Microsoft Windows 7 operating systems and some recent, select computers with Windows Vista operating systems. HP Support Assistant is an HP application that are shipped without a version of Microsoft Windows. Click the Start button, right-click Computer, and then click Properties. 3. To add restore points manually: 1. Click Create...
... at the factory. To start a System Restore: 1. System Recovery System Recovery completely erases and reformats the hard disk drive, deleting all HP or Compaq computers with Microsoft Windows 7 operating systems and some recent, select computers with Windows Vista operating systems. HP Support Assistant is an HP application that are shipped without a version of Microsoft Windows. Click the Start button, right-click Computer, and then click Properties. 3. To add restore points manually: 1. Click Create...
Getting Started Guide
Page 17
... Recovery Media Creation program tells you must use high-quality discs. You will automatically run System Recovery from the computer except the monitor, keyboard, and mouse. 5. Store the recovery discs, or the recovery USB flash drive, in the recovery-disc set . 3. If the computer works, click the Start button, and then click Shut Down. Use the arrow keys to select the USB device and press Enter to boot from the recovery image stored on your computer at the factory. You...
... Recovery Media Creation program tells you must use high-quality discs. You will automatically run System Recovery from the computer except the monitor, keyboard, and mouse. 5. Store the recovery discs, or the recovery USB flash drive, in the recovery-disc set . 3. If the computer works, click the Start button, and then click Shut Down. Use the arrow keys to select the USB device and press Enter to boot from the recovery image stored on your computer at the factory. You...
Getting Started Guide
Page 18
... system settings ● Add a device or printer and change other system settings ● Get help and support for your specific model ● Install HP support software for your computer ● Purchase supplies and accessories for your computer 12 Getting Started ENWW The program will be able to boot up from the list of creating recovery discs, or a recovery USB drive, takes some time to create the recovery drive. NOTE: Recovery Media Creation formats the flash drive and...
... system settings ● Add a device or printer and change other system settings ● Get help and support for your specific model ● Install HP support software for your computer ● Purchase supplies and accessories for your computer 12 Getting Started ENWW The program will be able to boot up from the list of creating recovery discs, or a recovery USB drive, takes some time to create the recovery drive. NOTE: Recovery Media Creation formats the flash drive and...
HP ProtectTools Security Software,Version 6.0 User Guide
Page 8
... ...52 Backing up and restoring 52 Creating a backup file 52 Restoring certification data from the backup file 52 Changing the owner password 52 Resetting a user password 52 Migrating keys with the Migration Wizard 52 9 Device Access Manager for HP ProtectTools 53 Starting background service ...53 Simple configuration ...53 Device class configuration (advanced 54 Adding a user or a group 54 Removing a user or a group 54 Denying or allowing access to a user or group 54 Just In...
... ...52 Backing up and restoring 52 Creating a backup file 52 Restoring certification data from the backup file 52 Changing the owner password 52 Resetting a user password 52 Migrating keys with the Migration Wizard 52 9 Device Access Manager for HP ProtectTools 53 Starting background service ...53 Simple configuration ...53 Device class configuration (advanced 54 Adding a user or a group 54 Removing a user or a group 54 Denying or allowing access to a user or group 54 Just In...

HP ProtectTools Security Software,Version 6.0 User Guide
Page 12
... add and remove HP ProtectTools users and view user status. ● Configure and change File Sanitizer Shred, Bleaching, and Settings. ● View settings for Encryption Status and Device Access Manager. ● Use Privacy Manager to increase security of e-mails and documents. ● Activate Computrace for HP ProtectTools ● Configure Preferences and Backup and Restore options. ● Organize, set up and change user names and passwords. ● Configure and change user credentials such as Windows password and Smart Card...
... add and remove HP ProtectTools users and view user status. ● Configure and change File Sanitizer Shred, Bleaching, and Settings. ● View settings for Encryption Status and Device Access Manager. ● Use Privacy Manager to increase security of e-mails and documents. ● Activate Computrace for HP ProtectTools ● Configure Preferences and Backup and Restore options. ● Organize, set up and change user names and passwords. ● Configure and change user credentials such as Windows password and Smart Card...
HP ProtectTools Security Software,Version 6.0 User Guide
Page 14
... user names, and passwords within a hardware TPM (Trusted Computing Module) chip located on the motherboard. The Warehouse Manager can also be used anywhere data needs to be used to the operating system. Embedded Security can decrypt the data. Example 2: A Stock Broker wants to transport extremely sensitive data to another hard drive. Example 1: A Purchasing Agent for a large manufacturer makes most often used to restrict access to...
... user names, and passwords within a hardware TPM (Trusted Computing Module) chip located on the motherboard. The Warehouse Manager can also be used anywhere data needs to be used to the operating system. Embedded Security can decrypt the data. Example 2: A Stock Broker wants to transport extremely sensitive data to another hard drive. Example 1: A Purchasing Agent for a large manufacturer makes most often used to restrict access to...
HP ProtectTools Security Software,Version 6.0 User Guide
Page 15
... opened by an imposter. automatically when she can be easily recovered using their personal passwords. An example would be a situation where outside vendors need access to a USB drive. The network is used to block unauthorized access to disable the USB ports and CD burners so they are blocked, mouse and keyboards will not allow the data to be copied or stolen. Privacy Manager for HP ProtectTools Privacy Manager...
... opened by an imposter. automatically when she can be easily recovered using their personal passwords. An example would be a situation where outside vendors need access to a USB drive. The network is used to block unauthorized access to disable the USB ports and CD burners so they are blocked, mouse and keyboards will not allow the data to be copied or stolen. Privacy Manager for HP ProtectTools Privacy Manager...
HP ProtectTools Security Software,Version 6.0 User Guide
Page 30
... HP ProtectTools, refer to Privacy Manager for HP ProtectTools enables you want to update the SpareKey information. 4. The number and type of communication when using e-mail, Microsoft Office documents, or instant messaging (IM). Most Smart Cards will often provide an unlock key. Ensure that Initialize the smart card is set up with the manufacturer's software, insert the card into the reader. 2. screen, click Next and enter your PIN number...
... HP ProtectTools, refer to Privacy Manager for HP ProtectTools enables you want to update the SpareKey information. 4. The number and type of communication when using e-mail, Microsoft Office documents, or instant messaging (IM). Most Smart Cards will often provide an unlock key. Ensure that Initialize the smart card is set up with the manufacturer's software, insert the card into the reader. 2. screen, click Next and enter your PIN number...
HP ProtectTools Security Software,Version 6.0 User Guide
Page 38
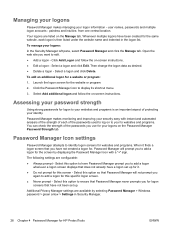
... created for the website or program. 2. user names, passwords and multiple logon accounts - Click the Password Manager icon to add a logon for the screen by selecting Password Manager > Windows password > green arrow > Settings in the logon list. Select this screen - Then change the logon data as desired. ● Delete a logon - Select this specific logon screen. ● Never prompt - Your logons are configurable: ● Always prompt - Launch the...
... created for the website or program. 2. user names, passwords and multiple logon accounts - Click the Password Manager icon to add a logon for the screen by selecting Password Manager > Windows password > green arrow > Settings in the logon list. Select this screen - Then change the logon data as desired. ● Delete a logon - Select this specific logon screen. ● Never prompt - Your logons are configurable: ● Always prompt - Launch the...

HP ProtectTools Security Software,Version 6.0 User Guide
Page 40
... the Drive Encryption logon screen, you will also be accessed unless the TPM settings are migrated to activate Drive Encryption. Select the Enhance security with TPM check box. 30 Chapter 5 Drive Encryption for HP ProtectTools to deactivate Drive Encryption. Setup procedures Opening Drive Encryption 1. Select your user name, and then type your password at the Drive Encryption logon screen requires the Windows user name and password. NOTE: If you use a recovery key...
... the Drive Encryption logon screen, you will also be accessed unless the TPM settings are migrated to activate Drive Encryption. Select the Enhance security with TPM check box. 30 Chapter 5 Drive Encryption for HP ProtectTools to deactivate Drive Encryption. Setup procedures Opening Drive Encryption 1. Select your user name, and then type your password at the Drive Encryption logon screen requires the Windows user name and password. NOTE: If you use a recovery key...

HP ProtectTools Security Software,Version 6.0 User Guide
Page 60
... HP ProtectTools Security Manager icon in the New password and Verify new password boxes, and then press F10. 4. Follow the on -screen instructions. If the Embedded Security User Initialization Wizard is displayed in Computer Setup: 1. Open Computer Setup by turning on the embedded security chip. ● Set up a basic user account and enable the user security features: 1. Then follow the on -screen instructions. Type your preferences and exit Computer Setup, use the arrow keys...
... HP ProtectTools Security Manager icon in the New password and Verify new password boxes, and then press F10. 4. Follow the on -screen instructions. If the Embedded Security User Initialization Wizard is displayed in Computer Setup: 1. Open Computer Setup by turning on the embedded security chip. ● Set up a basic user account and enable the user security features: 1. Then follow the on -screen instructions. Type your preferences and exit Computer Setup, use the arrow keys...
HP ProtectTools Security Software,Version 6.0 User Guide
Page 72
... managing Drive Encryption 30 opening 30 E Embedded Security for HP ProtectTools backup file, creating 52 basic user account 50 Basic User Key 50 certification data, restoring 52 common use examples 4 enabling TPM chip 49 encrypted e-mail 51 encrypting files and folders 51 initializing chip 50 installing 49 migrating keys 52 owner password, changing 52 password 9 Personal Secure Drive 51 resetting user password 52 setup procedures 49 emergency recovery 50 emergency recovery token password definition 9 setting...
... managing Drive Encryption 30 opening 30 E Embedded Security for HP ProtectTools backup file, creating 52 basic user account 50 Basic User Key 50 certification data, restoring 52 common use examples 4 enabling TPM chip 49 encrypted e-mail 51 encrypting files and folders 51 initializing chip 50 installing 49 migrating keys 52 owner password, changing 52 password 9 Personal Secure Drive 51 resetting user password 52 setup procedures 49 emergency recovery 50 emergency recovery token password definition 9 setting...

HP ProtectTools Security Software,Version 6.0 User Guide
Page 73
... recovery 21 HP ProtectTools Security Manager Administrative Console configuring application settings 16 configuring your system 13 disallowing device access 17 drive encryption 17 managing users 15 HP ProtectTools Security, accessing 6 I initial setup 13 initializing embedded security chip 50 J just-in-time authentication (JITA) 54 K key security objectives 6 L logging in 18 O objectives, security 6 owner password changing 52 definition 9 setting 50 P password changing owner 52 emergency recovery token 50 guidelines 10 HP ProtectTools 9 managing 9 owner 50 policies, creating 8 resetting user...
... recovery 21 HP ProtectTools Security Manager Administrative Console configuring application settings 16 configuring your system 13 disallowing device access 17 drive encryption 17 managing users 15 HP ProtectTools Security, accessing 6 I initial setup 13 initializing embedded security chip 50 J just-in-time authentication (JITA) 54 K key security objectives 6 L logging in 18 O objectives, security 6 owner password changing 52 definition 9 setting 50 P password changing owner 52 emergency recovery token 50 guidelines 10 HP ProtectTools 9 managing 9 owner 50 policies, creating 8 resetting user...

Safety and Regulatory Information
Page 16
...Service Equipment 2 Power Service Grounding Electrode System (NEC Art 250, Part H) 3 Ground Clamps 4 Grounding Conductors (NEC Section 810-21) 5 Antenna Discharge Unit (NEC Section 810-20) 6 Ground Clamp 7 Antenna Lead-in wire to an antenna-discharge unit, size of grounding conductors, location of antenna-discharge unit, connection... grounding electrode. Article 810 of the National Electrical Code, ANSI/NFPA 70, provides information with regard to proper electrical grounding of the mast and supporting structure, grounding of the lead-in Wire 10 Chapter 2 Regulatory agency notices
...Service Equipment 2 Power Service Grounding Electrode System (NEC Art 250, Part H) 3 Ground Clamps 4 Grounding Conductors (NEC Section 810-21) 5 Antenna Discharge Unit (NEC Section 810-20) 6 Ground Clamp 7 Antenna Lead-in wire to an antenna-discharge unit, size of grounding conductors, location of antenna-discharge unit, connection... grounding electrode. Article 810 of the National Electrical Code, ANSI/NFPA 70, provides information with regard to proper electrical grounding of the mast and supporting structure, grounding of the lead-in Wire 10 Chapter 2 Regulatory agency notices

GPT Hard Disk Drives for HP Business Desktops
Page 5
...boot referencing a top-level Startup menu (Figure 3). Splash screen of Byte 2 specifies UEFI specification support. Bit 3 of HP UEFI BIOS system The startup menu (Figure 4) can be made about the virtuality of model-specific software and firmware content through third-party content distribution services. 3 When set, UEFI specification is supported. 4 When set, the SMBIOS table describes a virtual machine. BIOS Characteristics Extension Byte 2 Bit Position Description 0 When set, BIOS boot specification is supported 1 When set, function key-initiated Network Service boot is useful...
...boot referencing a top-level Startup menu (Figure 3). Splash screen of Byte 2 specifies UEFI specification support. Bit 3 of HP UEFI BIOS system The startup menu (Figure 4) can be made about the virtuality of model-specific software and firmware content through third-party content distribution services. 3 When set, UEFI specification is supported. 4 When set, the SMBIOS table describes a virtual machine. BIOS Characteristics Extension Byte 2 Bit Position Description 0 When set, BIOS boot specification is supported 1 When set, function key-initiated Network Service boot is useful...


