Warranty and Regulatory Guide
Page 4
... exclusive remedies. 2. Software, media, parts, accessories, supplies, or power adapters or sources not provided or supported by HP's limited warranty, HP may contain remanufactured parts, components, or materials equivalent to province in Canada, and from defects in performance. 9. B. Under local law, certain disclaimers and limitations of warranty service may not apply to local standards. HP shall have other problems, including those...
... exclusive remedies. 2. Software, media, parts, accessories, supplies, or power adapters or sources not provided or supported by HP's limited warranty, HP may contain remanufactured parts, components, or materials equivalent to province in Canada, and from defects in performance. 9. B. Under local law, certain disclaimers and limitations of warranty service may not apply to local standards. HP shall have other problems, including those...
Quick Start Guides
Page 12
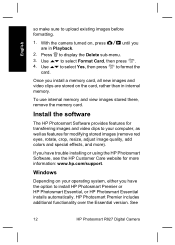
... option to your operating system, either you have trouble installing or using the HP Photosmart Software, see the HP Customer Care website for modifying stored images (remove red eyes, rotate, crop, resize, adjust image quality, add colors and special effects, and more information: www.hp.com/support. Windows Depending on , press until you install a memory card, all new images and video clips are in internal memory. See 12 HP Photosmart R827 Digital Camera Use to upload existing images before formatting. 1. With the camera turned on your...
... option to your operating system, either you have trouble installing or using the HP Photosmart Software, see the HP Customer Care website for modifying stored images (remove red eyes, rotate, crop, resize, adjust image quality, add colors and special effects, and more information: www.hp.com/support. Windows Depending on , press until you install a memory card, all new images and video clips are in internal memory. See 12 HP Photosmart R827 Digital Camera Use to upload existing images before formatting. 1. With the camera turned on your...

Quick Start Guides
Page 18
Connect the camera and printer using the USB cable that came with your camera. 3. To change the setting. 5. Press to change the settings, use on the camera to select a menu option, then use on the camera to begin printing. 18 HP Photosmart R827 Digital Camera Turn on the camera. When the camera is connected to the printer, the Print Setup Menu displays on the camera. 4. English 2.
Connect the camera and printer using the USB cable that came with your camera. 3. To change the setting. 5. Press to change the settings, use on the camera to select a menu option, then use on the camera to begin printing. 18 HP Photosmart R827 Digital Camera Turn on the camera. When the camera is connected to the printer, the Print Setup Menu displays on the camera. 4. English 2.
Quick Start Guides
Page 20
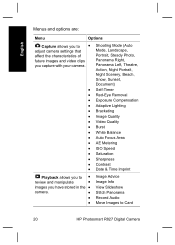
Shooting Mode (Auto Mode, Landscape, Portrait, Steady Photo, Panorama Right, Panorama Left, Theatre, Action, Night Portrait, Night Scenery, Beach, Snow, Sunset, Document) Self-Timer Red-Eye Removal Exposure Compensation Adaptive Lighting Bracketing Image Quality Video Quality Burst White Balance Auto Focus Area AE Metering ISO Speed Saturation Sharpness Contrast Date & Time Imprint Playback allows you to Card 20 HP Photosmart R827 Digital Camera English Menus and options are: Menu Options Capture allows you to ● adjust camera settings that affect the characteristics of ...
Shooting Mode (Auto Mode, Landscape, Portrait, Steady Photo, Panorama Right, Panorama Left, Theatre, Action, Night Portrait, Night Scenery, Beach, Snow, Sunset, Document) Self-Timer Red-Eye Removal Exposure Compensation Adaptive Lighting Bracketing Image Quality Video Quality Burst White Balance Auto Focus Area AE Metering ISO Speed Saturation Sharpness Contrast Date & Time Imprint Playback allows you to Card 20 HP Photosmart R827 Digital Camera English Menus and options are: Menu Options Capture allows you to ● adjust camera settings that affect the characteristics of ...
User Guide
Page 3
...subject 12 Optimizing focus 13 Using Focus Lock 13 Optimizing exposure 14 Other recommendations 14 Using the focus range settings 14 Using zoom...15 Optical zoom 15 Digital zoom...15 Setting the flash...16 Red eye...16 Using the shooting modes 16 Using Panorama mode 17 Using the Capture Menu 18 Using the Self-Timer settings 21 Using the Burst setting 22 Exposure Compensation 22 Adaptive Lighting 23 White Balance 23 ISO speed...23 3 Reviewing images and video clips 24 Using Playback...24 Deleting images 25 Saving frames from video clips 25 HP Photosmart R827 Digital Camera 3
...subject 12 Optimizing focus 13 Using Focus Lock 13 Optimizing exposure 14 Other recommendations 14 Using the focus range settings 14 Using zoom...15 Optical zoom 15 Digital zoom...15 Setting the flash...16 Red eye...16 Using the shooting modes 16 Using Panorama mode 17 Using the Capture Menu 18 Using the Self-Timer settings 21 Using the Burst setting 22 Exposure Compensation 22 Adaptive Lighting 23 White Balance 23 ISO speed...23 3 Reviewing images and video clips 24 Using Playback...24 Deleting images 25 Saving frames from video clips 25 HP Photosmart R827 Digital Camera 3

User Guide
Page 4
... computer 34 Using a memory card reader 34 Printing images from the camera 34 Printing panoramas from the camera 35 6 Using HP Photosmart Express 36 Using the Photosmart Express Menu 36 Tagging images as Favorites 37 Marking images for printing 37 Buying prints online 38 Sharing images...38 Setting up online destinations in the camera 39 Sending images to online destinations 39 7 Using the Setup Menu 41 8 Troubleshooting 43 Resetting the camera 43 Problems and solutions 43 9 Product support 48 Helpful websites...48 Getting assistance 48 A Managing batteries 50...
... computer 34 Using a memory card reader 34 Printing images from the camera 34 Printing panoramas from the camera 35 6 Using HP Photosmart Express 36 Using the Photosmart Express Menu 36 Tagging images as Favorites 37 Marking images for printing 37 Buying prints online 38 Sharing images...38 Setting up online destinations in the camera 39 Sending images to online destinations 39 7 Using the Setup Menu 41 8 Troubleshooting 43 Resetting the camera 43 Problems and solutions 43 9 Product support 48 Helpful websites...48 Getting assistance 48 A Managing batteries 50...

User Guide
Page 9
... installed. 1. HP Photosmart R827 Digital Camera 9 For information about supported memory cards, see Storage under Using the Playback Menu on -screen instructions. See About the HP Photosmart Software on the computer desktop. 3. Insert the HP Photosmart Software CD into the CD drive and follow the on the card, rather than in internal memory. Double-click the CD icon on page 9. Windows If your Macintosh computer must meet the system requirements as features for modifying stored images (remove red eyes...
... installed. 1. HP Photosmart R827 Digital Camera 9 For information about supported memory cards, see Storage under Using the Playback Menu on -screen instructions. See About the HP Photosmart Software on the computer desktop. 3. Insert the HP Photosmart Software CD into the CD drive and follow the on the card, rather than in internal memory. Double-click the CD icon on page 9. Windows If your Macintosh computer must meet the system requirements as features for modifying stored images (remove red eyes...
User Guide
Page 11
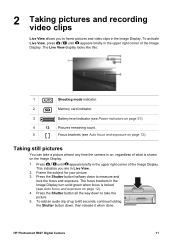
... take a picture almost any time the camera is locked (see Auto focus and exposure on page 12). 4. Frame the subject for your picture. 3. Press the Shutter button all the way down to frame pictures and video clips in the Image Display. 2 Taking pictures and recording video clips Live View allows you are in Live View. 2. The Live View display looks like this: 1 Shooting mode indicator. 2 Memory card indicator. 3 Battery level indicator (see Power indicators on page 51). 4 12 Pictures remaining count. 5 Focus brackets (see Auto focus and exposure...
... take a picture almost any time the camera is locked (see Auto focus and exposure on page 12). 4. Frame the subject for your picture. 3. Press the Shutter button all the way down to frame pictures and video clips in the Image Display. 2 Taking pictures and recording video clips Live View allows you are in Live View. 2. The Live View display looks like this: 1 Shooting mode indicator. 2 Memory card indicator. 3 Battery level indicator (see Power indicators on page 51). 4 12 Pictures remaining count. 5 Focus brackets (see Auto focus and exposure...

User Guide
Page 14
... Focus (Default)-Use when taking close-up pictures of subjects greater than 500 mm (20 in the future. Press the Shutter button all the way down and reframe. 4. Macro-Use when taking pictures of subjects between 100 mm and 1 m (4.7 to correct the problem for the length of time required. Chapter 2 3. The camera will require a very long exposure, a shaking hand icon ( ) appears. If you can retake an image...
... Focus (Default)-Use when taking close-up pictures of subjects greater than 500 mm (20 in the future. Press the Shutter button all the way down and reframe. 4. Macro-Use when taking pictures of subjects between 100 mm and 1 m (4.7 to correct the problem for the length of time required. Chapter 2 3. The camera will require a very long exposure, a shaking hand icon ( ) appears. If you can retake an image...

User Guide
Page 15
... zoomed the lens out fully using digital zoom, make the subject of distant objects and landscapes. Release , then press it is called camera shake). (continued) Auto Macro-Use when you want to print the captured image. Infinity-Use when taking pictures of your body or against a steady object, or set the camera on the Zoom lever to control zoom. Using zoom Your camera has both optical and digital zoom. Digital zoom uses no moving lens parts. Try holding the camera closer to indicate...
... zoomed the lens out fully using digital zoom, make the subject of distant objects and landscapes. Release , then press it is called camera shake). (continued) Auto Macro-Use when you want to print the captured image. Infinity-Use when taking pictures of your body or against a steady object, or set the camera on the Zoom lever to control zoom. Using zoom Your camera has both optical and digital zoom. Digital zoom uses no moving lens parts. Try holding the camera closer to indicate...

User Guide
Page 19
... make the images you are about red eyes, see Instant Review on page 16. (continued) Red-Eye Removal-For automatically removing red eyes when flash is set to a different value. ● Off (Default)-Processes the image as normal. ● Low-Gently brightens dark regions. ● High-Greatly brightens dark regions. and over-exposed by 7 in full color, black & white, and sepia. The greater the number, the higher the resolution. HP Photosmart R827 Digital Camera 19...
... make the images you are about red eyes, see Instant Review on page 16. (continued) Red-Eye Removal-For automatically removing red eyes when flash is set to a different value. ● Off (Default)-Processes the image as normal. ● Low-Gently brightens dark regions. ● High-Greatly brightens dark regions. and over-exposed by 7 in full color, black & white, and sepia. The greater the number, the higher the resolution. HP Photosmart R827 Digital Camera 19...

User Guide
Page 22
... chose 2 Shots and are recording a video clip, press the Video button to highlight Burst, press , use of memory. While in scenes that contain many light objects (like a white object against a light background) or many dark objects (like a black object against a dark background). For a scene with many light objects, increase the Exposure Compensation to take two or more details on page 28. The Self-Timer setting resets to select...
... chose 2 Shots and are recording a video clip, press the Video button to highlight Burst, press , use of memory. While in scenes that contain many light objects (like a white object against a light background) or many dark objects (like a black object against a dark background). For a scene with many light objects, increase the Exposure Compensation to take two or more details on page 28. The Self-Timer setting resets to select...

User Guide
Page 23
... scene. Lower ISO speeds capture images with or without flash, but result in dark areas without a flash or a tripod. White Balance Different lighting conditions cast different colors. ISO speed This setting adjusts the sensitivity of grain (or noise), but it is set to produce creative effects. Higher ISO speeds produce pictures with a flash, Adaptive Lighting can also adjust the white balance to the default Auto setting, the camera selects the best ISO speed for example, in front of a window) You...
... scene. Lower ISO speeds capture images with or without flash, but result in dark areas without a flash or a tripod. White Balance Different lighting conditions cast different colors. ISO speed This setting adjusts the sensitivity of grain (or noise), but it is set to produce creative effects. Higher ISO speeds produce pictures with a flash, Adaptive Lighting can also adjust the white balance to the default Auto setting, the camera selects the best ISO speed for example, in front of a window) You...

User Guide
Page 27
Viewing image information The Image Info screen shows the settings used when capturing the currently displayed image or video clip. 1 ISO Speed. 2 Non-default shooting mode (see Using the shooting modes on page 16), Flash (see Setting the flash on page 16), and Focus setting (see Using the focus range settings on page 14). 3 All non-default Capture Menu settings except Image Quality. 4 Memory card indicator. 5 File name of the image. 6 File size of the image. 7 Date and time image was captured. 8 Image Quality setting at which the image was captured. 9 The information in...
Viewing image information The Image Info screen shows the settings used when capturing the currently displayed image or video clip. 1 ISO Speed. 2 Non-default shooting mode (see Using the shooting modes on page 16), Flash (see Setting the flash on page 16), and Focus setting (see Using the focus range settings on page 14). 3 All non-default Capture Menu settings except Image Quality. 4 Memory card indicator. 5 File name of the image. 6 File size of the image. 7 Date and time image was captured. 8 Image Quality setting at which the image was captured. 9 The information in...

User Guide
Page 34
... XP and you to copy images from video clips on the desktop for the disk drive icon for your computer. 5. For information about how to a printer, see Saving frames from the camera to copy the images manually, look on page 35. 34 On Windows computers, the camera appears as a memory card reader. For more information about printing panoramas directly to copy files, visit Mac help . If no application starts automatically or if you...
... XP and you to copy images from video clips on the desktop for the disk drive icon for your computer. 5. For information about how to a printer, see Saving frames from the camera to copy the images manually, look on page 35. 34 On Windows computers, the camera appears as a memory card reader. For more information about printing panoramas directly to copy files, visit Mac help . If no application starts automatically or if you...
User Guide
Page 35
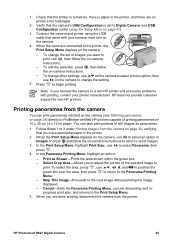
... 34, verifying that came with printing, contact your camera, then turn on -camera instructions. - Cancel-Exits the Panorama Printing Menu, cancels all pending and inprogress print jobs, and returns to the next image without printing the image displayed. - Connect the camera and printer using the USB cable that you are no printer error messages. 2. In the Panorama Printing Menu, highlight an option. - to return to begin printing. HP Photosmart R827 Digital Camera 35 When the camera is set of printing panoramas on 10 x 30 cm...
... 34, verifying that came with printing, contact your camera, then turn on -camera instructions. - Cancel-Exits the Panorama Printing Menu, cancels all pending and inprogress print jobs, and returns to the next image without printing the image displayed. - Connect the camera and printer using the USB cable that you are no printer error messages. 2. In the Panorama Printing Menu, highlight an option. - to return to begin printing. HP Photosmart R827 Digital Camera 35 When the camera is set of printing panoramas on 10 x 30 cm...

User Guide
Page 41
..., 1, 2 (Default), and 4 seconds. HP Photosmart R827 Digital Camera 41 While in Live View or Playback, press , then use to the computer on page 8. To exit the Setup Menu, press . Off, Low (Default), High. See Set the date and time on page 34. ● Digital Camera (Default)-Recognizes the camera as a digital camera using PTP (Picture Transfer Protocol). ● Disk Drive-Recognizes the camera as button presses and shutter clicks) and recorded audio. 7 Using the Setup Menu The Setup Menu allows you to set preferences for camera sounds...
..., 1, 2 (Default), and 4 seconds. HP Photosmart R827 Digital Camera 41 While in Live View or Playback, press , then use to the computer on page 8. To exit the Setup Menu, press . Off, Low (Default), High. See Set the date and time on page 34. ● Digital Camera (Default)-Recognizes the camera as a digital camera using PTP (Picture Transfer Protocol). ● Disk Drive-Recognizes the camera as button presses and shutter clicks) and recorded audio. 7 Using the Setup Menu The Setup Menu allows you to set preferences for camera sounds...

User Guide
Page 46
... the Image Display. ● Reset the camera (see Resetting the camera on page 43 ). See Storage on page 55 and Memory capacity on page 55 for signs of the ordinary, turn off , or the camera seems stuck and won't operate. ● Press Live View/Playback to improve. ● Use a lower ISO Speed setting (see if the images are missing on page 8). Remove the memory card and see ISO Speed under Using the Capture Menu...
... the Image Display. ● Reset the camera (see Resetting the camera on page 43 ). See Storage on page 55 and Memory capacity on page 55 for signs of the ordinary, turn off , or the camera seems stuck and won't operate. ● Press Live View/Playback to improve. ● Use a lower ISO Speed setting (see if the images are missing on page 8). Remove the memory card and see ISO Speed under Using the Capture Menu...
User Guide
Page 57
... & Time Imprint 21 deleting images 25 digital zoom 15, 41 dimensions 55 direct print 34 Display Brightness 41 Display Timeout 41 dock 6 Document mode 17 E e-mail images 38, 39 exposure 14 Exposure Compensation 19, 22 F F-number 54 Favorites 37 flash red-eye removal 16, 19 working range 54 Flash button 5 focal length 54 focus auto focus 12 Auto Focus Area 20 brackets 12 focus lock 13 optimizing 13 settings 14, 54 Focus Assist light 41 Focus button 5 folded lens 6 format memory card 8 G getting assistance 48 H HP Photosmart Express 36, 37 HP Photosmart Express button 5 HP Photosmart Software...
... & Time Imprint 21 deleting images 25 digital zoom 15, 41 dimensions 55 direct print 34 Display Brightness 41 Display Timeout 41 dock 6 Document mode 17 E e-mail images 38, 39 exposure 14 Exposure Compensation 19, 22 F F-number 54 Favorites 37 flash red-eye removal 16, 19 working range 54 Flash button 5 focal length 54 focus auto focus 12 Auto Focus Area 20 brackets 12 focus lock 13 optimizing 13 settings 14, 54 Focus Assist light 41 Focus button 5 folded lens 6 format memory card 8 G getting assistance 48 H HP Photosmart Express 36, 37 HP Photosmart Express button 5 HP Photosmart Software...

User Guide
Page 58
... settings reset 42 Setup Menu 41 share pictures 36 Sharpness 21 shooting mode 16 Shutter button 5, 12 shutter speed 54 slideshow 27 Snow mode 17 software install 9 solving problems 43 sounds of camera 41 Sounds Volume 41 space remaining in memory 11 specifications 54 Steady Photo mode 17 Stitch Panorama 28 storage 55 Sunset mode 17 support process 48 T Theatre mode 17 Thumbnails 25 Thumbnails control 5 Time & Date 8, 41 transfer images 33 troubleshooting 43 turn on/off power 7 TV Configuration 42 U USB configuration 34, 41 V Video button 5 video clips...
... settings reset 42 Setup Menu 41 share pictures 36 Sharpness 21 shooting mode 16 Shutter button 5, 12 shutter speed 54 slideshow 27 Snow mode 17 software install 9 solving problems 43 sounds of camera 41 Sounds Volume 41 space remaining in memory 11 specifications 54 Steady Photo mode 17 Stitch Panorama 28 storage 55 Sunset mode 17 support process 48 T Theatre mode 17 Thumbnails 25 Thumbnails control 5 Time & Date 8, 41 transfer images 33 troubleshooting 43 turn on/off power 7 TV Configuration 42 U USB configuration 34, 41 V Video button 5 video clips...


