
User Guide
Page 3
...clips Taking pictures...8 Recording video clips...9 Instant Review...9 Auto focus and exposure...9 Focusing on the subject...10 Optimizing focus...10 Using Focus Lock...11 Optimizing exposure...11 Using zoom...11 Optical zoom...12 Digital zoom...12 3 Setting options for taking pictures and recording video clips Setting the flash...13 Flash Setting-Red-Eye...13 Using the Picture Capture and Video Record menus 14 Using Panorama mode...15 Using the Self-Timer setting 16 Using the Burst setting...17 Adaptive Lighting...17 White Balance...17 4 Reviewing images and video clips Deleting images...19...
...clips Taking pictures...8 Recording video clips...9 Instant Review...9 Auto focus and exposure...9 Focusing on the subject...10 Optimizing focus...10 Using Focus Lock...11 Optimizing exposure...11 Using zoom...11 Optical zoom...12 Digital zoom...12 3 Setting options for taking pictures and recording video clips Setting the flash...13 Flash Setting-Red-Eye...13 Using the Picture Capture and Video Record menus 14 Using Panorama mode...15 Using the Self-Timer setting 16 Using the Burst setting...17 Adaptive Lighting...17 White Balance...17 4 Reviewing images and video clips Deleting images...19...
User Guide
Page 4
... to a printer 27 7 Using HP Photosmart Express Using the Photosmart Express Menu 29 Marking images for printing...29 Buying prints online...30 Sharing images...31 Setting up online destinations in the camera 31 Sending images to online destinations 31 8 Using the Camera Setup Menu 33 9 Troubleshooting Resetting the camera...34 Problems and solutions...34 Camera error messages...39 10 Product support Helpful websites...40 Getting assistance...40 A Managing batteries Top points about batteries...41 Extending battery life...41 Safety precautions for using batteries 41 Power indicators...42...
... to a printer 27 7 Using HP Photosmart Express Using the Photosmart Express Menu 29 Marking images for printing...29 Buying prints online...30 Sharing images...31 Setting up online destinations in the camera 31 Sending images to online destinations 31 8 Using the Camera Setup Menu 33 9 Troubleshooting Resetting the camera...34 Problems and solutions...34 Camera error messages...39 10 Product support Helpful websites...40 Getting assistance...40 A Managing batteries Top points about batteries...41 Extending battery life...41 Safety precautions for using batteries 41 Power indicators...42...
User Guide
Page 8
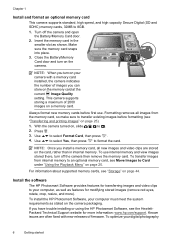
... memory card snaps into place. 3. Close the Battery/Memory Card door and turn on , slide to Card under "Using the Playback Menu" on a memory card. NOTE: When you turn on the memory card at the current Image Quality setting. If you can store on your computer, as well as features for modifying stored images (remove red eyes, rotate, crop, resize, and more information: www.hp.com/support. Use to format the card. To use . To install the HP Photosmart Software, your digital...
... memory card snaps into place. 3. Close the Battery/Memory Card door and turn on , slide to Card under "Using the Playback Menu" on a memory card. NOTE: When you turn on the memory card at the current Image Quality setting. If you can store on your computer, as well as features for modifying stored images (remove red eyes, rotate, crop, resize, and more information: www.hp.com/support. Use to format the card. To use . To install the HP Photosmart Software, your digital...
User Guide
Page 9
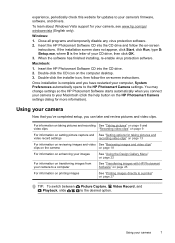
... the installer icon, then follow the on -screen instructions. You may change settings so the HP Photosmart Software starts automatically when you connect your camera's firmware, software, and drivers. Double-click the CD icon on page 27 TIP: To switch between Picture Capture, Video Record, and Playback, slide to your camera to the HP Photosmart Camera settings. Once installation is the letter of your camera to a computer See "Transferring images with HP Photosmart Software" on page 25 For information on printing images See "Printing images directly to a printer" on...
... the installer icon, then follow the on -screen instructions. You may change settings so the HP Photosmart Software starts automatically when you connect your camera's firmware, software, and drivers. Double-click the CD icon on page 27 TIP: To switch between Picture Capture, Video Record, and Playback, slide to your camera to the HP Photosmart Camera settings. Once installation is the letter of your camera to a computer See "Transferring images with HP Photosmart Software" on page 25 For information on printing images See "Printing images directly to a printer" on...
User Guide
Page 12
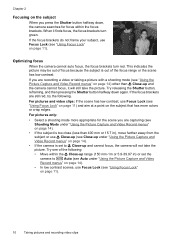
... the camera cannot auto focus, the focus brackets turn green. Try releasing the Shutter button, reframing, and then pressing the Shutter button halfway down , the camera searches for the scene you are capturing (see Shooting Mode under "Using the Picture Capture and Video Record menus" on page 14). • If the camera is out of the focus range or the scene has low contrast. For pictures only: • Select a shooting mode more colors...
... the camera cannot auto focus, the focus brackets turn green. Try releasing the Shutter button, reframing, and then pressing the Shutter button halfway down , the camera searches for the scene you are capturing (see Shooting Mode under "Using the Picture Capture and Video Record menus" on page 14). • If the camera is out of the focus range or the scene has low contrast. For pictures only: • Select a shooting mode more colors...
User Guide
Page 13
.... Digital zoom uses no moving lens parts. In low light or low contrast situations, frame a brighter or higher contrast object. 2. Hold the Shutter button halfway down . 3. Optimizing exposure When you are recording a video, the camera continuously updates exposure. Optical zoom physically extends the lens to make the subject of time required. frame. 4. Using zoom 11 NOTE: When you are taking a picture and press the Shutter button halfway down, the camera also measures the light level to set the shooting mode...
.... Digital zoom uses no moving lens parts. In low light or low contrast situations, frame a brighter or higher contrast object. 2. Hold the Shutter button halfway down . 3. Optimizing exposure When you are recording a video, the camera continuously updates exposure. Optical zoom physically extends the lens to make the subject of time required. frame. 4. Using zoom 11 NOTE: When you are taking a picture and press the Shutter button halfway down, the camera also measures the light level to set the shooting mode...

User Guide
Page 16
... defaults. Use to highlight a setting, then press to change the setting or press to exit without using flash. • / Panorama-For grand landscapes or group pictures where you need to capture a wide shot that one or more information, see "Using the Self-Timer setting" on page 16). This mode uses the flash and a long exposure. Self-Timer-For capturing images or recording video after a 10-second delay (see "Adaptive Lighting" on page 17. To exit the menu...
... defaults. Use to highlight a setting, then press to change the setting or press to exit without using flash. • / Panorama-For grand landscapes or group pictures where you need to capture a wide shot that one or more information, see "Using the Self-Timer setting" on page 16). This mode uses the flash and a long exposure. Self-Timer-For capturing images or recording video after a 10-second delay (see "Adaptive Lighting" on page 17. To exit the menu...
User Guide
Page 17
...on lighting conditions. Camera Setup...-Displays the Camera Setup Menu for scene illuminance. To preview your panoramic sequence, use Focus Lock (see "Using Focus Lock" on the image. • Date Only-Date permanently imprinted. • Date & Time-Date and time permanently imprinted. Camera Help...-Displays a list of a scene the camera uses to calculate the exposure. • Average (Default)-Useful when you installed the HP Photosmart Software (see "Using the Burst setting" on page 33). White Balance-Balances color based on page 21). (continued) Image Quality...
...on lighting conditions. Camera Setup...-Displays the Camera Setup Menu for scene illuminance. To preview your panoramic sequence, use Focus Lock (see "Using Focus Lock" on the image. • Date Only-Date permanently imprinted. • Date & Time-Date and time permanently imprinted. Camera Help...-Displays a list of a scene the camera uses to calculate the exposure. • Average (Default)-Useful when you installed the HP Photosmart Software (see "Using the Burst setting" on page 33). White Balance-Balances color based on page 21). (continued) Image Quality...
User Guide
Page 18
... video clip. 5. In the Shooting Mode menu, use to highlight Shooting Mode, then press . 2. to end the panoramic During Instant Review (see "Instant Review" on page 9), each image in the Image Display. 4. Frame the subject in the panoramic sequence is taken. 16 Setting options for taking pictures and recording video clips When the focus brackets turn green, press the Shutter button all the way down to lock focus and exposure. Press the Shutter button to the panorama, or press sequence. Continue...
... video clip. 5. In the Shooting Mode menu, use to highlight Shooting Mode, then press . 2. to end the panoramic During Instant Review (see "Instant Review" on page 9), each image in the Image Display. 4. Frame the subject in the panoramic sequence is taken. 16 Setting options for taking pictures and recording video clips When the focus brackets turn green, press the Shutter button all the way down to lock focus and exposure. Press the Shutter button to the panorama, or press sequence. Continue...
User Guide
Page 27
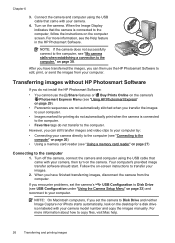
... fully charged or use this method to transfer images and video clips to the computer by following the instructions on page 29), verify that image transfer is connected to the Internet, you can also perform these tasks using the HP Photosmart Software: 1. Even if your Image Display turns off the camera. Panoramic sequences (see "Using HP Photosmart Express" on the computer screen. Transferring and printing images 25 If you have installed the HP Photosmart Software (see "Install the software" on page 6), use...
... fully charged or use this method to transfer images and video clips to the computer by following the instructions on page 29), verify that image transfer is connected to the Internet, you can also perform these tasks using the HP Photosmart Software: 1. Even if your Image Display turns off the camera. Panoramic sequences (see "Using HP Photosmart Express" on the computer screen. Transferring and printing images 25 If you have installed the HP Photosmart Software (see "Install the software" on page 6), use...
User Guide
Page 28
... cannot use the HP Photosmart Software to the computer" on page 26) • Using a memory card reader (see the Help feature in the HP Photosmart Software. When the Image Display indicates that the camera is connected to the computer. • Favorites tags do not automatically print when the camera is connected to the computer." For more information about how to transfer your camera model number and copy the images manually. Chapter 6 3. Connect the camera and computer using the USB cable that...
... cannot use the HP Photosmart Software to the computer" on page 26) • Using a memory card reader (see the Help feature in the HP Photosmart Software. When the Image Display indicates that the camera is connected to the computer. • Favorites tags do not automatically print when the camera is connected to the computer." For more information about how to transfer your camera model number and copy the images manually. Chapter 6 3. Connect the camera and computer using the USB cable that...

User Guide
Page 35
... automatic adjustment of Image Display brightness based on page 5. Use to highlight a menu option, then press to highlight a setting, then press . 4. Use to display the menu option's sub- See "Choose the language" on page 26. • Digital Camera (Default)-Recognizes the camera as a digital camera using PTP (Picture Transfer Protocol). • Disk Drive-Recognizes the camera as button presses and shutter clicks) off if you to Picture Capture, Video Record, or Playback. While in the Picture Capture, Video Record, or Playback menu, use...
... automatic adjustment of Image Display brightness based on page 5. Use to highlight a menu option, then press to highlight a setting, then press . 4. Use to display the menu option's sub- See "Choose the language" on page 26. • Digital Camera (Default)-Recognizes the camera as a digital camera using PTP (Picture Transfer Protocol). • Disk Drive-Recognizes the camera as button presses and shutter clicks) off if you to Picture Capture, Video Record, or Playback. While in the Picture Capture, Video Record, or Playback menu, use...
User Guide
Page 36
... fixed with new releases of firmware. Turn on the camera; To optimize your camera's firmware, software, and drivers. Remove the memory card and batteries for updates to your digital photography experience, periodically check the Hewlett-Packard Technical Support website (www.hp.com/support) for at least 5 seconds. 3. How can I get professional-quality prints if I don't have using a memory card reader, or replace the memory card. 34 Troubleshooting Use the Buy Prints Online feature on the Photosmart Express Menu (see "Install and format...
... fixed with new releases of firmware. Turn on the camera; To optimize your camera's firmware, software, and drivers. Remove the memory card and batteries for updates to your digital photography experience, periodically check the Hewlett-Packard Technical Support website (www.hp.com/support) for at least 5 seconds. 3. How can I get professional-quality prints if I don't have using a memory card reader, or replace the memory card. 34 Troubleshooting Use the Buy Prints Online feature on the Photosmart Express Menu (see "Install and format...

User Guide
Page 38
... "Using the Picture Capture and Video Record menus" on page 14). • Use the Spot setting for natural lighting conditions to capture is grainy. • Add indirect lighting, use a tripod or hold the camera steady, or improve lighting conditions. • Use Steady Photo shooting mode (see Steady Photo under "Using the Playback Menu" on my camera. For best image quality, avoid storing the camera in internal memory. If so, transfer the images to the memory card (see "Setting the flash...
... "Using the Picture Capture and Video Record menus" on page 14). • Use the Spot setting for natural lighting conditions to capture is grainy. • Add indirect lighting, use a tripod or hold the camera steady, or improve lighting conditions. • Use Steady Photo shooting mode (see Steady Photo under "Using the Playback Menu" on my camera. For best image quality, avoid storing the camera in internal memory. If so, transfer the images to the memory card (see "Setting the flash...
User Guide
Page 39
... Performance, Pro, Ultra, or High Speed. Look for tips about memory cards. The camera responds sluggishly when trying to "Delete All" images from my memory card. Video recording terminates abruptly. Having a large number of images stored on a memory card increases the time the camera takes to reactivate the Image Display. • Reset the camera (see "Install and format an optional memory card" on the memory card at the current Image Quality setting. The Power light is on but one stores many...
... Performance, Pro, Ultra, or High Speed. Look for tips about memory cards. The camera responds sluggishly when trying to "Delete All" images from my memory card. Video recording terminates abruptly. Having a large number of images stored on a memory card increases the time the camera takes to reactivate the Image Display. • Reset the camera (see "Install and format an optional memory card" on the memory card at the current Image Quality setting. The Power light is on but one stores many...
User Guide
Page 40
... transfer images from the USB cable and reset the camera (see "Install and format an optional memory card" on page 6). Open the HP Photosmart Camera settings in internal memory. The HP Photosmart Software does not start automatically when I get an error message when transferring images to the touch. If that the USB cable is normal. A power surge or electrostatic discharge may have affected the camera. Configure your camera preferences so the HP Photosmart software starts automatically when you connect your camera to your computer (see "Transferring and printing images...
... transfer images from the USB cable and reset the camera (see "Install and format an optional memory card" on page 6). Open the HP Photosmart Camera settings in internal memory. The HP Photosmart Software does not start automatically when I get an error message when transferring images to the touch. If that the USB cable is normal. A power surge or electrostatic discharge may have affected the camera. Configure your camera preferences so the HP Photosmart software starts automatically when you connect your camera to your computer (see "Transferring and printing images...

User Guide
Page 41
... Support website: www.hp.com/support. I am having a problem installing or using the HP Photosmart Software. • Make sure your camera, you receive one of the following error messages when using your computer meets the minimum system requirements as stated on the camera. • Recharge the battery. • Replace the battery. The HP Photosmart Software takes a long time before it is ready to transfer images from my camera. 39 Remove the battery and reset the camera (see "Install and format an optional memory card...
... Support website: www.hp.com/support. I am having a problem installing or using the HP Photosmart Software. • Make sure your camera, you receive one of the following error messages when using your computer meets the minimum system requirements as stated on the camera. • Recharge the battery. • Replace the battery. The HP Photosmart Software takes a long time before it is ready to transfer images from my camera. 39 Remove the battery and reset the camera (see "Install and format an optional memory card...
User Guide
Page 46
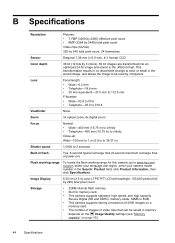
... internal flash memory. • Slot for this camera, go to www.hp.com/ support, select your language and region, enter your camera model number in the Search: Product field, click Product Information, then click Specifications. This transformation results in no discernible change to color or detail in the stored image, and allows the image to 8GB. • This camera supports storing a maximum of 2000 images on a memory card. • The number...
... internal flash memory. • Slot for this camera, go to www.hp.com/ support, select your language and region, enter your camera model number in the Search: Product field, click Product Information, then click Specifications. This transformation results in no discernible change to color or detail in the stored image, and allows the image to 8GB. • This camera supports storing a maximum of 2000 images on a memory card. • The number...

User Guide
Page 48
...weight 45 Camera Setup Menu 33 Camera Sounds 33 Close-up mode 14 color depth 44 colors 23 compression format 45 computer, connect to 25, 26 D Date & Time 5, 33 Date & Time Imprint 15 Delete button 3 digital zoom 12 dimensions 45 direct print 27 Display Brightness 33 Display Timeout 33 E e-mail images 31 exposure 11 F F-number 44 Favorites 21 flash red-eye reduction 13 setting 13 Flash button 3 focal length 44 focus auto focus 9 brackets 9 focus lock 11 optimizing 10 format memory card 6 G getting assistance 40 H HP Photosmart Express 29 HP Photosmart Software 6 I Image Display 3 Image Quality...
...weight 45 Camera Setup Menu 33 Camera Sounds 33 Close-up mode 14 color depth 44 colors 23 compression format 45 computer, connect to 25, 26 D Date & Time 5, 33 Date & Time Imprint 15 Delete button 3 digital zoom 12 dimensions 45 direct print 27 Display Brightness 33 Display Timeout 33 E e-mail images 31 exposure 11 F F-number 44 Favorites 21 flash red-eye reduction 13 setting 13 Flash button 3 focal length 44 focus auto focus 9 brackets 9 focus lock 11 optimizing 10 format memory card 6 G getting assistance 40 H HP Photosmart Express 29 HP Photosmart Software 6 I Image Display 3 Image Quality...
User Guide
Page 49
... mode 14 software install 6 solving problems 34 sounds of camera 33 space remaining in memory 8 specifications 44 State Selector 3 Steady Photo mode 14 storage 44 Sunset mode 14 support process 40 T Theatre mode 14 Thumbnails 19 Thumbnails control 3 Time & Date 5, 33 transfer images 25, 26 troubleshooting 34 turn on/off power 4 U USB configuration 26, 33 V video clips 9 Video Record Menu 14 View Slideshow 21 viewing thumbnails 19 Vista support 40 W weight 45 White Balance 15, 17 Windows Vista support 40 Z zoom 11, 12, 44 Zoom...
... mode 14 software install 6 solving problems 34 sounds of camera 33 space remaining in memory 8 specifications 44 State Selector 3 Steady Photo mode 14 storage 44 Sunset mode 14 support process 40 T Theatre mode 14 Thumbnails 19 Thumbnails control 3 Time & Date 5, 33 transfer images 25, 26 troubleshooting 34 turn on/off power 4 U USB configuration 26, 33 V video clips 9 Video Record Menu 14 View Slideshow 21 viewing thumbnails 19 Vista support 40 W weight 45 White Balance 15, 17 Windows Vista support 40 Z zoom 11, 12, 44 Zoom...


